Herunterladen Inhalt Inhalt Diese Seite drucken

Werbung

Verfügbare Sprachen
  • DE

Verfügbare Sprachen

VDP
PLDJBA
4 SPOT
T LED PAR
LEDPA
AR BOVENLI
HERSE
E À PAR LED
JUEGO
O DE ILUMI
LEDPA
AR-LICHTEF
USER M
MANUAL
GEBRU
IKERSHAND
NOTICE
E D'EMPLOI
MANUA
AL DEL USUA
BEDIEN
NUNGSANLE
AR4
BATTEN
ICHT - 4 SP
POTS
D - 4 SPOTS
S
NACIÓN PA
AR LED - 4
FFEKT-SET
- 4 SCHEIN
DLEIDING
ARIO
ITUNG
FOCOS
NWERFER
3
7
 
1
2
 
1
6
 
2
1
 

Werbung

Inhaltsverzeichnis
loading

Inhaltszusammenfassung für Velleman VDPLDJBAR4

  • Seite 1 PLDJBA 4 SPOT T LED PAR BATTEN LEDPA AR BOVENLI ICHT - 4 SP POTS HERSE E À PAR LED D - 4 SPOTS JUEGO O DE ILUMI NACIÓN PA AR LED - 4 FOCOS LEDPA AR-LICHTEF FFEKT-SET - 4 SCHEIN NWERFER USER M MANUAL...
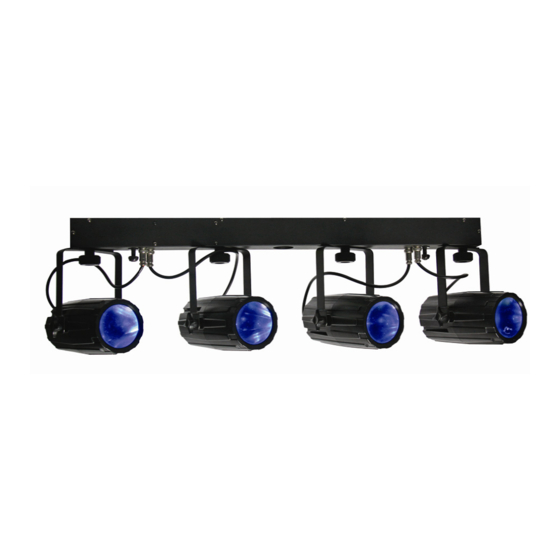
  • Seite 2 VDPLDJ BAR4 D layout Lay-o out leds Dispositi ion LED D layout D layout terminato eindweer rstand résistance e de terminais terminaci ión Terminier rung How to t urn the control ller line from 3- -pins into 5-pin ns (plug and soc cket).
  • Seite 3 • This device is design ned for professio onal use on stag ge, in discos, th heatres, etc. The e VDPLDJBAR4 4 can be us sed indoor (< 3 35°C, < 75%RH H) with an altern nating current o of 90-250 VAC~ ~50-60 Hz.
  • Seite 4: Getting Started

    • The VDPLDJBAR4 batten is designed to be mounted on a tripod with a 35 mm tube diameter. Make sure that the diameter of the inserted tripod tube is not less than 35 mm as otherwise secure mounting cannot be guaranteed.
  • Seite 5: Operation

    Connect tion to the AC Power Supply The AC C socket providi ng power to the e VDPLDJBAR4 4 batten must b be properly and separa tely earthed. D o not use any o other AC cords t...
  • Seite 6 VDPLDJ BAR4 Channel 000 ~ 010 no function 1 ~ 4 011 ~ 016 group 017 ~ 022 white group 023 ~ 028 group 029 ~ 034 group 035 ~ 040 group 041 ~ 046 group 047 ~ 052 group 053 ~ 058 green group...
  • Seite 7: Maintenance

    © COPYR RIGHT NOTICE The copyr right to this man nual is owned by y Velleman nv. Al ll worldwide righ hts reserved. No part of this manual or ma ay be copied, repr roduced, translated...
  • Seite 8 3. Alg gemene rich htlijnen ® Raadplee eg de Velleman service- en kwaliteitsgara antie achteraan n deze handleidi ing. Gebruik k het toestel enk kel binnenshu is. Bescherm te...
  • Seite 9 • Monteer de VDPLDJBAR4 op een statief met buizen van 35 mm om een goede bevestiging te garanderen. Schuif de VDPLDJBAR4 op een geschikt statief (niet meegeleverd) en bevestig door de knop [8] vast te draaien.
  • Seite 10 VDPLDJ BAR4 eindw weerstand (raad dpleeg §6 DMX 512-aansluitin ng). • Kopp pel het voetpeda aal aan het mas stertoestel [6]. • Sluit alle voedingska abels [7] aan. • Plaat ts het mastertoe estel op (auto) of (muzieksturing g) met MODE [A •...
  • Seite 11 90 x 320 mm gewicht 5 kg Gebruik dit toestel en kel met origin nele accessoire es. Velleman n nv is niet aans prakelijk voor schade o of kwetsuren b bij (verkeerd) ) gebruik van d dit toestel. Voo...
  • Seite 12 © AUTEUR RSRECHT Velleman nv heeft het aut teursrecht voor deze handleiding g. Alle wereldwij jde rechten voor rbehouden. Het i s niet toegestaan...
  • Seite 13: Caractéristiques

    • Monter la VDPLDJBAR4 sur un trépied ayant un diamètre de 35 mm pour une fixation en toute sécurité. Monter la VDPLDJBAR4 sur un pied adapté (non inclus) et fixer en serrant l’écrou [8].
  • Seite 14 Chois sir l’appareil ma aître et connecte er sa sortie DMX X [4] à l’entrée DMX [3] de la VDPLDJBAR4 suiva ante, etc. Prévo ir une résistanc e de terminaiso on sur la sortie D DMX [4] de la d dernière...
  • Seite 15 VDPLDJ BAR4 • Sélec ctionner l’adress se DMX de dépa art avec le bouto on UP [C] ou D OWN [D]. L’aff ficheur affiche suivi d’un digit (p.ex : adre esse = 16). • Se ré éférer au tablea u ci-dessous po our l’aperçu des fonctions DMX disponibles.
  • Seite 16 90 x 320 mm poids 5 kg N’emplo oyer cet appare eil qu’avec de s accessoires d’origine. SA V Velleman ne s sera aucuneme respons able de domm mages ou lésion ns survenus à un usage (inc correct) de cet t appareil.
  • Seite 17 3. No rmas gener rales ® ® Véase la Garantía de se ervicio y calid ad Velleman al final de este e manual del usu uario. Utilice el a aparato sólo en n interiores. N o exponga este equipo a lluvia , humedad ni a ningún tip...
  • Seite 18: Montaje

    Si fuera necesario, conecte un cable con conector XLR (no incl.) a la salida XLR hembra de 3 polos del controlador y el otro conector XLR macho de 3 polos a la entrada [3] del VDPLDJBAR4. Es posible conectar varios VDPLDJBAR4 en serie. Use un cable blindado de doble hilo conductor con conectores XLR de entrada y de salida VDPLDJBAR4.
  • Seite 19 VDPLDJ BAR4 Conexió ón a la rojo Asegúre ese de que el en nchufe al que es stá conectado e l foco esté pues sto a tierra por separad do. Utilice sólo e el cable de alime entación entreg ado con el foco o un cable autoriza ado por el fabric...
  • Seite 20 VDPLDJ BAR4 053 ~ 058 grupo 059 ~ 064 grupo 065 ~ 070 grupo 071 ~ 076 azul grupo 077 ~082 grupo 083 ~ 088 blanco 089 ~ 094 rojo 095 ~ 100 verde 101 ~ 106 azul 107 ~ 112 rojo + verde todos los LEDs del mi...
  • Seite 21: Sic Cherheitshin Nweise

    © DERECH HOS DE AUTOR Velleman NV dispone de l los derechos de autor para este manual del usua ario. Todos los der rechos mundiales reservados s.
  • Seite 22 VDPLDJ BAR4 • Mach hen Sie das Gerä ät mit einem ge eeigneten Siche rheitskabel fest (z.B. VDLSC7 oder VDLSC8) • Blick en Sie niemals direkt in die Lic htquelle da bei empfindlichen M Menschen epilep ptische Anfälle ausg elöst werden kö önnen.
  • Seite 23 VDPLDJ BAR4 Montage Gefahr vor Ver rletzungen. Fü ür die Installatio on des Gerätes i st eine solide p raktische Erfahr rung notwendig. Sie müssen die Höc chstlast einer Tr ragkonstruktion berechnen kön nnen, wissen we elches Baumaterial Sie e verwenden kön nnen und Sie m müssen das verw wendete Materia...
  • Seite 24 ändern, w wird nur d das besagte Ger rät beeinflusst. • Im Fa alle des 6-Kana l VDPLDJBAR4 4, werden Sie d ie Startadresse des ersten Ger ätes auf 1 (CH1 1~6), der z zweiten Einheit a auf 7 (1 + 6) (C...
  • Seite 25: Tec Chnische Da Aten

    840 x 90 x 320mm² Gewicht Verwend den Sie dieses s Gerät nur mit t originellen Z Zubehörteilen. Velleman NV übernimmt ke eine Haftung für Schaden o oder Verletzun ngen bei (falsc cher) Anwend ung dieses Ge erätes. Für me...
  • Seite 26 - damage caused by a commercial, professional or collective use of Velleman® jouit d’une expérience de plus de 35 ans dans le monde the article (the warranty validity will be reduced to six (6) months de l’électronique avec une distribution dans plus de 85 pays.
  • Seite 27 - daños causados por reparaciones o modificaciones efectuadas por una tercera persona sin la autorización explicita de SA Velleman® ; - se calcula gastos de transporte de y a Velleman® si el aparato ya no está cubierto por la garantía.

Inhaltsverzeichnis