THORENS TD 204 Bedienungsanleitung

Verwandte Anleitungen für THORENS TD 204


Inhaltszusammenfassung für THORENS TD 204
- Seite 1 TD 204 BEDIENUNGSANLEITUNG USER GUIDE MANUEL D’UTILISATION 使用手册 Thorens GmbH Lustheide 85 · 51427 Bergisch Gladbach · Deutschland www.thorens.com · info@thorens.com www.thorens.com...
- Seite 2 FEATURES / OBERSEITE...
-
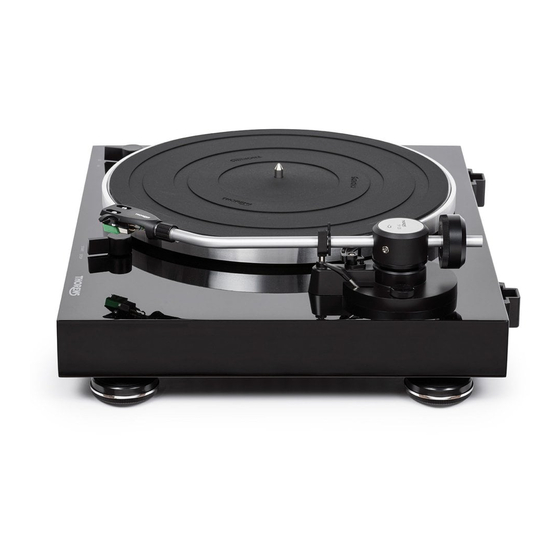
Seite 3: Gegengewicht
01. Gegengewicht Das Gegengewicht dient zum korrekten Ausbalancieren des Tonarms und der Einstellung der Auflagekraft. 02. Anti-Skating Einstellung Damit wird die korrekte Anti-Skating Kraft eingestellt. Der jeweilige Wert richtet sich nach dem verwendeten Ton- abnehmer. Im Falle des serienmäßigen AT 95E Tonabnehmers sollte der Wert, dem der eingestellten Auflagekraft entsprechen. - Seite 4 10 11 10. Erdungsschraube Geräteseitige Befestigung des Erdungskabels gegen Brummstörungen. 11. RCA Buchsen (links/rechts) Anschluss des Signalkabels mit RCA (Cinch-) Steckern. 12. Phonoverstärker Ein/Aus Schalter (für MM-Systeme) ON: eingebauter Phonoverstärker eingeschaltet. Cinchkabel wird mit einem beliebigen „Line“-Eingang des nach- folgenden Verstärkers verbunden (nicht “Phono”!). OFF: eingebauter Phonoverstärker ausgeschaltet.
-
Seite 5: So Installieren Sie Den Antriebsriemen Auf Dem Plattenspieler
SO INSTALLIEREN SIE DEN ANTRIEBSRIEMEN AUF DEM PLATTENSPIELER Der Antriebsriemen liegt bereits auf der Unterseite des Plattentellers auf. Setzen Sie den Plattenteller auf die Tellerachse auf und greifen Sie mit einem Finger den Antriebsriemen, durch eines der Löcher im Platten- teller, in der Höhe des Motors. -
Seite 6: Installation Der Staubschutzhaube
Drehen Sie den Teller einige Male mit der Hand damit der Riemen in die richtige Position rutscht und leicht läuft. Legen Sie erst dann die Gummimatte (8) mit dem Schriftzug „Thorens“ nach oben auf den Teller. 02. Schieben Sie die Headshell (5) vorne in die Öffnung des Tonarms und befestigen Sie sie durch Drehen der Überwurfmutter. -
Seite 7: Anschluss Und Betrieb
Dem Plattenspieler liegt ein externes Steckernetzteil passend für Ihr Stromnetz bei. Die RCA (Cinch-) Anschlüsse auf der Rückseite des TD 204 werden je nach Stellung des Schalters (12) entwe- der mit einem freien Line-Eingang (Stellung „On“) oder einem freien „Phono“-Eingang (Stellung „Off“) des folgen- den Verstärkers verbunden. -
Seite 8: Ersetzen Der Abtastnadel
ERSETZEN DER ABTASTNADEL • Verriegeln Sie den Tonarm in der Stütze. • Entfernen Sie den Nadelschutz. • Umfassen Sie en Nadeleinschub und ziehen in vorsichtig nach vorne. • Setzen sie einen neuen Nadeleinschub in umgekehrter Reihenfolge ein. • Setzen sie den Nadelschutz wieder auf. ENTFERNEN DES TONABNEHMERS •... - Seite 9 • Setzen Sie den Nadeleinschub wieder ein. • Schieben sie den Nadelschutz auf. • Falls Sie die Headshell vom Arm abgenommen haben, setzen Sie sie wieder ein. • Um den neuen Tonabnehmer zu justieren, folgen Sie der dazu beiliegenden Anleitung. Es empfiehlt sich dazu, die Schrauben in der Headshell zunächst noch nicht fest anzuziehen.
-
Seite 10: Technische Daten
Laufwerk Antriebsart Riemen Motor DC Motor Geschwindigkeit 33,3/45 U/Min Abweichung Solldrehzahl max. +/–2% Max. Gleichlaufschwankungen 0.2% Signal-to-Noise Abstand >67dB (A-bewertet, 20kHz LPF) >60dB (unbewertet, 20kHz LPF) Plattenteller Aluminumguss Plattenteller 12“, 300mm TECHNISCHE DATEN... - Seite 11 Tonarm Aluminium Gerade, statisch ausbalanciert, J-förmig Effektive Länge 9“, 232,8 mm Auflagekraft 0 bis 4 g Systemgewicht 3.5 bis 6.0 g Überhang 17,8 mm Anti-skating Einstellung vorhanden TECHNISCHE DATEN...
- Seite 12 Tonabnehmer MM (Audio-Technica AT 95 E) Nadel elliptisch Diamant Frequenzgang 20Hz bis 20kHz Kanaltrennung 20 dB Kanalgleichheit 2 dB Vertikaler Spurwinkel 20 Grad Impedanz 47 kOhm Ausgangsspannung 3.5mV (1kHz, 3.54cm/Sek.) Empfohlene Auflagekraft Gewicht 5.7 g Gewicht Headshell 10g (einschl. Kabel und Befestigung) TECHNISCHE DATEN...
- Seite 13 Ausgang Anschluss RCA (vergoldet) Stromversorgung AC 100 bis 240 V, 50/60 Hz, 12 V Leistungsaufnahme 1.5W (<0.5W im Standby) Maße über alles (B x T x H) 420 x 355 x 140 mm Gewicht 4,8 Kg TECHNISCHE DATEN...
- Seite 14 USER GUIDE...
- Seite 15 TD 204 BEDIENUNGSANLEITUNG USER GUIDE MANUEL D’UTILISATION 使用手册 15 USER GUIDE...
- Seite 16 FEATURES / TOP PANEL...
- Seite 28 MANUEL D’UTILISATION...
- Seite 29 TD 204 BEDIENUNGSANLEITUNG USER GUIDE MANUEL D’UTILISATION 使用手册 29 MANUEL D’UTILISATION...
- Seite 30 COMPOSITIONS : 1. PANNEAU AVANT...
- Seite 42 Thorens GmbH Lustheide 85 · 51427 Bergisch Gladbach · Deutschland www.thorens.com · info@thorens.com www.thorens.com...