Herunterladen Inhalt Inhalt Diese Seite drucken
Electrolux LIT81443 Benutzerinformation
Vorschau ausblenden Andere Handbücher für LIT81443:
Inhaltsverzeichnis

Werbung

Verfügbare Sprachen
  • DE

Verfügbare Sprachen

  • DEUTSCH, seite 63
LIT81443
Gebruiksaanwijzing
Kookplaat
User Manual
Hob
Notice d'utilisation
Table de cuisson
Benutzerinformation
Kochfeld
Istruzioni per l'uso
Piano cottura
Manual de instrucciones
Placa de cocción
electrolux.com/register
NL
2
EN 23
FR 42
DE 63
IT
85
ES 106

Werbung

Inhaltsverzeichnis
loading

Inhaltszusammenfassung für Electrolux LIT81443

  • Seite 1 Gebruiksaanwijzing Kookplaat User Manual EN 23 LIT81443 Notice d'utilisation FR 42 Table de cuisson Benutzerinformation DE 63 Kochfeld Istruzioni per l’uso Piano cottura Manual de instrucciones ES 106 Placa de cocción electrolux.com/register...
  • Seite 2: Inhaltsverzeichnis

    WIJ DENKEN AAN JOU Bedankt voor je aankoop van een Electrolux-apparaat. Je hebt voor een product gekozen dat decennia aan professionele ervaring en innovatie met zich meebrengt. Ingenieus en stijlvol en ontworpen met jou in het achterhoofd. Dus wanneer je het gebruikt, kan je erop rekenen dat je telkens weer geweldige resultaten krijgt.
  • Seite 3: Veiligheid Van Kinderen En Kwetsbare Mensen

    uit de onjuiste installatie of het onjuiste gebruik. Bewaar de instructies altijd op een veilige, toegankelijke plek voor toekomstig gebruik. 1.1 Veiligheid van kinderen en kwetsbare mensen Dit apparaat kan worden gebruikt door kinderen van 8 jaar • en ouder en door mensen met beperkte lichamelijke, zintuiglijke of verstandelijke vermogens of een gebrek aan ervaring en kennis, indien zij onder toezicht staan of instructies hebben gekregen over het veilig gebruiken van...
  • Seite 4 Probeer NOOIT om een brand te blussen met water. • Schakel het apparaat uit en bedek dan de vlam, bv. met een deksel of een vuurdeken. LET OP: Het apparaat mag niet van stroom worden • voorzien door een extern schakelapparaat, zoals een tijdklok, of aangesloten worden op een circuit dat door het elektriciteitsbedrijf regelmatig aan en uit wordt geschakeld.
  • Seite 5: Veiligheidsvoorschriften

    geïntegreerd. Het gebruik van ongeschikte kookplaatbeschermers kan ongelukken veroorzaken. 2. VEILIGHEIDSVOORSCHRIFTEN 2.1 Installatie 2.2 Aansluiting aan het elektriciteitsnet WAARSCHUWING! Alleen een erkende WAARSCHUWING! installatietechnicus mag het Gevaar voor brand en apparaat installeren. elektrische schokken. • Alle elektrische aansluitingen moeten WAARSCHUWING! door een gediplomeerd elektromonteur Gevaar voor letsel of schade worden gemaakt.
  • Seite 6 • Steek de stekker pas in het stopcontact • Gebruikers met een pacemaker moeten als de installatie is voltooid. Zorg ervoor een afstand van minimaal 30 cm bewaren dat het netsnoer na installatie bereikbaar van de inductiekookzones als het apparaat in werking is. •...
  • Seite 7: Installatie

    2.4 Onderhoud en reiniging worden verkocht: Deze lampen zijn bedoeld om bestand te zijn tegen extreme • Reinig het apparaat regelmatig om te fysieke omstandigheden in huishoudelijke voorkomen dat het materiaal van het apparaten, zoals temperatuur, trillingen, oppervlak achteruitgaat. vochtigheid, of zijn bedoeld om informatie •...
  • Seite 8 50mm www.youtube.com/electrolux www.youtube.com/aeg Als het apparaat boven een lade How to install your Electrolux geïnstalleerd is, dan kan tijdens het koken de Induction Hob - Worktop installation ventilatie van de kookplaat de items die in de lade geplaatst zijn verwarmen.
  • Seite 9: Beschrijving Van Het Product

    4. BESCHRIJVING VAN HET PRODUCT 4.1 Indeling kookoppervlak Inductiekookzone Bedieningspaneel 210 mm 210 mm 210 mm 210 mm 4.2 Bedieningspaneel lay-out Gebruik de tiptoetsen om het apparaat te bedienen. De displays, indicatielampjes en geluiden tonen welke functies worden gebruikt. Tip‐ Functie Opmerking toets...
  • Seite 10 Tip‐ Functie Opmerking toets Om de kookzone te selecteren. De tijd verlengen of verkorten. PowerBoost Het inschakelen van de functie. Bedieningsstrip Het instellen van de kookstand. 4.3 Kookstanddisplays Scherm Beschrijving De kookzone is uitgeschakeld. De kookzone wordt gebruikt. Pauzeren werkt. Automatisch opwarmen werkt.
  • Seite 11: Dagelijks Gebruik

    5. DAGELIJKS GEBRUIK 5.3 De kookstand WAARSCHUWING! Raadpleeg de hoofdstukken Voor het instellen of wijzigen van de Veiligheid. kookstand: Raak de bedieningsstrip aan bij de juiste 5.1 In- of uitschakelen kookstand of beweeg uw vinger langs de bedieningsstrip totdat u de jusite kookstand Raak 1 seconde aan om de kookplaat in–...
  • Seite 12 De functie uitschakelen: wijzig de Om in de gaten te houden hoelang de kookstand. kookzone werkt: tik op om de kookzone in te stellen. Het indicatielampje van de 5.6 Timer kookzone begint te knipperen. De display geeft aan hoe lang de zone werkt. •...
  • Seite 13 • Timer met aftelfunctie naar beneden komt De functie inschakelen: raak aan. • u iets op het bedieningspaneel plaatst. gaat gedurende 4 seconden aan. De timer blijft aan. 5.11 Energiebeperking De functie uitschakelen: Raak aan. De Aanvankelijk staat de kookplaat op zijn vorige kookstand gaat aan.
  • Seite 14 • De functie verlaagt het vermogen naar de snelheid van de ventilator wordt automatisch andere kookzones aangesloten op bepaald op basis van de modusinstelling en dezelfde fase. de temperatuur van de heetste pan op de • De weergave van de warmte-instelling kookplaat.
  • Seite 15: Aanwijzingen En Tips

    De ventilatorsnelheid handmatig bedienen U kunt de functie ook handmatig bedienen. Automa‐ Koken 1) Bakken 2) tische Raak daartoe aan als de kookplaat actief is. Dit schakelt de automatische bediening verlich‐ van de functie uit zodat u de ting ventilatorsnelheid handmatig kunt Modus H6 Ventilator‐...
  • Seite 16 6.2 Lawaai tijdens gebruik Gebruik de inductiekookzones met geschikte pannen. Als u dit hoort: • De bodem van de pannen moet zo dik en • kraakgeluid: de pan is gemaakt van vlak mogelijk zijn. verschillende materialen (een sandwich- • Zorg ervoor dat bodems schoon en droog constructie).
  • Seite 17 Warmte-instel‐ Gebruik om: Tijd Tips ling (min) Bereide gerechten warmhouden. zoals no‐ Een deksel op het kookgerei doen. 1 - 3 Hollandaisesaus, smelten: boter, cho‐ 5 - 25 Van tijd tot tijd mengen. colade, gelatine. 1 - 3 Stollen: luchtige omeletten, gebakken 10 - 40 Met deksel bereiden.
  • Seite 18: Onderhoud En Reiniging

    Zie de consumentenwebsite voor de Andere op afstand bediende volledige reeks afzuigkappen die met deze apparaten kunnen het signaal functie werken. De Electrolux-afzuigkappen hinderen. Gebruik dergelijke die met deze functie werken moeten het apparaten niet in de buurt van symbool hebben.
  • Seite 19 Probleem Mogelijke oorzaak Oplossing De zekering is doorgeslagen. Verzeker u ervan dat de zekering de oorzaak van de storing is. Als de zeke‐ ringen keer op keer doorslaan, neemt u contact op met een erkende installa‐ teur. Stel gedurende 10 seconden geen Schakel de kookplaat opnieuw in en kookstand in.
  • Seite 20: Technische Gegevens

    9. TECHNISCHE GEGEVENS 9.1 Typeplaatje Model LIT81443 PNC-productnummer 949 596 772 00 Type 62 D4A 01 AD 220-240 V/400 V 2N 50-60 Hz Inductie 7.2 kW Gemaakt in Duitsland Serienr.
  • Seite 21: Energiezuinigheid

    Het verandert met het materiaal en de vermeld in de tabel. afmetingen van het kookgerei. 10. ENERGIEZUINIGHEID 10.1 Productinformatie volgens EU 66/2014 alleen geldig voor EU-markt Modelidentificatie LIT81443 Type kookplaat Ingebouwde kookplaat Aantal kookzones Verwarmingstechnologie Inductie Diameter ronde kookzones (Ø)
  • Seite 22: Milieubescherming

    11. MILIEUBESCHERMING Recycleer de materialen met het symbool Gooi apparaten gemarkeerd met het symbool niet weg met het huishoudelijk afval. Breng . Gooi de verpakking in een geschikte het product naar het milieustation bij u in de afvalcontainer om het te recycleren. buurt of neem contact op met de gemeente.
  • Seite 23: Safety Information

    WE’RE THINKING OF YOU Thank you for purchasing an Electrolux appliance. You’ve chosen a product that brings with it decades of professional experience and innovation. Ingenious and stylish, it has been designed with you in mind. So whenever you use it, you can be safe in the knowledge that you’ll get great results every time.
  • Seite 24: Children And Vulnerable People Safety

    installation or usage. Always keep the instructions in a safe and accessible location for future reference. 1.1 Children and vulnerable people safety This appliance can be used by children aged from 8 years • and above and persons with reduced physical, sensory or mental capabilities or lack of experience and knowledge if they have been given supervision or instruction concerning the use of the appliance in a safe way and understand the...
  • Seite 25: Safety Instructions

    CAUTION: The appliance must not be supplied through an • external switching device, such as a timer, or connected to a circuit that is regularly switched on and off by a utility. CAUTION: The cooking process has to be supervised. A •...
  • Seite 26: Electrical Connection

    • Do not install or use a damaged • Make sure that a shock protection is appliance. installed. • Follow the installation instructions • Use the strain relief clamp on the cable. supplied with the appliance. • Make sure the mains cable or plug (if •...
  • Seite 27 • Do not put cutlery or saucepan lids on the Always lift these objects up when you cooking zones. They can become hot. have to move them on the cooking • Do not operate the appliance with wet surface. hands or when it has contact with water. •...
  • Seite 28: Installation

    3. INSTALLATION WARNING! WARNING! Refer to Safety chapters. All electrical connections must be made by a qualified electrician. 3.1 Before the installation Before you install the hob, write down the CAUTION! information below from the rating plate. The Do not drill or solder the wire rating plate is on the bottom of the hob.
  • Seite 29 How to install your Electrolux Induction Hob - Worktop installation min. min. 500mm 50mm If the appliance is installed above a drawer, the hob ventilation can warm up the items stored in the drawer during the cooking process.
  • Seite 30: Product Description

    4. PRODUCT DESCRIPTION 4.1 Cooking surface layout Induction cooking zone Control panel 210 mm 210 mm 210 mm 210 mm 4.2 Control panel layout Use the sensor fields to operate the appliance. The displays, indicators and sounds tell which functions operate. Sensor Function Comment...
  • Seite 31: Daily Use

    Sensor Function Comment field To select the cooking zone. To increase or decrease the time. PowerBoost To activate the function. Control bar To set a heat setting. 4.3 Heat setting displays Display Description The cooking zone is deactivated. The cooking zone operates. Pause operates.
  • Seite 32: The Heat Setting

    5.1 Activating and deactivating 5.4 Automatic Heat Up Activate this function to get a desired heat Touch for 1 second to activate or setting in a shorter time. When it is on, the deactivate the hob. zone operates on the highest setting in the beginning and then continues to cook at the 5.2 Automatic Switch Off desired heating setting.
  • Seite 33: Child Safety Device

    To see the remaining time: touch to set To stop the sound: touch the cooking zone. The indicator of the The function has no effect on the cooking zone starts to flash. The display operation of the cooking zones. shows the remaining time. To change the time: touch to set the 5.7 Pause...
  • Seite 34: Power Management

    To override the function for only one • P35 — 3500 W • P40 — 4000 W cooking time: activate the hob with • P45 — 4500 W comes on. Touch for 4 seconds. Set the • P50 — 5000 W heat setting in 10 seconds.
  • Seite 35 When you set the Power limitation function to more than 6000 W, the power of the hob is Automat‐ Boiling 1) Frying 2) divided between its left and right side. ic light Mode H3 Fan speed Mode H4 Fan speed Fan speed Mode H5 Fan speed...
  • Seite 36: Hints And Tips

    Activating the light an intensive level and press again you will You can set the hob to activate the light set fan speed to 0 which deactivates the automatically whenever you activate the hob. hood fan. To start the fan again with fan To do so set the automatic mode to H1 –...
  • Seite 37: Examples Of Cooking Applications

    6.4 Examples of cooking consumption of power. It means that a cooking zone with the medium heat setting applications uses less than a half of its power. The correlation between the heat setting of a The data in the table is for zone and its consumption of power is not guidance only.
  • Seite 38: Care And Cleaning

    Other remotely controlled work with this function refer to our consumer appliances may block the signal. website. The Electrolux cooker hoods that Do not use any such appliances work with this function must have the symbol near to the hob while Hob²Hood is on.
  • Seite 39 Problem Possible cause Remedy Pause operates. Refer to "Daily use". There is water or fat stains on the Clean the control panel. control panel. An acoustic signal sounds and You put something on one or more Remove the object from the sensor the hob deactivates.
  • Seite 40: Technical Data

    9. TECHNICAL DATA 9.1 Rating plate Model LIT81443 PNC 949 596 772 00 Typ 62 D4A 01 AD 220 - 240 V / 400 V 2N 50 - 60 Hz Induction 7.2 kW...
  • Seite 41: Energy Saving

    Diameter of circular cooking zones (Ø) Left front 21.0 cm Left rear 21.0 cm Right front 21.0 cm Right rear 21.0 cm Energy consumption per cooking zone (EC electric Left front 177.0 Wh / kg cooking) Left rear 171.4 Wh / kg Right front 179.6 Wh / kg Right rear...
  • Seite 42: Informations De Sécurité

    NOUS PENSONS À VOUS Merci d’avoir choisi un appareil Electrolux. Vous avez choisi un produit qui bénéficie de décennies d'expérience professionnelle et d'innovation. Ingénieux et élégant, il a été pensé pour vous. C'est la raison pour laquelle vous pouvez avoir la certitude d'obtenir d'excellents résultats à...
  • Seite 43: Sécurité Des Enfants Et Des Personnes Vulnérables

    mauvaise installation ou utilisation. Conservez toujours les instructions dans un lieu sûr et accessible pour vous y référer ultérieurement. 1.1 Sécurité des enfants et des personnes vulnérables Cet appareil peut être utilisé par des enfants âgés d'au • moins 8 ans et par des personnes ayant des capacités physiques, sensorielles ou mentales réduites ou dénuées d’expérience ou de connaissance, s'ils sont correctement surveillés ou si des instructions relatives à...
  • Seite 44 une table de cuisson car cela pourrait provoquer un incendie. N'essayez JAMAIS d'éteindre un feu avec de l'eau. • Éteignez l'appareil puis couvrez les flammes, par exemple avec un couvercle ou une couverture ignifuge. ATTENTION : L'appareil ne doit pas être branché à •...
  • Seite 45: Consignes De Sécurité

    dispositifs de protection non adaptés peut entraîner des accidents. 2. CONSIGNES DE SÉCURITÉ 2.1 Installation 2.2 Branchement électrique AVERTISSEMENT! AVERTISSEMENT! L'appareil doit être installé Risque d'incendie ou uniquement par un professionnel d'électrocution. qualifié. • Tous les raccordements électriques doivent être effectués par un électricien AVERTISSEMENT! qualifié.
  • Seite 46 • Ne branchez la fiche secteur dans la prise • Les porteurs de pacemakers doivent secteur qu'à la fin de l'installation. rester à une distance minimale de 30 cm Assurez-vous que la prise secteur est des zones de cuisson à induction lorsque accessible après l'installation.
  • Seite 47: Mise Au Rebut

    des usages autres que celui pour lequel il vendues séparément : Ces lampes sont a été conçu, à des fins de chauffage par conçues pour résister à des conditions exemple. physiques extrêmes dans les appareils électroménagers, telles que la 2.4 Entretien et Nettoyage température, les vibrations, l’humidité, ou sont conçues pour signaler des •...
  • Seite 48 500mm 50mm www.youtube.com/electrolux www.youtube.com/aeg Si l'appareil est installé au-dessus d'un tiroir, How to install your Electrolux la ventilation de la table de cuisson peut Induction Hob - Worktop installation chauffer les éléments rangés dans le tiroir durant la cuisson. FRANÇAIS...
  • Seite 49: Description De L'appareil

    4. DESCRIPTION DE L'APPAREIL 4.1 Agencement des zones de cuisson Zone de cuisson à induction Bandeau de commande 210 mm 210 mm 210 mm 210 mm 4.2 Description du bandeau de commande Les touches sensitives permettent de faire fonctionner l'appareil. Les affichages, les voyants et les signaux sonores indiquent les fonctions activées.
  • Seite 50 Touche Fonction Commentaire sensiti‐ Hob²Hood Pour activer et désactiver le mode manuel de la fonc‐ tion. Pour choisir la zone de cuisson. Pour augmenter ou diminuer la durée. PowerBoost Pour activer la fonction. Bandeau de sélection Pour sélectionner un niveau de cuisson. 4.3 Affichage du niveau de cuisson Afficheur Description...
  • Seite 51: Utilisation Quotidienne

    5. UTILISATION QUOTIDIENNE AVERTISSEMENT! Niveau de cuisson La table de cuisson Reportez-vous aux chapitres s'éteint au bout de concernant la sécurité. 10 - 14 1,5 heure 5.1 Activation et désactivation 5.3 Niveau de cuisson Appuyez sur pendant 1 seconde pour activer ou désactiver la table de cuisson.
  • Seite 52 revient automatiquement au niveau de Pour arrêter le signal sonore : appuyez sur cuisson le plus élevé. Reportez-vous au chapitre • CountUp Timer « Caractéristiques techniques ». Cette fonction permet de vérifier la durée de fonctionnement de la zone de cuisson Pour activer la fonction pour une zone de sélectionnée.
  • Seite 53 5.7 Pause Appuyez sur pendant 4 secondes. s'allume. Éteignez la table de cuisson en Cette fonction sélectionne le niveau de cuisson le plus bas pour toutes les zones de appuyant sur cuisson activées. Pour désactiver la fonction le temps d'une Lorsque la fonction est en cours, tous les cuisson : activez la table de cuisson avec autres symboles du bandeau de commande...
  • Seite 54 Gestion alimentation avec Limitation de 4. Appuyez sur . P72 apparaît. puissance 5. Appuyez sur les touches Lorsque vous réglez la fonction Limitation de minuteur pour régler le niveau de puissance sur 6000 W ou moins, la puissance. puissance de la table de cuisson est répartie Niveaux de puissance entre toutes les zones de cuisson.
  • Seite 55 2. Appuyez sur pendant 3 secondes. Sur la plupart des hottes, le L'affichage s'allume, puis s'éteint. système de commande à distance est désactivé par 3. Appuyez sur pendant 3 secondes. défaut. Activez-le avant d'utiliser 4. Appuyez plusieurs fois sur jusqu'à ce cette fonction.
  • Seite 56: Conseils

    faire, réglez le mode automatique sur H1 - L'éclairage de la hotte s'éteint 2 minutes après la mise hors tension de la table de cuisson. 6. CONSEILS de la puissance générée par la zone de AVERTISSEMENT! cuisson. Reportez-vous aux chapitres •...
  • Seite 57: Exemples De Cuisson

    6.4 Exemples de cuisson qu'une zone de cuisson avec le niveau de cuisson moyen utilise moins de la moitié de Le rapport entre le niveau de cuisson et la sa puissance. consommation énergétique de la zone de cuisson n'est pas linéaire. Lorsque vous Les données du tableau sont augmentez le niveau de cuisson, cela n'est fournies à...
  • Seite 58: Entretien Et Nettoyage

    Pour trouver la gamme complète des hottes dotées de cette fonction, consultez notre site web destiné aux consommateurs. Les hottes Electrolux dotées de cette fonction doivent porter le symbole 7. ENTRETIEN ET NETTOYAGE les aliments contenant du sucre car la AVERTISSEMENT! saleté...
  • Seite 59 8.1 Que faire si... Problème Cause possible Solution Vous ne pouvez pas allumer la La table de cuisson n’est pas bran‐ Vérifiez que la table de cuisson est table de cuisson ni la faire fonc‐ chée à une source d’alimentation correctement branchée à...
  • Seite 60: Caractéristiques Techniques

    (située dans un des coins de la surface en verre) et le message d'erreur 9. CARACTÉRISTIQUES TECHNIQUES 9.1 Plaque signalétique Modèle LIT81443 PNC 949 596 772 00 Type 62 D4A 01 AD 220 - 240 V / 400 V 2N, 50 - 60 Hz Induction 7.2 Kw...
  • Seite 61: Rendement Énergétique

    10. RENDEMENT ÉNERGÉTIQUE 10.1 Informations sur le produit conformément à la norme EU 66/2014 valable pour le marché européen uniquement Identification du modèle LIT81443 Type de table de cuisson Table de cuisson intégrée Nombre de zones de cuisson Technologie de chauffage Induction Diamètre des zones de cuisson circulaires (Ø)
  • Seite 62: En Matière De Protection De L'environnement

    • Posez directement le récipient au centre • Vous pouvez utiliser la chaleur résiduelle de la zone de cuisson. pour conserver les aliments au chaud ou pour faire fondre. 11. EN MATIÈRE DE PROTECTION DE L'ENVIRONNEMENT Recyclez les matériaux portant le symbole portant le symbole avec les ordures ménagères.
  • Seite 63: Kundendienst Und Service

    WIR DENKEN AN SIE Vielen Dank für Ihren Kauf eines Electrolux-Geräts. Sie haben ein Produkt gewählt, das jahrzehntelange professionelle Erfahrung und Innovation mit sich bringt. Das ausgeklügelte und stilvolle Produkt wurde für Sie entwickelt. So können Sie jedes Mal, wenn Sie das Produkt verwenden, sicher sein, dass Sie großartige Ergebnisse erzielen werden.
  • Seite 64: Sicherheit Von Kindern Und Schutzbedürftigen

    Schäden infolge nicht ordnungsgemäßer Montage oder Verwendung übernimmt der Hersteller keine Haftung. Bewahren Sie die Anleitung zum Nachschlagen an einem sicheren und zugänglichen Ort auf. 1.1 Sicherheit von Kindern und schutzbedürftigen Personen Das Gerät kann von Kindern ab 8 Jahren und Personen mit •...
  • Seite 65 WARNUNG: Kochen mit Fett oder Öl auf einem • unbeaufsichtigten Kochfeld ist gefährlich und kann zu einem Brand führen. Versuchen Sie NIEMALS, ein Feuer mit Wasser zu löschen, • sondern schalten Sie das Gerät aus und decken Sie die Flamme ab, z.B. mit einem Deckel oder einer Feuerlöschdecke.
  • Seite 66: Sicherheitsanweisungen

    WARNUNG: Verwenden Sie nur Schutzabdeckungen des • Herstellers des Kochgeräts, von ihm in der Bedienungsanleitung als geeignete und empfohlene Schutzabdeckungen oder die im Gerät enthaltene Schutzabdeckung. Es besteht Unfallgefahr durch die Verwendung ungeeigneter Schutzabdeckungen. 2. SICHERHEITSANWEISUNGEN 2.1 Montage Kühlgebläse beschädigen oder das Kühlsystem beeinträchtigen können.
  • Seite 67 oder ggf. der Netzstecker nicht mit dem • Nehmen Sie keine technischen heißen Gerät oder heißem Kochgeschirr Änderungen am Gerät vor. in Berührung kommt. • Die Lüftungsöffnungen dürfen nicht • Verwenden Sie keine abgedeckt werden. Mehrfachsteckdosen oder • Lassen Sie das Gerät bei Betrieb nicht Verlängerungskabel.
  • Seite 68: Wartung

    • Legen Sie keine heißen Topfdeckel auf Reinigungsschwämmchen, Lösungsmittel die Glasoberfläche des Kochfeldes. oder Metallgegenstände. • Lassen Sie das Kochgeschirr nicht 2.5 Wartung leerkochen. • Lassen Sie keine Gegenstände oder • Wenden Sie sich zur Reparatur des Kochgeschirr auf das Gerät fallen. Die Geräts an den autorisierten Oberfläche könnte beschädigt werden.
  • Seite 69: Einbau

    Zweiphasiger Anschluss WARNUNG! 1. Entfernen Sie die Aderendhülse von Alle elektrischen Anschlüsse schwarzen und braunen Adern. müssen von einem qualifizierten 2. Entfernen Sie die Isolierung der braunen Elektriker ausgeführt werden. und schwarzen Adern. 3. Bringen Sie an jedem Kabelende eine VORSICHT! neue Aderendhülse mit 1,5 mm²...
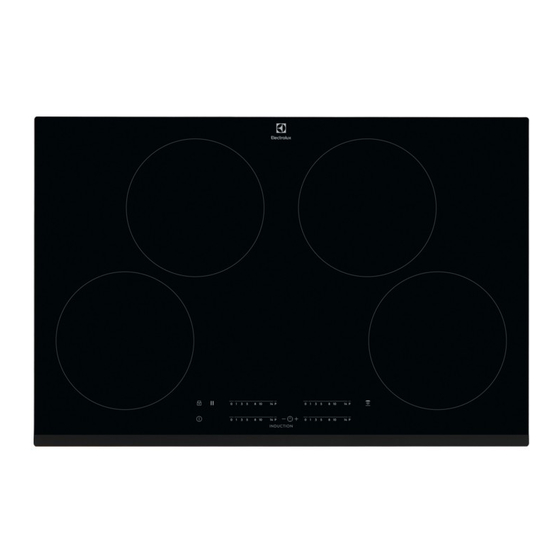
  • Seite 70: Gerätebeschreibung

    How to install your Electrolux Induction Hob - Worktop installation 4. GERÄTEBESCHREIBUNG 4.1 Anordnung der Kochflächen Induktionskochzone Bedienfeld 210 mm 210 mm 210 mm 210 mm DEUTSCH...
  • Seite 71: Bedienfeldanordnung

    4.2 Bedienfeldanordnung Bedienen Sie das Gerät über die Sensorfelder. Die Anzeigen, Kontrolllampen und akustischen Signale informieren Sie über die aktiven Funktionen. Sen‐ Funktion Kommentar sorfeld EIN/AUS Ein- und Ausschalten des Kochfeldes. Verriegelung / Kindersicherung Verriegeln/Entriegeln des Bedienfelds. Pause Ein- und Ausschalten der Funktion. Kochstufenanzeige Zeigt die Kochstufe an.
  • Seite 72: Optiheat Control (3-Stufige Restwärmeanzeige)

    Display Beschreibung Automatisches Aufheizen ist eingeschaltet. PowerBoost ist eingeschaltet. Eine Störung ist aufgetreten. + Zahl OptiHeat Control (3-stufige Restwärmeanzeige): Weitergaren/Warmhalten/Restwärme. Verriegelung/ Kindersicherung ist eingeschaltet. Das Kochgeschirr ist ungeeignet oder zu klein bzw. es befindet sich kein Kochgeschirr auf der Kochzone. Automatische Abschaltung ist eingeschaltet.
  • Seite 73: Automatisches Aufheizen

    schaltet die Induktionskochzone automatisch wieder auf die höchste Kochstufe um. Kochstufe Das Kochfeld wird ausgeschaltet nach Siehe Kapitel „Technische Daten“. 6 Std , 1 - 3 Einschalten der Funktion für eine 4 - 7 5 Std Kochzone: Berühren Sie leuchtet 8 - 9 4 Std auf.
  • Seite 74: Verriegelung

    • CountUp Timer Die Funktion unterbricht nicht die Timer- Mit dieser Funktion können Sie feststellen, Funktionen. wie lange eine Kochzone bereits in Betrieb Berühren Sie zum Einschalten der Funktion ist. Auswählen der Kochzone: Berühren Sie leuchtet.Die Kochstufe verringert sich auf wiederholt, bis die Anzeige der gewünschten Kochzone erscheint.
  • Seite 75: Offsound Control (Ein- Und Ausschalten Der Signaltöne)

    4 Sekunden lang. Stellen Sie die Kochstufe • P20 - 2000 W innerhalb von 10 Sekunden ein. Das • P25 - 2500 W Kochfeld kann jetzt bedient werden. Wenn • P30 - 3000 W • P35 - 3500 W Sie das Kochfeld mit ausschalten, wird •...
  • Seite 76 Bei den meisten Dunstabzugshauben ist das Fernsteuerungssystem werkseitig ausgeschaltet. Schalten Sie es ein, bevor Sie die Funktion nutzen. Weitere Informationen finden Sie in der Anleitung der Dunstabzugshaube. Automatikbetrieb der Funktion Stellen Sie für den automatischen Betrieb den Modus auf H1 – H6. Das Kochfeld ist Bei Einstellung der Funktion standardmäßig auf H5 gestellt.Die Leistungsbegrenzungauf mehr als 6000 W...
  • Seite 77 Manuelles Einstellen der Lüftergeschwindigkeit Automa‐ Kochen 1) Braten 2) Sie können den Lüfter auch manuell tische einstellen. Berühren Sie hierzu , wenn das Einschal‐ Kochfeld eingeschaltet ist. Auf diese Weise tung der wird der Automatikbetrieb ausgeschaltet und Beleuch‐ Sie können die Lüftergeschwindigkeit tung manuell ändern.
  • Seite 78: Tipps Und Hinweise

    6. TIPPS UND HINWEISE „Spezifikation der WARNUNG! Kochzonen“ angegeben. Vermeiden Sie Siehe Kapitel es, Kochgeschirr während des Sicherheitshinweise. Kochvorgangs in der Nähe des Bedienfelds zu halten. Dies könnte sich 6.1 Kochgeschirr auf die Funktionsweise des Bedienfelds auswirken oder die Kochfeldfunktionen Bei Induktionskochzonen versehentlich aktivieren.
  • Seite 79 Bei den Angaben in der folgenden Tabelle handelt es sich um Richtwerte. Kochstufe Verwendung: Dauer Hinweise (Min.) Warmhalten von gegarten Speisen. Nach Be‐ Legen Sie einen Deckel auf das Koch‐ darf geschirr. 1 - 3 Sauce Hollandaise, Schmelzen von: 5 - 25 Gelegentlich umrühren.
  • Seite 80: Reinigung Und Pflege

    Dunstabzugshauben mit der Funktion Hob²Hood Die komplette Palette von Dunstabzugshauben, die mit dieser Funktion ausgestattet sind, finden Sie auf unserer Verbraucher-Website. Die Electrolux Dunstabzugshauben, die mit dieser Funktion ausgestattet sind, sind mit dem Symbol gekennzeichnet. Andere ferngesteuerte Geräte können das Signal blockieren.
  • Seite 81: Fehlersuche

    8. FEHLERSUCHE WARNUNG! Siehe Kapitel Sicherheitshinweise. 8.1 Was zu tun ist, wenn ... Störung Mögliche Ursache Problembehebung Der Backofen kann nicht einge‐ Das Kochfeld ist nicht oder nicht ord‐ Prüfen Sie, ob das Kochfeld ordnungs‐ schaltet oder bedient werden. nungsgemäß an die Spannungsver‐ gemäß...
  • Seite 82 Störung Mögliche Ursache Problembehebung Die Kochstufe schaltet zwischen Power-Management in Betrieb. Siehe „Täglicher Gebrauch“. zwei Stufen hin und her. Die Sensorfelder werden heiß. Das Kochgeschirr ist zu groß oder Stellen Sie großes Kochgeschirr nach Sie haben es zu nahe an die Bedie‐ Möglichkeit auf die hinteren Kochzo‐...
  • Seite 83: Technische Daten

    9. TECHNISCHE DATEN 9.1 Typenschild Modell LIT81443 Produkt-Nummer (PNC) 949 596 772 00 Typ 62 D4A 01 AD 220–240 V/400 V 2N ~ 50–60 Hz Induktion 7.2 kW Hergestellt in Deutschland Ser.-Nr....7.2 kW ELECTROLUX 9.2 Technische Daten der Kochzonen...
  • Seite 84: Energie Sparen

    EN 60350-2 - Elektrische Kochgeräte für den • Decken Sie Kochgeschirr, wenn möglich, Hausgebrauch - Teil 2: Kochfelder - mit einem Deckel ab. Verfahren zur Messung der • Stellen Sie Kochgeschirr auf die Gebrauchseigenschaften Kochzone, bevor Sie sie einschalten. • Stellen Sie kleineres Kochgeschirr auf die 10.2 Energie sparen kleineren Kochzonen.
  • Seite 85: Informazioni Di Sicurezza

    PENSIAMO A TE Grazie per aver acquistato un elettrodomestico Electrolux. Hai scelto un prodotto che ha alle spalle decenni di esperienza professionale e innovazione. Ingegnoso ed elegante, è stato progettato pensando a te. Quindi, in qualsiasi momento lo utilizzi, avrai la certezza di ottenere sempre i migliori risultati.
  • Seite 86: Avvertenze Di Sicurezza Generali

    uso scorretti. Conservare sempre le istruzioni in un luogo sicuro e accessibile per poterle consultare in futuro. 1.1 Sicurezza dei bambini e delle persone vulnerabili Questa apparecchiatura può essere usata da bambini a • partire dagli 8 anni e da adulti con limitate capacità fisiche, sensoriali o mentali o con scarsa esperienza o conoscenza sull'uso dell'apparecchiatura, solamente se sorvegliati o se istruiti relativamente all'uso dell'apparecchiatura e se hanno...
  • Seite 87 Non tentare MAI di spegnere un incendio con dell'acqua; • spegnere l'apparecchiatura e coprire le fiamme ad es. con un coperchio o una coperta di protezione dal fuoco. ATTENZIONE: L'apparecchiatura non deve essere • alimentata tramite dispositivi esterni, ad esempio timer, o collegata a un circuito regolarmente acceso e spento da un'azienda.
  • Seite 88: Istruzioni Di Sicurezza

    incorporate nell'apparecchiatura. L'uso inadeguato delle protezioni può causare incidenti. 2. ISTRUZIONI DI SICUREZZA 2.1 Installazione dell'apparecchiatura e le componenti conservate nel cassetto. • Togliere gli eventuali pannelli separatori AVVERTENZA! installati nel mobiletto sotto L’installazione all'apparecchiatura. dell'apparecchiatura deve essere eseguita da personale 2.2 Collegamento elettrico qualificato.
  • Seite 89 tale da non poter essere disattivati senza • Non utilizzare l'apparecchiatura come l'uso di attrezzi. superficie di lavoro o come piano di • Inserire la spina di alimentazione nella appoggio. presa solo al termine dell'installazione. • Se la superficie dell'apparecchiatura Verificare che la spina di alimentazione presenta delle incrinature, scollegare rimanga accessibile dopo l'installazione.
  • Seite 90: Pulizia E Cura

    spostare questi oggetti sollevarli sempre • Per quanto riguarda la lampada o le dalla superficie di cottura. lampade all'interno di questo prodotto e le • L'apparecchiatura è destinata solo alla lampade di ricambio vendute cottura. Non deve essere utilizzata per separatamente: Queste lampade sono altri scopi, come per esempio il destinate a resistere a condizioni fisiche...
  • Seite 91 500mm 50mm www.youtube.com/electrolux www.youtube.com/aeg Se l'apparecchiatura viene installata sopra a un cassetto, la ventilazione del piano cottura How to install your Electrolux può riscaldare gli articoli all'interno del Induction Hob - Worktop installation cassetto durante il processo di cottura. ITALIANO...
  • Seite 92: Descrizione Del Prodotto

    4. DESCRIZIONE DEL PRODOTTO 4.1 Disposizione del piano di cottura Zona di cottura a induzione Pannello dei comandi 210 mm 210 mm 210 mm 210 mm 4.2 Disposizione del pannello dei comandi Utilizzare i tasti sensore per mettere in funzione l'apparecchiatura. I display, gli indicatori ed i segnali acustici mostrano quali funzioni sono attive.
  • Seite 93 Tasto Funzione Commento senso‐ Hob²Hood Per attivare e disattivare la modalità manuale della fun‐ zione. Per selezionare la zona di cottura. Per aumentare o ridurre il tempo. PowerBoost Per attivare la funzione. Barra dei comandi Per impostare un livello di potenza. 4.3 Display del livello di potenza Display Descrizione...
  • Seite 94: Utilizzo Quotidiano

    5. UTILIZZO QUOTIDIANO 5.3 Livello di potenza AVVERTENZA! Fare riferimento ai capitoli sulla Per impostare o modificare il livello di sicurezza. potenza: Sfiorare la barra di controllo per impostare il 5.1 Attivazione e disattivazione livello di potenza corretto o spostare il dito lungo la barra di controllo fino a raggiungere Sfiorare per 1 secondo per accendere o...
  • Seite 95 Per attivare la funzione per una zona di Per impostare la zona di cottura: sfiorare cottura: sfiorare si accende. ripetutamente fino all'accensione della spia della zona di cottura desiderata. Per disattivare la funzione, modificare il livello di potenza. Per attivare la funzione: sfiorare timer.
  • Seite 96 5.10 OffSound Control (Attivazione Per disattivare la funzione, sfiorare . Si e disattivazione dei segnali attiva l'impostazione precedente di calore. acustici) 5.8 Blocco Disattivare il piano di cottura. Sfiorare il tasto È possibile bloccare il pannello dei comandi per 3 secondi. Il display si accende e si mentre le zone di cottura sono in funzione.
  • Seite 97 • P60 — 6000 W ATTENZIONE! Assicurarsi che la potenza selezionata sia idonea ai fusibili installati nell'impianto domestico. 5.12 Gestione energia • Le zone di cottura sono raggruppate in base alla posizione e al numero di fasi del piano di cottura. Vedere l'illustrazione. •...
  • Seite 98: Consigli E Suggerimenti Utili

    Quando si termina la cottura e si Illumina‐ Ebollizio‐ Frittura 2) disattiva il piano di cottura, la zione au‐ ne 1) ventola della cappa rimane in tomatica funzione ancora per un po'. Trascorso questo tempo, il Modalità sistema disattiva la ventola automaticamente ed evita Modalità...
  • Seite 99: Esempi Di Impiego Per La Cottura

    6.1 Pentole al pannello dei comandi durante la sessione di cottura. Ciò potrebbe influire sul funzionamento del pannello dei Per le zone di cottura a comandi o attivare accidentalmente le induzione, un forte campo funzioni piastra. elettromagnetico crea il calore nelle pentole molto rapidamente.
  • Seite 100 Livello di po‐ Usare per: Tempo Suggerimenti tenza (min.) Tenere in caldo le pietanze cotte. secondo Mettere un coperchio sulla pentola. necessità 1 - 3 Salsa olandese: fondere burro, ciocco‐ 5 - 25 Mescolare di tanto in tanto. lata, gelatina. 1 - 3 Solidificare: omelette morbide, uova 10 - 40...
  • Seite 101: Manutenzione E Pulizia

    Le bloccare il segnale. Non usare cappe da cucina Electrolux compatibili con apparecchiature di questo tipo questa funzione devono riportare il simbolo vicino al piano cottura mentre Hob²Hood è...
  • Seite 102 Problema Causa possibile Soluzione È saltato il fusibile. Verificare che il fusibile sia la causa del malfunzionamento. Nel caso in cui il fusibile continui a saltare, rivolgersi ad un elettricista qualificato. Non è stato impostato il livello di ca‐ Accendere nuovamente il piano cottu‐ lore entro 10 secondi.
  • Seite 103: Dati Tecnici

    Assicurarsi 9. DATI TECNICI 9.1 Targhetta identificativa Modello LIT81443 PNC 949 596 772 00 Tipo 62 D4A 01 AD 220 - 240 V / 400 V 2N 50 - 60 Hz Induzione 7.2 kW...
  • Seite 104: Caratteristiche Tecniche Zone Di Cottura

    10. EFFICIENZA ENERGETICA 10.1 Informazioni sul prodotto conformemente a EU 66/2014 valido solo per il mercato UE Identificativo modello LIT81443 Tipo di piano di cottura Piano di cottura da incasso Numero di zone di cottura Tecnologia di riscaldamento Induzione Diametro delle zone di cottura circolari (Ø)
  • Seite 105: Considerazioni Sull'ambiente

    • Utilizzare il calore residuo per mantenere caldi i cibi o fonderli. 11. CONSIDERAZIONI SULL'AMBIENTE riportano il simbolo insieme ai normali Riciclare i materiali con il simbolo . Buttare rifiuti domestici. Portare il prodotto al punto di l'imballaggio negli appositi contenitori per il riciclaggio più...
  • Seite 106: Información Sobre Seguridad

    PENSAMOS EN USTED Gracias por adquirir un electrodoméstico Electrolux. Ha elegido un producto que lleva décadas de experiencia e innovación profesionales. Ingenioso y elegante, ha sido diseñado pensando en usted. Así pues, cada vez que lo utilice, puede tener la seguridad de que obtendrá...
  • Seite 107: Seguridad De Niños Y Personas Vulnerables

    responsable de lesiones o daños producidos como resultado de una instalación o un uso incorrectos. Conserve siempre estas instrucciones en lugar seguro y accesible para futuras consultas. 1.1 Seguridad de niños y personas vulnerables Este aparato puede ser utilizado por niños de 8 años en •...
  • Seite 108 ADVERTENCIA: Cocinar con grasa o aceite sin estar • presente puede resultar peligroso, ya que podría ocasionarse un incendio. NUNCA intente apagar un fuego con agua; apague el • aparato y cubra la llama con una tapa o una manta ignífuga.
  • Seite 109: Instrucciones De Seguridad

    o bien las protecciones incluidas con el aparato. El uso de protectores inadecuados puede provocar accidentes. 2. INSTRUCCIONES DE SEGURIDAD 2.1 Instalación 2.2 Conexión eléctrica ADVERTENCIA! ADVERTENCIA! Solo un técnico cualificado Riesgo de incendios y puede instalar el aparato. descargas eléctricas. •...
  • Seite 110: Uso Del Aparato

    instalación. Asegúrese de tener acceso al • Los usuarios que tengan marcapasos enchufe del suministro de red una vez implantados deberán mantener una finalizada la instalación. distancia mínima de 30 cm de las zonas • Si la toma de corriente está floja, no de cocción por inducción cuando el conecte el enchufe.
  • Seite 111: Asistencia Tecnica

    2.4 Mantenimiento y limpieza destinadas a soportar condiciones físicas extremas en los aparatos domésticos, • Limpie periódicamente el aparato para como la temperatura, la vibración, la evitar el deterioro del material de la humedad, o están destinadas a señalar superficie. información sobre el estado de •...
  • Seite 112 500mm 50mm www.youtube.com/electrolux www.youtube.com/aeg Si el aparato se instala sobre un cajón, la How to install your Electrolux ventilación de la placa puede calentar el Induction Hob - Worktop installation contenido del cajón durante el proceso de cocción. ESPAÑOL...
  • Seite 113: Descripción Del Producto

    4. DESCRIPCIÓN DEL PRODUCTO 4.1 Disposición de las zonas de cocción Zona de cocción por inducción Panel de mandos 210 mm 210 mm 210 mm 210 mm 4.2 Disposición del panel de control Utilice el aparato con los sensores. Las pantallas, indicadores y señales acústicas indican qué funciones están en funcionamiento.
  • Seite 114 Sensor Función Comentario Para seleccionar una zona de cocción. Para aumentar o disminuir el tiempo. PowerBoost Para activar la función. Barra de control Para ajustar la temperatura. 4.3 Indicación de la temperatura en pantalla Pantalla Descripción La zona de cocción está apagada. La zona de cocción está...
  • Seite 115: Uso Diario

    5. USO DIARIO ADVERTENCIA! Ajuste del nivel de La placa de cocción Consulte los capítulos sobre calor se apaga seguridad. 10 - 14 1,5 hora 5.1 Activación y desactivación 5.3 Ajuste de temperatura Toque durante 1 segundo para encender o apagar el la placa de cocción. Para ajustar o cambiar la temperatura: Toque la barra de control en el ajuste de 5.2 Desconexión automática...
  • Seite 116 Para seleccionar la zona de cocción: Consulte el capítulo “Datos toque varias veces hasta que parpadee el técnicos”. indicador de la zona de cocción que desee. Para activar la función de una zona de Para activar la función: toque cocción: toque .
  • Seite 117: Dispositivo De Seguridad Para Niños

    5.10 OffSound Control (Activación y se enciende.El ajuste de temperatura desactivación de los sonidos) baja a 1. Para desactivar la función, toque . Se Apague la placa de cocción. Toque enciende el ajuste de temperatura anterior. durante 3 segundos. La pantalla se enciende 5.8 Bloqueo y se apaga.
  • Seite 118: Gestión De Energía

    PRECAUCIÓN! Asegúrese de que la potencia seleccionada se adapta a los fusibles de la instalación doméstica. 5.12 Gestión de energía • Las zonas de cocción se agrupan según la ubicación y el número de fases de la placa. Consulte la ilustración. •...
  • Seite 119: Consejos

    Cuando termine de cocinar y Luz auto‐ Hervir 1) Freír 2) apague la placa de cocción, la mática campana puede seguir funcionando un breve período Modo Encendido Velocidad Velocidad de tiempo. Tras ese tiempo, el del ventila‐ del ventila‐ sistema desactiva el ventilador dor 1 dor 1 automáticamente y evita la...
  • Seite 120 6.1 Utensilios de cocina activar accidentalmente las funciones de la placa. En las zonas de cocción por Consulte "Datos técnicos". inducción, un campo electromagnético fuerte crea un calor muy rápido en los 6.2 Ruidos durante la utilización utensilios de cocina. Es posible que escuche los ruidos Utilice las zonas de cocción por inducción siguientes:...
  • Seite 121 Ajuste del ni‐ Utilícelo para: Tiempo Sugerencias vel de calor (min) Mantener calientes los alimentos. como esti‐ Tape los utensilios de cocina. me nece‐ sario 1 - 3 Salsa holandesa, derretir: mantequilla, 5 - 25 Remover de vez en cuando. chocolate, gelatina.
  • Seite 122: Mantenimiento Y Limpieza

    No utilice ningún otro consumidores. Las campanas extractoras aparato cerca de la placa Electrolux que usan esta función deben tener mientras esté Hob²Hood el símbolo activado. Campanas extractoras con la función Hob²Hood...
  • Seite 123 Problema Posible causa Solución Ha saltado el fusible. Asegúrese de que el fusible es la cau‐ sa del fallo de funcionamiento. Si el fu‐ sible se funde repetidamente, consulte a un electricista cualificado. No ha ajustado la temperatura antes Vuelva a encender la placa y ajuste el de que transcurran 10 segundos.
  • Seite 124: Datos Técnicos

    Asegúrese de que 9. DATOS TÉCNICOS 9.1 Placa de datos técnicos Modelo LIT81443 Número de producto (PNC) 949 596 772 00 Tipo 62 D4A 01 AD 220-240 V / 400 V 2N 50-60 Hz Inducción 7.2 Kw...
  • Seite 125: Eficacia Energética

    10. EFICACIA ENERGÉTICA 10.1 Información de producto de acuerdo con EU 66/2014 válida solo para el mercado de la UE Identificación del modelo LIT81443 Tipo de placa de cocción Placa empotrada Número de zonas de cocción Tecnología de calentamiento Inducción...
  • Seite 126: Aspectos Medioambientales

    11. ASPECTOS MEDIOAMBIENTALES deseche los aparatos marcados con el Recicle los materiales con el símbolo símbolo junto con los residuos Coloque el material de embalaje en los domésticos. Lleve el producto a su centro de contenedores adecuados para su reciclaje. reciclaje local o póngase en contacto con su Ayude a proteger el medio ambiente y la oficina municipal.
  • Seite 128 electrolux.com...

Inhaltsverzeichnis