Technoline WT265 Bedienungsanleitung
Inhaltsverzeichnis
Quicklinks
Inhaltsverzeichnis

Verwandte Anleitungen für Technoline WT265


Inhaltszusammenfassung für Technoline WT265
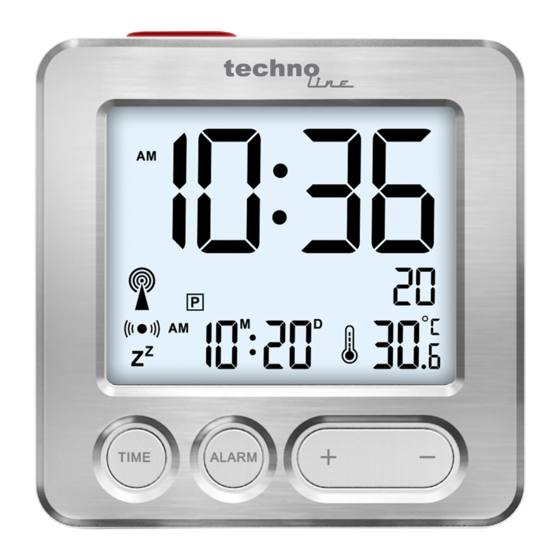
- Seite 1 WT265 Bedienungsanleitung Produktaufbau...
- Seite 2 Teil A- LCD-Anzeige + Tasten A1: Uhrzeit A2: Funkmast-Symbol A3: Datum A4: Temperatur A5: “TIME” - Taste A6: “ALARM” - Taste A7: “+”- Taste A8: “-”- Taste...
- Seite 3 Teil B- Tasten B1: “ ”- Taste B2: “ALARM ON/OFF” - Taste B3: “WAVE” - Taste Funktionen: Funkgesteuerte DCF77-Uhr 12/24 Stunden Zeitformat Manuelle Zeiteinstellung Kalender bis 2099 Datumsanzeige Temperatur alternativ in °C oder °F ...
- Seite 4 Temperatur: Innenmessbereich: -9.9°C ~ 49.9°C Batterien: 2 x 1.5V “AAA” Micro (nicht inklusive) Inbetriebnahme: Öffnen Sie die Batteriefachabdeckung. Legen Sie 2 x AAA Batterien unter Berücksichtigung der richtigen Polarität ein [ “+” und “ –“ Markierungen]. ...
- Seite 5 Empfang des Funksignals: Nach der Inbetriebnahme beginnt die Uhr automatisch nach DCF77-Funksignal suchen. Funkmast-Symbol blinkt auf. Um 1:00, 2:00 und 3:00 Uhr beginnt die Uhr automatisch das DCF77-Funksignal zu suchen und die Uhrzeit zu synchronisieren. Sollte die Synchronisation der Zeitdaten fehlschlagen (das Funkmast-Symbol verschwindet), dann wird die Uhr automatisch zur nächsten vollen Stunde eine weitere Synchronisation starten.
- Seite 6 die manuelle Signalsuche zu beginnen. Die Signalsuchen wird nach 7 Minuten ohne Signalempfang beendet (das Funkmast-Symbol verschwindet) weiterer Versuch wird zur nächsten vollen Stunde durchgeführt. Hinweise: Wenn die Uhr kein DCF77-Signal empfangen kann (z.B. wegen zu großer Distanz vom Signal des Senders in Mainflingen, Deutschland), dann kann die Uhr trotzdem manuell eingestellt werden, wie unten beschrieben.
- Seite 7 Eine Mindestentfernung von 2,5 Metern(8.2 Fuß) zu allen möglichen Störquellen wird empfohlen, wie z.B. von Fernsehgeräten oder Computerbildschirmen. Funkempfang schwächer Räumen Betonwänden (z.B. in Kellern) und in Büros. In solchen Umgebungen sollte die Uhr in der Nähe eines Fensters aufgestellt werden.
- Seite 8 auszuwählen. Drücken Sie die “TIME” Taste um die Einstellung zu bestätigen und die Zeitzone blinkt. Drücken Sie die “+” und die “-” Tasten um die Zeitzone einzustellen. Für Deutschland wird die Zeitzone 0 und für das Vereinigte Königreich wird die Zeitzone -1 genutzt. ...
- Seite 9 Drücken Sie die “TIME” Taste um die Einstellung zu bestätigen und die Datums- und Monatssymbole blinken. Drücken Sie die “+” und die “-” Tasten um die Darstellung Datum-Monat oder Monat-Datum einzustellen. Drücken Sie die “TIME” Taste um die Einstellung zu bestätigen und die Jahresanzeige 2016 blinkt.
- Seite 10 die “+” und die “-” Tasten um das Datum einzustellen. Drücken Sie die “TIME” Taste um die Einstellung zu bestätigen und zu beenden. Die Uhr kehrt in den Zeitanzeigemodus zurück. Hinweis: Die Uhr beendet automatisch den Einstellungsmodus und wechselt in den normalen Zeitanzeigemodus, wenn innerhalb von 30 Sekunden keine Taste gedrückt wird Alarmeinstellung: ...
- Seite 11 und die Alarmzeit blinkt. Die Stunde der Alarmzeit blinkt. Drücken Sie die “+” und die “-” Taste um die Alarmstunde einzustellen. Drücken Sie die “ALARM” Taste um die Einstellung zu bestätigen. Die Minute der Alarmzeit blinkt. Drücken Sie die “+” und die “-”...
- Seite 12 Die Uhr beendet automatisch den Einstellungsmodus und wechselt in den normalen Zeitanzeige- modus, wenn innerhalb von 30 Sekunden keine Taste gedrückt wird. Der Alarmton ist für 2 Minuten zu hören, wenn keine Taste zum Beenden gedrückt wird. In diesem Fall wird der Alarm nach 24 Stunden automatisch wiederholt.
- Seite 13 werden auf dem LCD angezeigt. Die Alarmfunktion ist angeschaltet. Drücken Sie die “ALARM ON/OFF” Taste erneut um die Alarmfunktion auszuschalten und das Alarmsymbol wird nicht mehr angezeigt. Schlummerfunktion: Drücken Sie während des Alarms die “ ” Taste und der Alarmton wechselt in die Schlummer- funktion.
- Seite 14 Die Schlummerfunktion kann durch das Drücken einer beliebigen anderen Taste unterbrochen werden. °C/°F-Temperaturanzeige: Die Temperatur kann in den Einheiten °C oder °F angezeigt werden. Drücken Sie die “-” Taste um zwischen den Temperatureinheiten °C und °F zu wechseln. Hintergrundbeleuchtung: ...
- Seite 15 Hiermit erklärt Technotrade, dass sich das Produkt WT265 in Übereinstimmung mit den grundlegenden Anforderungen und den übrigen einschlägigen Bestimmungen der Richtlinie 2014/53/EU ROHS 2011/65/EG befindet. Original-EU-Konformitätserklärung finden unter: www.technoline.de/doc/4029665102658 Technische Daten: Batterielebensdauer: 12 Monate Umweltbedingungen: Nutzung-10~50°C & 20%~95% Lagerung -20~60°C & 20%~95%...
- Seite 16 Umwelteinflüsse auf Funkempfang Die Uhr empfängt kabellos die genaue Uhrzeit. Wie bei allen kabellosen Geräten kann der Funkempfang durch folgende Einflüsse beeinträchtigt sein: lange Übertragungswege naheliegende Berge und Täler nahe Autobahnen, Gleisen, Flughäfen, Hochspannungsleitungen, etc. nahe Baustellen ...
- Seite 17 nahe elektrischer Geräte (Computer, Fernseher, etc) und metallischer Gegenstände in bewegten Fahrzeugen Platzieren Sie die Uhr an einem Ort mit optimalem Empfang, z.B. in der Nähe von Fenstern und entfernt zu metallischen oder elektrischen Gegenständen. Vorsichtsmaßnahmen Dieses Gerät ist ausschließlich für den Gebrauch in Innenräumen gedacht.
- Seite 18 direktem Sonnenlicht, Staub und Feuchtigkeit aus. Tauchen Sie das Gerät nicht in Wasser. Vermeiden Sie den Kontakt mit ätzenden Materialien. Werfen Sie das Gerät nicht ins Feuer. Es könnte explodieren. Öffnen Sie nicht das Gehäuse und manipulieren Sie nicht bauliche Bestandteile des Geräts.
- Seite 19 Entfernen Sie erschöpfte Batterien sofort. Entfernen Sie die Batterien bei Nichtnutzung. Laden Sie die Batterien nicht auf und werfen Sie sie nicht ins Feuer. Sie könnten explodieren. Bewahren Sie die Batterien nicht in der Nähe von Metallobjekten auf, da ein Kontakt einen Kurzschluss verursachen kann.
- Seite 20 Hinweispflicht nach dem Batteriegesetz Altbatterien gehören nicht in den Hausmüll. Wenn Batterien in die Umwelt gelangen, können diese Umwelt- Gesundheitsschäden zur Folge haben. Sie können gebrauchte Batterien unentgeltlich bei ihrem Händler und Sammelstellen zurückgeben. Sie sind als Verbraucher zur Rückgabe von Altbatterien gesetzlich verpflichtet! DE20...
- Seite 21 Hinweispflicht nach dem Elektronikgerätegesetz Laut Elektro- und Elektronikgerätegesetz (ElektroG) gehört Elektroschrott nicht in den Hausmüll, sondern ist zu recyceln oder umweltfreundlich zu entsorgen. Entsorgen Sie ihr Gerät in einen Recycling Container oder an eine lokale Abfallsammelstelle. DE21...
- Seite 22 WT265 Manual Production Appearance...
- Seite 23 Part A- LCD + Buttons A1: Time A2: RCC symbol...
- Seite 24 A3: Date and Month A4: Temperature A5: “TIME” button A6: “ALARM” button A7: “+” button A8: “-” button Part B-Buttons B1: “ ” button B2: “ALARM ON/OFF” button B3: “WAVE” button Features: Radio controlled DCF-77 clock 12/24 hour time format...
- Seite 25 Manual time setting Calendar up to year 2099 Date display Temperature alternatively in °C or °F Automatic snooze function (5 minutes) Thermometer: Indoor measurement range: -9.9°C ~ 49.9°C Battery: battery 1.5V “AAA” size x 2 pcs (not included) Initial operation: ...
- Seite 26 Insert 2 x AAA batteries observing polarity [ “+” and “ –“ marks] When you insert the batteries, all icons on the LCD display will light up for 3 seconds, you will hear a beep tone and the station detects indoor temperature. Reception of the DCF radio controlled signal: ...
- Seite 27 signal to correct any deviations to the exact time. If this synchronization attempt is unsuccessful (The radio mast symbol disappears from the display), the system will automatically attempt another synchronization at the next full hour. This procedure is repeated automatically up to 5 times.
- Seite 28 Please note: If the clock cannot receive the DCF signal (because the distance is too great to receive a signal from the transmitter in Mainflingen,Germany), you have the option of setting the time manually as mentioned below. As soon as the reception of the DCF signal is possible, then the clock is readjusted automatically.
- Seite 29 circumstances, place the clock close to the window. Manual time setting: Press and hold the “TIME” button for 2 seconds, 12/24HR start to flash. Now use “+” and “-” buttons to switch 12/24 hour mode. Press “TIME” to confirm your setting, the time zone starts to flash.
- Seite 30 starts to flash. Now use “+” and “-“buttons to set the minute. Press “TIME” to confirm your setting, the date and month symbols start to flash. Now use “+” and “-“buttons to set the Date-Month or Month-Date as display option. ...
- Seite 31 starts to flash. Now use “+” and “-“ buttons to set the date. Press “TIME” to confirm your setting and to end the setting procedures, enter the clock mode. Please note: If there is no valid operation within 30 seconds, the clock will automatically return to normal time mode from the set mode.
- Seite 32 The Hour display of the Alarm time starts to flash. Use the “+” and “-“buttons to set the hour. Press “ALARM” button to confirm your setting The Minute display of the Alarm time starts to flash. Use the “+” and “-“buttons to set the minute. Press “ALARM” button to confirm your setting and to end the setting procedure.
- Seite 33 Please note: If there is no valid operation within 30 seconds, the clock will automatically return to normal time mode from the set mode. The alarm will sound for 2 minutes if you do not deactivate it by pressing any button. In this case the alarm will be repeated automatically after 24 hours.
- Seite 34 times, under the clock mode, press the “ALARM ON/OFF” button at the top of the product to activate the alarm function and the alarm symbol and the alarm time are displayed on the screen. Press the “ALARM ON/OFF” button at the top of the product again to deactivate the alarm function and the alarm symbol no longer is displayed.
- Seite 35 and a flashing “ ” icon appears on the display. This stops the alarm for 5 minutes and will sound again. The Snooze function can be interrupted by pressing any other button. °C/°F temperature display: The temperature is displayed either in °C or °F. Pressing the “- “...
- Seite 36 Hereby, Technotrade declares that this product WT265 is in compliance with the essential requirements and other relevant provisions of Directive 2014/53/EU and ROHS 2011/65/EC. The original EU declaration of conformity may be found at: www.technoline.de/doc/4029665102658 Specifications: Battery life 12 months Environmental requirement: Usage -10~50℃...
- Seite 37 Storage -20~60℃ & 20%~95% Environmental reception effects The clock obtains the accurate time with wireless technology. Same as all wireless devices, the reception is maybe affected by the following circumstances: long transmitting distance nearby mountains and valleys near freeway, railway, airports, high voltage cable etc.
- Seite 38 near electrical appliances (computers, TV’s, etc) and metallic structures inside moving vehicles Place the clock at a location with optimal signal, i.e. close to a window and away from metal surfaces or electrical appliances. Precautions This main unit is intended to be used only indoors. ...
- Seite 39 Do not dispose this unit in a fire as it may explode. Do not open the inner back case or tamper with any components of this unit. Batteries safety warnings Use only alkaline batteries, not rechargeable batteries. ...
- Seite 40 Avoid exposing batteries to extreme temperature or humidity or direct sunlight. Keep all batteries out of reach from children. They are a choking hazard. Use the product only for its intended purpose! Consideration of duty according to the battery law Old batteries do not belong to domestic waste because they could cause damages of health environment.
- Seite 41 Consideration of duty according to the law of electrical devices This symbol means that you must dispose of electrical devices separated from the General household waste when it reaches the end of its useful life. Take your unit to your local waste collection point or recycling centre.
- Seite 42 WT265 Guide d’utilisation Apparence du produit...
- Seite 44 Partie A – LCD + Touches A1: Heure A2: Symbole heure radio-pilotée A3: Jour A4: Température A5: Touche «TIME» A6: Touche «ALARM» A7: Touche «+» A8: Touche «-» Partie B - Touches B1: Touche « » B2: Touche «ALARM ON/OFF» B3: Touche «WAVE»...
- Seite 45 Caractéristiques : Horloge radio pilotée DCF-77 Format de l'heure 12/24 heures Réglage manuel de l'heure Calendrier continu jusqu'à 2099 Affichage du jour Affichage de la température en °C ou °F Rappel d’alarme automatique (5 minutes) ...
- Seite 46 Mise en marche : Ouvrez le couvercle du compartiment à piles Insérez 2 piles AAA en respectant les polarités [marques «+» et «-»] Lorsque vous insérez les piles, tous les icônes de l'écran LCD s’allument pendant 3 secondes, un bip sera émis et la station détecte la température intérieure.
- Seite 47 A 01h00 l'horloge radio-pilotée effectue automatiquement une procédure de synchronisation avec le signal DCF pour corriger les écarts avec l'heure exacte. En cas d’échec des tentatives de synchronisation (l'icône d'antenne radio disparaît de l'écran), le système va automatiquement essayer une nouvelle synchronisation après heure.
- Seite 48 système va essayer une nouvelle réception après une heure. Remarque : Si l'horloge n’arrive pas à recevoir le signal DCF (parce que la distance est trop grande pour recevoir un signal de l'émetteur à Mainflingen, Allemagne), vous pouvez régler l'heure manuellement comme indiqué ci-dessous. Dès que la réception du signal DCF est possible, l'horloge sera réajustée automatiquement.
- Seite 49 ou écrans d'ordinateur ; la réception du signal radio est plus faible dans les chambres avec des murs en béton et dans les immeubles. Dans de telles circonstances extrêmes, placez l'horloge près d’une fenêtre. Réglage manuel de l'heure : Maintenez appuyée la touche «TIME»...
- Seite 50 touches «+» et «-» pour régler le fuseau horaire. Pour le Royaume-Uni le fuseau horaire est -1. Appuyez sur la touche «TIME» pour confirmer votre réglage, les heures se mettent à clignoter. Utilisez les touches «+» et «-» pour régler les heures. ...
- Seite 51 d'affichage. Appuyez sur la touche «TIME» pour confirmer votre réglage, l'année 2016 se met à clignoter. Utilisez les touches «+» et «-» pour régler l'année. Appuyez sur la touche «TIME» pour confirmer votre réglage, le mois se met à clignoter. Utilisez les touches «+»...
- Seite 52 Remarque : Si au bout de 30 secondes, il n'y a aucune opération valide, l'horloge retourne automatiquement à l’affichage de l'heure. Réglage de l'alarme quotidienne : Maintenez appuyée la touche «ALARM» pendant 2 secondes jusqu'à ce que l’heure d'alarme se mette à clignoter.
- Seite 53 touche ALARM» pour confirmer votre réglage. Les minutes de l’alarme se mettent à clignoter. Utilisez les touches «+» et «-» pour régler les minutes. Appuyez sur la touche «ALARM» pour confirmer votre réglage et terminer la procédure de réglage. ...
- Seite 54 de l'heure. L'alarme sonne pendant 2 minutes si vous ne la désactivez pas en appuyant sur une touche quelconque. Dans ce cas, l'alarme sera déclenchée automatiquement après 24 heures. Augmentation du niveau sonore de alarme (crescendo, durée : 2 minutes) Activer / Désactiver l'alarme quotidienne: ...
- Seite 55 activer la fonction d'alarme et le symbole d'alarme et l'heure de l'alarme sont affichés sur l'écran. Appuyez de nouveau sur le bouton «ALARM ON/OFF» en haut du produit pour désactiver la fonction d'alarme et le symbole d'alarme ne s'affiche plus. Rappel d’alarme automatique : ...
- Seite 56 » pour activer la fonction rappel d’alarme. La « fonction rappel d’alarme est active et un icône « » clignotant apparaît sur l'écran. Cela arrête l'alarme pendant 5 minutes puis celle-ci sonne de nouveau. La fonction rappel d’alarme peut être arrêtée en appuyant sur une touche quelconque.
- Seite 57 A tout moment, appuyez sur le bouton « » pour allumer le rétroéclairage pendant 8 secondes. Par la présente Technotrade déclare que l'appareil WT265 est conforme aux exigences essentielles et aux autres dispositions pertinentes de la directive 2014/53/EU et ROHS 2011/65/CE. La déclaration de conformité...
- Seite 58 Conditions environnementales : utilisation : 10~50 °C & 20%~95% Stockage : -20~60 °C & 20%~95% Effets de l'environnement sur la réception L’horloge utilise la technologie sans fil pour obtenir l'heure précise. Comme pour tout appareil sans fil, la réception peut être affectée dans les cas suivants : ...
- Seite 59 À proximité d’un chantier de construction. Entouré de bâtiments élevés. À l’intérieur de bâtiments en béton. À proximité d'appareils électriques (ordinateurs, téléviseurs, etc.) et des structures métalliques À l’intérieur de véhicules mobiles. Placez votre horloge dans un endroit avec des signaux optimaux, par exemple près d'une fenêtre, loin des surfaces métalliques et des appareils électriques.
- Seite 60 Ne soumettez pas l'appareil à une force ou à un choc excessif. N'exposez pas l'appareil à la lumière directe du soleil, à des températures élevées, à l'humidité ou à la poussière. Ne plongez pas l'appareil dans l'eau. ...
- Seite 61 Ne combinez pas des piles usagées avec des piles neuves. Lorsque les piles sont déchargées, retirez-les immédiatement de l'appareil. Retirez les piles lorsque vous n'envisagez pas d'utiliser votre appareil avant longtemps. N'essayez pas de recharger des piles qui ne sont pas rechargeables et ne jetez aucune pile dans le feu (elle risque d'exploser).
- Seite 62 Utilisez le produit uniquement pour son usage prévu! Noter l'obligation de la Loi sur la batterie Les piles ne doivent pas être déposées avec vos ordures ménagères. Dans le cas où vous le faites vous risquez provoquer dommages importants à votre environnement ou à la santé d'autrui.
- Seite 63 symbole signifie appareils électriques ne doivent pas être jetés aux ordures ménagères à la fin de leur vie utile. Ramenez votre appareil à votre point local de collecte de déchets ou à un centre de recyclage. Ceci s'applique à tous les pays de l'Union européenne et aux autres pays européens disposant d'un système de collecte des déchets sélectif.
- Seite 64 Manual WT265 Apariencia de producción...
- Seite 65 Manual WT265 Parte A – LCD + Botones A1: Hora A2: Símbolo RCC A3: Día A4: Temperatura A5: Botón “TIME” A6: Botón “ALARM” A7: Botón “+” A8: Botón “-” Parte B - Botones B1: Botón “ ” B2: Botón “ALARM ON/OFF”...
- Seite 66 Manual WT265 Funciones: Reloj DCF-77 controlado por radio Formato de la hora en 12/24 Ajuste manual de la hora Calendario continuo hasta el año 2099 Pantalla de fecha Temperatura alternativamente en °C o °F ...
-
Seite 67: Ajuste Manual De La Hora
Manual WT265 automáticamente otra sincronización después de una hora. Este procedimiento se repite automáticamente hasta un total de 5 veces. Para iniciar la recepción de la señal DCF manual, mantenga pulsado el botón “WAVE”. Si no recibe señal en un periodo de siete minutos, la búsqueda de señal DCF se detendrá... - Seite 68 Manual WT265 de Reino Unido, seleccione la zona horaria -1. Pulse “TIME” para confirmar la configuración y la hora empezará a parpadear. Ahora use los botones “+” y “-” para configurar la hora. Pulse “TIME” para confirmar la configuración y los minutos empezarán a parpadear.
- Seite 69 Manual WT265 hasta que parpadee la hora de alarma. El dígito de hora de la hora de alarma empezará a parpadear. Use los botones “+” y “-” para configurar la hora. Pulse el botón “ALARM” para confirmar la configuración.
-
Seite 70: Datos Técnicos
Manual WT265 producto nuevamente para desactivar la función de alarma y ya no se mostrará el símbolo de alarma Función de repetición automática: Mientras suene la alarma, toque “ ” para activar la función de repetición. La función de repetición está activa y en la pantalla aparece un icono “... - Seite 71 Manual WT265 Requisitos ambientales: -10–50 °C y 20%–95% -20~60 °C almacenamiento & 20%~95% Efectos del medio ambiente sobre la recepción El reloj consigue la hora precisa con tecnología inalámbrica. Y al igual que en el resto de los dispositivos inalámbricos, la recepción puede verse afectada por las circunstancias siguientes: ...
- Seite 72 Manual WT265 No abra la carcasa posterior interna ni altere ningún componente de la unidad. Advertencias de seguridad sobre las pilas Use solamente pilas alcalinas, no use pilas recargables. Instale las pilas correctamente, haciendo coincidir las polaridades (+/-).
- Seite 73 Manual WT265 Consideración obligaciones según leyes sobre dispositivos electrónicos Este símbolo indica que no debe deshacerse de los aparatos eléctricos en la basura doméstica general cuando lleguen al final de su vida útil. Lleve su unidad a su punto de recogida selectiva de basura o al centro de reciclaje de su localidad.
- Seite 74 WT265 Handleiding Uiterlijk van product...
- Seite 75 WT265 Handleiding Deel A – LCD + Toets A1: Tijd A2: RCC-symbooltje A3: Datum A4: Temperatuur A5: “TIME” -toets A6: “ALARM” -toets A7: “+”-toets A8: “-”-toets Deel B - Toets B1: “ ”-toets B2: “ALARM ON/OFF” -toets B3: “WAVE” -toets...
- Seite 76 WT265 Handleiding Eigenschappen: Radiogestuurde DCF-77 klok 12/24 uur tijdformaat Handmatige tijdinstelling Doorlopende kalender tot jaar 2099 Weergave van datum Temperatuur kan worden uitgedrukt in °C of °F Automatische sluimerfunctie (5 minuten) Thermometer: Meetbereik binnenshuis: -9,9 °C ~ 49,9 °C ...
- Seite 77 WT265 Handleiding De radiogestuurde klok voert om 1:00am automatisch een synchronisatieprocedure uit met het DCF-signaal om eventuele afwijkingen van de exacte tijd te corrigeren. Als de synchronisatiepoging mislukt (radiotorensymbooltje verdwijnt uit de display), zal het systeem automatisch een nieuwe poging starten op het volgende volle uur.
-
Seite 78: Handmatige Tijdinstelling
WT265 Handleiding Handmatige tijdinstelling: Houd de toets “TIME” voor 2 seconden ingedrukt en “12/24HR” zal beginnen te knipperen. Gebruik nu de toetsen “+” en “-” om te wissen tussen 12/24 uurformaat. Druk op “TIME” om uw instelling te bevestigen en de tijdzone begint te knipperen. -
Seite 79: Het Dagelijkse Alarm Instellen
WT265 Handleiding Merk op: Als u binnen 30 seconden geen geldige actie uitvoert, zal de klok de instellingen automatisch verlaten en terugkeren naar de normale tijdmodus. Het dagelijkse alarm instellen: Houd de toets “ALARM” voor 2 seconden ingedrukt totdat de alarmtijd begint te knipperen. - Seite 80 WT265 Handleiding Activeren / Deactiveren van het dagelijkse alarm: Deze klok heeft 1 dagelijkse alarmen. Om de alarmtijden te bekijken, drukt u onder de klokmodus op de knop “ALARM ON/OFF” bovenaan het product om de alarmfunctie te activeren en worden het alarmsymbool en de alarmtijd op het scherm weergegeven.
-
Seite 81: Technische Gegevens
WT265 Handleiding Achtergrondlicht Druk op elk gewenst moment op de knop “ ”om de verlichting 8 seconden te laten branden. Technische gegevens: Levensduur batterij 12 maanden Omgevingsvereisten: gebruik -10~50 °C & 20%~ -20~60 °C & 20%~ opslag... - Seite 82 WT265 Handleiding Voorzorgsmaatregelen Het hoofdapparaat is uitsluitend bestemd voor gebruik binnenshuis. Stel het apparaat niet bloot aan overmatige krachten of schokken. Stel het apparaat niet bloot aan extreme temperaturen, direct zonlicht, stof of vochtigheid. Dompel het apparaat niet onder in water.
- Seite 83 WT265 Handleiding eindgebruiker wettelijk verplicht verbruikte batterijen in te leveren bij distributeurs of andere inzamelpunten! Houd rekening met heffingen in het kader van wetgeving m.b.t. het afvoeren van elektrische apparatuur. Dit symbooltje betekent dat u elektrische apparaten aan het einde van hun levensduur niet als algemeen, huishoudelijk afval mag afvoeren.
- Seite 84 Manuale WT265 Aspetto del prodotto...
- Seite 85 Manuale WT265 Parte A – LCD + Pulsanti A1: Ora A2: Simbolo RCC A3: Dati A4: Temperatura A5: Pulsante “TIME” A6: Pulsante “ALARM” A7: Pulsante “+” A8: Pulsante “-” Parte B - Pulsanti B1: Pulsante “ ” B2: Pulsante “ALARM ON/OFF”...
-
Seite 86: Funzionamento Iniziale
Manuale WT265 Funzioni: Orologio radiocontrollato DCF-77 Formato 12/24 ore Impostazione manuale dell’ora Calendario continuo fino all'anno 2099 Visualizzazione data Temperatura commutabile in °C o °F Funzione snooze automatica (5 minuti) Termometro: Intervallo di misurazione interno: -9,9 °C ~ 49,9 °C... -
Seite 87: Impostazione Manuale Dell'ora
Manuale WT265 correggere qualsiasi deviazione all'orario esatto. Se il tentativo di sincronizzazione non ha successo (il simbolo dell'antenna radio scompare dal display), il sistema tenterà automaticamente un'altra sincronizzazione all'ora successiva. Questa procedura è ripetuta automaticamente fino a 5 volte. Per avviare manualmente la ricezione del segnale DCF, premere e tenere premuto il pulsante “WAVE”, se nessun... - Seite 88 Manuale WT265 fuso orario inizia a lampeggiare. Usare i pulsanti “+” e “-” per impostare un fuso orario corretto. Per il Regno Unito impostare il fuso orario a -1. Premere “TIME” per confermare la propria impostazione, l'ora inizia a lampeggiare. Ora usare i pulsanti “+” e “-” per impostare l'ora.
- Seite 89 Manuale WT265 Impostazione della sveglia quotidiana: Premere e tenere premuto il pulsante “ALARM” per 2 secondi fino a quando l'orario di allarme sta lampeggiando. L'indicazione dell'ora dell'orario della sveglia inizia a lampeggiare. Usare i pulsanti “+” e “-” per impostare l'ora.
- Seite 90 Manuale WT265 della sveglia vengono visualizzati sullo schermo. Premere nuovamente il pulsante “ALARM ON/OFF” nella parte superiore del prodotto per disattivare la funzione di allarme e il simbolo di allarme non viene più visualizzato. Funzione Snooze automatica: Mentre la sveglia suona, toccare “...
-
Seite 91: Dati Tecnici
Manuale WT265 Dati tecnici: Durata batteria 12 mesi -10~50 °C Requisito ambientale: in uso & 20%~95% -20~60 °C conservazione & 20%~95% Effetti della ricezione ambientale L’orario ottiene preciso mediante tecnologia wireless. Come per tutti i dispositivi wireless, la ricezione può essere influenzata dalle seguenti circostanze: ... - Seite 92 Manuale WT265 Non immergere in acqua. Evitare il contatto con qualsiasi materiale corrosivo. Non gettare l'unità nel fuoco in quanto può esplodere. Non aprire l'alloggiamento posteriore interno o alterare componenti di questa unità. Avvisi di sicurezza delle batterie ...
- Seite 93 Manuale WT265 tutti i paesi dell’Unione europea e agli altri paesi europei in cui viene praticata la raccolta differenziata.
- Seite 94 Návod k zařízení WT265 Popis výrobku...
- Seite 95 Návod k zařízení WT265 Část A – Displej LCD + Tlačítka A1: Čas A2: Symbol rádiového příjmu A3: Datum A4: Teplota A5: Tlačítko “TIME” A6: Tlačítko “ALARM” A7: Tlačítko “+” A8: Tlačítko “-” Část B – Tlačítka B1: Tlačítko “...
-
Seite 96: První Spuštění
Návod k zařízení WT265 Funkce Hodiny řízené rádiovým signálem DCF-77 12- a 24hodinový formát času Ruční nastavení času Souvislý kalendář až do roku 2099 Zobrazení data Zobrazení teploty ve °C nebo °F Automatická funkce opakovaného buzení (po 5 minutách) ... -
Seite 97: Ruční Nastavení Času
Návod k zařízení WT265 automaticky o další synchronizaci v příští celou hodinu. Tento postup se opakuje automaticky až 5krát. Chcete-li spustit příjem signálu DCF ručně, stiskněte tlačítko „WAVE“ a držte jej stisknuté. Pokud nedojde k příjmu signálu do sedmi minut, vyhledávání signálu DCF se poté zastaví... - Seite 98 Návod k zařízení WT265 zobrazení hodin. Nyní nastavte hodiny pomocí tlačítek „+“ a „−“. Stisknutím tlačítka „TIME“ potvrďte nastavení. Začne blikat zobrazení minut. Nyní nastavte minuty pomocí tlačítek „+“ a „−“. Stisknutím tlačítka „TIME“ potvrďte nastavení. Začne blikat symboly data a měsíce.
- Seite 99 Návod k zařízení WT265 potvrďte nastavení. Začne blikat zobrazení minut v času budíku. Pomocí tlačítek „+“ a „−“ nastavte minuty. Stisknutím tlačítka „ALARM“ potvrďte nastavení a ukončete proces nastavování. Chcete-li aktivovat nebo deaktivovat každodenní budík, stiskněte jednou tlačítko „ALARM“. Je-li budík aktivní, zobrazuje se ikona zvonku.
-
Seite 100: Technické Údaje
Návod k zařízení WT265 Automatická funkce opakovaného buzení Během zvonění budíku aktivujete funkci opakovaného buzení stisknutím tlačítka „ “. Funkce opakovaného buzení bude aktivní a na displeji se zobrazí blikající ikona „ “. Dojde tak k vypnutí zvonění budíku a jeho opětovnému zapnutí... - Seite 101 Návod k zařízení WT265 Vlivy prostředí na příjem signálu Čas hodiny je přesně řízen bezdrátovou technologií. Stejně jako u jiných bezdrátových zařízení může být příjem negativně ovlivněn následujícími podmínkami: Dlouhá přenosová vzdálenost Blízkost hor a údolí Blízkost dálnic, železnic, letišť, vedení vysokého napětí apod.
- Seite 102 Návod k zařízení WT265 Jestliže zařízení nepoužíváte, vyjměte z něj baterie. Baterie nenabíjejte a nevhazujte je do ohně – mohou explodovat. Baterie skladujte mimo dosah kovových předmětů, kontakt s nimi může způsobit zkrat. Nevystavujte baterie extrémním teplotám, vlhkosti či přímému ...
- Seite 103 Instrukcja obsługi WT265 Wygląd produkcyjny...
- Seite 104 Instrukcja obsługi WT265 Część A – Wyświetlacz LCD + Przycisk A1: Godzina A2: Symbol RCC A3: Data A4: Temperatura A5: Przycisk “TIME” A6: Przycisk “ALARM” A7: Przycisk “+” A8: Przycisk “-” Część B – Przycisk B1: Przycisk “ ” B2: Przycisk “ALARM ON/OFF”...
-
Seite 105: Odbiór Sygnału Radiowego Dcf
Instrukcja obsługi WT265 Właściwości: Zegar DCF-77 sterowany sygnałem radiowym Format czasu 12/24 godz. Ręczne ustawianie czasu Ciągły kalendarz do roku 2099 Wyświetlacz daty Temperatura w °C lub °F Automatyczna funkcja drzemki (5 minut) ... - Seite 106 Instrukcja obsługi WT265 dokładnego czasu. Jeśli próby synchronizacji nie powiodą się (symbol masztu radiowego znika z wyświetlacza), system automatycznie ponownej synchronizacji o następnej pełnej godzinie. Procedura powtarza się automatycznie do 5 razy. Aby rozpocząć ręczną procedurę odbioru sygnału DCF, należy nacisnąć...
- Seite 107 Instrukcja obsługi WT265 zacznie migać strefa czasowa. Użyć przycisków „+” oraz „-”, aby ustawić prawidłową strefę czasową. W Wielkiej Brytanii strefa czasowa jest ustawiana na -1. Nacisnąć „TIME”, aby potwierdzić ustawienia, wyświetlacz godziny zacznie migać. Teraz użyć przycisków „+” oraz „-”, aby ustawić...
- Seite 108 Instrukcja obsługi WT265 Ustawianie codziennego alarmu: Nacisnąć i przytrzymać przycisk „ALARM” przez 2 sekundy, aż zacznie migać wyświetlacz czasu alarmu. Wyświetlacz godziny czasu alarmu zacznie migać. Użyć przycisków „+” oraz „-”, aby ustawić godzinę. Nacisnąć przycisk „ALARM”, aby potwierdzić ustawienia.
- Seite 109 Instrukcja obsługi WT265 góry urządzenia, aby włączyć funkcję alarmu, a na ekranie pojawi się symbol alarmu i godzina alarmu. Naciśnij ponownie przycisk “ALARM ON/OFF” u góry urządzenia, aby wyłączyć funkcję alarmu, a symbol alarmu nie jest już wyświetlany. Funkcja automatycznej drzemki: ...
-
Seite 110: Dane Techniczne
Instrukcja obsługi WT265 Podświetlenie W dowolnym momencie dotknij przycisku “ ”podświetli podświetlenie na 8 sekund. Dane techniczne: Czas życia baterii 12 miesięcy podczas użycia Wymagania otoczenia: -10 – 50 °C i 20% – 95% podczas przechowywania -20 – 60 °C i 20% – 95% Środowiskowe efekty odbioru... -
Seite 111: Środki Ostrożności
Instrukcja obsługi WT265 Zegar najlepiej jest ustawić w miejscu, gdzie uzyska ona najlepszy zasięg sygnału, tj. blisko okna i z dala od metalowych powierzchni czy urządzeń elektrycznych. Środki ostrożności Jednostkę główną można wykorzystywać jedynie w pomieszczeniach. Nie wystawiać urządzenia na nadmierną siłę lub wstrząsy. - Seite 112 Instrukcja obsługi WT265 Zobowiązania według przepisów prawa dotyczących baterii Stare baterie nie należą do odpadów domowych, ponieważ mogą szkodzić zdrowiu i środowisku. Zużyte baterie można oddać bezpłatnie u swojego sprzedawcy lub punktach zbiórek. Użytkownik końcowy jest zobowiązany prawem do zwrotu odpowiednich baterii sprzedawcom lub w innych punktach zbiórek!