Werbung
Verfügbare Sprachen
Verfügbare Sprachen
Quicklinks
Werbung

Verwandte Anleitungen für Technoline WT 534


Inhaltszusammenfassung für Technoline WT 534
- Seite 1 WT 534 – Bedienungsanleitung Übersicht...
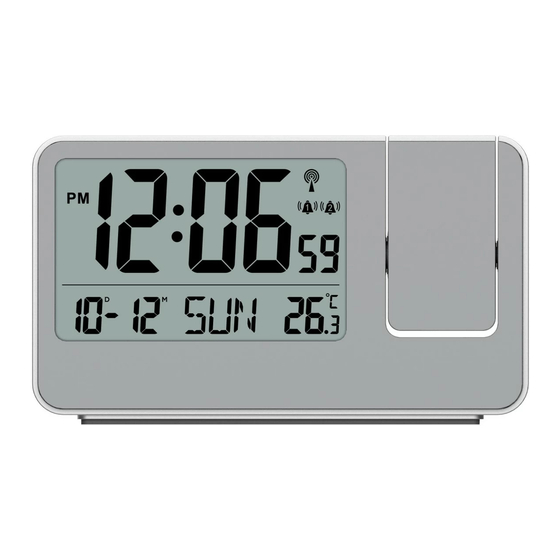
- Seite 2 1: Uhrzeit 2: Empfangssymbol des Zeitsignals 3: Alarmsymbol 4: Batterieendanzeige 5: Projektionsfenster 6: Innentemperatur 7: Wochentag 8: Datum und Monat 9: Taste zur Drehung der Projektion 10: Funktionstasten (+ / - / ALARM / SET) 11: Netzadapter-Verbindungsbuchse 12: Batteriefachabdeckung 13: Berührungsfeld für die Schlummerfunktion (SNOOZE) Funktionen ...
- Seite 3 180 Grad Drehung der Projektionsrichtung Innentemperatur Temperatur wahlweise in °C oder °F Tischaufstellung Inbetriebnahme Verbinden Sie das mitgelieferte Netzkabel mit der Buchse auf der Rückseite des Weckers und schließen Sie das Kabel dann an eine passende Stromquelle an.
- Seite 4 :Der vorherige Empfang war erfolgreich, aber der letzte Empfang ist fehlgeschlagen :Zeitsignalsuche ist ausgeschaltet (RCC OFF eingestellt) Um 1:00 /2:00 / 3:00 (AM) führt die Uhr automatisch den Synchronisationsversuch mit dem DCF77-Signal durch, um eventuelle Abweichungen auf die genaue Zeit zu korrigieren. Bleibt dieser Synchronisationsversuch erfolglos (das Funkmastsymbol verschwindet aus der Anzeige), versucht das System automatisch die Synchronisation zur nächsten vollen Stunde.
- Seite 5 Halten Sie die " " (SET) Taste für 2 Sekunden gedrückt und die Anzeige RCC ON/OFF beginnt zu blinken. Drücken Sie die " " oder die " " Taste, um die funkgesteuerte Zeitfunktion anzuschalten(ON) oder auszuschalten (OFF). Drücken Sie die “ "...
- Seite 6 Sprache Englisch Deutsch Französisch Spanisch / Wochentag Montag Dienstag Mittwoch Donnerstag Freitag Samstag Sonntag Sprache Italienisch Niederländisch Dänisch / Wochentag Montag Dienstag Mittwoch Donnerstag Freitag Samstag Sonntag Aktivierung/Deaktivierung des täglichen Alarms Drücken Sie einmal die " " Taste und auf der LCD-Anzeige wird das Symbol angezeigt, was bedeutet, dass nur Alarm 1 aktiviert ist.
- Seite 7 kein Symbol, was bedeutet, dass sowohl Alarm 1 als auch Alarm 2 deaktiviert sind. Alarmeinstellung Drücken Sie einmal die " " (ALARM) Taste, um Alarmzeit 1 anzuzeigen. Drücken Sie die " " Taste erneut, um Alarmzeit 2 anzuzeigen. Drücken Sie die " "...
- Seite 8 Wenn Alarm 2 angezeigt wird, halten Sie die " " Taste für 2 Sekunden gedrückt und die Stunde von Alarmzeit 2 beginnt zu blinken. Drücken Sie die die " " oder die " " Taste, um die gewünschte Stunde einzustellen. ...
- Seite 9 Schlummerfunktion Wenn der Weckton ertönt, drücken Sie das "SNOOZE" Berührungsfeld, um den Weckton zu beenden und in den Schlummermodus zu wechseln. Das Alarmsignal ertönt nach einer Schlummerdauer von 8 Minuten erneut. Temperatur in °C oder °F Drücken Sie einmal die " "...
- Seite 10 Projektion vorübergehend ausgeschaltet und die Helligkeit wird nach Abschluss der Signalsuche wiederhergestellt. Konformitätserklärung Hiermit erklärt Technotrade, dass sich das Produkt WT 534 in Übereinstimmung mit den grundlegenden Anforderungen und den übrigen einschlägigen Bestimmungen der Richtlinie 2014/53/EU und ROHS 2011/65/EG befindet.
- Seite 11 aus. Setzen Sie das Gerät nicht hohen Temperaturen, direktem Sonnenlicht, Staub und Feuchtigkeit aus. Tauchen Sie das Gerät nicht in Wasser. Vermeiden Sie den Kontakt mit ätzenden Materialien. Werfen Sie das Gerät nicht ins Feuer. Es könnte explodieren. ...
- Seite 12 Externe Stromversogung Präziser Veröffentlichte Informationen Einheit Wert Modell-Nr. TC-0500600-01A Eingangsspannung 100-240 Eingangs- 50/60 Wechselstromfrequenz Ausgangsspannung DC 5 Ausgangsstrom Ausgangsleistung Durchschnittliche aktive ≥ 69,64 Effizienz Wirkungsgrad bei niedriger Last (10 %) ≤ 0,10 Leistungsaufnahme bei Nulllast Die relevanten Lastbedingungen sind wie folgt: Prozentualer Anteil des Ausgangsstroms auf dem Typenschild Lastzustand 1...
- Seite 13 WT 534 – Instruction manual Overview...
- Seite 14 1: Time 2: Time signal reception icon 3: Alarm icon 4: Low battery indicator 5: Projection window 6: Indoor temperature 7: Weekday 8: Date and month 9: Projection rotation button 10: Operation buttons (+ / - / ALARM / SET) 11: Power adapter input jack 12: Battery cover 13: Snooze function touch field...
- Seite 15 180 degree rotation of projection direction Indoor temperature Temperature alternatively in °C or °F Table standing Initial operation Connect the included power cable with the socket on the backside of the clock and then connect the cable to a fitting power source. ...
- Seite 16 :The previous reception was successful, but the last reception failed :Time signal search is set to OFF At 1:00 /2:00 / 3:00 (AM), the clock automatically carries out the synchronization procedure with the DCF77 signal to correct any deviations to the exact time. If this synchronization attempt is unsuccessful (the radio mast icon disappears from the display), the system will automatically attempt synchronization at the next full one hour.
- Seite 17 ON/OFF display starts to flash. Press the “ ” or “ ” button to set the radio-controlled time function to ON or OFF. Press the “ ” button to confirm this setting point and continue to the next setting point. The sequence of setting points is as follows: RCC ON/OFF12/24Hr Time zone ...
- Seite 18 / Weekday Monday Tuesday Wednesday Thursday Friday Saturday Sunday Activating/deactivating the daily alarm Press the “ ” button once and the LCD will display the icon, which means that only alarm 1 is activated. Press the “ ” button again and the LCD will display the icon, which means that only alarm 2 is activated.
- Seite 19 When alarm 1 is displayed,press and hold the “ ” button for 2 seconds and the hour of the alarm 1 time starts to flash. Press the “ ” or the “ ” button to set the required hour. ...
- Seite 20 alarm 2. Notes: If there is no button operation within 20 seconds, the clock will automatically quit the setting and return to normal time display. While setting the value, press and hold the “ ” or “ ” button to quickly adjust the setting values.
- Seite 21 Hereby, Technotrade declares that this product WT534 is in compliance with the essential requirements and other relevant provisions of Directive 2014/53/EU and ROHS 2011/65/EC. The original EU declaration of conformity may be found at: www.technoline.de/doc/4029665005348 Specifications Indoor temperature measurement ranges: -9.9°C (14.2°F) ~ 50°C (122°F)
- Seite 22 near electrical appliances (computers, TV’s, etc) and metallic structures inside moving vehicles Place the clock at a location with optimal signal, i.e. close to a window and away from metal surfaces or electrical appliances. Precautions This main unit is intended to be used only indoors. ...
- Seite 23 This symbol means that you must dispose of electrical devices separated from the General household waste when it reaches the end of its useful life. Take your unit to your local waste collection point or recycling centre. This applies to all countries of the European Union, and to other European countries with a separate waste collection system.
- Seite 24 WT 534 – Manuel d'instructions Vue d'ensemble...
- Seite 25 1 : Heure 2 : Icône de réception du signal horaire 3 : Icône d'alarme 4 : Indicateur de batterie faible 5 : Fenêtre de projection 6 : Température intérieure 7 : Jour de la semaine 8 : Date et mois 9 : Bouton de rotation de la projection 10 : Boutons de commande (+ / - / ALARM / SET) 11 : Prise d'entrée de l'adaptateur d'alimentation...
- Seite 26 Rotation de 180 degrés de la direction de projection Température intérieure Température au choix en °C ou °F Table debout Fonctionnement initial Connectez le câble d'alimentation fourni à la prise située à l'arrière de l'horloge, puis branchez le câble à une source d'alimentation appropriée.
- Seite 27 :La réception précédente a réussi, mais la dernière réception a échoué. :La recherche du signal de temps est réglée sur OFF A 1:00 /2:00 / 3:00 (AM), l'horloge effectue automatiquement la procédure de synchronisation avec le signal DCF77 pour corriger les éventuels écarts par rapport à...
- Seite 28 RCC ON/OFF commence à clignoter. Appuyez sur le bouton " " ou " " pour régler la fonction de l'heure radio-pilotée sur ON ou OFF. Appuyez sur le bouton " " pour confirmer ce point de réglage et passer au point de réglage suivant. La séquence des points de réglage est la suivante : RCC ON/OFF12/24Hr Fuseau horaire ...
- Seite 29 Jeudi Vendredi Samedi Dimanche Langue Italien Néerlandais Danois / Jour de la semaine Lundi Mardi Mercredi Jeudi Vendredi Samedi Dimanche Activation/désactivation de l'alarme quotidienne Appuyez une fois sur le bouton " " et l'écran LCD affiche l'icône , ce qui signifie que seule l'alarme 1 est activée. ...
- Seite 30 Réglage de l'alarme quotidienne Appuyez une fois sur le bouton " " (ALARM) pour afficher l'heure de l'alarme 1. Appuyez à nouveau sur le bouton " " pour afficher l'heure de l'alarme 2. Appuyez à nouveau sur le bouton " "...
- Seite 31 sur le bouton " " ou le bouton " " pour régler l'heure souhaitée. Appuyez sur le bouton " " pour confirmer votre réglage et les minutes de l'heure de l'alarme 2 se mettent à clignoter. Appuyez sur le bouton "...
- Seite 32 température à °C ou °F. Fonction de rétro-éclairage et de projection Mode adaptateur DC Lorsque vous utilisez l'adaptateur secteur, le rétroéclairage et la projection sont toujours allumés. Appuyez sur le bouton " " pour régler la luminosité du rétroéclairage ou l'éteindre. L'ordre de réglage de la luminosité...
- Seite 33 Déclaration de conformité Technotrade, déclare par la présente que ce produit WT 534 est conforme aux exigences essentielles et aux autres dispositions pertinentes de la directive 2014/53/UE et ROHS 2011/65/CE. La déclaration de conformité de l’UE originelle est disponible à l’adresse: www.technoline.de/doc/4029665005348...
- Seite 34 Avertissements de sécurité concernant les piles Utilisez uniquement des piles au lithium, et non des piles rechargeables. Installez les piles en respectant les polarités (+/-). Remplacez toujours toutes les piles en même temps. Ne mélangez pas des piles usagées avec des piles neuves. ...
- Seite 35 FR12...
- Seite 36 WT 534 – Manual de instrucciones Vista general...
- Seite 37 1: Hora 2: Icono de recepción de señal de la hora 3: Icono de alarma 4: Indicador de pila agotada 5: Ventana de proyección 6: Temperatura interior 7: Día laborable 8: Fecha y mes 9: Botón de rotación de la proyección 10: Botones de funcionamiento (+ / - / ALARM / SET) 11: Conector para el adaptador eléctrico 12: Tapa de las pilas...
- Seite 38 Rotación de 180 grados de la dirección de proyección Temperatura interior Cambio de unidad de temperatura en °C o °F Soporte de mesa Puesta en funcionamiento Conecte el cable del adaptador de corriente incluido en el conector situado en la parte trasera del reloj y, a continuación, enchufe el adaptador a una toma de corriente.
- Seite 39 :La recepción anterior fue correcta, pero la última no pudo realizarse :La búsqueda de la señal está OFF A la 1:00/2:00/3:00 (AM), el reloj realiza automáticamente el procedimiento de sincronización con la señal del DCF77 para corregir cualquier desviación de la hora exacta. Si este intento de sincronización no es satisfactorio (el icono del mástil de radio desaparece de la pantalla), el sistema lo volverá...
- Seite 40 indicación RCC ON/OFF comenzará a parpadear. Use el botón « » o « » para ON o OFF la función hora radio-controlada. Pulse el botón « » para confirmar este parámetro de ajuste y continuar con el siguiente. La secuencia de los parámetros de ajuste es la siguiente: Activar/desactivar RCC12/24Hr Zona horaria ...
- Seite 41 Idioma Italiano Holandés Danés / Día laborable Lunes Martes Miércoles Jueves Viernes Sábado Domingo Activar / Desactivar las alarmas diarias Pulse el botón « » una vez y el icono aparecerá en la LCD, indicando que solo la alarma 1 está activada. ...
- Seite 42 alarma 2. Vuelva a pulsar el botón « » para volver al modo de pantalla normal. Mientras se muestra la hora de la alarma 1, mantenga pulsado el botón “ ” durante 2 segundos y la hora de la alarma 1 empezará a parpadear.
- Seite 43 Si no se pulsa ningún botón en 20 segundos, el reloj saldrá automáticamente de los ajustes y regresará a la pantalla normal de visualización. Mientras ajuste el valor, mantenga pulsado el botón « » o « » para realizar el ajuste más rápido. ...
- Seite 44 Por la presente, Technotrade declara que este producto WT534 cumple con los requisitos fundamentales y otras provisiones relevantes de la directiva 2014/53/UE y ROHS 2011/65/CE. Puede encontrar la declaración de conformidad de la UE original en: www.technoline.de/doc/4029665005348 Especificaciones Intervalo de medición de temperatura en interiores: -9.9°C (14.2°F) ~ 50°C (122°F)
- Seite 45 proximidad de edificios en construcción encontrarse entre edificios altos en el interior de edificios de hormigón proximidad de aparatos eléctricos (PC, TV, etc.) y estructuras metálicas en el interior de vehículos en movimiento Coloque el reloj en una posición donde obtenga una señal óptima, p.ej. cerca de una ventana y lejos de superficies metálicas o aparatos eléctricos.
- Seite 46 ¡Como usuario final, tiene la obligación de devolver las pilas que utilice a su distribuidor y otros puntos de recogida! Consideración de obligaciones según las leyes sobre dispositivos electrónicos Este símbolo indica que no debe desechar los dispositivos eléctricos junto con la basura general del hogar cuando llegan al final de su vida útil.
- Seite 47 WT 534 - Gebruikshandleiding Overzicht...
- Seite 48 1: Tijd 2: Ontvangstpictogram tijdsignaal 3: Alarmpictogram 4: Indicator lege batterij 5: Projectievenster 6: Binnentemperatuur 7: Dag van de week 8: Datum en maand 9: Rotatietoets voor projectie 10: Bedieningstoetsen (+ / - / ALARM / SET) 11: Aansluiting netadapter 12: Batterijklepje 13: Aanraakveld sluimerfunctie Eigenschappen...
- Seite 49 180 graden rotatie van de projectierichting Binnentemperatuur Temperatuuraanduiding instelbaar op °C of °F Tafelsteun. Eerste gebruik Sluit de meegeleverde stroomkabel aan op de aansluiting aan de achterzijde van de klok, en sluit de kabel daarna aan op een geschikt stopcontact.
- Seite 50 :De ontvangst was eerder succesvol, maar de laatste ontvangst mislukte :Het zoeken naar het tijdsignaal is op OFF gezet De klok voert om 1:00u//2:00u/3:00u automatisch de synchronisatieprocedure uit met het DCF77-signaal om eventuele afwijkingen van de exacte tijd te corrigeren. Als deze synchronisatiepoging mislukt (het zendmastpictogram verdwijnt van het display), dan zal het systeem op het volgende volle uur automatisch nog een synchronisatiepoging uitvoeren.
- Seite 51 ON/OFF display gaat knipperen. Druk op de toets “ ” of “ ” om de radiogestuurde tijdfunctie in of uit te schakelen. Druk op de toets “ ” om dit instelpunt te bevestigen, en door te gaan naar het volgende instelpunt. De volgorde van instelpunten is de volgende: RCC aan/uit12/24 uur Tijdzone ...
- Seite 52 Zondag Taal Italiaans Nederlands Deens /Dag van de week Maandag Dinsdag Woensdag Donderdag Vrijdag Zaterdag Zondag Activeren/deactiveren van het dagelijks alarm Druk één keer op de toets “ ”; op het display verschijnt hert pictogram , wat betekent dat enkel alarm 1 actief is. ...
- Seite 53 Druk één keer op de toets “ ” (ALARM) om het tijdstip van alarm 1 weer te geven. Druk nogmaals op de toets “ ” om het tijdstip van alarm 2 weer te geven. Druk weer op de toets “ ”...
- Seite 54 Indien er binnen de 20 seconden op geen enkele toets wordt gedrukt, verlaat de klok automatisch de instelmodus, en keert ze terug naar de normale tijdweergave. Hou bij het instellen van een waarde de toetsen “ ” of “ ”...
- Seite 55 Technotrade verklaart hierbij dat dit product WT534 voldoet aan de essentiële vereisten en andere relevante bepalingen van richtlijn 2014/53/EU en ROHS 2011/65/EC. De originele EU-conformiteitsverklaring is te vinden op: www.technoline.de/doc/4029665005348 Specificaties Meetbereik binnentemperatuur: - 9,9°C (14,2°F) ~ 50°C (122°F) Voeding:...
- Seite 56 Nabij elektrische apparatuur (computers, tv's, enz.) en metalen structuren Binnenin bewegende voertuigen Plaats de klok op een plek met optimale signaalontvangst, d.w.z. dicht in de buurt van een raam en uit de buurt van metalen oppervlaktes of elektrische apparatuur.
- Seite 57 andere inzamelpunten! Houd rekening met heffingen in het kader van wetgeving m.b.t. het afvoeren van elektrische apparatuur Dit symbool betekent dat u elektrische apparaten aan het einde van hun nuttige levensduur gescheiden van het gewone huisvuil moet weggooien. Lever uw apparaat in bij een plaatselijk inzamelpunt voor afvalverwerking of bij een recyclingcentrum.
- Seite 58 WT 534 – Manuale di istruzioni Panoramica...
- Seite 59 1: Ora 2: Icona ricezione segnale orario 3: Icona sveglia 4: Indicatore di batteria in esaurimento 5: Finestra di proiezione 6: Temperatura interna 7: Giorni settimana 8: Giorno e mese 9: Pulsante di rotazione della proiezione 10: Tasti funzione (+ / - / ALARM / SET) 11: Presa jack di ingresso dell'adattatore 12: Coperchio batteria 13: Tasto a sfioramento della funzione Snooze...
- Seite 60 Rotazione di 180 gradi della direzione di proiezione Temperatura interna Visualizzazione della temperatura in °C o °F Supporto da tavolo Primo utilizzo Collegare il cavo di alimentazione fornito in dotazione alla presa sul retro dell'orologio, quindi collegare il cavo a una sorgente di alimentazione adeguata.
- Seite 61 :in precedenza la ricezione è andata a buon fine, ma questa volta non è riuscita :la ricerca del segnale orario è impostata su OFF Alle ore 1:00 / 2:00 / 3:00 (AM), l'orologio avvia automaticamente la procedura di sincronizzazione con il segnale DCF77 per correggere eventuali deviazioni dall'ora esatta.
- Seite 62 ripristinata al termine della ricerca del segnale. Impostazione manuale dell’ora Premere e tenere premuto il pulsante “ ” (SET) per 2 secondi fino a quando l'icona RCC ON/OFF sul display inizia a lampeggiare. Premere il pulsante “ ” o “ ”...
- Seite 63 Lingua Inglese Tedesco Francese Spagnolo Giorno settimana Lunedì Martedì Mercoledì Giovedì Venerdì Sabato Domenica Lingua Italiano Olandese Danese Giorno settimana Lunedì Martedì Mercoledì Giovedì Venerdì Sabato Domenica Attivazione/disattivazione della sveglia giornaliera Premendo di nuovo il pulsante “ ”, sul display LCD verrà visualizzata l'icona per indicare che solo la sveglia 1 è...
- Seite 64 Premendo nuovamente il pulsante " ", il display LCD non visualizzerà alcuna icona, e ciò significa che entrambe le sveglie 1 e 2 sono disattivate. Impostazione della sveglia giornaliera Premere una volta il pulsante “ ” (ALARM) per visualizzare l'orario della sveglia 1.
- Seite 65 desiderata. Premere il pulsante “ ” per confermare l’impostazione; i minuti dell’orario della sveglia 2 iniziano a lampeggiare. Premere il pulsante “ ” o “ ” per impostare i minuti desiderati. Premere il pulsante “ ” per confermare l’impostazione e terminare l’impostazione della sveglia 2.
- Seite 66 Dichiarazione di conformità Con il presente, Technotrade dichiara che il prodotto WT534 è conforme ai requisiti essenziali e alle altre disposizioni applicabili della Direttiva 2014/53/UE e della Direttiva ROHS 2011/65/CE. La dichiarazione di conformità UE originale è disponibile sul sito: www.technoline.de/doc/4029665005348...
- Seite 67 Caratteristiche tecniche Intervalli di misurazione temperatura interna: -9,9 °C (14,2 °F) - 50 °C (122 °F) Alimentazione: TC-0500600-01A Adattatore 5 V CC, 600 mA (incluso), 1 batteria CR2032 (inclusa, di riserva) Effetti della ricezione ambientale L’orologio offre un orario accurato grazie alla tecnologia wireless. Come per tutti i dispositivi wireless, la ricezione può...
- Seite 68 in quanto il contatto può causare un corto circuito. Evitare di esporre le batterie a temperatura o a umidità estreme o a luce solare diretta. Tenere tutte le batterie fuori dalla portata dei bambini. Perché potrebbero causare il rischio di soffocamento. Utilizzare il prodotto solo per lo scopo previsto! Obblighi in base alla normativa sulle batterie Non smaltire le batterie vecchie con i rifiuti domestici, in...
- Seite 69 WT 534 – návod k použití Přehled...
- Seite 70 1: Čas 2: Ikona příjmu signálu času 3: Ikona upozornění 4: Indikátor vybitých baterií 5: Okno projekce 6: Vnitřní teplota 7: Den v týdnu 8: Datum a měsíc 9: Tlačítko rotace projekce 10: Ovládací tlačítka (+ / − / ALARM / SET) 11: Konektor pro napájecí...
- Seite 71 Otočení směru projekce o 180 stupňů Vnitřní teplota Zobrazení teploty ve °C nebo °F Postavení na stůl První použití Dodaný napájecí kabel zapojte do zásuvky na zadní straně hodin a poté připojte kabel k vhodnému zdroji napájení. ...
- Seite 72 Předchozí příjem byl úspěšný, ale poslední příjem se nezdařil : Hledání časového signálu je nastaveno na OFF V 1:00, 2:00 nebo 3:00 hod. se hodiny automaticky synchronizují se signálem DCF77 a opraví všechny odchylky od přesného času. Je-li tento pokus o synchronizaci neúspěšný (ikona rádiového příjmu z displeje zmizí), systém se o další...
- Seite 73 Stisknutím tlačítka „ “ tento bod nastavení potvrďte a pokračujte na další bod nastavení. Pořadí bodů nastavení je následující: RCC ON/OFF12/24 h Časové pásmo Hodiny Minuty Formát data (D/M nebo M/D) Rok Měsíc Datum Jazyk dnů v týdnu ...
- Seite 74 Neděle Aktivace/deaktivace každodenního buzení Stiskněte jednou tlačítko „ “ a na LCD displeji se zobrazí ikona , která znamená, že je aktivován pouze budík 1. Stiskněte znovu tlačítko „ “ a na LCD displeji se zobrazí ikona která znamená, že je aktivován pouze budík 2. ...
- Seite 75 budíku 1. Stisknutím tlačítka „ “ nebo „ “ nastavte požadované minuty. Stisknutím tlačítka „ “ potvrdíte nastavení a ukončíte nastavování budíku 1. Když je zobrazen budík 2, stiskněte tlačítko „ “ a držte jej stisknuté po dobu 2 sekund. Začnou blikat hodiny času budíku 2. Stisknutím tlačítka „...
- Seite 76 Funkce opakovaného buzení Když zazní tón budíku, stisknutím tlačítka „SNOOZE“ ukončíte zvuk budíku a přejdete do režimu opakovaného buzení. Po uplynutí 8 minut doby opakovaného buzení signál budíku zazní znovu. Zobrazení teploty ve °C nebo °F Jedním stisknutím tlačítka „ “...
- Seite 77 Společnost Technotrade prohlašuje, že tento produkt WT534 je v souladu se základními požadavky a dalšími ustanoveními směrnice 2014/53/EU a ROHS 2011/65/ES. Originál prohlášení o shodě EU lze nalézt na webu: www.technoline.de/doc/4029665005348 Technické údaje Rozsah měření vnitřní teploty: −9,9 °C (14,2 °F) ~ 50 °C (122 °F) Napájení: Napájecí...
- Seite 78 Nikdy nemíchejte dohromady použité a nové baterie. Slabé baterie okamžitě vyjměte. Jestliže zařízení nepoužíváte, vyjměte z něj baterie. Baterie nenabíjejte a nevhazujte je do ohně – mohou explodovat. Baterie skladujte mimo dosah kovových předmětů, kontakt s nimi může způsobit zkrat.
- Seite 79 WT 534 — Instrukcja obsługi Przegląd...
- Seite 80 1: Godzina 2: Ikona odbioru sygnału DCF 3: Ikona alarmu 4: Wskaźnik rozładowania baterii 5: Okienko projektora 6: Temperatura wewnętrzna 7: Dzień tygodnia 8: Data i miesiąc 9: Przycisk obrotu wyświetlania 10: Przyciski obsługowe (+ / - / ALARM / SET) 11: Gniazdo wejściowe zasilacza 12: Pokrywka baterii 13: Pole dotykowe funkcji drzemki...
- Seite 81 Obrót kierunku wyświetlania o 180 stopni Temperatura wewnętrzna Wyświetlanie temperatury na zmianę w °C lub °F Ustawianie na stole Działania wstępne Podłączyć dołączony kabel zasilający do gniazda z tyłu zegara, a następnie podłączyć drugi koniec kabla do odpowiedniego źródła zasilania.
- Seite 82 :Poprzedni odbiór się powiódł, ale ostatni odbiór zakończył się niepowodzeniem :Wyszukiwanie sygnału czasu jest ustawione na OFF O godz. 1:00/2:00/3:00 zegar automatycznie wykonuje procedurę synchronizacji z sygnałem DCF77, aby skorygować ewentualną rozbieżność wskazania czasu. Jeżeli próba synchronizacji nie powiedzie się (ikona masztu radiowego zniknie z wyświetlacza), system podejmie automatycznie próbę...
- Seite 83 Wyświetlacz RCC ON/OFF zaczyna migać. Nacisnąć przycisk „ ” lub „ ”, aby włączyć lub wyłączyć funkcję wykorzystania radiowego sygnału czasu. Nacisnąć przycisk „ ” abypotwierdzić ten punkt ustawień i przejść do następnego punktu ustawień. Kolejność punktów ustawień jest następująca: RCC ON/OFF12/24Hr Strefa czasowa ...
- Seite 84 Piątek Sobota Niedziela Język Włoski Duński Niderlandzki Dzień tygodnia Poniedziałek Wtorek Środa Czwartek Piątek Sobota Niedziela Włączanie/wyłączanie codziennego budzika Nacisnąć raz przycisk „ ”, a na wyświetlaczu LCD pojawi się ikona , co oznacza, że włączony jest tylko budzik 1. ...
- Seite 85 Nacisnąć przycisk „ ” (ALARM), aby wyświetlić godzinę budzika 1. Nacisnąć ponownie przycisk „ ”, aby wyświetlić godzinę budzika 2. Nacisnąć ponownie przycisk „ ” , aby wrócić do zwykłego wyświetlania godziny. Gdy wyświetlany jest budzik 1, nacisnąć i przytrzymać przycisk „ ”...
- Seite 86 Jeśli w ciągu 20 sekund nie zostanie naciśnięty żaden przycisk, zegar automatycznie przełączy z ustawiania na normalne wyświetlanie czasu. Ustawiając wartość, nacisnąć i przytrzymać przycisk „ ” lub „ ”, aby szybko zmieniać wartości. Dźwięk budzika będzie trwał 2 minuty, jeśli nie zostanie wyłączony przez naciśnięcie dowolnego przycisku.
- Seite 87 Firma Technotrade niniejszym oświadcza, że produkt WT534 spełnia istotne wymagania i inne ważne postanowienia dyrektywy 2014/53/UE i ROHS 2011/65/WE. Oryginał deklaracji zgodności UE można znaleźć pod adresem: www.technoline.de/doc/4029665005348 Specyfikacja Zakres pomiaru temperatury wewnątrz: od -9,9°C (14,2°F) do 50°C (122°F) Zasilanie: Zasilacz TC-0500600-01A DC5V 600mA (w zestawie), 1 x bateria CR2032 (w zestawie, służy jako bateria rezerwowa)
- Seite 88 znajdujące się w pobliżu urządzenia elektryczne (komputery, telewizory itd.) i struktury metalowe usytuowanie w poruszających się pojazdach Zegar najlepiej jest ustawić w miejscu, gdzie uzyska on najlepszy zasięg sygnału, tj. blisko okna i z dala od metalowych powierzchni czy urządzeń elektrycznych.
- Seite 89 punktach zbiórek. Użytkownik końcowy jest zobowiązany prawem do zwrotu odpowiednich baterii sprzedawcom lub w innych punktach zbiórek! Zobowiązania według przepisów prawa dotyczących urządzeń elektrycznych Ten symbol oznacza, że urządzenia elektryczne, które przestały być użyteczne, należy usunąć oddzielnie od zwykłych odpadów z gospodarstwa domowego. Swoje urządzenie najlepiej jest oddać...