Herunterladen Inhalt Inhalt Diese Seite drucken
Technoline WT 496 Bedienungsanleitung

Technoline WT 496 Bedienungsanleitung

Lcd-funkwecker mit 5 weckalarmen

Werbung

Verfügbare Sprachen
  • DE

Verfügbare Sprachen

  • DEUTSCH, seite 1
WT 496 - BEDIENUNGSANLEITUNG
LCD-FUNKWECKER mit 5 WECKALARMEN
Produktübersicht:
LCD-Anzeige
Tasten
DE. 1

Werbung

Inhaltsverzeichnis
loading

Inhaltszusammenfassung für Technoline WT 496

  • Seite 1 WT 496 - BEDIENUNGSANLEITUNG LCD-FUNKWECKER mit 5 WECKALARMEN Produktübersicht: LCD-Anzeige Tasten DE. 1...
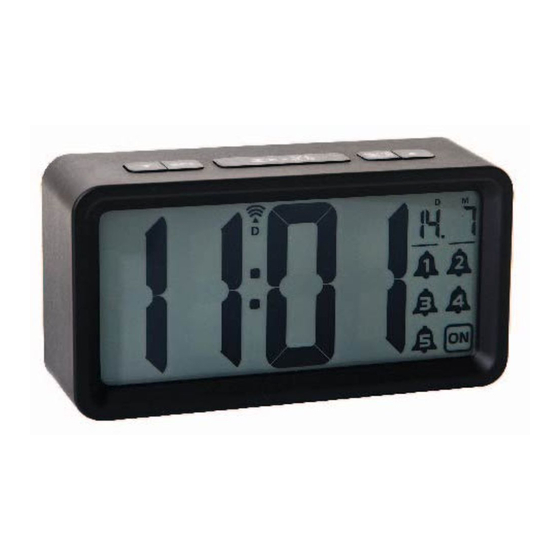
  • Seite 2 Batteriefach Ziffernbeschreibung: 1. PM-Symbol 2. Nachtlicht-Symbol 3. Uhrzeit 4. Funk- und Sommerzeit-Symbol 5. Monat und Datum 6. Alarmsymbole (Alarm 1, 2, 3, 4, 5 und 7. Batterieendanzeige 8. DOWN (/WAVE)-Taste 9. SET/ALM-Taste 10. Snooze/Light-Taste 11. ALM ON/OFF-Taste 12. UP-Taste 13. Batteriefach – 4 x AAA Batterien benötigt (nicht inklusive) INBETRIEBNAHME 1.
  • Seite 3: Empfang Des Funkzeitsignals

    EMPFANG DES FUNKZEITSIGNALS Nach der Inbetriebnahme wird das Signal für die Funkuhrzeit empfangen und das Symbol blinkt. Empfang des Signals Symbol blinkt) Erfolgreicher Empfang Symbol wird dauerhaft angezeigt) Fehlgeschlagener Empfang Symbol wird nicht mehr angezeigt) Automatischer und manueller Empfang Um 1:00, 2:00 und 3:00 Uhr beginnt die Uhr automatisch das DCF77- Funksignal zu suchen und die Uhrzeit zu synchronisieren.
  • Seite 4 Einstellungsprozess zu beschleunigen. Drücken Sie die SET/ ALM Taste und die Minutenziffern blinken. Drücken Sie die oder die Taste um die Minuten einzustellen. Halten Sie die oder die Taste gedrückt um den Einstellungsprozess zu beschleunigen. Drücken Sie die SET/ ALM Taste und “24 Hr” blinkt. Drücken Sie die Taste um das Zeitformat als “12 Hr”...
  • Seite 5: Einstellung Von Alarm 1 Bis

    EINSTELLUNG VON ALARM 1 bis 5 Drücken Sie die SET/ ALM Taste in der normalen Zeitanzeige um einen bestimmten Alarm auszuwählen und das entsprechende Alarmsymbol von wird angezeigt. Halten Sie die SET/ ALM Taste gedrückt bis die Stundenziffern blinken, 6:00 und werden angezeigt.
  • Seite 6: Einstellung Und Nutzung Des Spezialalarms

    = nur ein bestimmter Tag (Spezialalarm) Drücken Sie die SET/ ALM Taste erneut und “HI” blinkt. Drücken Sie Taste um “HI” oder “LO” für die Alarmlautstärke oder die einzustellen. HI = lauter Alarmton LO = leiser Alarmton Drücken Sie die SET/ ALM Taste erneut oder drücken Sie für 10 Sekunden keine Taste um die Einstellung dieses Alarms zu bestätigen und zur normalen Zeitanzeige zurückzukehren.
  • Seite 7: Alarm 1 Bis 5 Einschalten Und Ausschalten

    Drücken Sie die SET/ ALM Taste und “2017” blinkt. Drücken Sie die oder die Taste um das Jahr einzustellen. Press Drücken Sie die SET/ ALM Taste und die Monatsziffern blinken. Drücken Sie die oder die Taste um den Monat einzustellen. Drücken Sie die SET/ ALM Taste und die Datumsziffern blinken.
  • Seite 8: Alarm Beenden Und Am Nächsten Tag Wiederholen

    SCHLUMMERFUNKTION NUTZEN Ein Alarmton ist zu hören sobald die angezeigte Uhrzeit die eingestellte Alarmzeit erreicht und das entsprechende Alarmsymbol von blinkt. Drücken Sie die Taste um den Alarm zu beenden und das entsprechende Alarmsymbol blinkt weiterhin. Der Alarmton ist nach Ablauf der eingestellten Schlummerdauer erneut zu hören.
  • Seite 9: Nachtlicht-Anzeige Nutzen

    Drücken Sie die Taste während der normalen Zeitanzeige, um die Hintergrundbeleuchtung für 5 Sekunden einzuschalten. WARNUNG: ständige Nutzung der Hintergrundbeleuchtung reduziert die Lebensdauer der Batterie erheblich. NACHTLICHT-ANZEIGE NUTZEN Ihre Uhr hat eine einstellbare Nachtlicht-Anzeige, die das Lesen der Uhrzeit auch im Dunkeln möglich macht. 1.
  • Seite 10 Hiermit erklärt Technotrade, dass sich das Produkt WT496 in Übereinstimmung mit den grundlegenden Anforderungen und den übrigen einschlägigen Bestimmungen der Richtlinie 2014/53/EU und ROHS 2011/65/EG befindet. Die Original-EU-Konformitätserklärung finden Sie unter: www.technoline.de/doc/4029665004969 TECHNISCHE DATEN Alarmdauer 2 Minuten Schlummerdauer 5 bis 60 Minuten...
  • Seite 11 aus.  Setzen Sie das Gerät nicht hohen Temperaturen, direktem Sonnenlicht, Staub und Feuchtigkeit aus.  Tauchen Sie das Gerät nicht in Wasser.  Vermeiden Sie den Kontakt mit ätzenden Materialien.  Werfen Sie das Gerät nicht ins Feuer. Es könnte explodieren. ...
  • Seite 12 WT 496 - INSTRUCTION MANUAL RADIO CONTROLLED LCD ALARM CLOCK with 5 ALARMS Product overview: Display Buttons EN. 1...
  • Seite 13: Installation

    Battery compartment Figures: 1. PM icon 2. Night light icon 3. Time 4. Radio controlled icon and DST icon 5. Month and date 6. Alarm icons (Alarm 1, 2, 3, 4, 5 and ON) 7. Low battery icon 8. DOWN (/WAVE) button 9.
  • Seite 14 RADIO CONTROLLED TIME SIGNAL RECEPTION After your clock is powered up, it starts to receive radio controlled time signal. The icon flashes. Receiving Signal icon flashing) Successful Reception icon becomes static) Failed Reception icon disappear) Automatic reception and Manual Reception Your clock starts automatic reception everyday at 1:00, 2:00, and 3:00.
  • Seite 15 icon to indicate before-noon time. Press SET/ ALM once again, “2017” flashes. Press to set the year. Press SET/ ALM once again, month digits flash. Press button to set month. Press SET/ ALM once again, date digits flash. Press button to set date.
  • Seite 16 Then press and hold SET/ ALM, the hour digits flash. Press 6:00 and appear. Once the alarm is selected, then press and hold SET/ ALM until the hour digit flash. Then press to set the alarm in hours. Press and hold to accelerate setting in fast speed.
  • Seite 17 TO SET AND USE SPECIAL DAY ALARM (ONE TIME ALARM) At normal time display, press SET/ ALM one at a time to select an alarm to sound on a special day , the corresponding alarm icon from appears. Then press and hold SET/ ALM to set the respective alarm by following step 2) to 5) of TO SET ALARM 1 TO 5 as above.
  • Seite 18 2. Then press ALM/ON.OFF once to turn on the coresponding alarm, icon appears, press AL/ON.OFF once again to turn off the alarm, icon disappears. 3. Your clock will return to normal time display in 5 seconds if no press of any button.
  • Seite 19: Low Battery Alert

    reset it to come on the following day. After that the alarm icon remains static on the display. TO USE THE BACKLIGHT At normal time display, press once, the light will last for around 5 seconds and then go off. WARNING: constant use of the backlight will significantly reduce the life expectancy of the batteries.
  • Seite 20 Hereby, Technotrade declares that this product WT496 is in compliance with the essential requirements and other relevant provisions of Directive 2014/53/EU and ROHS 2011/65/EC. The original EU declaration of conformity may be found at: www.technoline.de/doc/4029665004969 SPECIFICATIONS Alarm duration 2 minutes...
  • Seite 21  Do not open the inner back case or tamper with any components of this unit. Batteries safety warnings  Use only alkaline batteries, not rechargeable batteries.  Install batteries correctly by matching the polarities (+/-).  Always replace a complete set of batteries. ...
  • Seite 22 WT 496 - MODE D’EMPLOI RADIORÉVEIL RADIOPILOTÉ AVEC LCD ET 5 ALARMES Vue d’ensemble de l’appareil : Affichage Touches FR. 1...
  • Seite 23 Compartiment à piles Figures : 1. Icône PM 2. Icône de la veilleuse 3. Heure 4. Icône du radiopilotage et icône 5. Mois et date 6. Icônes des alarmes (Alarmes 1, 2, 3, 4, 5 et ON) 7. Icône piles faibles 8.
  • Seite 24 l’appareil. 3. Insérez 4 piles AAA neuves dans le compartiment à piles en respectant les signes « + » et « - ». 4. Remettez le couvercle du compartiment à piles. RÉCEPTION DU SIGNAL HORAIRE RADIOPILOTÉ Une fois que votre horloge est mise sous tension, elle commence à recevoir un signal horaire radiopiloté.
  • Seite 25 = Finlande (GMT +2 heures) Appuyez de nouveau sur la touche SET/ALM et les chiffres des heures pour régler l’heure. Maintenez clignotent. Appuyez sur la touche appuyée permet un réglage de façon rapide. Appuyez à nouveau sur la touche SET/ALM et les chiffres des minutes clignotent.
  • Seite 26 RÉGLAGE DE L’ALARME 1 à 5 Pendant l’affichage normal de l’heure, appuyez une fois sur la touche SET/ALM pour afficher et sélectionner une alarme particulière, l’icône de l’alarme correspondante s’affiche (entre Appuyez ensuite sur la touche SET/ALM, les chiffres des heures se s’affiche.
  • Seite 27 = du lundi au dimanche seulement (tous les jours) = du lundi au vendredi seulement (jours ouvrés) = samedi et dimanche seulement (week-ends) = alarme pour un jour seulement (alarme pour un jour particulier) Appuyez à nouveau sur la touche SET/ALM, « HI » se met à clignoter, appuyez sur la touche pour sélectionner «...
  • Seite 28 Lorsque « 1-7 » s’affiche et clignote, appuyez sur pour sélectionner « 1-1 ». Ensuite, appuyez de nouveau sur SET/ALM, « 2017 » se met à pour régler l’année. clignoter. Appuyez sur Appuyez à nouveau sur la touche SET/ALM et les chiffres du mois clignotent.
  • Seite 29 correspondante apparaît sur l’affichage des heures pour indiquer la ou les alarmes activées. FONCTION RAPPEL DE RÉVEIL Lorsque la ou les heures d’alarme programmées sont atteintes, votre horloge sonne et l’icône d’alarme correspondante (entre pour arrêter l’alarme clignote. Appuyez une fois sur temporairement, l’icône d’alarme correspondante continue de clignoter.
  • Seite 30: Utilisation Du Rétroéclairage

    UTILISATION DU RÉTROÉCLAIRAGE Pendant l’affichage normal de l’heure, appuyez une fois sur l’éclairage demeure environ 5 secondes puis s’éteint. AVERTISSEMENT : l’utilisation constante du rétroéclairage réduira considérablement l’espérance de vie des piles. UTILISATION DE LA VEILLEUSE Votre horloge dispose d’une veilleuse programmable pour que vous puissiez regarder l’heure dans l’obscurité.
  • Seite 31 Par la présente Technotrade déclare que l'appareil WT496 est conforme aux exigences essentielles et aux autres dispositions pertinentes de la directive 2014/53/EU et ROHS 2011/65/CE. La déclaration de conformité UE originelle est disponible sur: www.technoline.de/doc/4029665004969 SPÉCIFICATIONS Durée de l’alarme 2 minutes Durée de rappel...
  • Seite 32  N'exposez pas l'appareil à des températures extrêmes, directs du soleil, à la poussière ou à l'humidité.  Ne plongez pas l'appareil dans l'eau.  Évitez tout contact avec des matériaux corrosifs.  Ne jetez pas l'appareil dans le feu, elle risque d'exploser. ...
  • Seite 33 WT 496 – MANUAL DE INSTRUCCIONES RELOJ CON ALARMA CONTROLADO POR RADIO LCD con 5 ALARMAS Vista general del producto: Presentación Botones ES. 1...
  • Seite 34: Instalación

    Compartimento de las pilas Figuras: 1. Icono PM 2. Icono de luz nocturna 3. Hora 4. Icono de controlado por radio e icono 5. Mes y fecha 6. Iconos de alarma (Alarma 1, 2, 3, 4, 5 y 7. Icono de bacteria 8.
  • Seite 35 2. Quite la tapa de las pilas en la parte trasera de la unidad. 3. Coloque 4 pilas AAA nuevas en el compartimiento de las pilas de acuerdo con la polaridad “+” y “-” indicada. 4. Vuelva a colocar la tapa de las pilas. RECEPCIÓN DE SEÑAL HORARIA CONTROLADA POR RADIO Una vez que enciende el reloj, empieza a recibir una señal horaria controlada por radio.
  • Seite 36 botón / para fijar la hora. Manteniendo pulsado el ajuste, se realizará a mayor velocidad. Vuelva a pulsar SET/ALM; parpadean los dígitos de los minutos. Pulse el botón / pajar los minutos. Manteniendo pulsado el ajuste, se realizará a mayor velocidad. Vuelva a pulsar SET/ALM;...
  • Seite 37 FIJAR LA ALARMA 1 a 5 En la pantalla horaria normal, pulse SET/ALM una vez para ver y seleccionar la alarma individual; aparece el icono correspondiente a la alarma de Posteriormente, mantenga pulsado SET/ALM; parpadean los dígitos de la hora. Pulse ; aparece 6:00 y Una vez que se ha seleccionado la alarma, mantenga pulsado SET/ALM hasta que parpadeen los dígitos de la hora.
  • Seite 38 Vuelva a pulsar SET/ALM; parpadea “HI”; pulse para seleccionar el sonido de la alarma “HI” o “LO”. HI = Al /sonido de la alarma alto LO =Bajo / sonido de la alarma suave Vuelva a pulsar SET/ALM o si no se pulsa una tecla durante aproximadamente 10 segundos se saldrá...
  • Seite 39 Posteriormente, vuelva a pulsar SET/ALM; parpadea “2017”. Pulse para fijar el año. Vuelva a pulsar SET/ALM; parpadean los dígitos de los meses. Pulse el botón para fijar el mes. Vuelva a pulsar SET/ALM; los dígitos de la fecha parpadean. Pulse el botón para fijar la fecha.
  • Seite 40 USAR EL RETARDO DE ALARMA Cuando la hora alcance la hora de la alarma fijada, el reloj sonará y el icono correspondiente a la alarma hasta parpadeará. Pulse una para detener la alarma temporalmente; el correspondiente icono de la alarma sigue parpadeando. La alarma volverá a sonar según la configuración de la duración del retardo.
  • Seite 41: Alerta De Batería Baja

    Por medio de la presente Technotrade declara que el WT496 cumple con los requisitos esenciales y cualesquiera otras disposiciones aplicables o exigibles de la Directiva 2014/53/EU y ROHS 2011/65/CE. El original de la declaración de conformidad UE se puede encontrar en: www.technoline.de/doc/4029665004969 ES. 9...
  • Seite 42 ESPECIFICACIONES Duración 2 minutos Alarma Duración desde 5 hasta 60 minutos retardo de alarma Configuración predeterminada: Hora 0:00 Alarma 1 a 5 6:00, 1-7 (Alarma diaria) Sonido alarma Luz nocturna Apagado Duración 05 (5 minutos) retardo de alarma Efectos ambientales en la recepción El reloj obtiene la hora exacta con tecnología inalámbrica.
  • Seite 43  No se deshaga de esta unidad arrojándola al fuego ya que puede explotar.  No abra la carcasa trasera interior ni manipule ninguno de los componentes de esta unidad. Advertencias de seguridad sobre las baterías  Utilizar solamente baterías alcalinas. No utilizar recargables baterías. ...
  • Seite 44 WT 496 - GEBRUIKERSHANDLEIDING RADIOGESTUURDE LCD WEKKER met 5 ALARMEN Productoverzicht: Weergave Knoppen NL. 1...
  • Seite 45 Batterijvak Figuren: 1. PM-icoontje 2. Icoontje nachtlamp 3. Tijd 4. Icoontje radiogestuurd en icoontje DST 5. Maand en datum 6. Icoontje alarm (Alarm 1, 2, 3, 4, 5 en 7. Icoontje batterij 8. Knop NAAR BENEDEN (/GOLF) bijna leeg 9. Knop SET/ALM 10.
  • Seite 46 3. Installeer 4 x nieuwe AAA batterijen in de batterijhouder en let daarbij op de juiste “+” en “-” polariteit. 4. Plaats het batterijklepje terug. ONTVANGST RADIOGESTUURD TIJDSIGNAAL Nadat uw klok is ingeschakeld, begint het radiogestuurde tijdsignaal te ontvangen. Het icoontje knippert.
  • Seite 47 Druk nogmaals op SET/ALM, het getal voor minuten knippert. Druk op de knop / om de minuten in te stellen. Houd ingedrukt om de instellingen sneller te doorlopen. Druk nogmaals op SET/ALM, “24 Hr” knippert, druk op om het tijdformaat “12 Hr” of “24 Hr” te selecteren. Voor 12Hr tijdformaat verschijnt “PM”...
  • Seite 48 ALARM 1 TOT 5 INSTELLEN Druk tijdens de normale tijdweergave één keer tegelijkertijd op SET/ALM om elk alarm te zien en te selecteren, waarbij het bijbehorende alarmicoontje van wordt weergegeven. Houd vervolgens SET/ALM ingedrukt en de vier getallen knipperen. Druk 6:00 en wordt weergegeven.
  • Seite 49 dag) Druk nogmaals op SET/ALM, “HI” knippert. Druk op om het alarmgeluid “HI” of “LO” te selecteren. HI = Hoog/luid alarmgeluid LO = Laag/zacht alarmgeluid Druk nogmaals op SET/ALM of als er ongeveer 10 seconden geen knop is ingedrukt om de instelling van het bijbehorende alarm te sluiten.
  • Seite 50 Druk nogmaals op SET/ALM, “2017” knippert. Druk op om het jaar in te stellen. Druk nogmaals op SET/ALM, het getal van de maand knippert. Druk op de knop om de maand in te stellen. Druk nogmaals op SET/ALM, het getal van de datum knippert. Druk op de knop om de datum in te stellen.
  • Seite 51 HET SNOOZE-ALARM GEBRUIKEN Wanneer de tijd de betreffende ingestelde alarmtijd(en) heeft bereikt, gaat uw alarm af en het bijbehorende alarmicoontje knippert. Druk één keer op om het alarm tijdelijk te stoppen, het bijbehorende alarmicoontje blijft knipperen. Het alarm gaat opnieuw af volgens de instelling van de sluimertijd.
  • Seite 52: Het Nachtlicht-Scherm Gebruiken

    Hierbij verklaart Technotrade dat het toestel WT496 in overeenstemming is met de essentiële eisen en de andere relevante bepalingen van richtlijn 2014/53/EU en ROHS 2011/65/EG. De oorspronkelijke EU-verklaring van overeenstemming is te vinden op: www.technoline.de/doc/4029665004969 NL. 9...
  • Seite 53 SPECIFICATIES Alarmduur 2 minuten Sluimertijd 5 tot 60 minuten Standaard instellingen: Tijd 0:00 Alarm 1 tot 5 6:00, 1-7 (dagelijks alarm) Alarmgeluid Nachtlicht Sluimertijd 05 (5 minuten) Milieueffecten op radio-ontvangst Het klok behoudt de exacte tijd via draadloze technologie. Zoals met alle draadloze apparatuur kan de ontvangstkwaliteit in de volgende omstandigheden worden aangetast: ...
  • Seite 54 Batterijvoorschriften  Gebruik uitsluitend alkaline batterijen, geen oplaadbare batterijen.  Installeer batterijen correct volgens de polariteitmarkeringen (+/-).  Vervang altijd een volledige set batterijen.  Combineer nooit gebruikte en nieuwe batterijen.  Verwijder onmiddellijk uitgeputte batterijen.  Verwijder batterijen wanneer niet in gebruik. ...
  • Seite 55 WT 496 - MANUALE DI ISTRUZIONI SVEGLIA LCD RADIOCONTROLLATA con 5 ALLARMI Panoramica prodotto: Visualizzazione Pulsanti IT. 1...
  • Seite 56: Installazione

    Vano batteria Figure: 1. Icona PM 2. Icona luce notturna 3. Ora 4. Icona radiocontrollo e icona DST 5. Mese e giorno 6. Icone sceglia (Sveglia 1, 2, 3, 4, 5 e ON) 7. Icona batteria 8. Pulsante GIÙ (/WAVE) scarica 9.
  • Seite 57 RICEZIONE SEGNALE ORARIO RADIOCONTROLLATO Dopo che l'orologio è acceso, esso inizia a ricevere il segnale orario radiocontrollato L'icona lampeggia. Ricezione segnale (L'icona lampeggia) Ricezione avvenuta con (L'icona diventa fissa) successo Ricezione fallita (L'icona scompare) Ricezione automatica e ricezione manuale L'orologio avvia la ricezione automatica ogni giorno all'1:00, 2:00, 3:00. Se la ricezione del segnale orario radiocontrollato alle 3:00 fallisce, essa sarà...
  • Seite 58 Premere il pulsante per impostare i minuti. Tener premuto per accelerare la velocità delle impostazioni. Premere nuovamente SET/ALM, “24 Hr” lampeggia, premere selezionare il formato del fuso orario “12 Hr” o “24 Hr”. Per il formato orario 12Hr, “PM” appare sulla sinistra delle cifre dell'ora per indicare l'orario pomeridiano.
  • Seite 59 PER IMPOSTARE LA SVEGLIA da 1 a 5 Nella visualizzazione dell'orario normale, premere una volta SET/ALM per visualizzare e selezionare la singola sveglia, l'icona della sveglia corrispondente da appare. Quindi premere e tenere premuto SET/ALM, le cifre dell'ora lampeggiano. Premere 6:00 e appare Una volta selezionata la sveglia, premere e tenere premuto SET/ALM fino a quando la cifra delle ore non lampeggia.
  • Seite 60 PER IMPOSTARE E USARE SVEGLIA GIORNO SPECIALE (SCEGLIA UNA VOLTA) Nella visualizzazione dell'orario normale, premere una volta SET/ALM per selezionare una sveglia che suona un giorno speciale, l'icona della sveglia corrispondente da appare. Quindi premere e tenere premuto SET/ALM per impostare la rispettiva sveglia seguendo i passi da 2) a 5) di PER IMPOSTARE DA 1 A 5 come sopra.
  • Seite 61 Premere nuovamente SET/ALM o non premere tasti per circa 10 secondi per uscire dall'impostazione Sveglia. Quando l'orario raggiunge l'ora della sveglia del giorno speciale impostato, l'orologio suona e il display mostra il giorno speciale impostato (anno, mese e giorno) e lampeggia. Premere una volta ALM/ON-OFF per spegnere la sveglia e l'orologio torna alla visualizzazione dell'orario normale.
  • Seite 62 PER UTILIZZARE LA FUNZIONE SNOOZE Quando l'orario raggiunge il rispettivo orario della sveglia impostato, l'orologio suona e l'icona dell'allarme corrispondente da lampeggia. Premere una volta per arrestare temporaneamente la sveglia, l'icona della sveglia corrispondente lampeggia. La sveglia suona nuovamente secondo l'impostazione della durata dello snooze. PER ARRESTARE O RIPRISTINARE LA SVEGLIA PER IL GIORNO SUCCESSIVO Quando la rispettiva sveglia suona, l'icona della sveglia relativa lampeggia.
  • Seite 63: Avviso Batteria Scarica

    Con la presente Technotrade dichiara che questo WT496 è conforme ai requisiti essenziali ed alle altre disposizioni pertinenti stabilite dalla direttiva 2014/53/EU e ROHS 2011/65/CE. La dichiarazione di conformità UE originale si trova a: www.technoline.de/doc/4029665004969 SPECIFICHE Durata sveglia 2 minuti...
  • Seite 64  in prossimità di apparecchiature elettriche (computer, TV, ecc.) e di strutture metalliche  all'interno di veicoli in movimento Porre l’orario in una posizione con segnale ottimale, ad es. vicino a una finestra e lontano da superfici in metallo o apparecchiature elettriche. Precauzioni ...
  • Seite 65 WT 496 – NÁVOD K POUŽITÍ LCD HODINY ŘÍZENÉ RÁDIOVÝM SIGNÁLEM s 5 TYPY BUZENÍ Přehled produktu: Zobrazení Tlačítka CZ. 1...
  • Seite 66 Prostor pro baterie Obrázky: 2. Ikona nočního světla 1. Ikona PM 3. Čas 4. Ikona rádiově řízeného signálu a ikona 5. Měsíc a datum 6. Ikony buzení (buzení 1, 2, 3, 4, 5 a ZAP.) 8. Tlačítko DOLŮ (/VLNA) 7. Ikona vybité baterie 9.
  • Seite 67 PŘÍJEM RÁDIOVĚ ŘÍZENÉHO SIGNÁLU ČASU Po zapnutí začnou hodiny přijímat rádiově řízený signál času. Bliká ikona. Příjem signálu (Bliká ikona Úspěšný příjem je svítí nepřerušovaně) (Ikona Neúspěšný příjem (Ikona zmizí) Automatický příjem a manuální příjem Budík zahajuje automatický příjem každý den v 01:00, 02:00 a 03:00 hod. Pokud nedojde k úspěšnému příjmu rádiově...
  • Seite 68 Znovu stiskněte tlačítko SET/ALM, začne blikat ikona „24 Hr“, stiskněte tlačítko a vyberte formát času „12 Hr“ nebo „24 Hr“. U časového formátu „12Hr“ se vlevo od času objeví ikona „PM“ označující odpolední čas. Dopolední čas není označen ikonou „AM“. Znovu stiskněte tlačítko SET/ALM, začne blikat „2017“.
  • Seite 69 NASTAVENÍ BUZENÍ 1 až 5 V normálním zobrazení času postupně stiskněte tlačítko SET/ALM a zobrazte a nastavte jednotlivá buzení, objeví se příslušné ikony buzení od Potom stiskněte a podržte tlačítko SET/ALM, začne blikat číslice hodin. Stiskněte 6:00 a objeví se ikona Po výběru buzení...
  • Seite 70 NASTAVENÍ A POUŽITÍ BUZENÍ VE SPECIÁLNÍ DNY (JEDNORÁZOVÉ BUZENÍ) V normálním zobrazení času postupně stiskněte tlačítko SET/ALM a vyberte buzení, které se má ve speciální den spustit, objeví se příslušná ikona buzení od Potom stiskněte a podržte tlačítko SET/ALM a nastavte příslušný alarm podle kroků...
  • Seite 71 Nastavení buzení ukončete dalším stisknutím tlačítka SET/ALM, nastavení se také ukončí, když po dobu přibližně 10 sekund nestisknete žádné tlačítko. Když přijde čas nastaveného buzení ve speciální den, vaše hodiny spustí upozornění a na displeji se zobrazí nastavený speciální den (rok, měsíc a datum), který...
  • Seite 72 POUŽITÍ OPAKOVANÉHO ALARMU Když přijde čas příslušného nastaveného buzení, vaše hodiny spustí upozornění a začne blikat ikona příslušného buzení až . Jedním buzení dočasně vypnete, příslušná ikona buzení bude stisknutím stále blikat. Buzení se znovu spustí podle nastavené doby opakovaného buzení.
  • Seite 73: Řešení Problémů

    +/-. Vaše hodiny budou resetovány na výchozí nastavení a vy je budete muset znovu nastavit. Technotrade tímto prohlašuje, že tento WT496 je ve shodě se základními požadavky a dalšími příslušnými ustanoveními směrnice 2014/53/EU a ROHS 2011/65/ES. Originál EU prohlášení o shodě lze nalézt na: www.technoline.de/doc/4029665004969 CZ. 9...
  • Seite 74 SPECIFIKACE Doba buzení 2 minuty 5 až 60 minut Doba opakovaného buzení Výchozí nastavení: Čas 0:00 Buzení 1 až 5 6:00, 1-7 (každodenní buzení) Zvuk buzení Noční světlo Vypnuto Doba 05 (5 minut) opakovaného buzení Environmentální dopady přijmu Hodiny přijímá přesný čas pomocí bezdrátové technologie. Stejně jako u všech bezdrátových přístrojů...
  • Seite 75 jednotky. Baterie a bezpečnostní varování  Používat pouze alkalické baterie. Nepoužívejte dobíjecí baterie.  Baterie vkládejte správně odpovídající polaritou (+/-).  Vždy vyměňte kompletní sadu baterií.  Nikdy nemíchejte použité a nové baterie.  Okamžitě odstraňte vybité baterie.  Baterie vyjměte, když není zařízení v provozu. ...
  • Seite 76 WT 496 – INSTRUKCJA OBSŁUGI ZEGAR STEROWANY SYGNAŁEM RADIOWYM Z WYŚWIETLACZEM LCD z 5 ALARMAMI Przegląd produktu: Wyświetlenie Przyciski PL. 1...
  • Seite 77 Komora baterii Rysunki: 2. Ikona podświetlenia nocnego 1. ikona PM 4. Ikona sygnału radiowego i ikona DST 3. Godzina 5. Miesiąc i dzień 6. Ikony alarmów (alarm 1, 2, 3, 4, 5 i WŁ.) 8. Przycisk DO DOŁU (/FALA) 7. Ikona niskiego stanu baterii 10.
  • Seite 78 2. Zdjąć pokrywę baterii z tyłu swojego urządzenia. 3. Włożyć 4 nowe baterie AAA do komory baterii, przestrzegając prawidłowej biegunowości „+” i „-”. 4. Założyć pokrywę baterii. ODBIÓR RADIOWEGO SYGNAŁU CZASU Po podłączeniu radia do źródła zasilania, zaczyna ono odbierać radiowy sygnał...
  • Seite 79 Nacisnąć ponownie przycisk SET/ALM, zaczną migać cyfry godzin. Nacisnąć przycisk / , aby ustawić godzinę. Nacisnąć i przytrzymać , aby dokonać ustawień z większą prędkością. przycisk Nacisnąć ponownie przycisk SET/ALM, zaczną migać cyfry godziny. Nacisnąć przycisk / , aby ustawić minuty. Nacisnąć i przytrzymać , aby dokonać...
  • Seite 80 USTAWIANIE ALARMU od 1 do 5 Przy normalnym wyświetlaniu czasu nacisnąć przycisk SET/ALM jeden raz, aby wyświetlić i zaznaczyć poszczególny alarm, pojawia się ikona odpowiedniego alarmu od Następnie nacisnąć i przytrzymać przycisk SET/ALM, zaczną migać cyfry godziny. Nacisnąć 6:00, a pojawi się Po wybraniu alarmu nacisnąć...
  • Seite 81 = tylko soboty i niedziele (weekendy) = tylko jednorazowy alarm określonego dnia (alarm określonego dnia) Nacisnąć ponownie przycisk SET/ALM, zacznie migać „HI”, nacisnąć , aby wybrać dźwięk alarmu „HI” lub „LO”. przycisk HI = wysoki/głośny dźwięk alarmu LO = niski/delikatny dźwięk alarmu Nacisnąć...
  • Seite 82 Następnie nacisnąć ponownie przycisk SET/ALM, zacznie migać „2017”. Nacisnąć przycisk , aby ustawić rok. Nacisnąć ponownie przycisk SET/ALM, zaczną migać cyfry miesiąca. Nacisnąć przycisk , aby ustawić miesiąc. Nacisnąć ponownie SET/ALM, zaczną migać cyfry daty. Nacisnąć , aby ustawić datę. przycisk Nacisnąć...
  • Seite 83 KORZYSTANIE Z ALARMU DRZEMKI Kiedy czas osiągnie czas odpowiedniego ustawionego alarmu, rozlegnie się alarm i zacznie migać ikona odpowiedniego alarmu od Nacisnąć jednokrotnie przycisk , aby zatrzymać tymczasowo alarm, nadal miga ikona odpowiedniego alarmu. Alarm będzie rozlegał się zgodnie z ustawieniem czasu drzemki. ZATRZYMYANIE I RESETOWANIE ALARMU WYZNACZONEGO NA NASTĘPNY DZIEŃ...
  • Seite 84: Rozwiązywanie Problemów

    OSTRZEŻENIE: stałe korzystanie z podświetlenia znacznie zmniejszy okres eksploatacji baterii. KORZYSTANIE Z WYŚWIETLACZA Z PODŚWIETLENIEM NOCNYM Zegar posiada programowalny wyświetlacz z podświetleniem nocnym umożliwiający wyświetlanie czasu w ciemności. Przy normalnym wyświetlaniu czasu nacisnąć i przytrzymać przycisk , na wyświetlaczu LCD pojawi się i zacznie migać...
  • Seite 85 2014/53/EU i ROHS 2011/65/EC.Kopię pełnej deklaracji zgodności można pobrać pod adresem: www.technoline.de/doc/4029665004969 SPECYFIKACJA Czas trwania 2 minuty alarmu Czas drzemki 5 do 60 minut Domyślne ustawienia: Godzina 0:00 Alarm od 1 do 5 6:00, 1-7 (codzienny alarm) Dźwięk alarmu Podświetlenie Wyłączony...
  • Seite 86  Nie wyrzucać urządzenia do ognia, gdyż może wybuchnąć.  Nie otwierać obudowy i nie ingerują w wewnętrzne części urządzenia. Ostrzeżenia bezpieczeństwa dotyczące baterii  Używać tylko baterii alkalicznych. Nie wolno używać akumulatorów.  Włożyć baterie prawidłowo, zgodnie z biegunowością (+/-). ...

Inhaltsverzeichnis