Werbung
Verfügbare Sprachen
Verfügbare Sprachen
Quicklinks
WT 245 – Bedienungsanleitung
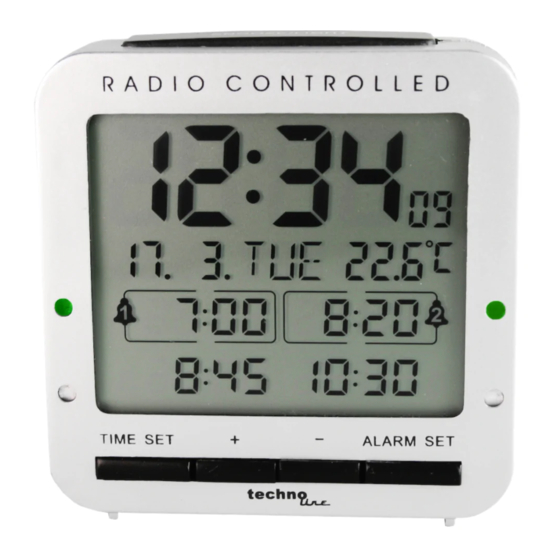
Produktübersicht
A – Anzeige
A1 – Uhrzeit
A2 – Wochentag
A3 – Datum und Monat
A4 – Innentemperatur
A5 – Alarmglocken-Symbol
A6 – Alarmzeit von Alarm 1
A7 – Alarmzeit von Alarm 2
A8 – Alarmzeit von Alarm 3
A9 – Alarmzeit von Alarm 4
B – Gehäuse
B1 – SNOOZE / LIGHT Taste
B2 – ALARM-1 Schieberegler und
Indikator
B3 – ALARM-2 Schieberegler und
Indikator
B4 – ALARM-3 Schieberegler und
Indikator
B5 – ALARM-4 Schieberegler und
Indikator
B6 – TIME SET Taste
DE 1
Werbung

Verwandte Anleitungen für Technoline WT 245


Inhaltszusammenfassung für Technoline WT 245
- Seite 1 WT 245 – Bedienungsanleitung Produktübersicht A – Anzeige A1 – Uhrzeit A2 – Wochentag A3 – Datum und Monat A4 – Innentemperatur A5 – Alarmglocken-Symbol A6 – Alarmzeit von Alarm 1 A7 – Alarmzeit von Alarm 2 A8 – Alarmzeit von Alarm 3 A9 –...
- Seite 2 B7 – + (Plus) Taste B8 – - (Minus) Taste B9 – ALARM SET Taste Funktionen: Funkuhrzeit über DCF77-Frequenz Uhrzeit in 12/24 Stunden Zeitformat Manuelle Zeiteinstellung Kalender bis zum Jahr 2099 Datum- und Wochentagsanzeige Temperaturanzeige alternativ in °C oder °F ...
- Seite 3 Empfang des DCF-77 Funkzeitsignals Die Uhr startet die Suche nach dem DCF-77 Signal automatisch nach jedem Neustart oder Wechsel von Batterien. Das Empfangssymbol (Funkmast) blinkt. Um 2:00 Uhr morgens führt die Uhr automatisch den Synchronisationsvorgang mit dem DCF77 Funkzeitsignal durch, um eventuelle Abweichungen auf die Uhrzeit zu korrigieren.
- Seite 4 Manuelle Zeiteinstellung: Drücken Sie die “TIME SET” Taste, um mit der Zeiteinstellung zu beginnen und “dcf ON” blinkt auf der Anzeige. Drücken Sie die “ + ” oder die “ - “ Taste, um den DCF-77 Funkzeitempfang anzuschalten (ON) oder auszuschalten (OFF). ...
- Seite 5 Drücken Sie die “TIME SET” Taste, um die Einstellung zu bestätigen. Die Temperatur wird angezeigt und “C” blinkt auf der Anzeige. Drücken Sie die “ + ” oder die “ - “ Taste, um zwischen der Temperaturanzeige in °C oder °F zu wechseln. ...
- Seite 6 von ALARM-3 einzustellen. Drücken Sie die “ALARM SET” Taste, um die Einstellung zu bestätigen und die Alarmzeit von ALARM-4 blinkt auf der Anzeige. Drücken Sie die “ + ” oder die “ - “ Taste, um die Alarmzeit von ALARM-4 einzustellen. ...
- Seite 7 Die Innentemperatur kann in °C oder °F angezeigt werden. Hiermit erklärt Technotrade, dass sich das Produkt WT 245 in Übereinstimmung mit den grundlegenden Anforderungen und den übrigen einschlägigen Bestimmungen der Richtlinie 2014/53/EU und ROHS 2011/65/EG befindet. Die Original-EU-Konformitätserklärung finden Sie unter: www.technoline.de/doc/4029665002453...
- Seite 8 Funkempfang durch folgende Einflüsse beeinträchtigt sein: lange Übertragungswege naheliegende Berge und Täler nahe Autobahnen, Gleisen, Flughäfen, Hochspannungsleitungen, etc. nahe Baustellen inmitten hoher Gebäude in Betonbauten nahe elektrischer Geräte (Computer, Fernseher, etc) und metallischer Gegenstände ...
- Seite 9 Entfernen Sie die Batterien bei Nichtnutzung. Laden Sie die Batterien nicht auf und werfen Sie sie nicht ins Feuer. Sie könnten explodieren. Bewahren Sie die Batterien nicht in der Nähe von Metallobjekten auf, da ein Kontakt einen Kurzschluss verursachen kann.
- Seite 10 WT 245 – User Manual Product appearance A – Display A1 – Time A2 – Weekday A3 – Date and month A4 – Indoor temperature A5 – Alarm bell icon A6 – Alarm time of alarm 1 A7 – Alarm time of alarm 2 A8 –...
- Seite 11 Functions: Radio controlled time via DCF77 frequency Time in 12/24 hour format Manual time setting Calendar up to year 2099 Date and weekday display Temperature alternatively in °C or °F Snooze function (5 minutes) ...
- Seite 12 signal to correct any deviations to the exact time. If this synchronization attempt is unsuccessful (the radio mast icon disappears from the display), the system will automatically attempt synchronization at the next full hour. This procedure is repeated automatically up to total 5 times. ...
- Seite 13 Press the “TIME SET” button to confirm your setting and the hour of the current time blinks on the display. Press the “ + ” or “ - “ button to set the hour. Press the “TIME SET” button to confirm your setting and the minutes of the current time blinks on the display.
- Seite 14 Press and hold the “ + ” or “ - “ button to accelerate the setting process. Alarm time setting: Press the “ALARM SET” button to enter alarm setting mode and the alarm time of ALARM-1 blinks on the display. Press the “ + ” or “ - “ button to set the alarm time of ALARM-1. ...
- Seite 15 number of the alarm will be displayed with the alarm time. Slide the same “ALARM ON/OFF” switch to the OFF position, the corresponding alarm is deactivated and the alarm bell symbol is no longer displayed. Notes: Any combination of alarms can be set on or off at the same time. ...
- Seite 16 Hereby, Technotrade declares that this product WT 245 is in compliance with the essential requirements and other relevant provisions of Directive 2014/53/EU and ROHS 2011/65/EC. The original EU declaration of conformity may be found at: www.technoline.de/doc/4029665002453 Environmental reception effects The clock obtains the accurate time with wireless technology. Same as all wireless devices, the reception is maybe affected by the following circumstances: ...
- Seite 17 Do not open the inner back case or tamper with any components of this unit. Batteries safety warnings Use only alkaline batteries, not rechargeable batteries. Install batteries correctly by matching the polarities (+/-). Always replace a complete set of batteries. ...
- Seite 18 WT 245 – Guide d’utilisation Aspect du produit A - Affichage A1 – Heure A2 – Jour de la semaine A3 – Jour et mois A4 – Température intérieure A5 –Icône de cloche d’alarme A6 – Heure d’alarme de l’alarme 1 A7 –...
- Seite 19 Fonctions : Heure radiocommandée via la fréquence DCF77 Le format de l’heure est 12/24 heures Réglage manuel de l’heure Calendrier qui s’étend jusqu’en 2099 Affichage du jour et de la semaine Affichage de la température alternativement en °C et °F ...
- Seite 20 corriger les écarts avec l’heure exacte à 2 heures. En cas d’échec des tentatives de synchronisation (l’icône d’antenne radio disparaît de l’écran), le système essaie automatiquement une nouvelle synchronisation au bout d’une heure. Cette procédure est répétée automatiquement au maximum 5 fois. ...
- Seite 21 avec OFF ou activer DCF avec ON. Appuyez sur la touche « TIME SET » pour confirmer votre réglage et « TZ 0 » clignote sur l’affichage. Utilisez les touches « + »/« - » pour choisir un fuseau horaire de -11 à +12. Par exemple, sélectionnez 0 pour l’Allemagne et -1 pour le Royaume-Uni.
- Seite 22 Appuyez sur la touche « TIME SET » pour confirmer et quitter les réglages. L’horloge retourne à l’affichage normal de l’heure. Remarques : Si aucune touche n’estenfoncée pendant 30 secondes, l’horloge passe automatiquement du mode réglage de l’heure au mode affichage normal de l’heure. ...
- Seite 23 Remarques : Si aucune touche n’estenfoncée pendant 30 secondes, l’horloge passe automatiquement du mode réglage de l’alarme au mode affichage normal de l’heure. Maintenezenfoncées les touches « + »/« - » pour accélérer le réglage des valeurs. Commutateurs de réglage d’alarme : ...
- Seite 24 La température intérieure est affichée en °C ou °F. Par la présente Technotrade déclare que l'appareil WT 245 est conforme aux exigences essentielles et aux autres dispositions pertinentes de la directive 2014/53/EU et ROHS 2011/65/CE. La déclaration de conformité UE originelle est disponible sur: www.technoline.de/doc/4029665002453 Effets de réception dus à...
- Seite 25 À proximité d’appareils électriques (ordinateurs, téléviseurs, etc.) et des structures métalliques À l’intérieur de véhicules mobiles Placez votre horloge dans un endroit avec des signaux optimaux, par exemple près d’une fenêtre, loin des surfaces métalliques et des appareils électriques. Précautions ...
- Seite 26 N’utilisez cet appareil que pour l’usage auquel il est destiné ! Obligation légale concernant la mise au rebut des piles Ne jetez pas les piles usagées avec les ordures ménagères, car elles sont nuisibles à la santé et à l’environnement. Vous pouvez ramener les piles usagées sans frais à...
- Seite 27 WT 245 – Manual del usuario Vista general del producto A – Pantalla A1 – Hora A2 – Día de la semana A3 – Fecha y mes A4 – Temperatura en interiores A5 – Icono de alarma activada A6 – Hora de la alarma 1 A7 –...
- Seite 28 Función: Ajuste de la hora por radio control a través de la frecuencia DCF77 Hora en formato de 12/24 horas Ajuste manual de la hora Calendario hasta el año 2099 Pantalla de fecha y día de la semana ...
- Seite 29 A las 02:00 AM, el reloj inicia automáticamente el procedimiento de sincronización con la señal DCF para corregir cualquier desviación de la hora exacta. Si este intento de sincronización no es satisfactorio (el icono del mástil de radio desaparece de la pantalla), el sistema lo volverá a intentar a la siguiente hora en punto.
- Seite 30 DCF. Pulse el botón “TIME SET” para confirmar los ajustes realizados y “TZ 0” parpadeará en la pantalla. Use el botón “ + ” o el botón “ - ” para establecer la diferencia de la zona horaria desde -11 hasta +12. Por ejemplo, seleccione 0 para Alemania o -1 para Reino Unido. ...
- Seite 31 Pulse el botón “TIME SET” para confirmar y finalizar los ajustes. El reloj recupera la presentación normal de la hora. Notas: Transcurridos 30 segundos sin pulsar ningún botón, el reloj cambia automáticamente del modo de ajuste de la hora a la presentación normal de la hora. ...
- Seite 32 Notas: Transcurridos 30 segundos sin pulsar ningún botón, el reloj cambia automáticamente del modo de ajuste de alarma a la presentación normal de la hora. Mantenga pulsado el botón “ + ” o el botón “ - ” para acelerar el proceso de ajuste. Interruptores de activación de alarma: ...
- Seite 33 La temperatura del interior de la habitación se mostrará en °C o en °F. Por medio de la presente Technotrade declara que el WT 245 cumple con los requisitos esenciales y cualesquiera otras disposiciones aplicables o exigibles de la Directiva 2014/53/EU y ROHS 2011/65/CE.
- Seite 34 en el interior de edificios de hormigón proximidad de aparatos eléctricos (PCs, TVs, etc.) y estructuras metálicas en el interior de vehículos en movimiento Coloque el reloj en una posición donde obtenga una señal óptima, p.ej. cerca de una ventana y lejos de superficies metálicas o aparatos eléctricos.
- Seite 35 Consideración de obligaciones según las leyes sobre pilas No se debe eliminar las pilas usadas junto con los residuos domésticos porque podrían ser perjudiciales para la salud y el medio ambiente. Puede devolver las pilas usadas sin cargo alguno a su distribuidor y puntos de recogida. ¡Como usuario final, tiene la obligación de devolver las pilas que utilice a su distribuidor y otros puntos de recogida! Consideración de obligaciones según las leyes sobre dispositivos electrónicos...
- Seite 36 WT 245 – Gebruikshandleiding Productoverzicht A – Display A1 – Tijd A2 – Dag van de week A3 – Datum en maand A4 – Binnentemperatuur A5 – Alarmicoontje A6 – Alarmtijd van alarm 1 A7 – Alarmtijd van alarm 2 A8 –...
- Seite 37 Functie: Radiogestuurde tijd via DCF77-frequentie Tijd in 12/24-uurs formaat Handmatig instellen van de tijd Kalender tot en met het jaar 2099 Weergave van datum en weekdag Temperatuuraanduiding instelbaar op °C of °F Sluimerfunctie (5 minuten) ...
- Seite 38 De klok voert om 2:00u automatische de synchronisatieprocedure met het DCF-signaal uit om eventuele afwijkingen van de exacte tijd te corrigeren. Als deze synchronisatiepoging mislukt (het zendmasticoontje verdwijnt uit de display), dan zal het systeem om het volgende volle uur automatisch nog een synchronisatiepoging uitvoeren.
- Seite 39 OFF of in te schakelen met ON. Druk op de toets “TIME SET” om uw instelling te bevestigen en “TZ 0” zal op de display knipperen. Druk op de toets “ + ” of “ - “ om een tijdzoneverschil tussen -11 en +12 in te stellen.
- Seite 40 terugkeren naar de normale tijdsweergave. Opmerkingen: De klok schakelt vanuit de tijdinstellingsmodus automatisch op de normale tijdsweergave als u 30 seconden lang op geen toetsen drukt. Houd de toets “ + ” of “ - “ ingedrukt om de instellingen sneller te doorlopen. Alarmtijd instellen: ...
- Seite 41 Schakelaars voor alarminstelling: De klok is aan de zijkant voorzien van 4 ALARM ON-/OFF-schakelaars voor ALARM-1, ALARM-2, ALARM-3 en ALARM-4. Schuif de “ALARM ON/OFF”-schakelaar naar de stand ON en het corresponderende alarm zal worden geactiveerd. Zolang het alarm is geactiveerd, zal het corresponderende alarmsymbooltje met het nummer van het alarm worden weergegeven met de alarmtijd.
- Seite 42 ON/OFF” naar de stand OFF om het alarm te stoppen en deactiveren. Temperatuurweergave: De binnentemperatuur wordt weergegeven in °C of °F. Hierbij verklaart Technotrade dat het toestel WT 245 in overeenstemming is met de essentiële eisen en de andere relevante bepalingen van richtlijn 2014/53/EU en ROHS 2011/65/EG. De oorspronkelijke EU-verklaring...
- Seite 43 Voorzorgsmaatregelen Het hoofdapparaat is uitsluitend bestemd voor gebruik binnenshuis. Stel het apparaat niet bloot aan overmatige krachten of schokken. Stel het apparaat niet bloot aan extreme temperaturen, direct zonlicht, stof of vochtigheid. Dompel het apparaat niet onder in water. ...
- Seite 44 Houd rekening met heffingen in het kader van wetgeving m.b.t. het afvoeren van elektrische apparatuur. Dit symbool betekent dat u elektrische apparaten aan het eind van hun levensduur gescheiden van het algemene huishoudelijke afval moet afvoeren. Lever uw apparaat in bij een plaatselijk inzamelpunt voor afvalverwerking of bij een recyclingcentrum.
- Seite 45 WT 245 – Manuale dell'utente Come si presenta il prodotto A – Display A1 - Orario A2 – Giorno della settimana A3 – Giorno e mese A4 - Temperatura interna A5 - Icona a campana della sveglia A6 - Orario della sveglia 1...
- Seite 46 B7 – Pulsante + (più) B8 – Pulsante - (meno) B9 – Pulsante ALARM SET Funzioni: Orario radio controllato attraverso la frequenza DCF77 Formato orario 12/24 Impostazione manuale dell’ora Calendario fino all'anno 2099 Visualizzazione data e giorno della settimana ...
- Seite 47 Ricezione del segnale DCF-77 L'orologio avvia automaticamente la ricerca del segnale DCF-77 dopo ogni riavvio o dopo la sostituzione delle batterie. L'icona dell'antenna radio inizia a lampeggiare. Alle ore 2.00 del mattino, l'orologio effettua automaticamente una procedura di sincronizzazione con il segnale DCF, per correggere eventuali scostamenti rispetto all'ora esatta.
- Seite 48 Impostazione manuale dell’ora: Premere il pulsante "TIME SET" per accedere alla modalità di impostazione dell'ora; la scritta "dcf ON" lampeggerà sul display. Premere il pulsante "+" o "-" per disattivare o attivare la ricezione del segnale DCF impostandola su OFF o ON rispettivamente. ...
- Seite 49 settimana: DE (tedesco), EN (inglese), FR (francese), ES (spagnolo), IT (italiano) o NL (olandese) Premere il pulsante "TIME SET" per confermare e terminare l'impostazione. L'orologio torna alla normale modalità di visualizzazione dell'ora. Note: Se non si preme alcun pulsante per 30 secondi, l'orologio passa automaticamente dalla modalità...
- Seite 50 alla normale modalità di visualizzazione dell'ora. Note: Se non si preme alcun pulsante per 30 secondi, l'orologio passa automaticamente dalla modalità di impostazione della sveglia alla normale modalità di visualizzazione dell'ora. Tenere premuto il pulsante "+" o "-" per accelerare la procedura di impostazione. Interruttori di impostazione della sveglia: ...
- Seite 51 La temperatura interna può essere visualizzata in °C o °F. Con la presente Technotrade dichiara che questo WT 245 è conforme ai requisiti essenziali ed alle altre disposizioni pertinenti stabilite dalla direttiva 2014/53/EU e ROHS 2011/65/CE. La dichiarazione di conformità UE originale si trova a: www.technoline.de/doc/4029665002453 Effetti ricezione ambientale L'orologio riceve l'orario preciso grazie alla tecnologia wireless.
- Seite 52 Collocazione all'interno di edifici in cemento Prossimità di apparecchiature elettriche (computer, TV e altro) e strutture metalliche Collocazione all'interno di veicoli in movimento Posizionare l’orologio in una posizione per un segnale ottimale, ad esempio vicino a una finestra e lontano da superfici metalliche o elettrodomestici.
- Seite 53 Utilizzare il prodotto solo per lo scopo previsto. Obblighi in base alla normativa sulle batterie Non smaltire le batterie vecchie con i rifiuti domestici in quanto possono causare danni alla salute e all'ambiente. È possibile consegnare le batterie usate gratuitamente al proprio rivenditore e punti di raccolta. L'utente finale è obbligato per legge a portare le batterie esauste ai distributori e agli altri punti di raccolta! Considerare il carico in base alla normativa sui dispositivi elettrici Questo simbolo indica che i dispositivi elettrici alla fine del loro ciclo di vita...
- Seite 54 WT 245 – návod k obsluze Vzhled výrobku A – displej A1 – čas A2 – den v týdnu A3 – den a měsíc A4 – vnitřní teplota A5 – ikona buzení A6 – čas budíku 1 A7 – čas budíku 2 A8 –...
- Seite 55 Funkce: Řízení času rádiovým signálem na frekvenci DCF77 Čas ve formátu 12/24 hodin Ruční nastavení času Kalendář do roku 2099 Zobrazení data a dnů v týdnu Zobrazení teploty ve °C nebo °F Funkce opakovaného buzení (po 5 minutách) ...
- Seite 56 od přesného času. Je-li tento pokus o synchronizaci neúspěšný (ikona rádiového příjmu z displeje zmizí), systém se o další synchronizaci automaticky pokusí v příští celou hodinu. Tento proces se opakuje automaticky až pětkrát. Chcete-li spustit příjem signálu DCF77 ručně, stiskněte tlačítko „-“ a držte jej stisknuté po dobu 3 sekund.
- Seite 57 času. Stisknutím tlačítka „+“ nebo „-“ nastavte hodinu. Stisknutím tlačítka „TIME SET“ potvrďte nastavení. Na displeji začnou blikat minuty aktuálního času. Stisknutím tlačítka „+“ nebo „-“ nastavte minuty. Stisknutím tlačítka „TIME SET“ potvrďte nastavení. Na displeji začnou blikat sekundy aktuálního času.
- Seite 58 Nastavení času budíku: Stisknutím tlačítka „ALARM SET“ přejděte do režimu nastavení budíku. Na displeji začne blikat čas budíku pro ALARM-1. Stisknutím tlačítka „+“ nebo „-“ nastavte čas budíku pro ALARM-1. Stisknutím tlačítka „ALARM SET“ potvrďte nastavení. Na displeji začne blikat čas budíku pro ALARM-2.
- Seite 59 Vnitřní teplota se zobrazuje buď ve °C, nebo °F. Technotrade tímto prohlašuje, že tento WT 245 je ve shodě se základními požadavky a dalšími příslušnými ustanoveními směrnice 2014/53/EU a ROHS 2011/65/ES. Originál EU prohlášení o shodě lze nalézt na: www.technoline.de/doc/4029665002453...
- Seite 60 Vlivy prostředí na příjem signálu Budík získává přesný čas pomocí bezdrátové technologie. Stejně jako u jiných bezdrátových zařízení může být příjem negativně ovlivněn následujícími podmínkami: Dlouhá přenosová vzdálenost Blízkost hor a údolí Blízkost dálnic, železnic, letišť, vedení vysokého napětí apod. ...
- Seite 61 Nikdy nemíchejte dohromady použité a nové baterie. Slabé baterie okamžitě vyjměte. Jestliže zařízení nepoužíváte, vyjměte z něj baterie. Baterie nenabíjejte a nevhazujte je do ohně – mohou explodovat. Baterie skladujte mimo dosah kovových předmětů, kontakt s nimi může způsobit zkrat. ...
- Seite 62 WT 245 – Instrukcja obsługi Wygląd urządzenia A – wyświetlacz A1 – czas A2 – dzień tygodnia A3 – data i miesiąc A4 – temperatura w pomieszczeniu A5 – ikona dzwonka budzika A6 – czas budzenia budzik 1 A7 – czas budzenia budzik 2 A8 –...
- Seite 63 Funkcje: Czas sterowany sygnałem radiowym na częstotliwości DCF77 Czas w formacie godzinowym 12/24 Ręczne ustawianie czasu Kalendarz do roku 2099 Wyświetlacz daty i dnia tygodnia Wyświetlanie temperatury na zmianę w °C lub °F Funkcja drzemki (5 minut) ...
- Seite 64 aby skorygować ewentualną rozbieżność wskazania czasu. Jeżeli próba synchronizacji nie powiedzie się (ikona masztu radiowego zniknie z wyświetlacza), system podejmie kolejną próbę synchronizacji o następnej pełnej godzinie. Ta procedura powtarza się automatycznie maksymalnie 5 razy. Aby ręcznie uruchomić odbiór sygnału DCF-77, nacisnąć i przytrzymać przycisk „-” przez 3 sekundy.
- Seite 65 Nacisnąć przycisk TIME SET, aby potwierdzić ustawienie – na wyświetlaczu zacznie migać wskazanie „TZ 0”. Nacisnąć przycisk „ + ” lub „ - ”, aby ustawić przesunięcie strefy czasowej (od -11 do +12). Na przykład wartość 0 dla Niemiec lub -1 dla Wielkiej Brytanii. ...
- Seite 66 wyświetlania dni tygodnia: DE (niemiecki), EN (angielski), FR (francuski), ES (hiszpański), IT (włoski) lub NL (holenderski). Nacisnąć przycisk „TIME SET”, aby potwierdzić i zakończyć konfigurację. Zegar powróci do zwykłego trybu wyświetlania czasu. Uwagi: Jeżeli przez 30 sekund nie zostanie naciśnięty żaden przycisk, zegar automatycznie przełączy się...
- Seite 67 zwykłego trybu wyświetlania czasu. Uwagi: Jeżeli przez 30 sekund nie zostanie naciśnięty żaden przycisk, zegar automatycznie przełączy się z trybu konfiguracji budzika na zwykły tryb wyświetlania czasu. Nacisnąć i przytrzymać przycisk „ + ” lub „ - ”, aby przyspieszyć zmianę wartości. Przełącznik ustawień...
- Seite 68 Temperatura w pomieszczeniu może być wyświetlana w stopniach Celsjusza lub Fahrenheita (°C lub °F). Niniejszym Technotrade oświadcza, że WT 245 jest zgodny z zasadniczymi wymogami oraz pozostałymi stosownymi postanowieniami Dyrektywy 2014/53/EU i ROHS 2011/65/EC.Kopię pełnej deklaracji zgodności można pobrać pod adresem: www.technoline.de/doc/4029665002453 Wpływ środowiska na odbiór...
-
Seite 69: Środki Ostrożności
usytuowanie pomiędzy wysokimi budynkami; usytuowanie wewnątrz betonowych budynków; znajdujące się w pobliżu urządzenia elektryczne (komputery, telewizory itd.) i struktury metalowe; usytuowanie w poruszających się pojazdach. Zegar najlepiej jest ustawić w miejscu, gdzie uzyska on najlepszy zasięg sygnału, tj. blisko okna i z dala od metalowych powierzchni czy urządzeń... - Seite 70 Unikać wystawiania baterii na działanie ekstremalnych temperatur, wilgoć czy światło słoneczne. Baterie należy trzymać w miejscu niedostępnym dla dzieci. Stwarzają one zagrożenie udławienia się. Produkt należy używać tylko zgodnie z przeznaczeniem! Zobowiązania według przepisów prawa dotyczących baterii Zużyte baterie nie mogą być utylizowane wraz z odpadami z gospodarstwa domowego, ponieważ...