Herunterladen Inhalt Inhalt Diese Seite drucken
Creality Sermoon D3 Schnellstartanleitung

Creality Sermoon D3 Schnellstartanleitung

Vorschau ausblenden Andere Handbücher für Sermoon D3:

Werbung

Verfügbare Sprachen
  • DE

Verfügbare Sprachen

  • DEUTSCH, seite 9
3D Printer Quick Start Guide
Sermoon D3
EN
ES
DE FR
Pyc. PT-BR
IT
TR
CN
V1.2

Werbung

Inhaltsverzeichnis
loading

Inhaltszusammenfassung für Creality Sermoon D3

  • Seite 1 3D Printer Quick Start Guide Sermoon D3 DE FR Pyc. PT-BR V1.2...
  • Seite 3 Method 1 Scan the QR code of "Creality Cloud" by your mobile phone. If it is your first time using Creality Cloud, please register an account first and fill in the information according to the APP prompts; If you already have a Creality Cloud account, please log in directly.
  • Seite 4 Move the extruder Remove the belt fasteners Remove the belt fasteners Remove the top foam. Remove the belt fasteners and Remove the foam that holds the move the extruder kit in the Extruder. order shown. Lift the transparent cover in Remove the foam tray at the Switch on the power.
  • Seite 5: General Specifications

    Thread the thick Teflon Tube through the fixing (to be placed tight against the hole from top to bottom, then the thin Teflon Tube printing platform). on the Filament Detection module. General Specifications Product Model Sermoon D3 Dimensions 553*578*656mm Max.Build Dimensions 300*250*300mm Rated Voltage 100-240V~,50/60Hz...
  • Seite 6 ESTIMADOS USUARIOS, Gracias por elegir los productos 3D de Creality. Lea atentamente esta guía rápida antes de usar el producto para su comodidad. Usando el código QR, el enlace de la página web o el disco USB puede obtener las instrucciones y videos correspondientes antes de usar el producto.
  • Seite 7 Mueva el extrusor Retire las sujetadores de la cinta Retire las sujetadores de la cinta Retire los sujetadores de la Retire la espuma de la parte de Retire la espuma del extrusor. cinta y mueva el kit extrusor arriba. en el orden indicado. Levante la cubierta transparente Retire la bandeja de espuma que Encienda.
  • Seite 8: Especificaciones Generales

    Cámara en vivo incorporada Consejo: Para ver el manual del dispositivo y el vídeo de instrucciones de desembalaje, consulte la información en la unidad de almacenamiento USB proporcionado junto con el dispositivo o el enlace de nuestro sitio oficial: https://www.creality.com/download.
  • Seite 9 Methode 1 Scannen Sie den QR-Code von „Creality Cloud“ mit Ihrem Mobiltelefon. Wenn Sie Creality Cloud zum ersten Mal nutzen, registrieren Sie bitte zunächst ein Konto und geben Sie die Informationen gemäß den Aufforderungen der APP ein; Wenn Sie bereits über ein Creality Cloud-Konto verfügen, melden Sie sich bitte direkt an.
  • Seite 10 Verschieben Sie den Extruder Entfernen Sie die Gurtbefestigungen Entfernen Sie die Gurtbefestigungen Entfernen Sie den oberen Entfernen Sie die Entfernen Sie den Schaumstoff, Schaumstoff. Riemenbefestigungen und der den Extruder hält. verschieben Sie den Extrudersatz in der angegebenen Reihenfolge. Heben Sie die transparente Entfernen Sie die Schalten Sie das Gerät ein.
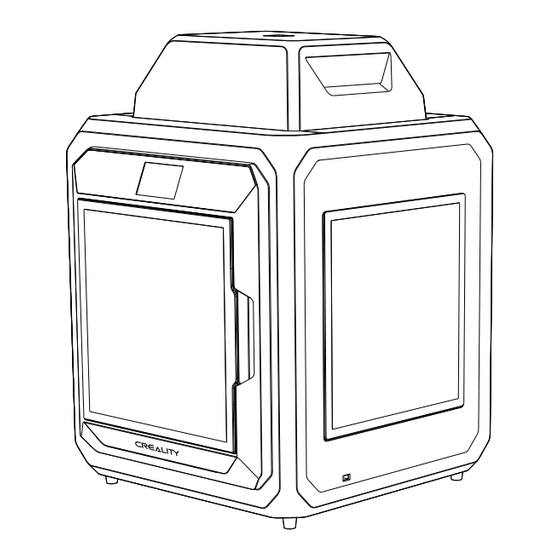
  • Seite 11: Allgemeine Angaben

    Erkennung des Filaments Intelligente Tür Automatisches Nivellieren Luftfilterung Eingebaute Live-Kamera Tipp: Die Bedienungsanleitung und das Video mit der Anleitung zum Auspacken des Geräts finden Sie auf der USB-Diskette, die Sie zusammen mit dem Gerät bekommen haben, oder auf unserer offiziellen Website-Verknüpfung: https://www.creality.com/download.
  • Seite 12 Web et du disque USB avant l'utilisation, et suivre strictement les instructions. L'équipe de Creality 3D est toujours prête à fournir des services de haute qualité. Quels que soient les problèm- es que vous rencontrez pendant l'utilisation, veuillez nous contacter par le téléphone et l'email fournis à la fin du guide d'installation rapide.
  • Seite 13 Déplacer l'extrudeuse Enlever les fixations de la courroie Enlever les fixations de la courroie Retirez la mousse supérieure. Retirer les fixations de la Retirez la mousse qui maintient courroie et faire progresser l'extrudeuse. le kit d'extrudeuse dans l'ordre indiqué. Soulevez le couvercle Retirez le bac en mousse situé...
  • Seite 14 fixation de haut en bas, puis le tube en contre la plateforme d'impression). téflon fin sur le module de détection de filament. Specifications générales Modèle du produit Sermoon D3 Dimensions 553*578*656mm Max. Dimensions de la construction 300*250*300mm Tension nominale...
  • Seite 15 Если Вы используете Creality Cloud впервые, пожалуйста, сначала зарегистрируйте аккаунт и заполните информацию, следуя подсказкам приложения; Если у Вас уже есть аккаунт Creality Cloud, пожалуйста, войдите в систему напрямую. Наличие: информация о новой продукции Creality Наличие: веселая печать Creality Cloud Наличие:...
  • Seite 16 Переместите экструдер Снимите крепления ремня Снимите крепления ремня Удалите верхнюю пену. Снимите крепления ремня и Удалите пену, которая переместите комплект удерживает экструдер. экструдера в указанном порядке. Поднимите прозрачную Удалите пенопластовый лоток Включите питание. крышку по порядку, и затем в нижней части прозрачной удалите...
  • Seite 17: Общие Характеристики

    Умная дверь Да Автовыравнивание Да Да Фильтрация воздуха Да Встроенная камера прямой передачи Совет: Для получения Руководства по устройству и видео-инструкции по распаковке обратитесь к информации на USB-накопителе, поставляемым вместе с устройством, или перейдите на наш официальный веб-сайт по ссылке: https://www.creality.com/download.
  • Seite 18 Método 1 Escaneie o código QR de "Creality Cloud” pelo seu celular. Se for a primeira vez que usa o Creality Cloud, registre uma conta primeiro e preencha as informações de acordo com as instruções do APP; Se você já tem uma conta no Creality Cloud, faça login diretamente.
  • Seite 19 Mova a extrusora Remova os fechos da correia Remova os fechos da correia Remova a espuma superior. Remova os fechos da correia Remova a espuma que apoia a e mova o kit da extrusora na extrusora. ordem mostrada. Levante a tampa transparente Remova a bandeja de espuma na Ligue a alimentação.
  • Seite 20: Especificações Gerais

    Porta Inteligente Autonivelamento Filtragem de Ar Câmera Ao Vivo Integrada Dica: Para o manual do dispositivo e o vídeo de instrução para desembalar, consulte as informações no pendrive USB que acompanha o dispositivo ou no link de nosso site oficial: https://www.creality.com/download.
  • Seite 21 QR, l'indirizzo del link della pagina web e il disco USB; ti preghiamo di seguire scrupolosamente le istruz- ioni. Il team di Creality 3D è sempre pronto a fornire servizi di alta qualità. Per qualsiasi problema riscontrato du- rante l'uso, ti preghiamo di contattarci tramite il telefono e l'e-mail forniti alla fine della guida rapida all'inst- allazione.
  • Seite 22 Rimozione dell'estrusore Rimozione dei fermi della cinghia Rimozione dei fermi della cinghia Rimuovere la gomma espansa Rimozione dei fermi della Rimuovere la gomma espansa superiore. cinghia e spostamento del dell'estrusore. kit estrusore nell'ordine indicato. Sollevare il coperchio Rimuovere il vassoio in gomma Accendere il dispositivo.
  • Seite 23: Specifiche Generali

    Filtraggio dell'aria Sì Telecamera live integrata Nota: Per il manuale del dispositivo e il video di istruzioni per il disimballo, consultare le informazioni contenute nel disco flash USB fornito insieme al dispositivo o il link del nostro sito web ufficiale: https://www.creality.com/download.
  • Seite 24 DEĞERLI KULLANICILAR, Creality 3D ürünlerini tercih ettiğiniz için te ekkürler. Size kolaylık sağlaması için, kullanmadan önce lütfen bu kılavuzu dikkatlice okuyunuz. Kullanmadan önce kare kod, internet sayfası bağlantı adresi ve USB bellek üzer- inden ilgili talimatlara ve videolara ula abilirsiniz; talimatlara sıkı bir ekilde uyun.
  • Seite 25 Ekstrüderi hareket ettirin Kayı bağlantılarını çıkarın Kayı bağlantılarını çıkarın Üst köpüğü çıkarın. Gösterilen sırayla kayı Ekstrüderi tutan köpüğü çıkarın. bağlantılarını çıkarın ve ekstrüder kitini hareket ettirin. Öncelikle saydam kapağı ekilde gösterildiği gibi öncelikle Gücü açın. kaldırın ve ardından yatay saydam kapağın altındaki köpük pozisyonda çıkarın.
  • Seite 26 Evet Akıllı Kapı Evet Evet Otomatik Düzle tirme Evet Hava Filtreleme Evet İç Canlı Kamera İpucu: Cihaz kılavuzu ve kutu açma talimat videosu için, lütfen cihazla birlikte sağlanan USB flash diskte yer alan bilgilere veya resmi internet sitemize bakın: https://www.creality.com/download.
  • Seite 27 尊敬的用户: 感谢您选择创想三维的产品。为了您使用方便,请您在使用之前仔细阅读本快速指南,您在使用前可以通过扫 描二维码、链接地址、U盘获取相关使用说明及视频,并严格按照指示进行操作。 创想三维团队时刻准备为您提供优质的服务。在使用过程中无论遇到什么问题,请按照快速指南结尾所提供的 电话、邮箱与我们进行联系。 方法 1 手机扫描“创想云”二维码 如果您第一次使用创想云,请先注册账号,并根据APP提示填写信息; 如果您已经有创想云账号,请直接登录。 拥有:Creality 新品资讯 拥有:创想云趣打印 拥有:开箱资料 (用户可通用搜索机器型号,找到说明书/开箱视频) 拥有:服务支持 创想云二维码 方法 2 电脑登录官网 如果您更方便使用电脑,登录https://www.creality.com/download,在首页也可通过输入机器型号找到说明书/ 开箱视频以及相关设备使用资料。 https://www.creality.com/download 方法 3 U盘 打开机器包裹,您可以从工具包里面找出U盘,通过电脑获取产品说明书及视频相关资料。 (备注:U盘资料可能不是当前最新,建议采用方法1、方法2获取最新的资料。)...
  • Seite 28 移动挤出 机组件 取出皮带 紧固件 取出皮带 紧固件 取出固定喷头的泡棉 取出顶部泡棉 按图示依序取出皮带紧固件、移 动挤出机组件。 依序托起透明罩再平移取出 接通电源 按图示依序取出透明罩底部泡棉托 接通电源后,点击屏幕“确认”, 按图示依序取出平台底部泡棉A 按图示依序取出平台底部泡棉B, 抬起打印平台。 点击屏幕“确认”。...
  • Seite 29 放置打印平台板(需贴紧打印 从上至下将粗铁氟龙管穿过固定孔后, 平台) 再穿过断料检测模块上的细铁氟龙管。 基本参数 Sermoon D3 型号 整机尺寸 553*578*656mm 成型尺寸 300*250*300mm 额定电压 100-240V~,50/60Hz 额定功率 500W 10℃-30℃ 使用环境温度 近端挤出 挤出机类型 喷头数量 喷嘴直径 0.4mm 0.1-0.4mm 切片厚度 打印精度 ±0.1mm 标准打印速度:100mm/s PLA最大打印速度:150mm/s 打印速度 ABS最大打印速度:250mm/s 支持耗材直径 1.75mm 兼容材料 ABS/PLA/PETG/ASA/PET/TPU95A 热床温度 最高110℃ 喷嘴温度 最高300 ºC 屏幕...
  • Seite 32 3D Printing Evangelists With the spirit of evangelists, we want to share the convenience of technology with everyone. 18th Floor, JinXiuHongDu Building, Meilong Road, Xinniu Community, Minzhi Street, Longhua District, Shenzhen City, China. Official Website: www.creality.com Tel: +86 755-8523 4565 E-mail: cs@creality.com...

Diese Anleitung auch für:

Csd3

Inhaltsverzeichnis