Inhaltsverzeichnis
Werbung
Verfügbare Sprachen
Verfügbare Sprachen
Quicklinks
Werbung
Inhaltsverzeichnis

Verwandte Anleitungen für GYS GYSPRESS PREMIUM 10T PUSH-PULL


Inhaltszusammenfassung für GYS GYSPRESS PREMIUM 10T PUSH-PULL
- Seite 1 02-04 / 05-14 / 65-68 10T PUSH-PULL 02-04 / 15-24 / 65-68 02-04 / 25-34 / 65-68 Riveteuse Riveting machine 02-04 / 35-44 / 65-68 02-04 / 45-54 / 65-68 02-04 / 55-64 / 65-68 73502 14/12/2022 Find more languages of user manuals www.gys.fr...
- Seite 2 Manuel d’utilisation GYSPRESS PREMIUM 10T PUSH-PULL Notice originale...
- Seite 3 Manuel d’utilisation GYSPRESS PREMIUM 10T PUSH-PULL Notice originale HR110 HR310 HR210...
- Seite 4 Manuel d’utilisation GYSPRESS PREMIUM 10T PUSH-PULL Notice originale COMPOSITION BOITE MATRICES / COMPOSITION BOX DIES / ZUSAMMENSTELLUNG VON MATRIZEN- BOXEN 058361 Matrices pour rivet auto-perçants (RAP) Matrix for self-piercing rivets (RAP) Matrizen für Stanznieten (RAP) Matrices para remaches autoperforantes Матрицы для самопроникающих заклепок (RAP) Matrijzen voor self-piercing rivets (RAP) セルフピアシング用マトリ...
-
Seite 5: Environnement De Travail
Manuel d’utilisation GYSPRESS PREMIUM 10T PUSH-PULL Notice originale AVERTISSEMENTS - RÈGLES DE SÉCURITÉ CONSIGNE GÉNÉRALE Ce manuel d’utilisation comprend des indications sur le fonctionnement de votre appareil et les précautions à suivre pour votre sécurité. Merci de le lire attentivement avant la première utilisation et de le conserver soigneu- sement pour toute relecture future. -
Seite 6: Caractéristiques Techniques
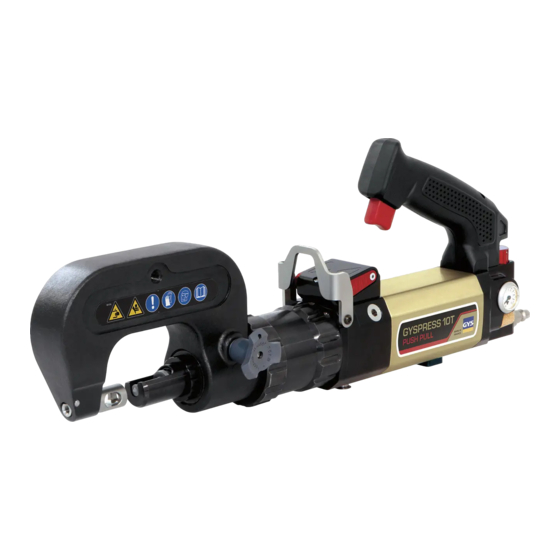
MANIPULATION Toutes les manipulations nécessaires à une utilisation correcte sont décrites dans cette notice. Il n’est pas permis d’avoir recours à des méthodes de travail qui ne sont pas explicitement autorisées par le fabricant GYS. DESCRIPTION DU MATÉRIEL (I) Bras en acier... - Seite 7 Manuel d’utilisation GYSPRESS PREMIUM 10T PUSH-PULL Notice originale MISE EN PLACE D’UN BRAS Placer le bras avec précaution sur le nez de la riveteuse en prenant soin d’aligner les 2 repères (a). Pour la mise en place de grands bras, il est conseillé...
-
Seite 8: Montage Des Embouts
Manuel d’utilisation GYSPRESS PREMIUM 10T PUSH-PULL Notice originale MONTAGE DES EMBOUTS Visser le kit d’embouts requis pour la procédure de rivetage dans le support du bras. Avant chaque montage, vérifier que la matrice et le support rivet sont correctement associés (voir page 4) et serrés. - Seite 9 Manuel d’utilisation GYSPRESS PREMIUM 10T PUSH-PULL Notice originale FONCTIONNEMENT DU MODE PUSH-PULL PUSH PULL Mode AUTO Mode MANUEL Mode (AUTO / MANUEL) Levier (PUSH / PULL) Gâchette Action du vérin PUSH Appuyée 0 > 100 kN PUSH Relâchée STOP MANUEL PULL Relâchée...
- Seite 10 Manuel d’utilisation GYSPRESS PREMIUM 10T PUSH-PULL Notice originale BOITE DE RIVETS FOURNIE La riveteuse est fournie avec une boite de 300 rivets acier auto-perçants (RAP) (ref. 048706). Ces rivets d’essai sont fournis pour permettre de tester la riveteuse et ne doivent en aucun cas être utilisés pour la réparation automobile.
- Seite 11 Manuel d’utilisation GYSPRESS PREMIUM 10T PUSH-PULL Notice originale Pour poinçonner la tôle et calibrer des trous, il est nécessaire d’utiliser une matrice spécifique appelée dévêtisseur. Cette matrice permet de retenir la tôle lors de l’extraction du poinçon. Après le poinçonnage, le poinçon est enfoncé dans les tôles à assem- bler.
- Seite 12 Manuel d’utilisation GYSPRESS PREMIUM 10T PUSH-PULL Notice originale POSE DE RIVETS FLOW-FORM Avant d’envisager d’assembler des tôles avec des rivets Flow-Form, il est nécessaire de faire un avant-trou (voir la dé- marche ci-dessus). Une fois l’avant-trou effectué, insérer le rivet Flow-Form dans celui-ci.
-
Seite 13: Contrôles Et Maintenance
Manuel d’utilisation GYSPRESS PREMIUM 10T PUSH-PULL Notice originale EXTRACTION DE RIVETS Dans le cas de réparations de tôles de carrosserie, des rivets anciens ou défectueux doivent être retirés des tôles jointes. Pour éviter d’avoir à retirer ces rivets par perçage, l’embout d’extraction et sa matrice doivent être utilisés. -
Seite 14: Anomalies, Causes, Remèdes
077164 Adaptateur 50 kN pour rivets aveugles 064867 Retrouvez tous les accessoires et matrices pour riveteuse sur www.gys.fr. CONDITIONS DE GARANTIE FRANCE La garantie couvre tous défauts ou vices de fabrication pendant 2 ans, à compter de la date d’achat (pièces et main-d’œuvre). - Seite 15 User manual Translation of the original GYSPRESS PREMIUM 10T PUSH-PULL instructions WARNINGS - SAFETY INSTRUCTIONS GENERAL INSTRUCTIONS This user’s manual includes operating instructions for your device and safety warnings for your protection. Please read it carefully before first use and keep it for future reference. This equipment should only be used by profes- sionals and only qualified and experienced personnel should install, adjust, or operate it.
- Seite 16 8 bar - 110 psi Maximum clamping force 100 kN HANDLING All the necessary steps for correct use are outlined in this manual. Operating procedures that are not explicitly approved by the manufacturer, GYS, are not permitted. DESCRIPTION OF THE EQUIPMENT (I) Steel arm...
- Seite 17 User manual Translation of the original GYSPRESS PREMIUM 10T PUSH-PULL instructions ARM INSTALLATION Carefully place the arm on the nose of the riveter, making sure to align the 2 markings (a). When fitting large arms, it is recommended that the arms are laid flat on a table, and the nose of the riveter is brought into the arm opening.
- Seite 18 User manual Translation of the original GYSPRESS PREMIUM 10T PUSH-PULL instructions MOUNTING THE FITTINGS Screw the end-cap kit required for the riveting procedure into the arm support. Before each assembly, check that the die and rivet holder are correctly paired (see page 4) and tightened securely.
- Seite 19 User manual Translation of the original GYSPRESS PREMIUM 10T PUSH-PULL instructions OPERATION OF THE PUSH-PULL MODE PUSH PULL AUTO mode MANUAL mode AUTO / MANUAL mode Lever (Push / Pull) Trigger Cylinder action PUSH Press 0 > 100 kN PUSH...
- Seite 20 User manual Translation of the original GYSPRESS PREMIUM 10T PUSH-PULL instructions RIVETS BOX INCLUDED The riveter is supplied with a box of 300 self-piercing steel rivets (RAP) (ref. 048706). These test rivets are provided for the purpose of testing the riveter and should not be used for automotive repair under any circumstances.
- Seite 21 User manual Translation of the original GYSPRESS PREMIUM 10T PUSH-PULL instructions To punch the sheet metal to a specific diameter, it is necessary to use a specific die. This die protects the sheet from damage. After punching, the punch is pushed into the metal sheet and pierces the hole.
- Seite 22 User manual Translation of the original GYSPRESS PREMIUM 10T PUSH-PULL instructions INSTALLATION OF FLOW FORM RIVETS Before you can consider joining sheets with Flow-Form rivets, it is necessary to make a pilot hole (see above). Once the pilot hole has been created, insert the Flow-Form rivet into it.
-
Seite 23: Controls And Maintenance
User manual Translation of the original GYSPRESS PREMIUM 10T PUSH-PULL instructions RIVET EXTRACTION For car body repairs, old or damaged rivets must be removed from the metal sheets. To avoid the necessity of removing these rivets by drilling, the extraction tip and its die should be used. They allow the rivets to be removed without damaging the sheet metal. - Seite 24 Compact 077164 Adapter 50 kN for blind rivets 064867 Find all riveting accessories and dies on www.gys.fr WARRANTY CONDITIONS FRANCE The warranty covers any defects or manufacturing faults for two years from the date of purchase (parts and labour). The warranty does not cover: •...
-
Seite 25: Warnungen - Sicherheitsregeln
Betriebsanleitung Übersetzung der GYSPRESS PREMIUM 10T PUSH-PULL Originalbetriebsanleitung WARNUNGEN - SICHERHEITSREGELN ALLGEMEINER HINWEIS In dieser Betriebsanleitung finden Sie Informationen zur Funktionsweise Ihres Geräts und zu den Sicherheitsvor- kehrungen, die Sie treffen müssen. Bitte lesen Sie diese vor dem ersten Gebrauch sorgfältig durch und bewahren Sie sie zum späteren Nachschlagen auf. -
Seite 26: Handhabung
100 kN HANDHABUNG Alle erforderlichen Handhabungen für eine sachgemäße Nutzung sind in dieser Betriebsanleitung beschrieben. Il n’est pas permis d’avoir recours à des méthodes de travail qui ne sont pas explicitement autorisées par le fabricant GYS. BESCHREIBUNG (I) Stahlbügel Modus AUTO / MANUELL... -
Seite 27: Anbringen Eines Bügels
Betriebsanleitung Übersetzung der GYSPRESS PREMIUM 10T PUSH-PULL Originalbetriebsanleitung ANBRINGEN EINES BÜGELS Den Bügel behutsam auf die Spitze des Nietgeräts platzieren und dabei die 2 Markierungen ausrichten(a). Beim Einsetzen großer Bügel sollten Sie die Bügel flach auf einen Tisch legen und die Nase des Nietgeräts in die Öffnung des Bügels führen. -
Seite 28: Montage Der Einsätze
Betriebsanleitung Übersetzung der GYSPRESS PREMIUM 10T PUSH-PULL Originalbetriebsanleitung MONTAGE DER EINSÄTZE Das für den Nietvorgang benötigte Endstück-Kit in die Armhalterung einschrauben. Vor jeder Montage prüfen, ob die Matrix und der Nietenhalter ordnungsgemäß verbunden (siehe Seite 4) und angezogen sind. Sobald die Matrix und der Spitzenhalter angebracht sind, das Spannen mit dem gelieferten Spezialschlüssel abschließen. Nach jedem Nietvorgang prüfen, ob die Nieteinsätze gut halten. -
Seite 29: Funktion Des Modus Push-Pull
Betriebsanleitung Übersetzung der GYSPRESS PREMIUM 10T PUSH-PULL Originalbetriebsanleitung FUNKTION DES MODUS PUSH-PULL PUSH PULL Modus AUTO Modus MANUELL Modus (AUTO / MANUELL) Hebel (PUSH / PULL) Brennertaster Zylindertätigkeit PUSH Gedrückt 0 > 100 kN PUSH Gelöst STOP MANUELL PULL Gelöst PULL Gedrückt... -
Seite 30: Anbringen Von Stanznieten
Betriebsanleitung Übersetzung der GYSPRESS PREMIUM 10T PUSH-PULL Originalbetriebsanleitung ANBRINGEN VON STANZNIETEN Ø 3,3 mm Ø 5,3 mm Beim Anbringen von Stanznieten muss das Sitzen der Nieten kontrolliert werden. Die Matrizen dürfen nicht beschädigt werden, das Nieten könnte dadurch problematisch werden. - Seite 31 Betriebsanleitung Übersetzung der GYSPRESS PREMIUM 10T PUSH-PULL Originalbetriebsanleitung Nach dem Stanzen wird der Stempel in die zusammenzufügenden Bleche eingedrückt. Das Blech wird von den Stempel befreit und zum Nieten vorbereitet. Sollte der Stempel nicht aus dem Blech austreten, wird die PULL-Funk- tion des Nietgeräts angewandt.
-
Seite 32: Anbringen Von Flow-Form-Nieten
Betriebsanleitung Übersetzung der GYSPRESS PREMIUM 10T PUSH-PULL Originalbetriebsanleitung ANBRINGEN VON FLOW-FORM-NIETEN Bevor ein Zusammenfügen der Bleche mit Flow-Form-Nieten in Betracht gezogen wird, muss eine Vorbohrung angelegt werden (siehe unten stehende Vorgehensweise). Nach dem Anlegen der Vorbohrung den Flow-Form-Nietkopf in die Der Einsatz F1 muss an der Kopfseite des Nietkopfs platziert werden. -
Seite 33: Abziehen Von Nieten
Betriebsanleitung Übersetzung der GYSPRESS PREMIUM 10T PUSH-PULL Originalbetriebsanleitung ABZIEHEN VON NIETEN Bei Reparaturen an Karosserieblechen müssen alte oder defekte Niete aus den zusammengefügten Blechen entfernt werden. Um ein Entfernen dieser Niete durch Ausbohren zu vermeiden, müssen der Abzieheinsatz und seine Matrix verwendet werden. Sie erlauben nämlich das Abziehen der Niete ohne Beeinträchtigung der Bleche. -
Seite 34: Fehler, Ursachen, Lösungen
077164 Adapter 50 kN für Blindnieten 064867 Alle Zubehörteile und Matrizen für Nietgeräte finden Sie unter www.gys.fr. HERSTELLERGARANTIE Die Garantie deckt alle Defekte oder Herstellungsfehler für 2 Jahre ab dem Kaufdatum (Teile und Arbeitszeit) ab. Die Garantieleistung erfolgt nicht bei Defekten, die durch: •... - Seite 35 Gebruikershandleiding GYSPRESS PREMIUM 10T PUSH-PULL Vertaling van de originele handleiding WAARSCHUWINGEN - VEILIGHEIDSINSTRUCTIES ALGEMENE INSTRUCTIES Deze handleiding bevat belangrijke aanwijzingen voor het gebruik van uw apparaat en de veiligheidsmaatregelen die in acht moeten worden genomen voor, tijdens en na het gebruik. Leest u deze handleiding aandachtig door alvorens uw aankoop in gebruik te nemen, en bewaar de handleiding vervolgens als naslagwerk.
- Seite 36 BEDIENING Alle handelingen die nodig zijn voor een correct gebruik van dit apparaat staan beschreven in deze handleiding. Het is verboden om werkmethodes uit te voeren die niet expliciet door de fabrikant GYS zijn toegestaan. BESCHRIJVING VAN HET MATERIAAL (I)
- Seite 37 Gebruikershandleiding GYSPRESS PREMIUM 10T PUSH-PULL Vertaling van de originele handleiding PLAATSEN VAN EEN ARM Plaats de arm voorzichtig op de neus van de ponsnageltang, let er daarbij goed op dat de 2 merktekens op één lijn liggen (a). Voor het plaatsen van grote armen bevelen wij u aan om de armen plat op een tafel te leggen, en dan de neus van de ponsnageltang in de opening van de arm in te brengen.
-
Seite 38: Aansluiting Perslucht
Gebruikershandleiding GYSPRESS PREMIUM 10T PUSH-PULL Vertaling van de originele handleiding MONTAGE TIPS Schroef de tips die nodig zijn voor uw ponsprocedure in de houder van de arm. Controleer voor iedere montage of de matrijs en de klinknagel-houder correct op elkaar aangesloten zijn (zie pagina 4) en goed vastgedraaid zijn. - Seite 39 Gebruikershandleiding GYSPRESS PREMIUM 10T PUSH-PULL Vertaling van de originele handleiding WERKING PUSH-PULL MODULE PUSH PULL Module AUTO HANDMATIGE module Module (AUTO / HANDMATIG) Hendel (PUSH / PULL) Trekker Werking van de cilinder PUSH Ingedrukt 0 > 100 kN PUSH Losgelaten...
- Seite 40 Gebruikershandleiding GYSPRESS PREMIUM 10T PUSH-PULL Vertaling van de originele handleiding DOOS MET KLINKNAGELS INBEGREPEN De ponsnageltang wordt geleverd met een doos met 300 self-piercing rivets (RAP) (art. code. 048706). Deze proef-ponsnagels zijn alleen bedoeld voor het testen van de ponsnageltang, ze mogen nooit worden gebruikt voor het uitvoeren van auto-reparaties.
- Seite 41 Gebruikershandleiding GYSPRESS PREMIUM 10T PUSH-PULL Vertaling van de originele handleiding Voor het ponsen van plaatwerk en het kalibreren van gaten is een speciale matrijs nodig (genaamd afstrijker). Deze matrijs blokkeert het plaatwerk tijdens het extraheren van de pons. Na het ponsen bevindt de pons zich in de te assembleren platen. De pons is verwijderd uit het plaatwerk, dat nu gereed is om vastgeklonken te worden.
- Seite 42 Gebruikershandleiding GYSPRESS PREMIUM 10T PUSH-PULL Vertaling van de originele handleiding AANBRENGEN VAN FLOW-FORM RIVETS Voordat u plaatwerk samen gaat voegen met Flow-Form rivets moet u eerst een voor-gaatje te boren (zie de hierboven beschreven aanwijzingen). Wanneer er een gaatje is voorgeboord, kunt u hierin de Flow-Form rivet...
-
Seite 43: Controle En Onderhoud
Gebruikershandleiding GYSPRESS PREMIUM 10T PUSH-PULL Vertaling van de originele handleiding VERWIJDEREN VAN RIVETS Bij reparaties van carrosserie-plaatwerk moeten de oude en/of versleten rivets eerst uit het plaatwerk verwijderd worden. Om te voorkomen dat u de rivets uit moet boren, kunt u het extractie-mondstuk en de bijbehorende matrijs gebruiken. -
Seite 44: Garantievoorwaarden
Compact 077164 Adapter 50 kN voor blindklinknagels 064867 Op onze website www.gys.fr vindt u alle accessoires en matrijzen voor ponsnageltangen. GARANTIEVOORWAARDEN De garantie dekt alle gebreken of fabricage-fouten gedurende 2 jaar, vanaf de aankoopdatum (onderdelen en uurloon). De garantie dekt niet : •... -
Seite 45: Istruzioni Generali
Manuale di utilizzo Traduzione delle istruzioni GYSPRESS PREMIUM 10T PUSH-PULL originali AVVERTENZE - NORME DI SICUREZZA ISTRUZIONI GENERALI Questo manuale descrive il funzionamento dell’apparecchio e le precauzioni da seguire per la vostra sicurezza. Leggerlo attentamente prima dell’uso e conservarlo con cura per poterlo consultare successivamente. Questa attrezzatura è... - Seite 46 Manuale di utilizzo Traduzione delle istruzioni GYSPRESS PREMIUM 10T PUSH-PULL originali SOSTITUZIONE DI BRACCI E ACCESSORI Utilizzare solo bracci e accessori raccomandati dal produttore. RUMORE Livello di potenza sonora ponderato : LWA = 78 dB VIBRAZIONE Le emissioni di vibrazioni sono inferiori alla soglia imposta di 2,5 m/s².
- Seite 47 Manuale di utilizzo Traduzione delle istruzioni GYSPRESS PREMIUM 10T PUSH-PULL originali INSTALLAZIONE DI UN BRACCIO Posizionare il braccio sul naso della rivettatrice facendo attenzione ad allineare i 2 punti di riferimento (a). Per posizionare un grande braccio, si consiglia di appoggiare il braccio a piatto su una tavola e inserire il naso della rivettatrice nell’orifizio del braccio.
- Seite 48 Manuale di utilizzo Traduzione delle istruzioni GYSPRESS PREMIUM 10T PUSH-PULL originali MONTAGGIO DEI TERMINALI Avvitare il kit di terminali richiesti per la procedura di rivettatura nei supporti del braccio. Prima di ogni montaggio verificare che la matrice e il supporto del punzone siano correttamente associati (vedi pag.
- Seite 49 Manuale di utilizzo Traduzione delle istruzioni GYSPRESS PREMIUM 10T PUSH-PULL originali FUNZIONAMENTO DELLA MODALITÀ PUSH-PULL PUSH PULL Modalità AUTO Modalità MANUALE Modalità (AUTO / MANUALE) Leva (PUSH / PULL) Pulsante di avanzamento Azione del martinetto PUSH Premuto 0 > 100 kN...
- Seite 50 Manuale di utilizzo Traduzione delle istruzioni GYSPRESS PREMIUM 10T PUSH-PULL originali CONFEZIONE DI RIVETTI La rivettatrice è fornita con una scatola da 300 rivetti in acciaio auto-perforanti (RAP) (rif. 048706). Questi rivetti di prova sono forniti per permettere di testare la rivettatrice e non devono essere utilizzati in nessun caso per le riparazioni delle automobili.
- Seite 51 Manuale di utilizzo Traduzione delle istruzioni GYSPRESS PREMIUM 10T PUSH-PULL originali Per punzonare la lamiera e calibrare i fori, è necessario utilizzare una matrice specifica chiamata estrattore. Questa matrice permette trattenere la lamiera quando si estrae il punzone. Dopo la punzonatura, il punzone resta inserito nelle lamiere da assem- blare.
- Seite 52 Manuale di utilizzo Traduzione delle istruzioni GYSPRESS PREMIUM 10T PUSH-PULL originali POSA DEI RIVETTI FLOW-FORM Prima di considerare di assemblare delle lamiere con rivetti Flow-Form, si deve fare un foro guida (vedi procedimento sopra riportato). Una volta fatto il foro guida , inserirvi il rivetto Flow-Form.
-
Seite 53: Controlli E Manutenzione
Manuale di utilizzo Traduzione delle istruzioni GYSPRESS PREMIUM 10T PUSH-PULL originali ESTRAZIONE DEI RIVETTI Nel caso di riparazioni di lamiere di carrozzeria vecchi rivetti o rivetti difettosi devono essere rimossi dalle lamiere assemblate. Per evitare di dover togliere questi rivetti perforando, utilizzare il terminale di estrazione e la sua matrice. - Seite 54 Adattatore da 50 kN per rivetti ciechi 064867 Trovate tutti gli accessori e le matrici per rivettatrici su www.gys.fr. CONDIZIONI DI GARANZIA FRANCIA La garanzia copre tutti i difetti o gli errori di fabbricazione per 2 anni dalla data di acquisto (parti e manodopera).
- Seite 55 Instrukcja obsługi GYSPRESS PREMIUM 10T PUSH-PULL Tłumaczenie instrukcji oryginalnej OSTRZEŻENIA - ZASADY BEZPIECZEŃSTWA WPROWADZENIE I OPIS OGÓLNY Niniejsza instrukcja obsługi zawiera informacje na temat obsługi urządzenia oraz środków ostrożności, które należy podjąć dla własnego bezpieczeństwa. Prosimy o dokładne zapoznanie się z nim przed pierwszym użyciem i zachowanie go do wykorzystania w przyszłości.
- Seite 56 Maksymalna siła zacisku 100 kN OBSŁUGA Wszystkie czynności niezbędne do prawidłowego użytkowania zostały opisane w niniejszej instrukcji. Niedopuszczalne jest stosowanie metod pracy, które nie są wyraźnie dopuszczone przez producenta GYS. OPIS SPRZĘTU (I) Ramiona stalowe Tryb AUTO / MANUAL Dźwignia (Push / Pull) Sworzeń...
-
Seite 57: Instrukcja Obsługi
Instrukcja obsługi GYSPRESS PREMIUM 10T PUSH-PULL Tłumaczenie instrukcji oryginalnej INSTALACJA RAMIENIA Ostrożnie umieścić ramię na nosie nitownicy, zwracając uwagę na wyrównanie 2 znaków (a). Przy ustawianiu dużych ramion warto położyć je płasko na stole i wprowadzić czubek nitownicy do otworu w ramieniu. -
Seite 58: Przyłącze Sprężonego Powietrza
Instrukcja obsługi GYSPRESS PREMIUM 10T PUSH-PULL Tłumaczenie instrukcji oryginalnej MONTAŻ KOŃCÓWEK Przykręcić zestaw zaślepek wymagany do nitowania do wspornika ramienia. Przed każdym montażem należy sprawdzić, czy matryca i uchwyt nitów są prawidłowo skojarzone (patrz strona 4) i dokręcone. Gdy matryca i uchwyt stempla są już na swoim miejscu, dokończ dokręcanie za pomocą specjalnego klucza znajdującego się w zestawie. - Seite 59 Instrukcja obsługi GYSPRESS PREMIUM 10T PUSH-PULL Tłumaczenie instrukcji oryginalnej PRACA W TRYBIE PUSH-PULL PUSH PULL Tryb AUTO Tryb MANUEL Tryb (AUTO / MANUAL) Dźwignia (PUSH / PULL) Spust Działanie siłownika PUSH Naciśnięty 0 > 100 kN PUSH Zwolniony STOP MANUEL...
- Seite 60 Instrukcja obsługi GYSPRESS PREMIUM 10T PUSH-PULL Tłumaczenie instrukcji oryginalnej PUDEŁKO NITÓW W ZESTAWIE Nitownica jest dostarczana z pudełkiem 300 stalowych nitów samozrywalnych (RAP) (nr kat. 048706). Nity próbne służą do testowania nitownicy i w żadnym wypadku nie powinny być używane do napraw samochodowych.
- Seite 61 Instrukcja obsługi GYSPRESS PREMIUM 10T PUSH-PULL Tłumaczenie instrukcji oryginalnej Do przebijania blachy i kalibrowania otworów konieczne jest użycie specjalnej matrycy zwanej stripperem. Dzięki tej matrycy blacha zostaje zachowana po wyjęciu wykrawacza. Po wykrawaniu stempel jest wbijany w łączone blachy. Blacha zostaje uwolniona od wykrawacza i przygotowana do nitowania.
- Seite 62 Instrukcja obsługi GYSPRESS PREMIUM 10T PUSH-PULL Tłumaczenie instrukcji oryginalnej OSADZANIE NITÓW TYPU FLOW-FORM Przed rozważeniem łączenia blach za pomocą nitów Flow-Form, konieczne jest wykonanie otworu pilotażowego (patrz wyżej). Po wywierceniu otworu pilotażowego włóż do niego nit Flow-Form. Końcówka F1 powinna być umieszczona po stronie główki nitu.
- Seite 63 Instrukcja obsługi GYSPRESS PREMIUM 10T PUSH-PULL Tłumaczenie instrukcji oryginalnej WYCIĄGANIE NITÓW W przypadku napraw nadwozia należy usunąć z łączonych blach stare lub uszkodzone nity. Aby uniknąć ko- nieczności usuwania tych nitów przez wiercenie, należy użyć końcówki ekstrakcyjnej i jej matrycy. Umożliwiają one usunięcie nitów bez uszkadzania blachy.
- Seite 64 077164 paktowy Adapter 50 kN do nitów jednostronnie zamykanych 064867 Znajdź wszystkie akcesoria i matryce do nitownic na stronie www.gys.fr. WARUNKI GWARANCJI FRANCJA Gwarancja obejmuje wszelkie wady lub usterki produkcyjne przez 2 lata od daty zakupu (części i robocizna). Gwarancja nie obejmuje: •...
- Seite 65 Tableau réglage pression GYSPRESS PREMIUM 10T PUSH-PULL PRESSURE CONTROL CHART / TABELLE EINSTELLUNG PRESSDRUCK / TABLA DE AJUSTE DE PRE- SIÓN / ТАБЛИЦА РЕГУЛИРОВКИ ДАВЛЕНИЯ / TABEL INSTELLING AANDRUKKRACHT / 圧力制御チャー ト / TABELLA REGOLAZIONE PRESSIONE 2,0 >6,5 mm 2,3 >8,3 mm...
- Seite 66 Dimensions GYSPRESS PREMIUM 10T PUSH-PULL DIMENSIONS / ABMESSUNGEN / DIMENSIONES / РАЗМЕРЫ / AFMETINGEN / DIMENSIONI...
- Seite 67 Pictogrammes GYSPRESS PREMIUM 10T PUSH-PULL SYMBOLS / ZEICHENERKLÄRUNG / ICONOS / СИМВОЛЫ / PICTOGRAMMEN / ICONE Attention ! Lire le manuel d’instruction avant utilisation. Warning ! Read the user manual before use. ACHTUNG ! Lesen Sie diese Anleitung sorgfältig durch vor Inbetriebnahme des Geräts.
- Seite 68 GYS France GYS Italia Siège social / Headquarter Filiale / Filiale 1, rue de la Croix des Landes - CS 54159 Vega – Parco Scientifico Tecnologico di 53941 Saint-berthevin Cedex Venezia France Via delle Industrie, 25/4 30175 Marghera - VE www.gys.fr...