Samsung C61RCCN Einbau- Und Betriebsanleitung
Vorschau ausblenden
Andere Handbücher für C61RCCN:
- Einbau- und betriebsanleitung (32 Seiten) ,
- Betriebsanleitung (32 Seiten)
Inhaltsverzeichnis
Werbung
Verfügbare Sprachen
Verfügbare Sprachen
Quicklinks
Installation and Operating Instructions
Ceramic Glass Hob
C61RCCN / C61RCAST / C61RCBAL / C61RCDST
To avoid the risk of accidents or damage to the hob, read all instructions before installing or
using the appliance. Keep this manual for future reference.
C61RCCN_XAG-00060A-01_EN.indd
1
2007-09-18
ソタネト 12:11:25
Werbung
Inhaltsverzeichnis
Fehlerbehebung

Verwandte Anleitungen für Samsung C61RCCN


Inhaltszusammenfassung für Samsung C61RCCN
- Seite 1 Installation and Operating Instructions Ceramic Glass Hob C61RCCN / C61RCAST / C61RCBAL / C61RCDST To avoid the risk of accidents or damage to the hob, read all instructions before installing or using the appliance. Keep this manual for future reference.
- Seite 2 C61RCCN_XAG-00060A-01_EN.indd 2007-09-18 ソタネト 12:11:25...
-
Seite 3: Inhaltsverzeichnis
Contents Using This Manual ............2 Safety . -
Seite 4: Using This Manual
Using This Manual Please take the time to read this owner’s manual, paying particular attention to the safety information contained in the following section, before using your appliance. Keep this manual for future reference. If transferring ownership of the appliance, please remember to pass the manual on to the new owner. -
Seite 5: Safety
Safety The safety aspects of this appliance comply with accepted technical standards and the German Appliance Safety Law. However, as manufacturers we also believe it is our responsibility to familiarise you with the following safety instructions. Electrical safety • Be sure the appliance is properly installed and grounded by a qualified technician. •... -
Seite 6: Safety During Use
Safety (continued) Safety during use • This appliance is to be used only for normal cooking and frying in the home. It is not de- signed for commercial or industrial use. • Never use the hob for heating the room. •... -
Seite 7: Installing The Hob
Installing the Hob Important: Be sure the new appliance is installed and grounded only by qualified personnel. Please observe this instruction. The warranty will not cover any damage that may occur as a result of improper installation. Technical data is provided at the end of this manual. Regulations and compliance This appliance meets the following standards: •... -
Seite 8: Connecting To The Mains Power Supply
Installing the Hob (Continued) Connecting to the mains power supply Before connecting, check that the nominal voltage of the appliance, that is, the voltage stated on the rating plate, corresponds to the available supply voltage. The rating plate is located on the lower casing of the hob. -
Seite 9: Installing Into The Countertop
Installing the Hob (Continued) Installing into the countertop Make a note of the serial number on the appliance rating plate prior to installation. This number will be required in the case of requests for service and is no longer ac- cessible after installation, as it is on the original rating plate on the underside of the appliance. - Seite 10 Installing the Hob (Continued) Model : C61RCBAL, C61RCCN, C61RCDST C61RCCN_XAG-00060A-01_EN.indd 2007-09-18 ソタネト 12:11:44...
- Seite 11 Installing the Hob (Continued) Model : C61RCAST C61RCCN_XAG-00060A-01_EN.indd 2007-09-18 ソタネト 12:12:02...
-
Seite 12: Parts And Features
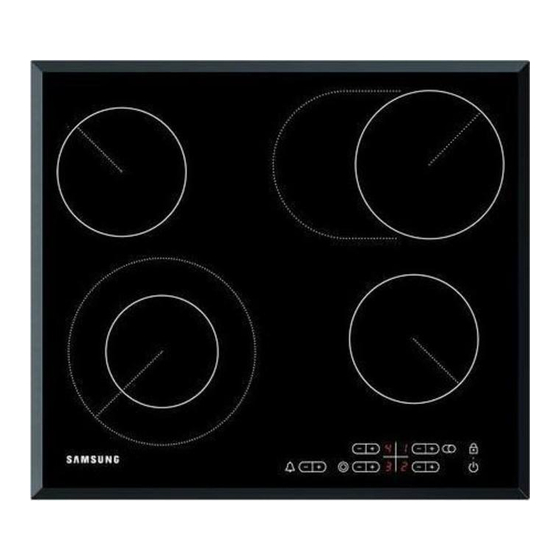
Parts and Features Cooking zones and control panel Single cooking zone 1200 W Casserole cooking zone 2400 W 265 mm 170 mm Control panel Single cooking zone 1200 W Double cooking zone 2200 W Indicators for heat set- Timer indicator and tings and residual heat control sensors “Lock”... -
Seite 13: Components
Parts and Features (Continued) Components Ceramic Glass Hob Installation Brackets Screws Scraper C61RCCN_XAG-00060A-01_EN.indd 2007-09-18 ソタネト 12:12:04... -
Seite 14: The Key Features Of Your Appliance
Parts and Features (Continued) The key features of your appliance • Ceramic glass cooking surface: The appliance has a ceramic glass cooking surface and four rapid - response cooking zones. The hob’s powerful radiant heater elements significantly shorten the amount of time required for the zones to heat up. •... -
Seite 15: Safety Shutoff
Parts and Features (Continued) Safety shutoff If one of the cooking zones is not switched off or the heat setting is not adjusted after an ex- tended period of time, that particular cooking zone will automatically switch itself off. Any residual warmth will be indicated with (for “hot”) in the digital displays corresponding to the particular cooking zones. -
Seite 16: Before You Begin
Before You Begin Initial cleaning Wipe the ceramic glass surface with a damp cloth and ceramic cooktop glass cleaner. Important: Do not use caustic or abrasive cleaners. The surface could be damaged. Hob Use Using suitable cookware Better pans produce better results. •... -
Seite 17: Using The Touch Control Sensors
Hob Use (Continued) • Always position pots and pans before switching on the cooking zone. • Dirty cooking zones and pan bases increase power consumption. • When possible, position the lids firmly on the pots and pans to cover completely. •... -
Seite 18: Switching The Appliance On
Hob Use (Continued) Switching the appliance on Touch the “Lock ” sensor for approximately 3 seconds. The appliance is switched on using the “On / Off ” control sensor. Touch the “On / Off ” sensor. The digital displays will show After the “On / Off ”... -
Seite 19: Switching The Appliance Off
Hob Use (Continued) Switching the appliance off To completely switch off the appliance, use the “On / Off ” control sensor. Touch the “On / Off ” sensor. After switching off a single cooking zone or the entire cooking surface, the presence of residual heat will be indicated in the digital displays of the corresponding cooking zones in the form of an (for “hot”). -
Seite 20: Using The Casserole Cooking Zone
Hob Use (Continued) If the heat setting is at and you want to turn the burner off, the sensor can be touched one additional time, and the heat setting will go to zero. For faster adjustment, keep your finger on the sensor until the required value is obtained. -
Seite 21: Using The Double Cooking Zone
Hob Use (Continued) Using the double cooking zone By using the double cooking zone, you can alternate between the smaller cooking zone and the larger cooking zone depending on the size of the cookware you are using. Select the set- ting with the “Double Cooking Zone ”... -
Seite 22: Switching A Cooking Zone Off
Hob Use (Continued) Switching a cooking zone off To switch off a cooking zone, return the setting to by using the control panel’s heat setting and touch sensors Using the child safety lock You can use the child safety lock to safeguard against unintentionally turning on a cooking zone and activating the cooking surface. -
Seite 23: Timer
Hob Use (Continued) Switching the child safety lock off 1. Touch the control sensor for approximately 3 seconds. An acoustic signal will sound as confirmation. approx. 3 sec. Timer There are two ways to use the timer: Using the timer as a safety shutoff If a specific time is set for a cooking zone, the cooking zone will shut itself off once this period of time has elapsed. -
Seite 24: Countdown Timer
Hob Use (Continued) 2. Use the timer setting control sensors to set the desired amount of time, for ex- ample, 15 minutes, after which the cooking zone will automatically switch itself off. The safety shutoff is now activated. To display the time remaining for any of the cooking zones, use the timer’s control sensor The corresponding control indicator will begin to blink slowly. -
Seite 25: Locking And Unlocking The Control Panel
Hob Use (Continued) Locking and unlocking the control panel At any stage during the cooking process, the control panel, with the exception of the “On / Off ” control sensor, can be locked in order to prevent the settings from being changed uninten- tionally, for example, by wiping over the panel with a cloth. -
Seite 26: Cleaning And Care
Cleaning and Care Important: Cleaning agents must not come into contact with a heated ceramic glass surface: All cleaning agents must be removed with adequate amounts of clean water after cleaning because they can have a caustic effect when the surface becomes hot. -
Seite 27: Hob Frame (C61Rcast, C61Rcbal, C61Rcdst)
Cleaning and Care (Continued) Problem Dirt 1. Remove burnt-on sugar, melted plastic, aluminium foil or other materials with a glass scraper immediately and while still hot. Important: There is a risk of burning yourself when the glass scraper is used on a hot cooking zone: 2. -
Seite 28: Warranty And Service
Warranty and Service FAQs and troubleshooting A fault may result from a minor error that you can correct yourself with the help of the following instructions. Do not attempt any further repairs if the following instructions do not help in each specific case. -
Seite 29: Service
Warranty and Service (Continued) What does it mean when the burner does not glow red? • The selected temperature of the cooking zone is maintained by a sensor that cycles the zone on and off, so the surface cooking area will not always glow red. If you select a low heat setting, the heat will cycle on and off more frequently than at higher settings. -
Seite 30: Technical Data
Technical Data Appliance dimensions Width 575 mm Depth 505 mm Height 55 mm Worktop cut - out dimensions Width 560 mm Depth 490 mm Corner radius 3 mm Cooking rings Position Diameter Power Front left 129 / 215 mm 750 / 2200 W Rear left 148 mm 1200 W... - Seite 31 Note C61RCCN_XAG-00060A-01_EN.indd 2007-09-18 ソタネト 12:12:11...
- Seite 32 Code No.:DG68-00060A-01 C61RCCN_XAG-00060A-01_EN.indd 2007-09-18 ソタネト 12:12:11...
- Seite 33 Einbau- und Betriebsanleitung Glaskeramik-Kochfeld C61RCCN / C61RCAST / C61RCBAL / C61RCDST Lesen Sie vor dem Einbau und der Verwendung dieses Geräts sorgfältig alle Anweisungen, um Unfälle und Schäden am Kochfeld zu vermeiden. Bewahren Sie diese Betriebsanleitung zur späteren Verwendung auf.
- Seite 34 C61RCCN_XAG-00060A-01_DE.indd 2007-09-18 ソタネト 1:35:03...
- Seite 35 Inhalt Arbeiten mit dieser Bedienungsanleitung ......2 Sicherheit ......... . . 3 Elektrische Sicherheit .
-
Seite 36: Arbeiten Mit Dieser Bedienungsanleitung
Arbeiten mit dieser Bedienungsanleitung Bitte nehmen Sie sich die Zeit, um diese Bedienungsanleitung sorgfältig zu lesen. Achten Sie insbesondere auf die im folgenden Abschnitt enthaltenen Sicherheitsinformationen, ehe Sie Ihr Gerät verwenden. Bewahren Sie sie so auf, dass Sie sie später schnell wiederfinden. Wenn Sie das Eigentum an diesem Gerät übertragen, vergessen Sie bitte nicht, auch das Handbuch an den neuen Eigentümer weiterzugeben. -
Seite 37: Sicherheit
Sicherheit Die Sicherheitsfunktionen dieses Geräts erfüllen anerkannte technische Standards sowie die gesetzlichen Bestimmungen zum Geräteschutz in Deutschland. Jedoch sind wir als Hersteller auch überzeugt, dass es in unserer Verantwortung liegt, Sie mit den folgenden Sicherheitshinweisen vertraut zu machen. Elektrische Sicherheit •... -
Seite 38: Sicherheit Beim Einsatz
Sicherheit (Fortsetzung) Sicherheit beim Einsatz • Dieses Gerät dient nur zum normalen Kochen und Braten im Haushalt. Es ist für kommerziellen oder industriellen Einsatz nicht geeignet. • Verwenden Sie den Herd nie zum Heizen des Zimmers. • Geben Sie Acht, wenn Sie elektrische Geräte in Netzsteckdosen nahe dem Herd stecken. Die Netzkabel dürfen mit der Kochmulde nicht in Kontakt kommen. -
Seite 39: Installieren Des Herds
Installieren des Herds Wichtig: Vergewissern Sie sich, dass das neue Gerät nur von einem qualifizierten Techniker installiert und geerdet wird. Beachten Sie diese Anweisung. Die Garantie deckt keine Schäden, die in Folge unsachgemäßer Installation auftreten. Technische Daten finden Sie am Ende dieses Handbuchs. Gesetzliche Bestimmungen und Konformität Dieses Gerät entspricht den folgenden Normen: •... -
Seite 40: Anschließen An Das Netz
Installieren des Herds (Fortsetzung) Anschließen an das Netz Vor dem Anschließen vergewissern Sie sich bitte, ob die auf dem Typenschild angegebene Nennspannung des Geräts der anliegenden Versorgungsspannung entspricht. Der Typenschild befindet sich auf der Unterseite des Herds. Schalten Sie die Netzstromversorgung ab, ehe Sie einzelne Kabel mit dem Netz verbinden. Die Spannung der Heizelemente beträgt 230 V~. -
Seite 41: Einbau In Einer Arbeitsplatte
Installieren des Herds (Fortsetzung) Einbau in einer Arbeitsplatte Notieren Sie vor dem Einbau die auf dem Typenschild angegebene Seriennummer des Geräts. Diese Nummer wird im Falle von Serviceanfragen benötigt, und sie ist nach dem Einbau nicht mehr zugänglich, da sie auf dem Originaltypenschild auf der Unterseite des Geräts angegeben wird. - Seite 42 Installieren des Herds (Fortsetzung) Modell: C61RCBAL, C61RCCN, C61RCDST C61RCCN_XAG-00060A-01_DE.indd 2007-09-18 ソタネト 1:35:22...
- Seite 43 Installieren des Herds (Fortsetzung) Modell: C61RCAST C61RCCN_XAG-00060A-01_DE.indd 2007-09-18 ソタネト 1:35:41...
-
Seite 44: Bauteile Und Funktionen
Bauteile und Funktionen Kochzonen und Bedienfeld Einzelne Kochzone 1200 W Bräterzone 2400 W 265 mm 170 mm Bedienfeld Einzelne Kochzone 1200 W Zweikreiszone 2200 W Anzeige für Hitzeregelung und für Restwärme Sensor für Sperre Zeitanzeige und Sensoren Anzeigelampe für Anzeigelampe für Bräterzone Zweikreiszone Sensor für Bräterzone... -
Seite 45: Komponenten
Bauteile und Funktionen (Fortsetzung) Komponenten Glaskeramikherd Bedienungsanleitung Montageklammern Schrauben Schaber C61RCCN_XAG-00060A-01_DE.indd 2007-09-18 ソタネト 1:35:42... -
Seite 46: Die Wichtigsten Merkmale Ihres Geräts
Bauteile und Funktionen (Fortsetzung) Die wichtigsten Merkmale Ihres Geräts • Kochfeld aus Glaskeramik: Das Gerät hat ein Kochfeld aus Glaskeramik und vier Schnellkochzonen. Die leistungsfähigen Strahlungsheizelemente des Herds verkürzen die für das Aufheizen der Zonen erforderliche Zeit ganz erheblich. • Berührungssensoren: Ihr Gerät wird mit Hilfe von Berührungsensoren bedient. -
Seite 47: Sicherheitsabschaltung
Bauteile und Funktionen (Fortsetzung) Sicherheitsabschaltung Wenn eine der Kochzonen nicht ausgeschaltet oder die eingestellte Kochstufe über längere Zeit nicht verändert wird, schaltet sich die entsprechende Kochzone automatisch aus. Die Restwärme wird in den digitalen Anzeigen für die jeweiligen Kochzonen mit (für „heiß“) angegeben. -
Seite 48: Vor Dem Ersten Kochen
Vor dem ersten Kochen Erstreinigung: Wischen Sie die Glaskeramikfläche mit einem feuchten Tuch und einem Glaskeramikreiniger sauber. Wichtig: Verwenden Sie keine ätzenden oder schleifenden Reinigungsmittel. Die Oberfläche könnte dadurch beschädigt werden. Verwenden des Herdes Verwenden von geeigneten Töpfen und Pfannen Bessere Pfannen bringen bessere Ergebnisse. -
Seite 49: Verwenden Der Berührungssensoren
Verwenden des Herdes (Fortsetzung) • Stellen Sie Töpfe und Pfannen immer vor dem Einschalten des Herdes auf die Kochzone. • Schmutzige Kochzonen und Pfannenböden erhöhen den Stromverbrauch. • Setzen Sie die Deckel von Töpfen und Pfannen fest auf, um sie vollständig zu verschließen. -
Seite 50: Anschalten Des Geräts
Verwenden des Herdes (Fortsetzung) Anschalten des Geräts Berühren Sie den Verriegelungssensor etwa 3 Sekunden lang. Das Gerät wird anschließend mit dem Ein-/Aus-Steuersensor eingeschaltet. Berühren Sie den Ein/Aus-Sensor Auf der Anzeige wird angezeigt. Nachdem Sie den Ein-/Aus-Sensor berührt haben, um das Gerät einzuschalten, müssen Sie innerhalb von etwa 10 Sekunden eine Wärmestufe auswählen. -
Seite 51: Ausschalten Des Geräts
Verwenden des Herdes (Fortsetzung) Ausschalten des Geräts Das Gerät wird mit dem Ein-/Aus-Steuersensor vollständig ausgeschaltet. Berühren Sie den Ein/Aus-Sensor Nach dem Ausschalten einer einzelnen Kochzone oder der ganzen Kochmulde wird die Restwärme der entsprechenden Kochzonen mit dem Symbol (für „heiß“) in der digitalen Anzeige angegeben C61RCCN_XAG-00060A-01_DE.indd 2007-09-18... -
Seite 52: Verwenden Der Kochzone Für Schmortöpfe
Verwenden des Herdes (Fortsetzung) Wenn die Wärmestufe eingestellt ist, und Sie möchten die Heizelemente ausschalten, berühren Sie den Sensor noch einmal. Die Einstellung wechselt dann auf die Wärmestufe Null. Sie können schneller einstellen, indem Sie Ihren Finger auf dem Sensor oder halten, bis der gewünschte Wert eingestellt ist. -
Seite 53: Verwenden Der Doppelkochzone
Verwenden des Herdes (Fortsetzung) Verwenden der Doppelkochzone Sie können eine kleine Kochzone in eine größere Kochzone umwandeln und für große Kochgeräte verwenden. Wählen Sie diese Einstellung mit dem Steuerungssensor „Doppelkochzone“ aus. Sie können den Wechsel zwischen den beiden Kochzonen nur vornehmen, wenn für die kleinere Zone bereits eine Wärmestufe eingestellt worden ist. -
Seite 54: Ausschalten Einer Kochzone
Verwenden des Herdes (Fortsetzung) Ausschalten einer Kochzone Wenn Sie eine Kochzone ausschalten möchten, verwenden Sie die Wärmesensoren oder des Bedienfeldes, um wieder die Wärmestufe einzustellen. Verwendeten der Kindersicherung Sie können die Kindersicherung verwenden, um sich davor zu schützen, dass Sie unabsichtlich eine Kochzone einschalten oder das Kochfeld aktivieren. Der Kindersicherungssensor kann nur eingesetzt werden, wenn der Strom angeschaltet ist. -
Seite 55: Timer
Verwenden des Herdes (Fortsetzung) Ausschalten der Kindersicherung 1. Berühren Sie den Steuerungssensor etwa 3 Sekunden lang. Als Bestätigung ertönt ein akustisches Signal. ca. 3 s Timer Es gibt zwei Methoden zum Einsatz des Timers: Verwenden des Timers als Sicherheitsabschaltung Wenn für eine Kochzone eine bestimmte Zeit eingestellt wird, schaltet sich die Kochzone ab, sobald diese Zeit abgelaufen ist. -
Seite 56: Countdowntimer
Verwenden des Herdes (Fortsetzung) 2. Verwenden Sie die Timer-Steuerungssensoren oder , um die gewünschte Zeit einzustellen, nach der sich die Kochzone automatisch abschalten soll. Dies können zum Beispiel 15 Minuten sein. Die Sicherheitsabschaltung ist nun aktiviert. Um die für eine Kochzone verbleibende Zeit anzuzeigen, berühren Sie den Timer- Steuerungssensor Die entsprechende Steuerungsanzeige beginnt, langsam zu blinken. -
Seite 57: Sperren Und Entsperren Des Bedienfelds
Verwenden des Herdes (Fortsetzung) Sperren und Entsperren des Bedienfelds Sie können das Bedienfeld mit Ausnahme des Ein-/Aus-Steuerungssensors jederzeit während des Kochens verriegeln. Damit lässt sich vermeiden, dass Sie versehentlich die Einstellungen verändern, indem Sie zum Beispiel mit einem Tuch über das Bedienfeld wischen. -
Seite 58: Reinigung Und Pflege
Reinigung und Pflege Herd Wichtig: Reinigungsmittel dürfen mit der heißen Glaskeramikfläche nicht in Kontakt kommen: Alle Reinigungsmittel müssen nach dem Säubern mit ausreichenden Mengen an klarem Wasser entfernt werden, weil sie eine ätzende Wirkung entfalten können, wenn die Oberfläche heiß wird. Verwenden Sie keine aggressiven Reinigungsmittel wie Grill- oder Ofensprays, Scheuerschwämme oder Reinigen Sie die Glaskeramikfläche nach jeder Verwendung, wenn sie noch handwarm ist. -
Seite 59: Herdrahmen (C61Rcast, C61Rcbal, C61Rcdst)
Reinigung und Pflege (Fortsetzung) Schwere Verschmutzung 1. Entfernen Sie eingebrannten Zucker, geschmolzenen Kunststoff, Aluminiumfolie und andere Materialien mit einem Glasschaber sofort und noch in heißem Zustand. Wichtig: Es besteht ein nicht unerhebliches Verbrennungsrisiko, wenn Sie den Glasschaber auf einer heißen Kochzone verwenden: 2. -
Seite 60: Garantie Und Service
Garantie und Service Häufig gestellte Fragen und Fehlerbehebung Aus einem geringfügigen Fehler kann eine Fehlfunktion entstehen, die Sie mit den folgenden Anweisungen selbst korrigieren können. Versuchen Sie aber keine weitergehenden Reparaturen, wenn die folgenden Anweisungen in einem bestimmten Fall nicht helfen. Achtung: Reparaturen dürfen nur von entsprechend geschultem Fachpersonal vorgenommen werden. -
Seite 61: Service
Garantie und Service (Fortsetzung) Was bedeutet es, wenn die Heizelemente nicht rot glühen? • Die eingestellte Temperatur der Kochzone wird von einem Sensor aufrechterhalten, der die Zone an- und ausschaltet, so dass die Kochzone nicht immer rot aussieht. Wenn Sie eine geringe Wärme einstellen, wird das Heizelement häufiger ausgeschaltet als bei höheren eingestellten Temperaturen. -
Seite 62: Technische Daten
Technische Daten Maße des Geräts Breite 575 mm Tiefe 505 mm Höhe 55 mm Maße des Ausschnitts in der Arbeitsplatte Breite 560 mm Tiefe 490 mm Eckenradius 3 mm Kochringe Position Durchmesser Leistung Vorne links 129 / 215 mm 750 / 2200 W Hinten links 148 mm 1200 W... - Seite 63 Hinweis C61RCCN_XAG-00060A-01_DE.indd 2007-09-18 ソタネト 1:35:49...
- Seite 64 Code No.: DG68-00060A-01 C61RCCN_XAG-00060A-01_DE.indd 2007-09-18 ソタネト 1:35:49...
- Seite 65 Navodila za namestitev in uporabo Steklokeramična kuhalna plošča C61RCCN / C61RCAST / C61RCBAL / C61RCDST Preden namestite ali uporabite kuhalni aparat, preberite celotna navodila, da se izognete poškodovanju le-tega. Navodila shranite za poznejšo uporabo. C61RCCN_XAG-00060A-01_SL.indd 2007-09-18 ソタネト 1:33:01...
- Seite 66 C61RCCN_XAG-00060A-01_SL.indd 2007-09-18 ソタネト 1:33:01...
- Seite 67 Vsebina Uporaba priročnika ........2 Varnost .
-
Seite 68: Uporaba Priročnika
Uporaba priročnika Vzemite si čas in preberite navodila. Pred uporabo aparata bodite še posebej pozorni na varnostne informacije v naslednjem razdelku. Navodila shranite za poznejšo uporabo. Če aparat prepustite novemu lastniku, mu ne pozabite dati navodil. V besedilu so uporabljeni naslednji simboli To je simbol varnostnega opozorila. -
Seite 69: Varnost
Varnost Varnostni standardi aparata ustrezajo sprejetim tehničnim standardom in nemškim zakonom o varnosti aparatov. Vandar verjamemo, da je naša dolžnost, da vas seznanimo z naslednjimi varnostnimi ukrepi. Električna varnost • Aparat mora pravilno namestiti in ozemljiti usposobljen strokovnjak. • Aparat sme servisirati samo usposobljeno servisno osebje. Popravila, ki jih izvedejo neusposobljeni posamezniki, lahko povzročijo poškodbe ali resne okvare. -
Seite 70: Varnost Med Uporabo
Varnost (nadaljevanje) Varnost med uporabo • Aparat lahko uporabljate samo za običajno domače kuhanje in cvrtje. Ni načrtovan za komercialno ali industrijsko uporabo. • Kuhalne plošče ne uporabljajte za segrevanje prostora. • Bodite pazljivi pri priključevanju električnih aparatov na vtičnice blizu kuhalne plošče. Kabli za napajanje ne smejo priti v stik s kuhalno površino. -
Seite 71: Namestitev Plošče
Namestitev plošče Pomembno: Aparat mora namestiti in ozemljiti usposobljen strokovnjak. Upoštevajte ta navodila. Garancija ne zajema škode, do katere pride zaradi nepravilne namestitve. Tehnični podatki so podani na koncu teh navodil. Skladnost s standardi Aparat ustreza naslednjim standardom: • EN 60 335 - 1 in EN 60 335 - 2 - 6, ki se nanašata na varnost električnih aparatov za gospodinjsko in podobno uporabo;... -
Seite 72: Priključitev Na Omrežno Napajanje
Namestitev plošče (nadaljevanje) Priključitev na omrežno napajanje. Pred priključitvijo preverite ali nominalna napetost aparata (napetost, ki je navedena na ploščici za navedbe) ustreza razpoložljivi napetosti napajanja. Ploščica za navedbe je na spodnjem delu ohišja plošče. Pred priključitvijo žic na tokokrog le-tega izklopite. Delovna napetost grelnega elementa je AC230 V. -
Seite 73: Namestitev V Pult
Namestitev plošče (nadaljevanje) Namestitev v pult Pred namestitvijo s ploščice za navedbe prepišite serijsko številko aparata. To številko boste potrebovali za servisne zahteve. Po namestitvi ne bo več dostopna, saj je napisana na spodnji strani aparata. Še posebej bodite pozorni na zahteve za prostor in odprtine. Pred namestitvijo plošče v okvirje le-te pritrdite na obeh straneh s priloženimi vijaki. - Seite 74 Namestitev plošče (nadaljevanje) Model: C61RCBAL, C61RCCN, C61RCDST C61RCCN_XAG-00060A-01_SL.indd 2007-09-18 ソタネト 1:33:22...
- Seite 75 Namestitev plošče (nadaljevanje) Model: C61RCAST C61RCCN_XAG-00060A-01_SL.indd 2007-09-18 ソタネト 1:33:40...
-
Seite 76: Deli In Funkcije
Deli in funkcije Kuhalna mesta in upravljalna plošča Enojno kuhalno mesto 1200 W Kuhalno mesto za ovalno posodo 2400 W 265 mm 170 mm Upravljalna plošča Enojno kuhalno mesto 1200 W Dvojno kuhalno mesto 2200 W Pokazatelji za nastavitev toplote in pokazatelj preostale toplote Senzor za upravljanje Pokazatelj časovnika in senzorji... -
Seite 77: Deli In Funkcije (Nadaljevanje)
Deli in funkcije (nadaljevanje) Komponente Steklokeramična kuhalna plošča Navodila za uporabo Namestitveni okvirji Vijaki Strgalo C61RCCN_XAG-00060A-01_SL.indd 2007-09-18 ソタネト 1:33:41... -
Seite 78: Ključne Funkcije Aparata
Deli in funkcije (nadaljevanje) Ključne funkcije aparata • Steklokeramična kuhalna površina: Aparat ima steklokeramično kuhalno površino in štiri hitro odzivna kuhalna mesta. Močna, žareča grelna telesa plošče znatno skrajšajo čas segrevanja kuhalnih mest. • Senzorji za upravljanje z dotikom: Aparat upravljate s senzorji na dotik. •... -
Seite 79: Varnostni Izklop
Deli in funkcije (nadaljevanje) Varnostni izklop: Če po določenem času ne izklopite kuhalnega mesta ali ne spremenite njegove toplote, se bo to kuhalno mesto samodejno izklopilo. Preostala toplota bo označena s simbolom (»hot«- vroče) na digitalnem zaslonu ustreznega kuhalnega mesta. Kuhalna mesta se samodejno izklopijo, ko poteče spodaj navedeni čas. -
Seite 80: Pred Začetkom
Pred začetkom Začetno čiščenje Steklokeramično površino obrišite z vlažno krpo in čistilom za steklokeramične kuhalne plošče. Pomembno: Ne uporabljajte jedkih ali agresivnih čistil. Z njimi lahko poškodujete površino plošče. Uporaba kuhalne plošče Uporaba ustrezne posode Boljša posoda zagotavlja boljše rezultate. •... -
Seite 81: Uporaba Senzorjev Za Upravljanje Na Dotik
Uporaba kuhalne plošče (nadaljevanje) • Ponve in posode vedno postavite na mesto, preden vklopite kuhalno mesto. • Umazana kuhalna mesta in dna posode lahko zvišajo porabo energije. • Ko je mogoče, dobro pokrijte posodo s pokrovko. • Kuhalna mesta izklopite, preden se čas kuhanja izteče, da preostalo toploto izrabite za pogrevanje ali tajanje živil. -
Seite 82: Vklop Aparata
Uporaba kuhalne plošče (nadaljevanje) Vklop aparata Približno 3 sekunde držite senzor Aparat vklopite s senzorjem za upravljanje za vklop/izklop Dotaknite se senzorja za vklop/izklop Na zaslonu se pojavi: Ko vklopite aparat s senzorjem za vklop/izklop , morate v približno desetih sekundah nastaviti toploto želenega kuhalnega mesta. -
Seite 83: Izklop Aparata
Uporaba kuhalne plošče (nadaljevanje) Izklop aparata Aparat izklopite z nadzornim senzorjem za vklop/izklop Dotaknite se senzorja za vklop/izklop Ko izklopite posamezno kuhalno mesto ali celotno kuhalno površino, bo na digitalnem zaslonu ustreznih kuhalnih mest prikazana ikona za preostalo toploto C61RCCN_XAG-00060A-01_SL.indd 2007-09-18 ソタネト... -
Seite 84: Uporaba Ovalnega Kuhalnega Mesta
Uporaba kuhalne plošče (nadaljevanje) Če je temperatura nastavljena na vrednost in želite izklopiti segrevanje, se še enkrat dotaknite senzorja in nastavitev temperature se bo prestavila na nič. Za hitrejšo nastavitev pritisnite in držite senzor , dokler se ne prikaže zahtevana vrednost. Če pritisnete in držite več... -
Seite 85: Uporaba Dvojnega Kuhalnega Mesta
Uporaba kuhalne plošče (nadaljevanje) Uporaba dvojnega kuhalnega mesta Dvojno kuhalno mesto lahko uporabite za preklapljanje med manjšim in večjim kuhalnim mestom glede na velikost uporabljene posode. Nastavitev izberite s senzorjem za upravljanje za nastavitev dvojnega kuhalnega mesta Med nastavitvama lahko preklapljate samo, ko je za manjše kuhalno mesto že nastavljena temperatura. -
Seite 86: Izklop Kuhalnega Mesta
Uporaba kuhalne plošče (nadaljevanje) Izklop kuhalnega mesta Če želite izklopiti kuhalno mesto, temperaturo znova nastavite na z uporabo senzorjev na dotik na upravljalni plošči Uporaba zaklepanja za zaščito otrok Zaklepanje za zaščito otrok lahko uporabite za zavarovanje pred nehotenim vklopom kuhalnega mesta in kuhalne površine. -
Seite 87: Časovnik
Uporaba kuhalne plošče (nadaljevanje) Izklop zaklepanja za zaščito otrok 1. Približno 3 sekunde držite senzor za zaklepanje. Zvočni signal bo potrdil odklepanje. približno 3 s. Časovnik Časovnik lahko uporabljate na dva načina: Uporaba časovnika za varni samoizklop Če je za kuhalno mesto nastavljen določen čas, se bo po poteku tega časa kuhalno mesto izklopilo. -
Seite 88: Časovnik Za Odštevanje Časa
Uporaba kuhalne plošče (nadaljevanje) 2. Za nastavitev želenega časa (npr. 15 minut), po katerem se kuhalno mesto samodejno izklopi uporabite senzor Varnostni izklop je aktiviran. Za prikaz preostalega časa za katerokoli kuhalno mesto uporabite senzor za upravljanje časovnika Ustrezni barvni znak počasi začne utripati. Nastavitve ponastavite s senzorjema za nastavitev časovnika . -
Seite 89: Zaklepanje In Odklepanje Upravljalne Plošče
Uporaba kuhalne plošče (nadaljevanje) Zaklepanje in odklepanje upravljalne plošče Upravljalno ploščo (razen senzorja za vklop/iklop ) lahko kadarkoli zaklenete in preprečite nenamerno spreminjanje nastavitev, kot npr. pri brisanju plošče s krpo. 1. Senzor za upravljanje držite približno 3 sekunde. Vklopil se bo pokazatelj v senzorju zaklepanja. Senzorji za upravljanje so zaklenjeni. 2. -
Seite 90: Čiščenje In Nega
Čiščenje in nega Plošča Pomembno: Čistila ne smejo priti v stik s segreto steklokeramično ploščo: Vsa čistila morajo biti odstranjena z zadostnimi količinami čiste vode po čiščenju, ker lahko postanejo jedka, ko se površina segreje. Ne uporabljajte agresivnih čistil, kot so čistila za žar ali pečico ali abrazivna čistila za ponve. -
Seite 91: Okvir Plošče (C61Rcast, C61Rcbal, C61Rcdst)
Čiščenje in nega (nadaljevanje) Težavna umazanija 1. Zažgani sladkor, stopljeno plastiko, aluminijasto folijo ali ostale materiale odstranite, dokler so še vroči. Pomembno: Ko strgalo za steklo uporabljate na vročem kuhalnem mestu obstaja nevarnost opeklin: 2. Ko se plošča ohladi, jo očistite po normalnem postopku. Če se kuhalno mesto, na katerem se je nekaj stopilo, ohladi, ga znova ogrejte pred čiščenjem. -
Seite 92: Garancija In Servis
Garancija in servis Pogosta vprašanja in odpravljanje težav Okvara se lahko pojavi zaradi manjše napake, ki jo lahko sami odpravite s pomočjo naslednjih navodil. Ne poskušajte opravljati dodatna popravila, če v posameznih primerih ne pomagajo naslednja navodila. Opozorilo: Popravila na aparatu mora opraviti usposobljen servisni tehnik. Nepravilno izvedena popravila lahko resno ogrozijo varnost uporabnika. -
Seite 93: Garancija In Servis (Nadaljevanje)
Garancija in servis (nadaljevanje) Kaj pomeni, če grelnik ne oddaja rdeče svetlobe? • Izbrano temperaturo kuhalnega mesta ohranja senzor, ki vklaplja in izklaplja kuhalno mesto, zato kuhalno mesto ne oddaja vedno rdeče svetlobe. Če ste izbrali nizko temperaturo, se bo grelnik bolj pogosto vklapljal in izklapljal kot pri višjih temperaturah. Grelnik se izklaplja in vklaplja tudi pri najvišji nastavitvi temperature. -
Seite 94: Tehnični Podatki
Tehnični podatki Dimenzije aparata Širina 575 mm Globina 505 mm Višina 55 mm Dimenzije izreza delovnega pulta Širina 560 mm Globina 490 mm Polmer kota 3 mm Kuhalni obroči Položaj Premer Moč Spredaj levo 129/215 mm 750/2.200 W Zadaj levo 148 mm 1.200 W Zadaj desno... - Seite 95 Opomba C61RCCN_XAG-00060A-01_SL.indd 2007-09-18 ソタネト 1:33:49...
- Seite 96 Št. kode: DG68-00060A-01 C61RCCN_XAG-00060A-01_SL.indd 2007-09-18 ソタネト 1:33:49...