Bresser Junior 8856000 Bedienungsanleitung
40x-60x
Vorschau ausblenden
Andere Handbücher für 8856000:
- Bedienungsanleitung (52 Seiten) ,
- Bedienungsanleitung (44 Seiten)
Werbung
Verfügbare Sprachen
Verfügbare Sprachen
All manuals and user guides at all-guides.com
40x-640x
Bedienungsanleitung
DE
Operating Instructions
EN
Mode d'emploi
FR
Handleiding
NL
Istruzioni per l'uso
IT
Instrucciones de uso
ES
Руководство по эксплуатации
RU
Návod k obsluze
CZ
Mikroskop
Microscope
Art. No. 8856000
Werbung
Inhaltsverzeichnis

Verwandte Anleitungen für Bresser Junior 8856000


Inhaltszusammenfassung für Bresser Junior 8856000
- Seite 1 Mikroskop All manuals and user guides at all-guides.com 40x-640x Microscope Art. No. 8856000 Bedienungsanleitung Operating Instructions Mode d’emploi Handleiding Istruzioni per l’uso Instrucciones de uso Руководство по эксплуатации Návod k obsluze...
- Seite 2 all-guides.com...
-
Seite 3: Manual Download
All manuals and user guides at all-guides.com MANUAL DOWNLOAD: EXPERIMENTS: www.bresser.de/P8856000 www.bresser.de/downloads MICROSCOPE GUIDE: MICROSCOPE FAQ: www.bresser.de/guide www.bresser.de/faq SERVICE AND WARRANTY: Bedienungsanleitung ..........4 Operating Instructions ..........9 Mode d’emploi ............13 Handleiding ............18 Istruzioni per l’uso ..........23 www.bresser.de/warranty_terms Instrucciones de uso ..........28 Руководство... - Seite 4 All manuals and user guides at all-guides.com 2x AA 1 1 1...
- Seite 5 All manuals and user guides at all-guides.com Allgemeine Warnhinweise Kontakt auf und kann das Gerät ggf. zwecks Reparatur einschicken. r die rbeit mit diesem er t erden h ufig scharfkantige und spitze • ERSTICKUNGSGEFAHR! Hilfsmittel eingesetzt. Bewahren Sie deshalb dieses Gerät sowie alle Dieses Produkt beinhaltet Kleinteile, die von Kindern verschluckt Zubehörteile und Hilfsmittel an einem für Kinder unzugänglichen Ort auf.
- Seite 6 All manuals and user guides at all-guides.com 1. Was ist ein Mikroskop? Schalter am Mikroskopfu ein. ur Beleuchtung findest du eitere ipps Das Mikroskop besteht aus zwei Linsen-Systemen: Dem Okular und dem im nächsten Abschnitt. Jetzt schiebst du ein Dauerpräparat unter die Objektiv.
-
Seite 7: Beschaffenheit Des Beobachtungsobjekts
All manuals and user guides at all-guides.com Polarität (+/- Angabe). Der Batteriefachdeckel muss nun zuerst rechts in 5.2. Herstellen dünner Präparatschnitte die kleine Öffnung gesteckt werden damit der Deckel genau passt. Jetzt Wie bereits vorher ausgeführt, sind von einem Objekt möglichst dünne kannst du die Schraube anziehen. - Seite 8 all-guides.com...
- Seite 9 All manuals and user guides at all-guides.com Nimm das Smartphone nach dem Gebrauch wieder von der Halterung ab! Setze ein Deckglas senkrecht am Rand des Wassertropfens an, so dass das Wasser entlang der Deckglaskante verläuft. Lege das Deckglas nun HINWEIS: langsam über dem Wassertropfen ab.
- Seite 10 Richtlinien und entsprechenden Normen ist von der chemischen Symbol des Schadstoffes bezeichnet. Bresser GmbH erstellt worden. Der vollständige Text der EG-Konformi- tätserklärung ist unter der folgenden Internetadresse verfügbar: Batterie enthält Cadmium www.bresser.de/download/8856000/CE/8856000_CE.pdf Batterie enthält Quecksilber Batterie enthält Blei Cd¹ Hg²...
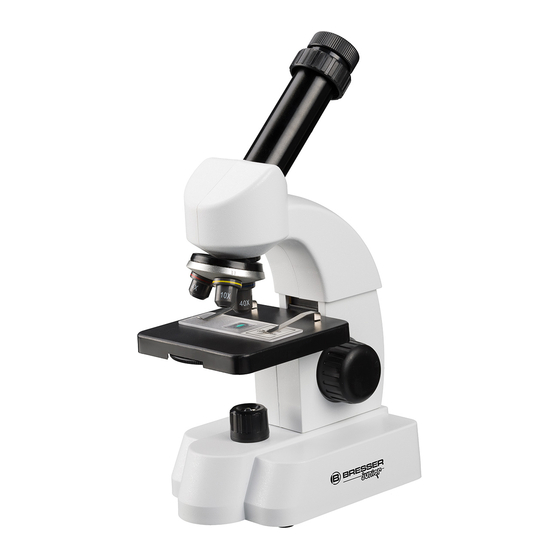
- Seite 11 All manuals and user guides at all-guides.com • Keep instructions and packaging as they contain important information. General Warnings Parts overview • Choking hazard — This product contains small parts that could be 1. Zoom Eyepiece swallowed by children. This poses a choking hazard. 2.
- Seite 12 All manuals and user guides at all-guides.com The lower lens (objective) produces a magnified image of the prepared fied specimen. At this point, you still might see a slightly fuzzy picture. specimen. The picture, which you can’t see, is magnified once more by Adjust the image sharpness by slowly turning the focus knob (2).
- Seite 13 All manuals and user guides at all-guides.com Now you can observe in the same way as described in the previous DANGER! section. Be exremely carfeful when dealing with hot wax, as there is a danger of being burned. TIP: The higher the magnification you use the more light is required for a good illumination of the picture.
- Seite 14 all-guides.com...
- Seite 15 In some cases you need to adjust with the zoom function to display the image fullscreen. A light shading at the edges is possible.
- Seite 16 All manuals and user guides at all-guides.com electrical and electronic equipment and its adaptation into German law, used electronic devices must be collected separately and recycled in an Consignes générales de sécurité environmentally friendly manner. Empty, old batteries must be disposed •...
- Seite 17 All manuals and user guides at all-guides.com votre revendeur spécialisé. Celui-ci prendra contact avec le service client 1. Qu’est ce qu’un microscope ? pour, éventuellement, envoyer l’appareil en réparation. Le microscope est composé de deux lots de lentilles : l’oculaire et l’objec- •...
- Seite 18 All manuals and user guides at all-guides.com Maintenant, allumer la lumière en utilisant l’interrupteur sur la base du du microscope (7). Le compartiment des piles est ouvert à l‘aide d‘un microscope. En ce qui concerne la lampe, tu trouveras d’autres conseils tournevis cruciforme.
- Seite 19 All manuals and user guides at all-guides.com nons ensuite. Avec de telles méthodes nous nous préparons à la partie Posez maintenant une lamelle couvre-objet (disponible dans chaque ma- suivante. gasin de bricolage un tant soit peu fourni) verticalement au bord de la goutte d‘eau de façon à...
- Seite 20 all-guides.com...
- Seite 21 Le texte complet de la déclaration UE de conformité est Bresser GmbH décline toute responsabilité pour tout dommage causé en disponible a l’adresse internet suivante: cas de chute du Smartphone. www.bresser.de/download/8856000/CE/8856000_CE.pdf 8. Dépannage ELIMINATION Eliminez l’emballage en triant les matériaux. Pour plus d’informations...
- Seite 22 All manuals and user guides at all-guides.com En conformité avec les règlements concernant les piles et les piles Algemene waarschuwingen rechargeables, jeter ces produits avec les déchets ménagers nor- maux est strictement interdit. Veuillez à bien déposer vos piles usagées •...
- Seite 23 All manuals and user guides at all-guides.com • Tijdens het gebruik van dit toestel worden regelmatig scherpe 1. Wat is een microscoop? hulpmiddelen gebruikt. Bewaar dit toestel en alle toebehoren en De microscoop bestaat uit twee lenssystemen: het oculair en het objec- hulpmiddelen dus op een voor kinderen ontoegankelijke plaats.
- Seite 24 All manuals and user guides at all-guides.com Doe nu de lamp aan met de schakelaar op de voet van de microscoop. De verlichting wordt ingeschakeld met behulp van de schakelaar op de Nu schuif je een duurzaam preparaat onder de klemmen op de objectta- voet van de microscoop.
- Seite 25 All manuals and user guides at all-guides.com langs de rand van het dekglas verdeelt. Laat het dekglaasje nu langzaam GEVAAR! boven de waterdruppel zakken. Wees uiterst voorzichtig bij het gebruik van hete wax, is er een risico van brandwonden. 6. Experimenten Voor het uit proberen van interessante experimenten klik op de volgende Het object wordt nu meermaals in de vloeibare was ondergedompeld.
- Seite 26 all-guides.com...
- Seite 27 Een “conformiteitsverklaring” in overeenstemming met de van toe- batterij bevat kwik passing zijnde richtlijnen en overeenkomstige normen is door Bres- accu bevat lood Cd¹ Hg² Pb³ ser GmbH afgegeven. Il testo completo della dichiarazione di conformita UE e disponibile al seguente indirizzo Internet: www.bresser.de/download/8856000/CE/8856000_CE.pdf...
- Seite 28 All manuals and user guides at all-guides.com • Per l’utilizzo di questo apparecchio vengono spesso utilizzati strumenti Avvertenze di sicurezza generali appuntiti e affilati. ertanto conservare l apparecchio e tutti gli accessori e strumenti fuori dalla portata dei bambini. PERICOLO DI LESIONE! •...
- Seite 29 All manuals and user guides at all-guides.com 1. Che cos’è un microscopio? Accendere la luce dall’interruttore previsto sul piede del microscopio. Su que- Il microscopio consiste in due sistemi di lenti: l’oculare e l’obiettivo. Per sto argomento troverai ulteriori suggerimenti al capitolo successivo. Spingi semplificare la spiegazione supponiamo che entrambi questi sistemi si- un vetrino preparato sotto le clip del tavolino portaoggetti (4) e posizionalo ano costituiti da una lente sola.
- Seite 30 All manuals and user guides at all-guides.com SUGGERIMENTO: Quanto maggiore è l’ingrandimento impostato, tanta PERICOLO! più luce è necessaria affinché l’immagine sia ben illuminata. Inizia quindi Fare molta attenzione quando si utilizza la cera a caldo, vi sempre i tuoi esperimenti con un ingrandimento basso. è...
- Seite 31 ¡Coja el Smartphone del soporte después de su uso! Dichiarazione di conformità CE Bresser GmbH ha redatto una “dichiarazione di conformità” in linea con le disposizioni applicabili e le rispettive norme. Il testo completo della dichiarazione di conformita UE e disponibile al seguente indirizzo Internet: www.bresser.de/download/8856000/CE/8856000_CE.pdf...
- Seite 32 all-guides.com...
- Seite 33 All manuals and user guides at all-guides.com SMALTIMENTO Smaltire i materiali di imballaggio in maniera differenziata. Le infor- mazioni su uno smaltimento conforme sono disponibili presso il servizio di smaltimento comunale o l’Agenzia per l’ambiente locale. Non smaltire gli apparecchi elettronici con i rifiuti domestici! Secondo la Direttiva Europea 2002/96/CE riguardante gli apparec- chi elettrici ed elettronici usati e la sua applicazione nel diritto na- zionale, gli apparecchi elettronici usati devono essere raccolti in maniera...
- Seite 34 All manuals and user guides at all-guides.com • ¡PELIGRO de lesiones corporales! Para trabajar con este aparato se Advertencias de carácter general emplean con frecuencia instrumentos auxiliares afilados y punzantes. Por ello, guarde este aparato y todos los accesorios e instrumentos •...
- Seite 35 All manuals and user guides at all-guides.com 1. ¿Qué es un microscopio? Ahora, encienda la luz usando el interruptor en la base del microscopio. El microscopio se compone de dos sistemas de lentes: el ocular y el objeti- Encontrar s m s conse os sobre la l mpara en el siguiente apartado. vo.
- Seite 36 All manuals and user guides at all-guides.com Coloque primero la tapa de las pilas en la peque a abertura para que la 5.2. Creación de segmentos delgados de cultivo tapa encaje perfectamente. Ahora puede apretar el tornillo. Tal como hemos descrito anteriormente, de preferencia se han de prepa- rar los ob etos en capas finas.
- Seite 37 All manuals and user guides at all-guides.com NOTA: de agua, de modo que ésta transcurra a lo largo del borde del cubreobje- Asegúrese de que el smartphone no puede salirse del soporte. tos. Ahora baje lentamente el cubre objetos sobre la gota de agua. Bresser mb no se responsabilizar de los da os que sufra su Smart- phone por una caída! 6.
- Seite 38 all-guides.com...
- Seite 39 E est disponible en la ter as que contienen productos t xicos est n marcados con un signo y un siguiente dirección de Internet: símbolo químico. www.bresser.de/download/8856000/CE/8856000_CE.pdf pila que contiene cadmio ELIMINACIÓN pila que contiene mercurio Elimine los materiales de embala e separados por tipos.
-
Seite 40: Опасность Получения Ожога
All manuals and user guides at all-guides.com се исным ент м и и не бх им сти т а ит ст ст Общие предупреждения ем нт. и з ании анным ст ст м м ет т еб ат ся • ОПАСНОСТЬ УДУШЕНИЯ! анн... - Seite 41 All manuals and user guides at all-guides.com 1. Что такое микроскоп? тех ка тическая т бка не б ет на максима н м ас- ик ск т тическая система с ст ящая с че е из ст янии т е метн ст...
- Seite 42 All manuals and user guides at all-guides.com ками - . атем ста те к ышк бата е н тсека на мест а ск зат е еет с з тес мик т м м и и ст ым снача а ин ыст...
-
Seite 43: Утилизация
н с ет е затенение на к аях. mb . м н см т ет за с б е емя www.bresser.de/download/8856000/CE/8856000_CE.pdf нима те сма т н ст н с е ате я с е ис з ания. УТИЛИЗАЦИЯ НОТА: ти изи... - Seite 44 all-guides.com...
- Seite 45 All manuals and user guides at all-guides.com щие е зак ны т еб т т е н сб а и е е аб тки бных Všeobecné výstražné pokyny ст ст . с з анные ементы итания с е ет ти изи ат...
- Seite 46 All manuals and user guides at all-guides.com stro nerozeb re te Obra te se v p padě z vady na va eho odborného 18. O n Cup prode ce. rode ce se spo se servisn m st ediskem a m e p stro 19.
- Seite 47 All manuals and user guides at all-guides.com revolver ob ektivu nastav na ne men zvět en zobrazen 50x-100x . m vy e nastavené zvět en t m v ce světla e zapot eb pro dob- yn zapni vyp na em na podstavci mikroskopu osvětlen . Ohledně osvět- ré...
- Seite 48 All manuals and user guides at all-guides.com 6. Experimenty NEBEZPEČÍ! omoc n sledu c ho odkazu naleznete za mavé experimenty které m - nane v opatrn p i zach zen s voskem hroz ete vyzkou et. nebezpe pop len http://www.bresser.de/downloads Vosk neche te ztvrdnout.
- Seite 49 Bresser mb . a vy d n e lze kdykoliv p edlo it k nahlédnut www.bresser.de/download/8856000/CE/8856000_CE.pdf LIKVIDACE Balic materi l zlikvidu te podle druhu. nformace t ka c se dné...
- Seite 50 all-guides.com...
- Seite 51 All manuals and user guides at all-guides.com Garantie & Service Garantie & Service Die reguläre Garantiezeit beträgt 2 Jahre und beginnt am Tag des Kaufs. De reguliere garantieperiode bedraagt 2 jaar en begint op de dag van aan- Um von einer verlängerten, freiwilligen Garantiezeit wie auf dem Ge- koop.
-
Seite 52: Гарантия И Обслуживание
All manuals and user guides at all-guides.com Гарантия и обслуживание тан а тны а анти ны с к с ста яет 2 а начиная с ня к ки. т бы с з ат ся асши енн а антие не бх им за... - Seite 53 All manuals and user guides at all-guides.com Bresser GmbH Gutenbergstr. 2 DE-46414 Rhede Germany www.bresser-junior.de...