Inhaltsverzeichnis

Verwandte Anleitungen für Bresser Junior 8855000


Inhaltszusammenfassung für Bresser Junior 8855000
- Seite 1 Mikroskop-Set 40x-1024x Microscope Set Art. No. 8855000 Bedienungsanleitung Operating Instructions Mode d’emploi Handleiding Istruzioni per l’uso Instrucciones de uso Manual de utilização...
-
Seite 2: Inhaltsverzeichnis
MANUAL DOWNLOAD: SOFTWARE DOWNLOAD: www.bresser.de/P8855000 www.bresser.de/download/CamLabLite_Junior SERVICE AND WARRANTY: EXPERIMENTS: www.bresser.de/warranty_terms www.bresser.de/downloads MICROSCOPE GUIDE: www.bresser.de/guide Bedienungsanleitung ..........4 Operating Instructions ..........12 MICROSCOPE FAQ: Mode d’emploi ............16 Handleiding ............22 Istruzioni per l’uso ..........28 Instrucciones de uso ..........34 Manual de utilização .......... - Seite 3 Fig. 1 2 2 2 2 & 2 2 & 2& 2 2 ...
-
Seite 4: Bedienungsanleitung
Bedienungsanleitung Gerät und Batterien nicht kurzschließen oder Ladens explodieren. ins Feuer werfen! Durch übermäßige Hitze • Aufladbare Batterien dürfen nur unter und unsachgemäße Handhabung können Aufsicht von Erwachsenen geladen werden. ACHTUNG! Nicht für Kinder unter 3 Kurzschlüsse, Brände und sogar Explosionen • Aufladbare Batterien sind aus dem Spielzeug Jahren geeignet. -
Seite 5: Entsorgung
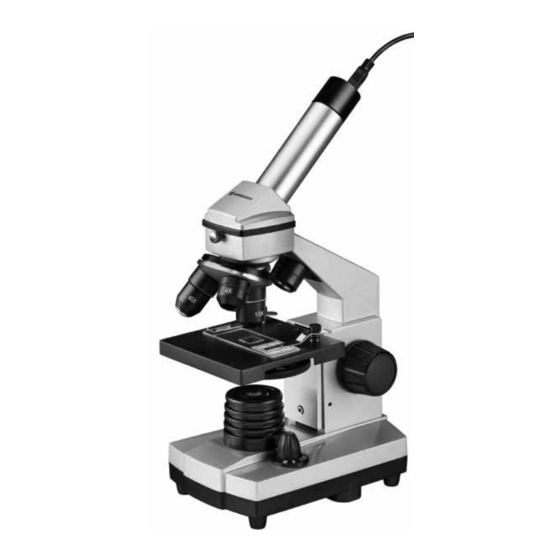
Gerät entfernt werden, wenn es rung ist unter der folgenden Internetadresse Output: 5V 1000mA(DC) längere Zeit nicht benutzt wird. verfügbar: www.bresser.de/download/8855000/CE/ HINWEISE zur Reinigung ENTSORGUNG 8855000_CE.pdf Trennen Sie das Gerät vor der Reini- Entsorgen Sie die Verpackungsmateriali- gung von der Stromquelle (Netzste- en sortenrein. - Seite 6 Aus diesen Teilen besteht dein Mikroskop 26 Transportkoffer Wählst du die… 27 Beleuchtungsfilter I, so kommt das Licht nur von unten (Durch- 10x WF Okular 28 USB Kabel licht). 16x WF Okular II, so scheint das Licht nur von oben (Auflicht). Barlowlinse Wo mikroskopiere ich? III, so werfen beide Lampen Licht auf das Prä-...
- Seite 7 Wie beobachte ich das Präparat? Wenn Du noch höhere Vergrößerungen möch- Wie stelle ich mein Mikroskop richtig ein? Nachdem Du das Mikroskop mit der passenden test, setze das Okular 16x (Abb. 1, 2) ein und Zu erst löse die Schrau- Beleuchtung aufgebaut und eingestellt hast, drehe den Objektivrevolver (Abb.
- Seite 8 Betrachtest Du undurchsichtige (opake) Objek- Wie stelle ich dünne Präparatschnitte her? Abb. 7 Abb. 8 te (z. B. kleinere Tiere, Pflanzenteile, Steine, Bitte nur unter Aufsicht Deiner Eltern oder ande- Münzen usw.) mit diesem Mikroskop, so fällt rer Erwachsener durchführen. das Licht auf den zu betrachtenden Gegen- stand.
- Seite 9 dem Okularstutzen, sowie die Staubschutz- Wie pflege ich mein Mikroskop und wie gehe Abb. 4 Abb. 5 kappe vom MikrOkular und stecke dieses ich damit um? anstelle der Barlowlinse in den Okularstuzen. 3. Starte den PC und schließe das MikrOkular Dein Mikroskop ist ein hochwertiges optisches an den USB-Port deines Computers an.
- Seite 10 Operating Instructions the batteries correctly. Empty or damaged • Tools with sharp edges are often used when batteries could cause burns if they come working with this device. Because there is into contact with the skin. If necessary, wear a risk of injury from such tools, store this WARNING! Not for children under adequate gloves for protection.
-
Seite 11: Www.bresser.de/Warranty_Terms
Clean the lens (objective and eyepiece) only 8855000_CE.pdf with the cloth supplied or some other soft lint- free cloth (e.g. micro-fibre). Do not use excessi- Warranty &... -
Seite 12: Operating Instructions
Here are the parts of your microscope (Fig. 25 Pipette If you select the … 1-6): 26 Carrying Case 27 Illumination filter the light only comes from below (transmit- 10x WF Eyepiece 28 USB cable ted light). 16x WF Eyepiece II, the light only comes from above (reflected Barlow Lens How do I use my microscope? - Seite 13 How do I adjust my microscope correctly? How do I observe the specimen? If you would like an even higher level of mag- First, loosen the screw After you have assembled the microscope with nification, insert the 16x eyepiece (Fig. 1, 2) (Fig.
- Seite 14 light falls on the object that is being observed. affin. It is best if you get a candle. Place the Experiments From there, the light is reflected back and pass- wax in a pot and heat it carefully over a low Use the following web link to find interesting es through the objective and eyepiece (where it burner.
-
Seite 15: Www.bresser.de/Download/Camlablite_Junior
How do I install the software? Troubleshooting Make sure your microscope has a long service 1. You can download the setup file for installa- life. tion here: Clean the lens (objective and eyepiece) only Error Solution www.bresser.de/download/CamLabLite_Junior with the cloth supplied or some other soft lint- No recognizable •... -
Seite 16: Mode D'emploi
Mode d’emploi surchauffe ou manipulation inappropriée peut peuvent exploser lorsqu’elles sont rechar- déclencher courts-circuits, incendies voire gées. conduire à des explosions! • Les piles rechargeables ne doivent être char- AVERTISSEMENT ! Ne convient pas • RISQUE DE BLESSURE ! En équipant l’appareil gées que sous la surveillance d’un adulte. - Seite 17 Retirez les piles de l‘appareil si vous de la déclaration UE de conformité est disponi- Output: 5V 1000mA(DC) ne n’utilisez pas pendant un certain temps ! ble a l’adresse internet suivante: www.bresser.de/download/8855000/CE/ REMARQUES concernant le nettoyage ÉLIMINATION 8855000_CE.pdf Avant de procéder au nettoyage de Éliminez les matériaux d’emballage selon...
- Seite 18 Voici les pièces de ton microscope (Illustr. 22 Appareil à coupe dessous, et la seconde lampe par au-dessus. 1-6): 23 Accessoires bruts des crevettes (Ce que tu veux observer sous le microscope 24 Pincette est désigné par Objet ou Préparation.) Tu peux Oculaire 10x WF 25 Pipette utiliser chaque lampe séparément, mais égale-...
- Seite 19 supports oculaires (Illustr. 1,5) et qu’elle ne soit (Illustr. 1, 5). Si la lentille de Barlow est retirée rents (par ex. grains d’amidon, organisme uni- pas retirée (Illustr. 2). entièrement et rapidement, le grossissement cellulaire) sont plus faciles à reconnaître dans peut être augmenté...
- Seite 20 Si tu observes des objets non transparents Comment fabriquer des tranches de prépara- Fig. 7 Fig. 8 (opaques) (par ex. de petits animaux, des par- tion fines ? ties de plante, des pierres, des pièces, etc.) Tu ne dois les effectuer que sous la supervision avec ce microscope, alors la lumière se répand de tes parents.
- Seite 21 Pour commencer, retire les lentilles de Barlow cular dans le porte oculaire au lieu de la len- Pour pouvoir profiter longtemps de ton mi- (Illustr. 4,3) avec l’oculaire utilisé momentané- tille de Barlow. croscope... ment du support oculaire (Illustr. 4,) et installe 3.
-
Seite 22: Handleiding
Handleiding Sluit het apparaat en de batterijen niet opgeladen. kort en gooi deze niet in het vuur! Te hoge • Oplaadbare batterijen moeten temperaturen ondeskundig gebruik speelgoed worden verwijderd voordat ze WAARSCHUWING! Niet geschikt kunnen leiden tot kortsluitingen, branden en worden opgeladen. -
Seite 23: Afvalverwerking
UE e disponibile al seguente indiriz- TIPS voor het schoonmaken zo Internet: Ontkoppel het apparaat vóór het AFVALVERWERKING www.bresser.de/download/8855000/CE/ schoonmaken van de stroombron Bied het verpakkingsmateriaal op soort 8855000_CE.pdf (stekker uit het stopcontact nemen gescheiden als afval aan. Informatie over... - Seite 24 Je microscoop bestaat uit de volgende onder- 24 Pincet Kies je voor… delen (afb.1-6): 25 Pipet dan komt het licht van onderen (doorlicht). 26 Transportkoffer dan schijnt het licht alleen van boven 10x WF oculair 27 Verlichtingsfilter (oplicht). 16x WF oculair 28 USB-kabel III, dan belichten beide lampen het preparaat.
- Seite 25 Hoe hoger de ingestelde vergrotingsfactor, des Let op: Breng de microscooptafel (afb. 1, 11) helemaal te meer licht is er nodig voor een goed belicht Niet bij elk preparaat is de hoogste vergrotings- naar beneden. Draai vervolgens de objectiefre- beeld. factor ook de beste! volver (afb.
- Seite 26 ééncelligen) schijnt het licht echter van onde- daarna hard worden. Met de dunsnijder of mi- Experimenten ren door de opening in de microscooptafel en crotoom (afb. 6, 23) of een mes of scalpel wor- Voor het uit proberen van interessante experi- dan door het bekeken voorwerp.
- Seite 27 Hoe installeer ik de software? Storingen oplossen Als je microscoop erg vuil is, vraag dan aan je 1. Download hier het installatiebestand voor de ouders om je bij het schoonmaken te helpen. installatie: Vraag of ze het poetsdoekje met een beetje Fout Oplossing www.bresser.de/download/CamLabLite_Junior...
-
Seite 28: It Istruzioni Per L'uso
Istruzioni per l’uso nel fuoco l‘apparecchio e le batterie! Un • I terminali non devono essere cortocircuitati. surriscaldamento oppure un utilizzo non • Non smontare l’apparecchio! In caso di conforme può provocare cortocircuiti, guasto, rivolgersi al proprio rivenditore AVVERTENZA! Non adatto ai bambi- incendi e persino esplosioni! specializzato. -
Seite 29: Smaltimento
UE e disponibile al seguente indiriz- SMALTIMENTO zo Internet: AVVERTENZE per la pulizia Smaltire i materiali di imballaggio dopo www.bresser.de/download/8855000/CE/ Per pulire l’apparecchio, scollegarlo averli suddivisi. Per informazioni sul cor- 8855000_CE.pdf dalla sorgente di energia elettrica retto smaltimento, si prega di rivolgersi all‘a- (scollegare l’alimentatore oppure ri-... - Seite 30 Il tuo microscopio comprende le 24 Pinzetta getto che vuoi osservare, detto anche “ogget- seguenti parti (fig. 1-6): 25 Pipetta to“.) Puoi utilizzare una sola delle due lampade 26 Valigetta per il trasporto e anche tutte due insieme. Per selezionare la Oculare a largo campo WF 10x 27 Filtro di illuminazione lampada o le lampade usa la ruota selettrice...
- Seite 31 pongono gli oggetti incolori e trasparenti (ad Come si osservano i preparati? Se vuoi usare ingrandimenti ancora maggiori, es. granelli di amido, organismi unicellulari) Dopo aver selezionato l’illuminazione adatta inserisci l’oculare 16 x (fig. 1,2) e gira il revolver possono essere così meglio riconoscibili. segui il seguente procedimento di base: portaobiettivi (fig.
- Seite 32 Quale illuminazione è la migliore per quale devono essere preparati nel modo giusto. Ciò ta facendola cadere sull’oggetto (fig. 7). Metti preparato? significa che li dobbiamo rendere trasparenti un coprivetrino in verticale accanto alla goccia Con questo microscopio, cosiddetto “a luce ri- con un pretrattamento o facendo penetrare del- per farla defluire lungo il bordo del coprivetrino.
- Seite 33 Come si utilizza il MicrOculare? Utilizzare il MicrOcular L’immagine • Ridurre la sfarfalla (os- risoluzione della sche- Informazione importante: Preparazione servazione con da grafica Il MicrOculare funziona solo senza la lente di 1. Inserire un vetrino sotto il microscopio e re- MicrOculare) •...
-
Seite 34: Instrucciones De Uso
Instrucciones de uso dios e incluso explosiones. • No desmonte el aparato. En caso de que exis- • ¡PELIGRO DE ABRASIÓN! No dejar las pilas ta algún defecto, le rogamos que se ponga en al alcance de los niños. Al colocar las pilas, contacto con su distribuidor autorizado. - Seite 35 Puede obtener siguiente dirección de Internet: ca (extraer el equipo de alimentación información sobre la eliminación reglamentaria www.bresser.de/download/8855000/CE/ o retirar las pilas). de desechos en su proveedor de servicios de 8855000_CE.pdf eliminación de desechos municipal o bien en Limpie el aparato con un paño seco y sólo por...
- Seite 36 Éstas son las partes de tu microscopio (Fig. 24 Pinza Puedes usar cada lámpara por separado, pero 1-6): 25 Pipeta también las dos al mismo tiempo. Para ello hay 26 Maletín de transporte una rueda de selección (Fig. 1, 14) que tiene Ocular 10x WF 27 Filtro de iluminación tres números: I, II y III.
- Seite 37 ¿Cómo se ajusta correctamente el ¿Cómo puedo observar la preparación? pleto, se puede subir el aumento casi al doble. microscopio? Una vez que hayas instalado el microscopio Si deseas aumentos aún mayores, introduce el En primer lugar, afloja el con la iluminación apropiada y lo hayas ajusta- ocular 16x (Fig.
- Seite 38 monedas, etc.) con este microscopio, la luz cae Como ya he comentado, a partir de un objeto Fig. 7 Fig. 8 sobre el objeto a observar. se pueden realizar rebanadas lo más finas po- Desde allí, la luz rebota y accede al ojo a través sible.
- Seite 39 En primer lugar, retiras del soporte del ocular instale el MicrOcular en el tubo del ocular. Para que puedas disfrutar mucho tiempo con (Fig. 4) la lente de Barlow (Fig. 4, 3) junto con el 3. Inicie su PC si aún no lo ha hecho y conécte- tu(s) microscopio ...
-
Seite 40: Pt Manual De Utilização
Manual de utilização aparelho nem as pilhas! O calor excessivo e carregadas. o manuseamento incorrecto podem provocar • Não provoque curto-circuitos nos terminais. curto-circuitos, incêndios e até explosões! • Não desmonte o aparelho! Em caso AVISO! Não é adequado a crianças •... - Seite 41 Declaração de Conformidade da CE está dispo- Especificações da alimentação: transporte. As pilhas devem ser retiradas do nível no seguinte endereço da Internet: aparelho, se este não for usado durante algum www.bresser.de/download/8855000/CE/ Tensão nominal: 5V tempo. 8855000_CE.pdf Input: 100-240V ~50/60Hz Output: 5V 1000mA(DC) ELIMINAÇÃO...
- Seite 42 Estes são os componentes do teu 23 Incubadora de camarões cada lâmpada individualmente ou as duas em microscópio (fig. 1-6): 24 Pinça conjunto. Para esse efeito existe a roda selecto- 25 Pipeta ra (fig. 1, 14). Esta possui três números: I, II e III. Ocular WF 10x WF 26 Mala de transporte Ocular WF 16x...
- Seite 43 Como ajusto correctamente o meu Como observo o preparado? Se quiseres ampliações ainda maiores, coloca a microscópio? Depois de teres equipado e ajustado o micros- ocular 16x (fig. 1, 2) e gira o revólver das objecti- Primeiro solta o parafuso cópio com a iluminação adequada são válidos vas (fig.
- Seite 44 objecto a ser observado. Como preparo cortes finos de Fig. 7 Fig. 8 Desse ponto, a luz é reflectida e chega aos preparado? olhos (pela ampliação) através da objectiva e Realiza a preparação com a ajuda dos teus pais da ocular. A isto se chama microscopia de luz ou de um outro adulto.
- Seite 45 Primeiro retiras a lente barlow (fig. 4, 3) com instale a MicrOcular no suporte da ocular em Para que te divirtas com o teu a ocular utilizada no momento (fig. 4) e colo- vez da lente Barlow. microscópio durante muito tempo... cas no seu lugar a micro-ocular (fig.
- Seite 46 Bresser GmbH Gutenbergstr. 2 DE-46414 Rhede Germany www.bresser-junior.de...