Herunterladen Inhalt Inhalt Diese Seite drucken
LENCO DAR-045 Benutzerhandbuch

LENCO DAR-045 Benutzerhandbuch

Dab+/fm radio mit cd player und bluetooth
Vorschau ausblenden Andere Handbücher für DAR-045:
Inhaltsverzeichnis

Werbung

Verfügbare Sprachen
  • DE

Verfügbare Sprachen

  • DEUTSCH, seite 34
Model DAR-045
User Manual - DAB+/FM radio with CD player and Bluetooth
Gebruikshandleiding - DAB+/FM-radio met cd-speler en Bluetooth
Benutzerhandbuch - DAB+/FM Radio mit CD Player und Bluetooth
Mode d'emploi - Radio DAB+/FM avec lecteur CD et Bluetooth
Manual del usuario - Radio DAB+/FM con reproductor de CD y Bluetooth
Manuale d'uso: radio DAB+/FM con lettore CD e Bluetooth

Werbung

Inhaltsverzeichnis
loading

Inhaltszusammenfassung für LENCO DAR-045

  • Seite 1 Model DAR-045 User Manual - DAB+/FM radio with CD player and Bluetooth Gebruikshandleiding - DAB+/FM-radio met cd-speler en Bluetooth Benutzerhandbuch - DAB+/FM Radio mit CD Player und Bluetooth Mode d’emploi - Radio DAB+/FM avec lecteur CD et Bluetooth Manual del usuario - Radio DAB+/FM con reproductor de CD y Bluetooth...
  • Seite 2: Inhaltsverzeichnis

    Index English ....................................3 Nederlands ................................... 18 Deutsch ....................................34 Français ....................................50 Español ....................................66 Italiano ....................................82 Version: 3.0...
  • Seite 3: English

    English DAR-045 CAUTION: Usage of controls or adjustments or performance of procedures other than those specified herein may result in hazardous radiation exposure. PRECAUTIONS BEFORE USE KEEP THESE INSTRUCTIONS IN MIND: Do not cover or block any ventilation openings. When placing the device on a shelf, leave 5 cm (2”) free space around the whole device.
  • Seite 4 ⚫ Do not overload ac outlets or extension cords. Overloading can cause fire or electric shock. ⚫ Devices with class 1 construction should be connected to a main socket outlet with a protective earthed connection. ⚫ Devices with class 2 construction do not require a earthed connection. ⚫...
  • Seite 5: Accessories

    WARNING Class 1 Laser Product Warning : Do not touch the lens. WARNING: When participating in the traffic listening to a personal music player can make the listener less aware of potential dangers such as approaching cars. WARNING: To prevent possible hearing damage, do not listen at high volume levels for long periods. ACCESSORIES AC/DC power adaptor Remote control...
  • Seite 6: Front Panel

    Warning Do not ingest the battery, Chemical Burn Hazard. This product contains a coin/button cell battery. *If corn/button cell battery is swallowed, it can severe internal burns in just 2 hours and can lead to death. Keep new and used batteries away from children. If the battery compartment does not close securely, stop using the product and keep it away from children.
  • Seite 7 TOP PANEL 1. – VOLUME + Adjust the main volume 2. STANDBY Press to turn on the unit. Press again to turn off and go to Standby mode 3. SOURCE Press this key to choose different modes: DAB+/FM/CD/AUX/Bluetooth 4. CLOCK SET In Standby mode, press to proceed the set up of the clock 5.
  • Seite 8: Remote Control Operation

    REMOTE CONTROL STANDBY NUMERIC BUTTONS MEM/PROG PREVIOUS /TUNE EQUALIZER REPEAT X-BASS INFO SCAN MENU BT PREVIOUS BT NEXT BT PLAY/PAUSE STOP CD PLAY/PAUSE VOLUME + VOLUME – MUTE RANDOM NEXT /TUNE ENTER MONO/ST SLEEP TIMER CLOCK SET OPEN/CLOSE SOURCE Remote Control Operation A CR2025 battery is already installed in the remote control unit.
  • Seite 9: Basic Operation

    To replace a new battery, please refer to the figure shown below. When inserting a battery, be sure to do so in the proper direction. Battery case Pull out the battery case Push in according to this direction CR2025 battery ●...
  • Seite 10 Manual Scan 1. Turn on the unit in DAB+ mode. 2. Press the MENU button to access the menu control. 3. Press the PREVIOUS or NEXT button until “Manual tune” is displayed and then press the ENTER button. 4. Press the PREVIOUS or NEXT button to select the desired channel (5A-13F).
  • Seite 11: Fm Radio Operation

    1. Press the MENU button to access the menu control. 2. Press the PREVIOUS or NEXT button until “DRC” is displayed and then press the ENTER button. 3. Press the PREVIOUS or NEXT button to select the DRC value and then press the ENTER to confirm. 4.
  • Seite 12: Audio Setting

    Scan Setting 1. Press the MENU button to access the menu control. 2. Press the PREVIOUS or NEXT button until “SCAN” is displayed and then press the ENTER button. 3. Press the PREVIOUS or NEXT button to toggle between “STRONG” and “ALL” and then press the ENTER button confirm. When the “STRONG”...
  • Seite 13: Bluetooth Audio

    2. If the unit has never been paired with a Bluetooth device before or cannot find the last paired device, the display and the Bluetooth status indicator will keep on flashing. Turn on the Bluetooth function of your device and enable the search until “Lenco DAR-045”...
  • Seite 14: Language Setup

    7. Then it displays the flashing minute digits. Press the PREVIOUS or NEXT button to set the off timer minute value. Press the ENTER button to confirm. 8. It will display the wake up source. Press the PREVIOUS or NEXT button to set the timer on source (DISC, DAB+, FM).
  • Seite 15 Trouble Shooting No power ● Ensure that the mains cable is securely connected. ● Ensure that the unit is switched on. The remote control does not function ● Use the remote control near to the unit. ● Point the remote control at the remote control sensor on the unit. ●...
  • Seite 16: Technical Specifications

    TECHNICAL SPECIFICATIONS DAB+ radio frequency range 174.928-239.2 MHz FM radio frequency range 87.5-108 MHz Bluetooth frequency range 2.402-2.480 GHz AC adaptor input 100-240V~ 50/60Hz 0.5A MAX AC adaptor output DC 9V 2A Speaker output power 2 x 5 W Bluetooth V2.1 + EDR Aux in 3.5mm stereo jack...
  • Seite 17 Guarantee Lenco offers service and warranty in accordance to European law, which means that in case of repairs (both during and after the warranty period) you should contact your local dealer. Important note: It is not possible to send products that need repairs to Lenco directly.
  • Seite 18: Nederlands

    Nederlands DAR-045 LET OP: Het gebruik van afstandsbedieningen of aanpassingen of de uitvoering van procedures die niet in dit document zijn gespecificeerd, kan leiden tot gevaarlijke blootstelling aan straling. VOORZORGSMAATREGELEN VOOR GEBRUIK ONTHOUD DE VOLGENDE INSTRUCTIES: Bedek of blokkeer de ventilatieopeningen niet. Wanneer u het apparaat op een schap plaatst, dient u 5 cm (2”) vrije ruimte rondom het gehele apparaat te behouden.
  • Seite 19 ⚫ Nooit op de voedingsadapter stappen of deze indrukken. Wees zeer voorzichtig, vooral in het gebied rond de stekkers en de kabelaansluitingen. Plaats geen zware voorwerpen op de voedingsadapter, om beschadiging ervan te voorkomen. Houd het gehele apparaat buiten bereik van kinderen! Wanneer kinderen met de voedingskabel spelen, kunnen zij ernstig letsel oplopen.
  • Seite 20 WAARSCHUWING Klasse 1 Laserproduct Waarschuwing: Raak de lens niet aan. WAARSCHUWING: Wanneer u zich op de straat bevindt, kan het gebruik van een persoonlijke muziekspeler de luisteraar afleiden van de potentiële gevaren, zoals naderende auto's. WAARSCHUWING: Luister nooit voor lange tijd op hoge volumeniveaus, om mogelijke gehoorbeschadiging te voorkomen.
  • Seite 21: Voorpaneel

    Waarschuwing Batterij niet inslikken, risico op chemische brandwonden. Dit product bevat een knoopcelbatterij. *Als de knoopcelbatterij wordt ingeslikt, kan dit binnen 2 uur ernstige inwendige brandwonden veroorzaken en tot de dood leiden. Houd nieuwe en gebruikte batterijen buiten bereik van kinderen. Als de batterijhouder niet goed kan worden gesloten, dient u het product niet meer te gebruiken en buiten bereik van kinderen te houden.
  • Seite 22 BOVENPANEEL 1. – VOLUME + Het hoofdvolume aanpassen 2. Stand-by Indrukken om het apparaat in te schakelen. Nogmaals indrukken om uit en op stand-by te schakelen 3. BRON Druk op deze toets om verschillende modi te kiezen: DAB+/FM/CD/AUX/Bluetooth 4. KLOKINSTELLING In de stand-by-modus indrukken om door te gaan met het instellen van de klok 5.
  • Seite 23: De Afstandsbediening Gebruiken

    AFSTANDSBEDIENING Stand-by NUMERIEKE TOETSEN GEHEUGEN/PROG VORIGE /AFSTEMMEN EQUALIZER HERHAAL X-BASS INFO SCAN MENU BT VORIGE BT VOLGENDE BT START/PAUZE STOP CD START/PAUZE VOLUME + VOLUME – DEMP WILLEKEURIG KANAAL- VOLGENDE /AFSTEMMEN INVOEREN MONO/ST KANAAL+ SLAPEN TIMER KLOKINSTELLING OPEN/SLUIT BRON De afstandsbediening gebruiken Er is al een CR2025 batterij geïnstalleerd in de afstandsbediening.
  • Seite 24: Algemene Bediening

    Raadpleeg a.u.b. de afbeelding hieronder als u de batterij door een nieuwe wilt vervangen. Let a.u.b. op de juiste polariteitrichting wanneer u een batterij installeert. Batterijhouder De batterijhouder uittrekken In deze richting indrukken CR2025 batterij ● Als deze afstandsbediening interferentie ontvangt van andere apparatuur, dan zal de werking ervan worden aangetast. ●...
  • Seite 25 Handmatige scan 1. Schakel het apparaat in op DAB+-modus. 2. Druk op de toets MENU om de menubediening te openen. 3. Druk op de toets VORIGE of VOLGENDE totdat “Manual tune” (Handmatig afstemmen) wordt weergegeven en druk vervolgens op de toets ENTER. 4.
  • Seite 26: Fm-Radiobediening

    Dynamische bereikcontrole (DRC) DRC kan zachtere geluiden duidelijker hoorbaar maken wanneer het apparaat wordt gebruikt in een lawaaierige omgeving. Het DRC- niveau van een uitzending is ingesteld door de zender en wordt samen met de service verzonden. Door de DRC-waarde op uw apparaat te veranderen, kunt u een schaalfactor toepassen op dit niveau.
  • Seite 27 2. Soort programma (PTY) Type van het programma verstrekt door de zender 3. Frequentie Huidige kanaalfrequentie 4. Soort audio Stereo of mono Tijd Toont de tijd verstrekt door het radiostation. 6. Datum Toont de huidige datum verstrekt door het radiostation. OVERIGE FM-MENUBEDIENING Druk op de toets MENU om de menubediening te openen.
  • Seite 28: Bluetooth-Audio

    2. Als het apparaat nooit eerder was gepaard met een Bluetooth-apparaat of het laatst gepaarde apparaat niet kan vinden, dan zullen de display en Bluetooth-statusindicator blijven knipperen. Schakel de Bluetooth-functie van uw apparaat in en laat deze zoeken totdat “Lenco DAR-045” is gevonden. Selecteer “Lenco DAR-045” op het Bluetooth-apparaat om verbinding te maken. Voer eventueel het wachtwoord “0000” in.
  • Seite 29: In-Uitschakeltimer Instellen

    3. Druk op de toets VORIGE of VOLGENDE om de weergave van het uurformaat in te stellen tussen 24H of 12H. Druk op de toets SELECT (of op de toets ENTER op de afstandsbediening) om te bevestigen. 4. Druk op de toets VORIGE of VOLGENDE om de uren aan te passen.
  • Seite 30 3. Druk op de toets VORIGE of VOLGENDE totdat “SYSTEM” (systeem) wordt weergeven en druk vervolgens op de toets ENTER. 4. Druk op de toets VORIGE of VOLGENDE totdat “RESET” wordt weergegeven en druk vervolgens op de toets ENTER. 5. Druk op de toets VORIGE of VOLGENDE totdat “RESET Y”...
  • Seite 31 Probleemoplossing Geen spanning ● Zorg ervoor dat de voedingskabel stevig is aangesloten. ● Zorg ervoor dat het apparaat is ingeschakeld. De afstandsbediening werkt niet ● Gebruik de afstandsbediening in de buurt van het apparaat. ● Richt de afstandsbediening op de afstandsbedieningssensor op het apparaat. ●...
  • Seite 32: Technische Specificaties

    TECHNISCHE SPECIFICATIES Frequentiebereik DAB+ radio 174,928-239,2 MHz Frequentiebereik FM-radio 87,5-108 MHz Bluetooth-frequentiebereik 2,402-2,480 GHz AC-adapteringang 100-240 V~ 50/60 Hz 0,5A MAX AC-adapteruitgang DC 9V 2A Uitgangsvermogen van luidspreker 2 x 5 W Bluetooth V2.1 + EDR Aux in 3,5 mm stereo aansluiting Afstandsbedieningbatterij (inbegrepen) CR2025 x 1 stuk Afmetingen van apparaat (L x D x H)
  • Seite 33 Garantie Lenco biedt service en garantie aan overeenkomstig met de Europese wetgeving. Dit houdt in dat u, in het geval van reparaties (zowel tijdens als na de garantieperiode), uw lokale handelaar moet contacteren. Belangrijke opmerking: Het is niet mogelijk om producten die gerepareerd moeten worden direct naar Lenco te sturen.
  • Seite 34: Deutsch

    Deutsch DAR-045 ACHTUNG: Eine andere als die hier beschriebene Bedienung, Einstellung oder Verwendung der Funktionen kann zu gefährlicher Strahlenbelastung führen. VORSICHTSMASSNAHMEN VOR DER BENUTZUNG BEFOLGEN SIE IMMER FOLGENDE ANWEISUNGEN: Blockieren oder bedecken Sie keine Lüftungsöffnungen. Wenn Sie das Gerät auf ein Regal stellen, lassen Sie um das gesamte Gerät 5 cm (2”) freien Platz.
  • Seite 35: Anschluss

    ⚫ Wenn irgendwelche Probleme auftreten, dann ziehen Sie den Netzstecker aus der Netzsteckdose und setzen Sie sich anschließend mit einer qualifizierten Fachkraft in Verbindung. ⚫ Treten Sie nicht auf das Netzteil und klemmen Sie es auch nicht ein. Geben Sie besonders im näheren Bereich des Steckers und der Stelle acht, wo das Kabel aus dem Gerät herausgeführt wird.
  • Seite 36 WARNUNG Laserprodukt der Klasse 1 Warnung: Berühren Sie die Linse nicht. WARNUNG: Bei der Teilnahme am Straßenverkehr kann das Hören von Musik über ein Musikgerät von möglichen Gefahren, wie sich annähernden Fahrzeugen, ablenken. WARNUNG: Hören Sie nicht für längere Zeit mit einem hohen Lautstärkepegel, um dauerhaften Hörschäden vorzubeugen.
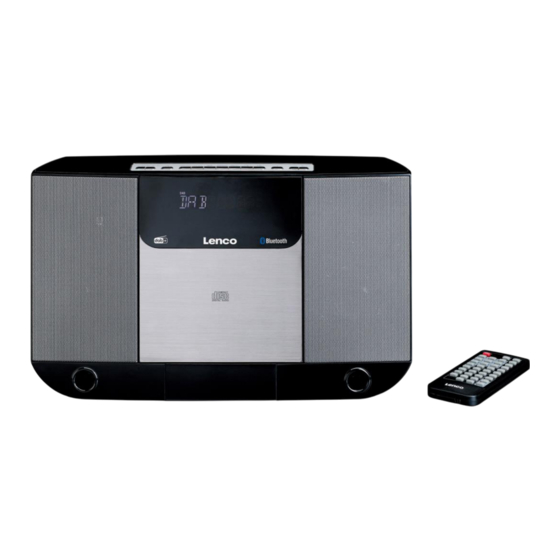
  • Seite 37: Vorderansicht

    Warnung Verschlucken Sie niemals die Batterie, Verätzungen wären die Folge. *Dieses Produkt enthält eine Knopfzelle. *Das Verschlucken der Knopfzelle kann innerhalb von nur 2 Stunden zu schweren inneren Verätzungen mit Todesfolge führen. Halten Sie neue und gebrauchte Batterien von Kindern fern. Verwenden Sie dieses Produkt nicht weiter und halten Sie es von Kindern fern, wenn das Batteriefach nicht sicher schließt.
  • Seite 38: Ansicht Von Oben

    ANSICHT VON OBEN 1. – VOLUME + Einstellung der Gesamtlautstärke 2. BEREITSCHAFTSMODUS Drücken Sie die Taste, um das Gerät einzuschalten. Drücken, um es auszuschalten und in den Standby-Modus zu versetzen 3. QUELLE Wählen Sie mit dieser Taste verschiedene Modi: DAB+/FM/CD/AUX/Bluetooth 4.
  • Seite 39: Fernbedienung

    FERNBEDIENUNG BEREITSCHAFTSMODUS ZIFFERNTASTEN MEM/PROG VORHERIGER /TITEL EQUALIZER WIEDERHOLEN X-BASS INFO SENDERSUCHLAUF MENÜ VORHERIGER BLUETOOTH-TITEL NÄCHSTER BLUETOOTH-TITEL BLUETOOTH WIEDERGABE/PAUSE STOPP CD WIEDERGABE/PAUSE LAUTSTÄRKE + LAUTSTÄRKE – STUMM ZUFALL SENDER- NÄCHSTER /TITEL EINGABE MONO/STEREO SENDER+ EINSCHLAFAUTOMATIK ZEITSCHALTUHR UHREINSTELLUNG ÖFFNEN/SCHLIESSEN QUELLE Bedienung der Fernbedienung In der Fernbedienung befindet sich bereits eine CR2025-Knopfzelle.
  • Seite 40: Grundlegende Bedienung

    Folgen Sie für das Ersetzen der Batterie nachfolgender Abbildung. Achten Sie beim Einlegen der Batterie auf die richtige Ausrichtung der Batterie. Batteriefach Batteriefach herausziehen In die angezeigte Richtung drücken CR2025-Knopfzelle ● Wenn die Fernbedienung und andere Geräte sich gegenseitig stören, kann dies ihren Betrieb beeinflussen. ●...
  • Seite 41: Manueller Suchlauf

    Manueller Suchlauf 1. Wechseln Sie in den DAB+-Modus. 2. Rufen Sie mit der Taste MENU die Menüsteuerung auf. 3. Drücken Sie die Taste VORHERIGER oder NÄCHSTER bis „Manual tune“ (Manueller Suchlauf) angezeigt wird und dann die Taste ENTER. 4. Drücken Sie die Taste VORHERIGER NÄCHSTER um den gewünschten Sender auszuwählen (5A-13F).
  • Seite 42: Fm-Radiobedienung

    Dynamik-Komprimierung (DRC) Durch Komprimierung sind leisere Töne besser hörbar, wenn das Gerät in einer lauten Umgebung verwendet wird. Die Komprimierungsstufe einer Sendung wird durch das Rundfunkanbieter festgelegt und zusammen mit dem Dienst übertragen. Durch Ändern des DRC-Werts Ihres Geräts sind Sie in der Lage, den Komprimierungsfaktor bezüglich dieser Stufe anzupassen. Es gibt drei Komprimierungsstufen: HOHE KOMPRIMIERUNG: Maximalkomprimierung, wie sie mit dem Dienst übertragen wird...
  • Seite 43: Audioeinstellung

    Anzeige von FM-Radiosenderinformationen Unten sind die verschiedenen Arten von Informationen aufgeführt. Drücken Sie zum Ändern der angezeigten Radiosenderinformationen mehrfach die Taste INFO. 1. Radiotext Laufschrifttext mit Informationen über Musiktitel oder Programmdetails, die vom Radiosender zur Verfügung gestellt werden 2. Programmart (PTY) Die Art des Programms, das vom Rundfunkanbieter bereitgestellt wird 3.
  • Seite 44: Einschlaffunktion

    Anzeige als auch Bluetooth-Statusanzeige weiter. Schalten Sie in diesem Fall die Bluetoth-Funktion Ihres Geräts ein und aktivieren Sie die Suche bis „Lenco DAR-045“ gefunden wurde. Wählen Sie auf dem Bluetooth-Gerät „Lenco DAR-045“, um eine Verbindung herzustellen. Geben Sie, falls erforderlich, den Zugangscode „0000“ ein.
  • Seite 45: Einstellen Der Uhrzeit

    2. Ist der Sleep-Timer auf 0 eingestellt, schaltet sich die Anlage automatisch aus. 3. Um die Einschlaffunktion aufzuheben, drücken Sie die Taste STANDBY zum Ausschalten der Anlage. Oder drücken Sie wiederholt die Taste SLEEP, um „SLEEP 00“ auszuwählen. EINSTELLEN DER UHRZEIT 1.
  • Seite 46: Zurücksetzen Auf Werkseinstellung

    5. Rufen Sie mit der Taste MENU die Menüsteuerung auf ZURÜCKSETZEN AUF WERKSEINSTELLUNG Diese Funktion setzt das Gerät auf die ursprünglichen Werkseinstellungen zurück. 1. Wechseln Sie hierfür in den DAB+- oder FM-Modus. 2. Rufen Sie mit der Taste MENU die Menüsteuerung auf. 3.
  • Seite 47 Fehlersuche Kein Strom ● Stellen Sie sicher, dass das Netzkabel ordnungsgemäß verbunden ist. ● Stellen Sie sicher, dass das Gerät eingeschaltet ist. Die Fernbedienung funktioniert nicht ● Verwenden Sie die Fernbedienung in der Nähe des Geräts. ● Richten Sie die Fernbedienung auf den Fernbedienungssensor des Geräts. ●...
  • Seite 48: Technische Spezifikationen

    TECHNISCHE SPEZIFIKATIONEN DAB+ Radiofrequenzbereich 174,928-239,2 MHz FM-Radio-Frequenzbereich 87,5-108 MHz Bluetooth Frequenzbereich 2,402 - 2,480 GHz Steckernetzteil-Eingang 100-240 V AC 50/60 Hz max. 0,5A Steckernetzteil-Ausgang 9 V DC 2 A Lautsprecherausgangsleistung 2 x 5 W Bluetooth V2.1 + EDR AUX-IN 3,5 mm Stereo-Klinkenbuchse Batterie der Fernbedienung (im Lieferumfang enthalten) 1 x CR2025 Geräteabmessungen (L x T x H)
  • Seite 49: Haftungsausschluss

    Garantie Lenco bietet Leistungen und Garantien im Einklang mit Europäischem Recht. Im Falle von Reparaturen (sowohl während als auch nach Ablauf der Garantiezeit) sollten Sie deshalb Ihren Einzelhändler kontaktieren. Wichtiger Hinweis: Es ist nicht möglich, Geräte für Reparaturen direkt an Lenco zu schicken.
  • Seite 50: Français

    Français DAR-045 ATTENTION : L’utilisation de commandes ou d’ajustements ou l’exécution de procédures autres que celles spécifiées dans le présent document peuvent entraîner une exposition dangereuse aux radiations. PRÉCAUTIONS AVANT UTILISATION GARDEZ CES INSTRUCTIONS À L’ESPRIT : Ne couvrez pas et n’obturez pas les ouvertures de ventilation. Lorsque vous placez l’appareil sur une étagère, laissez 5 cm (2”) d’espace libre tout autour de l’appareil.
  • Seite 51 ⚫ En cas de problème, débranchez le cordon d’alimentation CA et confiez l’entretien à un personnel qualifié. ⚫ Ne marchez pas sur l’adaptateur secteur ou ne le coincez pas. Faites très attention, en particulier à proximité des fiches et du point de sortie du câble. Ne placez pas d’objets lourds sur l’adaptateur secteur, car ils pourraient l’endommager. Gardez l’appareil hors de portée des enfants ! Ils pourraient se blesser gravement s’ils jouent avec le câble d’alimentation.
  • Seite 52 AVERTISSEMENT Produit laser de classe 1 Avertissement : Ne touchez pas la tête de lecture. AVERTISSEMENT : L’utilisation d’un lecteur de musique personnel dans la circulation peut détourner l’attention de l’auditeur de dangers potentiels tels que l’approche des voitures. AVERTISSEMENT : Pour éviter une éventuelle détérioration de l’ouïe, n’écoutez pas la musique à un niveau de volume élevé...
  • Seite 53 Attention N’ingérez pas la pile, risque de brûlure chimique. Ce produit contient une pile bouton. *Si la pile bouton est avalée, elle peut provoquer de graves brûlures internes en juste 2 heures et peut entraîner le décès. Tenez les piles neuves et usagées hors de portée des enfants. Si le compartiment à...
  • Seite 54 PANNEAU DU HAUT 1. – VOLUME + Pour régler le volume principal 2. MISE EN VEILLE Appuyez dessus pour mettre en marche l’appareil. Rappuyez dessus pour éteindre et passer en mode veille 3. SOURCE Appuyez sur cette touche pour choisir parmi les différents modes : DAB+/FM/CD/AUX/Bluetooth 4.
  • Seite 55: Utilisation De La Télécommande

    TÉLÉCOMMANDE MISE EN VEILLE PAVÉ NUMÉRIQUE MÉM/PROG PRÉCÉDENT /RÉGLAGE ÉGALISEUR RÉPÉTITION X-BASS INFO RECHERCHE MENU BT PRÉCÉDENT BT SUIVANT BT LECTURE/PAUSE ARRÊT LECTURE/PAUSE CD VOLUME + VOLUME – SOURDINE ALÉATOIRE STATION- SUIVANT /RÉGLAGE ENTRÉE MONO/ST STATION+ SOMMEIL MINUTERIE RÉGLAGE DE L’HORLOGE OUVERTURE/FERMETURE SOURCE Utilisation de la télécommande...
  • Seite 56: Fonctionnement De Base

    Pour installer une pile neuve, consultez la figure ci-dessous. En installant une pile, veillez à suivre les instructions. Compartiment à pile Sortez le compartiment à pile Poussez dans ce sens Pile CR2025 ● Si la télécommande entre en conflit avec d’autres appareils, le fonctionnement sera affecté. ●...
  • Seite 57 Recherche manuelle 1. Mettez l’appareil en marche et réglez-le en mode DAB+. 2. Appuyez sur la touche MENU pour accéder au menu. 3. Appuyez sur le bouton PRÉCÉDENT ou SUIVANT jusqu’à ce que « Manual tune » (Syntonisation manuelle) s'affiche, puis appuyez sur le bouton ENTER.
  • Seite 58 Contrôle de la gamme dynamique (DRC) DRC peut rendre les sons faibles lus faciles à entendre quand l’appareil est utilisé dans un environnement bruyant. Le niveau de DRC d’une diffusion est défini par le diffuseur et transmis avec le service. Une modification de la valeur de DRC sur votre appareil vous permet d’appliquer un facteur d’échelle à...
  • Seite 59 Affichage des informations d’une station FM Les différents types d’informations existants sont mentionnés ci-dessous. Pour changer les informations affichées, appuyez plusieurs fois sur le bouton INFO. 1. Texte radio Le texte défilant qui affiche des informations sur les titres de musique ou des détails de programme fourni par la station de radio 2.
  • Seite 60: Audio Bluetooth

    Bluetooth continueront de clignoter. Activez la fonction Bluetooth de votre appareil et activez la recherche jusqu’à ce qu'il ait trouvé « Lenco DAR-045 ». Sélectionnez « Lenco DAR-045 » sur l’appareil Bluetooth pour établir la connexion. Saisissez le mot de passe « 0000 », si nécessaire.
  • Seite 61: Configuration De La Langue

    3. Pour annuler la fonction de sommeil, appuyez sur le bouton STANDBY pour éteindre l’appareil. Ou bien, appuyez plusieurs fois sur le bouton SLEEP pour sélectionner « SLEEP 00 » (sommeil désactivé). RÉGLAGE DE L'HORLOGE 1. Éteignez l’appareil en le mettant en mode veille. 2.
  • Seite 62: Économie D'énergie

    4. Appuyez sur le bouton PRÉCÉDENT ou SUIVANT jusqu’à ce que « SW VER » (version du logiciel) s'affiche, puis appuyez sur le bouton ENTER pour afficher le numéro de la version du logiciel. 5. Appuyez sur la touche MENU pour quitter le menu RÉINITIALISATION DES RÉGLAGES D’USINE Cette fonction rétablit les réglages d’usine initiaux de l’appareil.
  • Seite 63 Dépannage Pas d’alimentation ● Vérifiez que le cordon secteur est correctement branché. ● Assurez-vous que l’appareil est allumé. La télécommande ne fonctionne pas ● Utilisez la télécommande près de l’appareil. ● Pointez la télécommande vers le capteur de la télécommande de l’appareil. ●...
  • Seite 64: Caractéristiques Techniques

    CARACTÉRISTIQUES TECHNIQUES Plage de fréquence radio DAB+ 174,928-239,2 MHz Plage de fréquence radio FM 87,5-108 MHz Plage de fréquence Bluetooth 2,402-2,480 GHz Entrée de l’adaptateur secteur 100-240 V ~ 50/60 Hz 0,5 A MAX Sortie de l’adaptateur secteur CC 9V 2A Puissance de sortie des enceintes 2 x 5 W Bluetooth...
  • Seite 65 Garantie Lenco propose un entretien et une garantie conformément à la législation européenne, ce qui signifie qu’en cas de besoin de réparation (aussi bien pendant et après la période de garantie), vous pouvez contacter votre revendeur le plus proche. Remarque importante : Il n’est pas possible de renvoyer l’appareil pour réparation directement à Lenco.
  • Seite 66: Español

    Español DAR-045 PRECAUCIÓN: El uso de controles o ajustes o rendimiento de procedimientos excepto aquellos que los aquí especificados puede provocar una exposición peligrosa a la radiación. PRECAUCIONES PREVIAS AL USO TENGA ESTAS INSTRUCCIONES EN MENTE: No cubra o bloquee ninguna apertura de ventilación. Cuando coloque el dispositivo en una estantería, deje 5 cm (2”) de espacio libre alrededor de todo el dispositivo.
  • Seite 67 ⚫ Si se produce cualquier problema, desconecte el cable de alimentación CA y remítalo a mantenimiento por parte de personal cualificado. ⚫ No pise o pince el adaptador de alimentación. Tenga mucho cuidado, en especial en las zonas alrededor de las tomas y el punto de salida del cable.
  • Seite 68 ADVERTENCIA Producto Láser Clase 1 Advertencia: No toque la lente. ADVERTENCIA: Utilizar un reproductor de música personal mientras participa en el tráfico puede hacer que el usuario esté menos atento a los peligros potenciales, como vehículos que se acercan. ADVERTENCIA: Para evitar posibles daños en la audición, no la escuche a volúmenes elevados durante largos periodos de tiempo.
  • Seite 69: Panel Frontal

    Advertencia No ingiera la batería; riesgo de quemaduras químicas. Este producto contiene una pila tipo botón. *Si se traga la pila de botón, puede causar quemaduras internas graves en solo 2 horas y provocar la muerte. Mantenga las pilas nuevas o usadas fuera del alcance de los niños. Si el compartimiento de la pila no se cierra correctamente, deje de usar el producto y no lo deje al alcance los niños.
  • Seite 70 PANEL SUPERIOR 1. – VOLUME + Ajusta el volumen principal 2. ESPERA Púlselo para encender la unidad. Vuélvalo a pulsar para apagarla y entrar en modo en espera 3. FUENTE Pulse esta tecla para elegir diferentes modos: DAB+/FM/CD/AUX/Bluetooth 4. AJUSTAR RELOJ En modo en espera, púlsela para proceder a la configuración del reloj 5.
  • Seite 71: Mando A Distancia

    MANDO A DISTANCIA ESPERA BOTONES NUMÉRICOS MEM/PROG ANTERIOR /SINTONIZAR ECUALIZADOR REPETIR X-BASS INFORMCIÓN BÚSQUEDA MENÚ BT ANTERIOR BT SIGUIENTE REPRODUCCIÓN/PAUSA DEL BT DETENER REPRODUCIR/PAUSAR CD VOLUMEN + VOLUMEN – SILENCIO ALEATORIO SIGUIENTE /SINTONIZACIÓN ENTRAR MONO/ESTÉREO SUSPENSIÓN TEMPORIZADOR AJUSTAR RELOJ ABRIR/CERRAR FUENTE Funcionamiento del mando a distancia En la unidad del mando a distancia ya se encuentra instalada una pila CR2025.
  • Seite 72: Operaciones Básicas

    Para sustituir una pila nueva, por favor, remítase a la figura que se muestra debajo. Cuando inserte una pila, asegúrese de hacerlo en la dirección correcta. Porta pilas Saque el porta pilas Empújela según esta dirección Pila CR2025 ● Si el mando a distancia entra en conflicto con otros dispositivos, se verá afectado el funcionamiento. ●...
  • Seite 73 Búsqueda manual 1. Encienda la unidad en modo DAB+. 2. Pulse el botón MENU para acceder al control del menú. 3. Pulse el botón ANTERIOR o SIGUIENTE hasta que se muestre “Manual tune” (Sintonización manual) y posteriormente, pulse el botón ENTER. 4.
  • Seite 74: Funcionamiento De La Radio Fm

    Control de gama dinámica (DRC) El DRC puede facilitar la audición de sonidos más suaves cuando se usa la unidad en un entorno ruidoso. El nivel del DRC de una emisión lo fija el emisor y se transmite dentro del servicio. Cambiar el valor del DRC en la unidad le permite aplicar un factor de subida o bajada a este nivel.
  • Seite 75 1. Radio texto Desplácese por el texto que muestra información sobre los títulos musicales o los detalles del programa que proporciona la emisora de radio 2. Tipo de programa (PTY) Tipo de programa proporcionado por el emisor 3. Frecuenc Frecuencia del canal actual 4.
  • Seite 76: Audio Bluetooth

    Bluetooth seguirán parpadeando. Encienda la función Bluetooth de su dispositivo y active la búsqueda hasta que se encuentre “Lenco DAR-045”. Seleccione “Lenco DAR-045” en el dispositivo Bluetooth para realizar la conexión. Introduzca la contraseña “0000” si la solicita.
  • Seite 77: Configuración Del Reloj

    CONFIGURACIÓN DEL RELOJ 1. Apague la unidad en modo de espera. 2. Pulse el botón CLOCK SET para ajustar el reloj. Mostrará “24H”. Pulse el botón ANTERIOR o SIGUIENTE para ajustar el formato de la pantalla horaria entre 24H o 12H. Pulse el botón SELECT (o el botón ENTER en el mando a distancia) para confirmarlo.
  • Seite 78: Ahorro De Energía

    2. Pulse el botón MENU para acceder al control del menú. 3. Pulse el botón ANTERIOR o SIGUIENTE hasta que se muestre “SYSTEM” y posteriormente pulse el botón ENTER. 4. Pulse el botón ANTERIOR o SIGUIENTE hasta que se muestre “RESET (RESTAURAR)” y posteriormente pulse el botón ENTER.
  • Seite 79 Solución de problemas No se enciende ● Compruebe que el cable de red está bien conectado. ● Asegúrese de que la unidad está encendida. El mando a distancia no funciona ● Use el mando a distancia cerca de la unidad. ●...
  • Seite 80: Especificaciones Técnicas

    ESPECIFICACIONES TÉCNICAS Margen de frecuencias de radio DAB+ 174.928-239.2 MHz Alcance de frecuencia de radio FM 87.5-108 MHz Rango de frecuencias Bluetooth 2.402-2.480 GHz Entrada del adaptador CA 100-240V~ 50/60Hz 0.5A MÁXIMO Salida del adaptador CA CC 9V 2A Potencia de salida del altavoz 2 x 5 W Bluetooth V2.1 + EDR...
  • Seite 81 Garantía Lenco ofrece servicio y garantía en cumplimiento con las leyes de la Unión Europea, lo cual implica que, en caso de que su producto precise ser reparado (tanto durante como después del periodo de garantía), deberá contactar directamente con su distribuidor.
  • Seite 82: Italiano

    Italiano DAR-045 ATTENZIONE: L'utilizzo di comandi o regolazioni o l'esecuzione di procedure diverse da quelle specificate può causare l'esposizione a radiazioni pericolose. PRECAUZIONI PRIMA DELL'USO CONSERVARE QUESTE ISTRUZIONI: Non coprire o bloccare le aperture di ventilazione. Quando si posiziona il dispositivo su uno scaffale, lasciare uno spazio libero di 5 cm (2") attorno all'intero perimetro.
  • Seite 83 ⚫ Non calpestare o schiacciare l'alimentatore. Fare molta attenzione, in particolare vicino alle prese e al punto di uscita del cavo. Non posizionare oggetti pesanti sull'alimentatore in quanto potrebbero danneggiarlo. Tenere il dispositivo fuori dalla portata dei bambini. Giocando con il cavo di alimentazione possono ferirsi gravemente. ⚫...
  • Seite 84 AVVERTENZA Prodotto laser di classe 1 CLASS 1 LASER PRODUCT PRODOTTO LASER DI CLASSE 1 CAUTION PERICOLO INVISIBLE LASER RADIATION WHEN OPEN AND INTERLOCKS RADIAZIONE LASER INVISIBILE QUANDO VIENE APERTO E GLI DEFEATED. INTERBLOCCHI SONO DIFETTOSI. AVOID EXPOSURE TO BEAM EVITARE L'ESPOSIZIONE AL RAGGIO This product contains a low power laser device.
  • Seite 85: Pannello Anteriore

    Manuale d'uso Avvertenza Non ingerire le batterie, rischio di ustione chimica Il presente prodotto contiene una pila a bottone. *In caso di ingerimento delle pile a bottone, ci sono gravi rischi di ustioni interne, che possono causare la morte in 2 ore. Tenere le batterie, nuove o usate, fuori dalla portata dei bambini.
  • Seite 86: Pannello Superiore

    PANNELLO SUPERIORE 14. – VOLUME + Regolazione del volume principale 15. STANDBY Premere per accendere l’unità. Premere di nuovo per spegnere l’unità e passare alla modalità Standby 16. SORGENTE Premere questo tasto per scegliere varie modalità: DAB+/FM/CD/AUX/Bluetooth 17. IMPOSTAZIONE DELL’OROLOGIO In modalità...
  • Seite 87: Funzionamento Del Telecomando

    TELECOMANDO STANDBY PULSANTI NUMERICI MEMORIA/PROGRAMMA TRACCIA PRECEDENTE /SINTONIZZA EQUALIZZATORE RIPETI X-BASS INFORMAZIONI SCANSIONA MENU TRACCIA PRECEDENTE IN MODALITÀ BT TRACCIA SUCCESSIVA IN MODALITÀ BT RIPRODUZIONE/PAUSA IN MODALITÀ BT INTERROMPI RIPRODUZIONE/PAUSA IN MODALITÀ CD VOLUME + VOLUME – DISATTIVA AUDIO CASUALE CANALE PRECEDENTE TRACCIA SUCCESSIVA /SINTONIZZA...
  • Seite 88: Operazione Base

    Per sostituire la batteria con una nuova, fare riferimento alla figura in basso. Durante l’inserimento di una batteria, assicurarsi di farlo nel verso giusto. Vano batteria Estrarre il vano batteria Spingere premendo questa direzione Batteria CR2025 ● Nel caso in cui il telecomando entri in conflitto con altri dispositivi, il suo corretto funzionamento verrà compromesso. ●...
  • Seite 89 Scansione manuale 9. Accendere l'unità in modalità DAB+. 10. Premere il pulsante MENU per accedere al controllo del menu. 11. Premere il pulsante PRECEDENTE o SUCCESSIVO finché sul display non viene visualizzato “Manual tune (Sintonizzazione manuale)” dopodiché premere il pulsante ENTER. 12.
  • Seite 90: Funzionamento Radio Fm

    Controllo intervallo dinamico (DRC) Il DRC è in grado di rendere i suoni più silenziosi più facili da sentire quando l'unità viene utilizzata in un ambiente rumoroso. Il livello di DRC di una trasmissione viene impostato dall'emittente e trasmesso con il servizio. La modifica del valore DRC sull'unità consente di applicare un fattore di scala a questo livello.
  • Seite 91 Selezione di Stereo/Mono forzato Quando viene ricevuta una stazione radio FM Stereo, premere il pulsante MONO/ST per passare dall'audio stereo all’audio mono forzato. Visualizzazione delle informazioni sulla stazione FM Esistono diversi tipi di informazioni, come elencato di seguito. Per modificare le informazioni sul display, premere ripetutamente il pulsante INFO.
  • Seite 92: Ingresso Ausiliario

    Bluetooth continueranno a lampeggiare. Attivare la funzione Bluetooth sul proprio dispositivo e abilitare la ricerca finché “Lenco DAR-045” non viene trovato. Selezionare “Lenco DAR-045” sul dispositivo Bluetooth per stabilire la connessione. Se necessario, inserire la password “0000”.
  • Seite 93: Funzione Di Spegnimento Automatico

    Quando viene attivato X-Bass, gli effetti audio dell’equalizzatore verranno disattivati. Premendo il pulsante EQUALIZER verrà visualizzato solamente BASS ON (Bassi attivati) senza alcun effetto dell’equalizzatore. Per poter usufruire nuovamente degli effetti audio dell’equalizzatore, premere prima il pulsante X-BASS per disattivare tale funzione. FUNZIONE DI SPEGNIMENTO AUTOMATICO 4.
  • Seite 94: Ripristino Delle Impostazioni Di Fabbrica

    11. Premere il pulsante PRECEDENTE o SUCCESSIVO per selezionare tra varie lingue. Selezionare la lingua desiderata e quindi premere ENTER per confermare. 12. Premere il pulsante MENU per uscire dal controllo del menu. CONTROLLO DELLA VERSIONE DEL SOFTWARE È possibile controllare la versione del software del dispositivo. 6.
  • Seite 95 Risoluzione dei problemi Alimentazione assente ● Assicurarsi che il cavo di alimentazione sia collegato in modo corretto. ● Assicurarsi che l’unità sia accesa. Il telecomando non funziona ● Utilizzare il telecomando vicino all’unità. ● Puntare il telecomando verso l’apposito sensore sull’unità. ●...
  • Seite 96: Specifiche Tecniche

    SPECIFICHE TECNICHE Gamma di radiofrequenze DAB+ 174,928 - 239,2 MHz Gamma di radiofrequenze FM 87,5 - 108 MHz Gamma di frequenza Bluetooth 2,402-2,480 GHz Ingresso adattatore CA 100-240 V~ 50/60 Hz 0,5 A MAX Uscita adattatore CA CC 9 V 2 A Potenza altoparlante in uscita 2 x 5 W Bluetooth...
  • Seite 97 Garanzia Lenco offre assistenza e garanzia in conformità con la legge europea, il che significa che in caso di riparazioni (sia durante che dopo il periodo di garanzia) è necessario contattare il rivenditore locale. Nota importante: Non è possibile inviare direttamente a Lenco i prodotti da riparare.

Inhaltsverzeichnis