Inhaltsverzeichnis
Werbung
Verfügbare Sprachen
Verfügbare Sprachen
S
r
mart
DAc
h
eizkörper
Kurzanleitung
Gi
S
r
mart
adiator
t
hermoStat
Quick Start Guide
FB
t
hermoStat pour
r
adiateur
Guide rapide
nB
r
-t
adiator
Snelle gids
IAN 368308_2010
adiator
-t
hermoStat
hermoStaat
Short manual
kurzanleitung
guide de démarrage rapide
t
hermoStat
C
T
ermosTaT Topného Tělesa
Stručný průvodce
s
t
ermoStat na
t
eleSo
Stručný sprievodca
E
t
ermoStato para
r
adiator
Guía rápida
d
r
adiatortermoStat
Hurtig vejledning
V
ýhreVne
Werbung
Kapitel
Inhaltsverzeichnis

Verwandte Anleitungen für Silvercrest 368308 2010


Inhaltszusammenfassung für Silvercrest 368308 2010
- Seite 1 Short manual kurzanleitung guide de démarrage rapide mart adiator hermoStat eizkörper hermoStat ermosTaT Topného Tělesa Stručný průvodce Kurzanleitung mart adiator ermoStat na ýhreVne hermoStat eleSo Quick Start Guide Stručný sprievodca ermoStato para hermoStat pour adiator adiateur Guía rápida Guide rapide adiatortermoStat adiator hermoStaat...
- Seite 2 Klappen Sie vor dem Lesen die Seite mit den Abbildungen aus und machen Sie sich mit allen Funktionen des Geräts vertraut. Before starting to read the information, fold out the page containing the illustrations and familiarise yourself with all the functions provided by the device. Dépliez la page sur laquelle se trouvent les illustrations et lisez attentivement les in- formations pour vous familiariser avec toutes les fonctions de l'appareil.
- Seite 3 Lieferumfang: Scope of Delivery Heizkörperthermostat Radiator thermostat Adapter Danfoss RA, RAV, RAVL Adapters: Danfoss RA, RAV, RAVL bei Lieferung nach Österreich und In the case of supply to Austria Polen zusätzlich: Überwurfmutter and Poland also: union nuts M28 und M30; Schablone für M28 and M30;...
- Seite 4 09:15 7 a - e 4 a - b Mo Tu We Th Fr Sa Su...
- Seite 5 DAc Diese Kurzanleitung ist fester Bestandteil der Bedienungsanleitung. Sie dient dazu, dieses Produkt sofort in Betrieb nehmen zu können. Lesen Sie vor der Verwendung die Bedienungsanleitung und beachten Sie insbesondere die Sicherheitshinweise. Sie können die vollständige Bedienungsanleitung von der folgenden Website herunterladen: http://www.lidl-service.com.
- Seite 6 nB Deze beknopte instructies vormen een integ- rerend deel van de gebruiksaanwijzing. Het is bedoeld om u in staat te stellen dit product onmiddellijk in gebruik te nemen. Lees vóór gebruik de gebruiksaanwijzing en let vooral op de veiligheidsvoorschriften. U kunt de voll- edige gebruiksaanwijzing downloaden van de volgende website: http://www.lidl-service.com.
- Seite 7 E Estas breves instrucciones son parte integrante del manual de instrucciones. Su objetivo es permitirle poner este producto en funcionamiento inmediatamente. Lea el manual de instrucciones antes de utilizarlo y preste espe- cial atención a las indicaciones de seguridad. Puede de- scargar el manual de instrucciones completo en la sigui- ente página web: http://www.lidl-service.com.
-
Seite 8: Inhaltsverzeichnis
Inhaltsverzeichnis 1. Einleitung ......... 9 2. Bestimmungsgemäße Verwendung .. 9 3. Technische Daten ......10 4. Bedien- und Anzeigeelemente ..11 5. Vor der Inbetriebnahme ....12 6. Montage ........12 Alten Thermostatkopf demontieren ......13 Neuen Thermostatkopf montieren ......13 Überwurfmutter montieren / demontieren (Polen / Österreich) .......... -
Seite 9: Einleitung
Einleitung Herzlichen Glückwunsch zum Kauf Ihres neuen Gerätes. Sie haben sich damit für ein hochwerti- ges Gerät entschieden. Die Bedienungsanleitung ist Bestandteil dieses Geräts. Sie enthält wichtige Hinweise für Sicherheit, Gebrauch und Entsorgung. Machen Sie sich vor der Benutzung des Produkts mit allen Bedien- und Sicherheitshinweisen vertraut. -
Seite 10: Technische Daten
Technische Daten Merkmal Wert 368308_2010 3 V ⎓ (DC, Gleichspan- Versorgungsspannung nung) Stromaufnahme max. 100 mAh Batterien 2 × Mignon (AA, LR6), 1,5 V Batterielebensdauer bis zu 3 Jahre Funk-Frequenz 2,402 - 2,480 GHz Sendeleistung +19 dBm Display Messgenauigkeit ±1 °C Abmessungen (L x B x H) 115 ×... -
Seite 11: Bedien- Und Anzeigeelemente
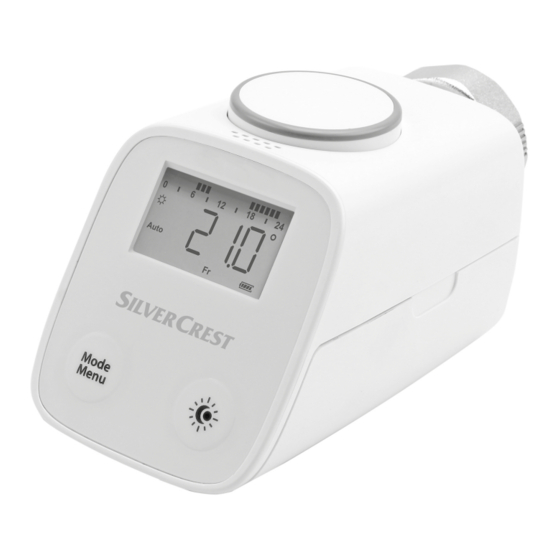
Bedien- und Anzeigeelemente Eine Übersicht der Bedien- und Anzeigeelemente des Ge- räts finden Sie auf der Ausklappseite dieser Bedienungs- anleitung. Überwurfmutter Temperatursensor Display Ladestandsanzeige Heizzeiten (Wochentage) Taste umschalten zwischen Heiz-/Spartemperatur Taste Menü/Modus Batteriefach Heiztemperatur Spartemperatur Fenster-auf-Funktion AUTO / MANU (automatischer/manueller Modus) Urlaubsfunktion Heizzeiten (Uhrzeiten) Drehtaster... -
Seite 12: Vor Der Inbetriebnahme
Einkerbung Adapter Stößelverlängerung Vor der Inbetriebnahme Bevor Sie das Gerät benutzen können, müssen Sie die Plastikfahne aus dem Batteriefach (6) entfernen. Abdeckung des Batteriefachs (6) abnehmen. Plastikfahne aus dem Batteriefach (6) ziehen. Abdeckung des Batteriefachs (6) schließen. Datum und Uhrzeit einstellen. Warten Sie einen Augenblick, das Gerät bereitet sich für die Montage vor. -
Seite 13: Alten Thermostatkopf Demontieren
passt auf alle Heizkörperventile mit dem Gewindemaß M30 × 1,5 mm der gängigsten Hersteller, wie z. B. Hei- meier, MNG, Junkers, Landis+Gyr (Duodyr), Honeywell- Braukmann, Oventrop Typ A, Oventrop AV6, Schlösser, Comap D805, Valf, Sanayii, Mertik Maxitrol, Watts, Wingenroth (Wiroflex) R.B.M, Tiemme, Jaga, Siemens, Idmar. - Seite 14 Vorsicht! Schnittgefahr! Die mitgelieferten Adapter und die Stößelverlängerung können scharfkantig sein. ▸ Entgraten Sie die Bruchstelle am verwendeten Adapter mit einem ge- eigneten Hilfsmittel. Die Einkerbungen (13) sorgen für einen optimalen Sitz des Adapters (14). Falls notwendig, den zum Heizkörperventil passen- den Adapter (14) auf das Heizkörperventil aufschie- ben, bis der Adapter (14) einrastet.
-
Seite 15: Überwurfmutter Montieren / Demontieren (Polen / Österreich)
Je nach Ventilzustand kann eine mehrmalige Adaptier- fahrt nötig sein, bis das Heizkörperventil korrekt erkannt wurde. Sollte die Adaption auch nach mehrmaligen Versuchen nicht funktionieren, montieren Sie das Gerät mit einem Distanzring erneut. Überwurfmutter montieren / demontieren (Polen / Österreich) Bei Lieferung nach Polen und Österreich ist die Überwurf- mutter (1) nicht vormontiert. -
Seite 16: Anzeige Erklärung
Durch Drücken des Drehtasters (9) wählen Sie die Funktion aus. Mit dem Drehtaster (9) können Sie die Einstellungen verändern. Durch Drücken des Drehtasters (9) bestätigen Sie Ihre Eingaben. Nach 30 Sekunden ohne Eingabe wechselt die Anzeige auf das Hauptbild. Anzeige Erklärung Zeitprogramm Aktuelle Ventilposition... -
Seite 17: Automatischen Modus Einstellen
Automatischen Modus einstellen Im automatischen Modus regelt das Gerät entsprechend dem eingestellten Zeitprogramm zwischen zwei Tempe- raturen. Wenn Sie im automatischen Modus die Temperatur über den Drehtaster (9) verstellen, bleibt die manuell einge- stellte Temperatur bis zum nächsten Schaltpunkt aktiv. Taste Mode/Menu (5 b) drücken, bis das Display den Modus (7 d) anzeigt. -
Seite 18: Garantie
Das Gerät und das Verpackungsmaterial sind recycelbar, entsorgen Sie diese getrennt für eine bessere Abfallbehandlung. Das Triman-Logo gilt nur für Frankreich. Werfen Sie Ihr Gerät, wenn es ausgedient hat, im Interesse des Umweltschutzes nicht in den Hausmüll, sondern führen Sie es einer fachgerechten Entsorgung zu. -
Seite 19: Servicepartner
service.at@gsl-servicenet.de service.ch@gsl-servicenet.de Kann der Fehler telefonisch nicht beseitigt werden, bitten wir Sie, das Gerät in der Originalverpackung an unseren Ser vicepartner zu senden. 13. Servicepartner GSL mbH Am Weimarer Berg 6 DE-99510 Apolda DEUTSCHLAND 14. Hersteller GO Europe GmbH Zum Kraftwerk 1 DE-45527 Hattingen DEUTSCHLAND www.go-europe.com... - Seite 20 Contents 1. Introduction ........21 2. Intended Use ........21 3. Technical Data ........ 22 4. Operating and Display Elements ..23 5. Before Starting Up ......24 6. Installation ........24 Disassembling the Old Thermostat Head ....25 Installing the New Thermostat Head ...... 25 Assembling/Disassembling the Union Nut (Poland / Austria) ............
-
Seite 21: Introduction
Introduction We are delighted that you have purchased this new device. You have chosen a high-quality product. The operating manual represents a component part of the device. It contains important information regarding safety, use and disposal. Familiarize yourself with all the operating and safety information before starting to use the device. -
Seite 22: Technical Data
Technical Data Feature Value Type 368308_2010 3 V ⎓ (DC, direct current) Supply voltage Current consumption Max. 100 mAh Batteries 2 × AA batteries (LR6), 1.5 V Battery service life Up to 3 years Radio frequency 2.402 - 2.480 GHz Transmission power +19 dBm Display... -
Seite 23: Operating And Display Elements
Operating and Display Elements An overview of the operating and indicator elements on the device is provided on the fold-out page of the oper- ating manual. Union nut Temperature sensor Display Charge status indicator Heating times (weekdays) button to switch between heating/energy-save temperature Mode/Menu button Battery compartment... -
Seite 24: Before Starting Up
Notch Adapters Plunger extension Before Starting Up Before you can start to use the device, you must remove the plastic tag out of the battery compartment (6). Remove the cover of the battery compartment (6). Pull the plastic tag out of the battery compartment (6). Replace the cover of the battery compartment (6). -
Seite 25: Disassembling The Old Thermostat Head
The union nut (1) permanently attached to the device fits on all radiator valves of the most common manufacturers with thread size M30 x 1.5 mm, e.g. Heimeier, MNG, Junkers, Landis+Gyr (Duodyr), Honeywell-Braukmann, Oventrop type A, Oventrop AV6, Schlösser, Comap D805, Valf, Sanayii, Mertik Maxitrol, Watts, Wingenroth (Wiroflex) R.B.M, Tiemme, Jaga, Siemens, Idmar. - Seite 26 Caution! Risk of cuts! The adapters and stem extension supplied could have sharp edges. ▸ Smoothen any burrs at the breakout points of the adapter used with the aid of an appropriate tool. The notches (13) ensure the adapter (14) fits perfectly. If required, slide the adapter (14) that fits the radiator valve onto the radiator valve until the adapter (14) snaps into place.
-
Seite 27: Assembling/Disassembling The Union Nut (Poland / Austria)
Assembling/Disassembling the Union Nut (Poland / Austria) In the case of supplies to Poland and Austria, the union nut (1) is not preassembled. Use the thread gauge sup- plied to determine which union nut (1) must be assembled on the radiator valve. Slide the union nut (1) on the radiator valve until you hear a distinct "click"... -
Seite 28: Operation
Reset the default factory settings Adapt the temperature to local character- istics or perception of temperature Open Window function Switch between summertime/wintertime Set the date and time Operation All operating modes are shown on the device display. Operate the device as described in the following sec- tions. -
Seite 29: Lidl Home App
Lidl Home App Installing the App Online Manual Lidl Home App To operate the device using the Lidl Home app, you must first install the Lidl Home app. Download the Lidl Home app from the App Store or Google Play. 10. -
Seite 30: Warranty
Defective or spent batteries must be recycled according to Directive 2006/66/EC. Return batteries and / or the device via the recycling services offered. The packing is made of environmentally friendly materials which can be disposed of through the local recycling centres. Refer to your local authorities or municipal offices for information on how to dispose of the device when no longer... -
Seite 31: Service Partner
13. Service Partner GSL mbH Am Weimarer Berg 6 DE-99510 Apolda GERMANY 14. Manufacturer GO Europe GmbH Zum Kraftwerk 1 DE-45527 Hattingen GERMANY www.go-europe.com 15. Simplified EU Declaration of Conformity We, GO Europe GmbH, Zum Kraftwerk 1, 45527 Hattingen, DEUTSCHLAND, declare under our sole responsibility, that the RADIATOR THERMOSTAT device complies with the EU directives 2014/53/EU and 2011/65/EU. - Seite 32 Table des matières 1. Introduction ........33 2. Utilisation conforme à l'usage prévu ......33 3. Données techniques ....... 34 4. Éléments de manipulation et d'affichage ......... 35 5. Avant la première mise en service .. 36 6. Montage ........36 Démontage de l'ancienne tête thermostatique ..
-
Seite 33: Introduction
Introduction Nous vous félicitons pour l'achat de votre nouvel appareil. Vous avez ainsi porté votre choix sur un produit de haute qualité. Le mode d'emploi fait partie de l'appareil. Il contient des informations importantes pour votre sécurité, sur l'utilisation et l'élimination de l'appareil. -
Seite 34: Données Techniques
Données techniques Caractéristique Valeur Modèle 368308_2010 3 V ⎓ (DC, tension conti- Alimentation en courant nue) Intensité de courant ab- max. 100 mAh sorbé Piles 2 Piles Mignon, type AA, LR6, 1,5 V Durée de vie des piles 3 ans maximum Fréquence radio 2,402 / 2,480 GHz Puissance d'émission... -
Seite 35: Éléments De Manipulation Et D'affichage
Éléments de manipulation et d'affichage Vous trouverez un récapitulatif des éléments de manipu- lation et d'affichage de l'appareil sur la page dépliable de ce mode d'emploi. Écrou-raccord Capteur de température Écran Affichage du niveau de charge des piles Périodes de chauffage (jours de la semaine) Touche de commutation entre température éco/ chauffage Touche Mode/Menu... -
Seite 36: Avant La Première Mise En Service
Encoche Adaptateur Prolongateur du poussoir Avant la première mise en service Avant d'utiliser l'appareil, enlever la languette plastique du logement pour piles (6). Pour cela, retirer le cache-piles du logement (6). Enlever le plastique du logement pour piles (6). Reposer le cache-piles sur le logement (6). Réglage de la date et l'heure. -
Seite 37: Démontage De L'ancienne Tête Thermostatique
Le montage de l'appareil est simple – pas besoin de vi- danger le circuit d'eau de l'installation ou d'intervenir dans le système de chauffage. Pas besoin d'un outillage spécial ou d'un débranchement du chauffage. L'écrou-raccord réuni à l'appareil (1) s'adapte à tous les corps de vanne ayant un filetage M30 x 1,5 mm des fabricants les plus courants tels que Heimeier, MNG, Junkers, Landis&Gyr (Duodyr), Honeywell-Braukmann,... - Seite 38 Prudence ! Risque de se coincer les doigts entre les moitiés d'adap- tateurs ! ▸ Lors de la pose, veillez à ne pas vous coincer les doigts entre les moi- tiés d'adaptateur ! Prudence ! Risque de coupure ! Les adaptateurs vendus avec l'appareil et le prolongateur du poussoir peuvent avoir des arêtes vives.
-
Seite 39: Montage/Démontage De L'écrou-Raccord (Pologne/Autriche)
Vissez l'appareil à l'aide de l'écrou-raccord (1) sur l'adaptateur (14) posé ou directement sur le corps de vanne. Appuyer sur le bouton-poussoir rotatif (9). L'adaptation démarre automatiquement. L'appareil s'adapte à la course du corps de vanne. À cet effet, le corps de vanne va s'ouvrir et se fermer plusieurs fois pour reconnaître les butées. -
Seite 40: Navigation Dans Le Menu
Navigation dans le menu Appuyez sur la touche Mode/Menu (5 b) pour accé- der au menu. Sélectionnez la fonction de votre choix en tournant le bouton rotatif (9). Sélectionnez la fonction de votre choix en appuyant sur le bouton rotatif (9). Le bouton rotatif (9) vous permet de modifier les réglages. -
Seite 41: Réglage Du Mode Automatique
est comprise entre 5,0 °C et 29,5 °C. Vous pouvez ré- gler la température en pas de 0,5 °C. Appuyer sur la touche Mode/Menu (5 b) jusqu'à ce que l'écran affiche le mode (7 d). Manu Régler la température voulue avec le bouton ro- tatif (9). -
Seite 42: Recyclage
11. Recyclage Tenez compte du marquage sur les emballages lorsque vous triez les déchets ; ceux-ci sont dotés d'abréviations (a) et de numéros (b) signifiant ce qui suit : 1–7 : plastiques / 20–22 : papiers et cartons / 80–98 : composites. L'appareil et les emballages sont recyclables. -
Seite 43: Garantie
12. Garantie Conservez impérativement le bon de garantie ! Chère cliente, cher client, nous vous félicitons d’avoir choisi cet appareil. Si, contre toute attente, vous deviez avoir un problème technique, veuillez tenir compte des points suivants : ▸ La durée de garantie de votre appareil est de 36 mois. - Seite 44 riode court à compter de la demande d‘intervention de l‘acheteur ou de la mise à disposition pour réparation du bien en cause, si cette mise à disposition est postérieure à la demande d‘intervention. Indépendamment de la garantie commerciale souscrite, le vendeur reste tenu des défauts de conformité du bien et des vices rédhibitoires dans les conditions prévues aux articles L217-4 à...
- Seite 45 tant, notamment dans la publicité ou l‘étiquetage ; 2° Ou s‘il présente les caractéristiques définies d‘un com- mun accord par les parties ou être propre à tout usage spécial recherché par l‘acheteur, porté à la connaissance du vendeur et que ce dernier a accepté. ARTICLE L217-12 DU CODE DE LA CON- SOMMATION L‘action résultant du défaut de conformité...
-
Seite 46: Prestataire De Services Sav
13. Prestataire de services SAV GSL mbH Am Weimarer Berg 6 DE-99510 Apolda ALLEMAGNE 14. Fabricant GO Europe GmbH Zum Kraftwerk 1 DE-45527 Hattingen ALLEMAGNE www.go-europe.com 15. Déclaration de conformité UE simplifiée Par la présente, notre société GO Europe GmbH Zum Kraftwerk 145527 Hattingen, Alle- magne, déclare sous sa seule responsabilité... - Seite 47 Inhoudsopgave 1. Inleidende opmerkingen ....48 2. Beoogd gebruik ......48 3. Technische gegevens ...... 49 4. Bedienings- en weergave-elementen ..... 50 5. Vóór de ingebruikname ....51 6. Montage ........51 Oude thermostaatkop demonteren ......52 Nieuwe thermostaatkop monteren ......52 Wartelmoer monteren / demonteren (Polen / Oostenrijk)..........
-
Seite 48: Inleidende Opmerkingen
Inleidende opmerkingen Gefeliciteerd met de aankoop van uw nieuwe apparaat. U hebt gekozen voor een product van hoge kwaliteit. De gebruiksaanwijzing maakt deel uit van dit product. Ze bevat belangrijke informatie over de veiligheid, het gebruik en de verwijdering. Maak uzelf vóór het gebruik van het product vertrouwd met alle bedienings- en veiligheidsinstructies. -
Seite 49: Technische Gegevens
Technische gegevens Kenmerk Waarde Type 368308_2010 3 V ⎓ (DC, gelijkspanning) Voedingsspanning Stroomverbruik max. 100 mAh Batterijen 2 × penlite (AA, LR6), 1,5 V Levensduur van de bat- tot 3 jaar terij Radiofrequentie 2.402 - 2.480 GHz Zendvermogen +19 dBm Display Meetnauwkeurigheid ±1 °C... -
Seite 50: Bedienings- En Weergave-Elementen
Bedienings- en weergave- elementen Een overzicht van de bedienings- en weergave-elemen- ten van het apparaat vindt u op de uitklapbare pagina van deze gebruiksaanwijzing. Wartelmoer Temperatuursensor Display Laadniveau-indicator Verwarmingstijden (weekdagen) Knop om te schakelen tussen verwarmings-/besparingstem- peratuur Knop Mode/Menu Batterijvak Verwarmingstemperatuur Besparingstemperatuur Openraamfunctie... -
Seite 51: Vóór De Ingebruikname
Hoogste stand op de radiator Thermostaatkop Inkeping Adapter Stoterverlenging Vóór de ingebruikname Voordat u het apparaat kunt gebruiken, moet u het plas- tic lipje uit het batterijvak (6) verwijderen. Klepje van het batterijvak (6) verwijderen. Plastic lipje uit het batterijvak (6) trekken. Klepje in het batterijvak (6) plaatsen. -
Seite 52: Oude Thermostaatkop Demonteren
De montage van het apparaat is eenvoudig en kan zon- der aftappen van verwarmingswater of ingrepen in het verwarmingssysteem plaatsvinden. Speciaal gereed- schap of het uitschakelen van de verwarming zijn niet noodzakelijk. De wartelmoer (1), die stevig op het apparaat is beves- tigd, past op alle radiatorkranen met een schroefdraad- maat van M30 ×... - Seite 53 Voorzichtig! Gevaar voor inklemming tussen de adapterhelf- ten! ▸ Zorg er bij de montage voor dat uw vingers niet bekneld raken tussen de adapterhelften! Voorzichtig! Gevaar voor snijwonden! De meegeleverde adapters en de stoterverlenging kunnen scherpe randen hebben. ▸ Ontbraam de breukplaats op de gebruikte adapter met een geschikt hulpmiddel.
-
Seite 54: Wartelmoer Monteren / Demonteren (Polen / Oostenrijk)
Het apparaat met behulp van de wartelmoer (1) op de gemonteerde adapter (14) of rechtstreeks op de radiatorkraan schroeven. Op draaiknop (9) drukken. De aanpassing begint automatisch. Het apparaat past zich de radiatorkraan aan. Hiervoor wordt de radiatorkraan meermaals geopend en geslo- ten, om de eindpunten te leren. -
Seite 55: Navigeren In Het Menu
Lichte druk met een plat voorwerp, bijvoorbeeld een schroevendraaier, uitoefenen op de krans van het apparaat. Wartelmoer (1) verwijderen. Navigeren in het menu Houd de knop Mode/Menu (5 b) ingedrukt, om het menu te openen. Draai aan de draaiknop (9) om de gewenste functie te selecteren. -
Seite 56: Handmatige Modus Instellen
Handmatige modus instellen In de handmatige modus stelt u een vaste temperatuur in die door uw apparaat wordt gehandhaafd. Het instel- bare bereik ligt tussen 5,0 °C en 29,5 °C. De tempera- tuur kan in stappen van 0,5 °C worden ingesteld. Op de knop Mode/Menu (5 b) drukken totdat het display de modus Manu (7 d) weergeeft. -
Seite 57: Reinigen
10. Reinigen Reinig het apparaat met een droge, niet-pluizende doek. Gebruik geen reinigings- of oplosmiddelen. Verontreini- gingen in de luchtsleuven kunt u bijvoorbeeld met een zachte borstel verwijderen. 11. Verwijderen Let op de markering van de verpakkingsmateria- len tijdens het scheiden van afval, deze zijn gemarkeerd met afkortingen (a) en nummers (b) met de volgende betekenis: 1–7: kunststoffen / 20–22: papier en karton / 80–98: composiet-... -
Seite 58: Garantie
De verpakking bestaat uit milieuvriende- lijke materialen, die kunnen worden ingeleverd bij de plaatselijke inzamelings- punten. Neem contact op met uw gemeente voor informatie over de verwijdering van het afgedankte apparaat. 12. Garantie VOORZICHTIG! BELANGRIJK GARANTIEDOCUMENT! BESLIST GOED BEWAREN! Geachte klant, U krijgt 3 jaar garantie op dit apparaat vanaf de datum van aankoop. -
Seite 59: Servicepartner
13. Servicepartner GSL mbH Am Weimarer Berg 6 99510 Apolda DUITSLAND 14. Fabrikant GO Europe GmbH Zum Kraftwerk 1 45527 Hattingen DUITSLAND www.go-europe.com 15. Vereenvoudigde EU-verklaring van overeenstemming Wij, GO Europe GmbH, Zum Kraftwerk 1, 45527 Hattingen, DUITSLAND, verklaren onder onze eigen verantwoordelijkheid dat het product RADIATOR-THER- MOSTAAT voldoet aan de EU-richtlijnen 2014/53/EU en 2011/65/EU. - Seite 60 Obsah 1. Úvod ..........61 2. Používání v souladu s určením ..61 3. Technické údaje ......62 4. Ovládací a zobrazovací prvky ..63 5. Před uvedením do provozu .... 64 6. Montáž .......... 64 Demontáž staré hlavice termostatu ......65 Montáž nové hlavice termostatu ......65 Montáž / demontáž převlečné matice (Polsko / Rakousko)..........
-
Seite 61: Úvod
Úvod Blahopřejeme vám k zakoupení nového zařízení. Rozhodli jste se pro produkt vysoké kvality. Návod k obsluze je součástí tohoto produktu. Návod obsahuje důležitá upozornění pro bezpečnost, použití a likvidaci. Se všemi pokyny k obsluze a bezpečnostními upozorněními se seznamte před použitím produktu. -
Seite 62: Technické Údaje
Technické údaje Vlastnosti Hodnota 368308_2010 3 V ⎓ (DC, stejnosměrné Napájecí napětí napětí) Odběr proudu max. 100 mAh Baterie 2 × Mignon (AA, LR6), 1,5 V Životnost baterií až 3 roky Rádiová frekvence 2,402–2,480 GHz Vysílací výkon +19 dBm Displej Přesnost měření... -
Seite 63: Ovládací A Zobrazovací Prvky
Ovládací a zobrazovací prvky Přehled ovládacích a zobrazovacích prvků přístroje na- leznete na rozkládací straně tohoto návodu k obsluze. Převlečná matice Teplotní čidlo Displej Indikace nabíjení Doby vytápění (dny v týdnu) Tlačítko přepínání mezi topnou a úspornou teplotou Tlačítko Nabídka/režim Přihrádka na baterie Topná... -
Seite 64: Před Uvedením Do Provozu
Hlavice termostatu Zářez Adaptér Prodloužení ovládací tyčky Před uvedením do provozu Před použitím přístroje musíte odstranit plastový proužek z prostoru pro baterie (6). Sejměte kryt prostoru pro baterie (6). Vytáhněte plastový proužek z prostoru pro baterie (6). Vložte kryt do prostoru pro baterie (6). Nastavte datum a čas. -
Seite 65: Demontáž Staré Hlavice Termostatu
Převlečná matice (1) spojená s přístrojem se hodí pro všechny ventily topného tělesa se závitem M30 x 1,5 mm nejběžnějších výrobců, jako např. Heimeier, MNG, Junkers, Landis&Gyr (Duodyr), Honeywell-Braukmann, Oventrop typ A, Oventrop AV6, Schlösser, Comap D805, Valf, Sanayii, Mertik Maxitrol, Watts, Wingenroth (Wiroflex) R.B.M, Tiemme, Jaga, Siemens, Idmar. - Seite 66 Pozor! Nebezpečí pořezání! Dodané adaptéry a prodloužení ovládací tyčky mohou mít ostré hrany. ▸ Místo zlomu na použitém adap- téru zbavte otřepů vhodným po- mocným prostředkem. Zářezy (13) zajistí optimální umístění adaptéru (14). V případě potřeby nasuňte vhodný adaptér (14) na ventil topného tělesa, až...
-
Seite 67: Montáž / Demontáž Převlečné Matice (Polsko / Rakousko)
Pokud by adaptace i po několika pokusech nefungovala, znovu namontujte přístroj s distančním kroužkem. Montáž / demontáž převlečné matice (Polsko / Rakousko) U dodávky do Polska nebo Rakouska není předmonto- vána převlečná matice (1). Dodanou závitovou měrkou musíte zkontrolovat, která převlečná matice (1) musí být umístěna na ventil topného tělesa. -
Seite 68: Obsluha
Po 30 sekundách bez zadání dojde k přechodu na hlavní obrazovku. Zobra- Vysvětlení zení Časový program Aktuální poloha ventilu Reset na nastavení z výroby Přizpůsobení teploty místním podmínkám, popř. subjektivnímu cítění teploty Funkce Okno Přepínání letního / zimního času Nastavení data a času Obsluha Všechny provozní... -
Seite 69: Aplikace Lidl Home
lota aktivní až do dalšího spínacího bodu. Stiskněte tlačítko Režim/nabídka (5 b), až se na displeji zobrazí režim (7 d). Auto Aplikace Lidl Home Instalace aplikace Online Manual Lidl Home App K provozování přístroje s aplikací Lidl Home musíte nejdříve instalovat apli- kaci Lidl Home. -
Seite 70: Záruka
Poškozené nebo vybité baterie / akumulátory nechte recyklovat podle směrnice 2006/66/ES a jejích změn. Baterie anebo přístroj vraťte zpět prostřednictvím nabízených sběrných zařízení. Obal je vyroben z ekologických materiálů, které mohou být zlikvidovány a recyklovány prostřednictvím místních sběrných dvorů. Informace o možnostech likvidace vysloužilého zařízení... -
Seite 71: Servisní Partner
13. Servisní partner GSL mbH Am Weimarer Berg 6 DE-99510 Apolda NĚMECKO 14. Výrobce GO Europe GmbH Zum Kraftwerk 1 DE-45527 Hattingen NĚMECKO www.go-europe.com 15. Zjednodušené prohlášení o shodě EU My, společnost GO Europe GmbH, Zum Kraftwerk 1, 45527 Hattingen, NĚMECKO, na vlastní odpovědnost prohlašujeme, že výrobek TERMOSTAT TOPNÉHO TĚLESA odpovídá... - Seite 72 Obsah 1. Úvod ..........73 2. Použitie podľa určenia ....73 3. Technické údaje ......74 4. Ovládacie a indikačné prvky ..75 5. Pred uvedením do prevádzky ..76 6. Montáž .......... 76 Demontáž starej termostatickej hlavice ....77 Montáž novej termostatickej hlavice ...... 77 Montáž/demontáž prevlečnej matice (Poľsko/Rakúsko) .............
-
Seite 73: Úvod
Úvod Blahoželáme vám k zakúpeniu vášho nového zariadenia. Jeho kúpou ste sa rozhodli pre vysokokvalitný produkt. Súčasťou tohto výrobku je návod na použitie. Obsahuje dôležité pokyny týkajúce sa bezpečnosti, používania a likvidácie. Pred prvým použitím sa oboznámte so všetkými pokynmi týkajúcimi sa zaobchádzania s výrobkom a bezpečnosti. -
Seite 74: Technické Údaje
Technické údaje Vlastnosť Hodnota 368308_2010 3 V ⎓ (DC, jednosmerné Napájacie napätie napätie) Odber prúdu max. 100 mA Batérie 2 × Mignon (AA, LR6), 1,5 V Životnosť batérie až 3 roky Rádiová frekvencia 2,402 - 2,480 GHz Vysielací výkon +19 dBm Displej Presnosť... -
Seite 75: Ovládacie A Indikačné Prvky
Ovládacie a indikačné prvky Prehľad ovládacích a indikačných prvkov zariadenia je uvedený na rozkladacej strane tohto návodu na obsluhu. Prevlečná matica Teplotný snímač Displej Indikátor nabíjania Časy vykurovania (dni v týždni) Tlačidlo prepína medzi vykurovacou / ekonomickou teplotou Tlačidlo Mode/Menu (režim/ponuka) Priehradka na batérie Vykurovacia teplota Úsporná... -
Seite 76: Pred Uvedením Do Prevádzky
Termostatická hlavica Zárez Adaptér Predĺženie piestu Pred uvedením do prevádzky Skôr než začnete zariadenie používať, musíte odstrániť z priehradky na batérie (6) plastový prúžok. Odoberte kryt priehradky na batérie (6). Plastový prúžok vytiahnite z priehradky na batérie (6). Do priehradky na batérie (6) vložte kryt. Nastavte dátum a denný... -
Seite 77: Demontáž Starej Termostatickej Hlavice
Montáž zariadenia je jednoduchá a môže sa uskutočniť bez vypustenia vykurovacej vody alebo zásahu do vy- kurovacieho systému. Nie je potrebné špeciálne náradie alebo vypnutie kúrenia. Prevlečná matica (1), ktorá je pevne spojená so zariade- ním, sa hodí pre všetky ventily vykurovacích telies s roz- merom závitu M30 ×... - Seite 78 Pozor! Nebezpečenstvo zovre- tia medzi polovicami adaptéra! ▸ Pri montáži dávajte pozor na to, aby ste si neprivreli prsty medzi po- lovice adaptéra! Pozor! Nebezpečenstvo poreza- nia! So zariadením dodávané adaptéry a predlžovacie tyčky môžu mať ostré hrany. ▸ Odstráňte výronky v mieste zlomu na použitom adaptéri pomocou vhodnej pomôcky.
-
Seite 79: Montáž/Demontáž Prevlečnej Matice
Stlačte otočný spínač (9). Adaptácia sa spustí automaticky. Zariadenie sa prispôsobí ventilu vykurovacieho telesa. Ventil vykurovacieho telesa sa pritom viackrát otvorí a zatvorí, aby sa naučil koncové body. Tento postup môže trvať niekoľko minút. V závislosti od stavu ventilu môže byť potrebné vykonať postup adaptovania niekoľkokrát, až... -
Seite 80: Navigovanie V Menu
Nákružok zariadenia ľahko pritlačte plochým pred- metom, napríklad skrutkovačom. Prevlečnú maticu (1) stiahnite. Navigovanie v menu Stlačením a podržaním tlačidla Mode/Menu (re- žim/ponuka) (5 b) vstúpite do ponuky. Otočením otočného spínača (9) vyberte želanú funkciu. Stlačením otočného spínača (9) zvoľte funkciu. S pomocou otočného spínača (9) môžete zmeniť... -
Seite 81: Nastavenie Manuálneho Režimu
Nastavenie manuálneho režimu V manuálnom režime nastavte pevnú teplotu, ktorú udr- žuje vaše zariadenie. Nastaviteľný rozsah sa nachádza v rozpätí od 5,0 °C do 29,5 °C. Teplotu je možné nasta- viť v krokoch po 0,5 °C. Stlačte tlačidlo Mode/Menu (režim/ ponuka), (5 b) až kým sa na displeji neobjaví režim (7 d). -
Seite 82: Čistenie
10. Čistenie Zariadenie čistite suchou handričkou, ktorá nepúšťa vlákna. Nepoužívajte čistiace prostriedky ani rozpúš- ťadlá. Znečistenia nachádzajúce sa na vetracích štrbi- nách je možné odstrániť napr. mäkkou kefkou. 11. Likvidácia Pri triedení odpadu dodržiavajte označenie obalových materiálov, ktoré sú označené skratkami (a) a číslami (b) v tomto význame: 1–7: plasty / 20–22: papier a lepenka / 80–98: kompozity. -
Seite 83: Záruka
12. Záruka POZOR! DÔLEŽITÝ PODKLAD PRE ZÁRUKU! PRO- SÍM, BEZPODMIENEČNE USCHOVAŤ! Vážená zákazníčka, vážený zákazník, Na tento prístroj dostávate 3 ročnú záruku od dátumu kúpy. Pokiaľ by došlo k nejakému problému a budete potrebovať pomoc, zavolajte najprv našu hotline: 00800 100 22 100 (medzinárodne) Často vám môže ďalej pomôcť... -
Seite 84: Výrobca
14. Výrobca GO Europe GmbH Zum Kraftwerk 1 DE-45527 Hattingen NEMECKO www.go-europe.com 15. Zjednodušené EÚ prehlásenie o zhode My, GO Europe GmbH, Zum Kraftwerk 1, 45527 Hattingen, NEMECKO, prehlasujeme vo výhradnej zodpovednosti, že produkt TERMOSTAT VYKUROVA- CIEHO TELESA, zodpovedá Smerniciam EÚ 2014/53/EÚ a 2011/65/EÚ. Úplný... - Seite 85 Índice de materias 1. Introducción ........86 2. Uso previsto ........86 3. Datos técnicos ........ 87 4. Elementos de mando e indicación ... 88 5. Antes de la puesta en servicio ..89 6. Montaje ......... 89 Desmontar la cabeza del termostato usada ..90 Montar la cabeza del termostato nueva ....
-
Seite 86: Introducción
Introducción Enhorabuena por la compra de su nuevo dispositivo. Usted se ha decidido por un producto de alta calidad. El manual de instrucciones forma parte de este producto. Incluye advertencias importantes referentes a la seguridad, el uso y la eliminación. Familiarícese con todas las advertencias de manejo y seguridad antes de usar el producto. -
Seite 87: Datos Técnicos
Datos técnicos Característica Valor Tipo 368308_2010 3 V ⎓ (CC, corriente con- Tensión de alimentación tinua) Consumo de corriente Máx. 100 mAh Pilas 2 pilas Mignon (AA, LR6), 1,5 V Vida útil de las pilas Hasta 3 años Emisión de radiofrecuen- 2,402 - 2,480 GHz cias Potencia de transmisión... -
Seite 88: Elementos De Mando E Indicación
Elementos de mando e indicación Encontrará una vista general de los elementos de mando e indicación del dispositivo en la página desplegable del presente manual de instrucciones. Tuerca de unión Sensor de temperatura Pantalla Indicador del nivel de carga Horarios de calefacción (días de la semana) Tecla para cambiar entre temperatura de calenta- miento/ahorro Tecla de menú/modo... -
Seite 89: Antes De La Puesta En Servicio
Nivel máximo del radiador Cabeza del termostato Muesca Adaptador Prolongación de empujador Antes de la puesta en servicio Antes de poder utilizar el dispositivo, debe retirar la pes- taña de plástico del compartimento de pilas (6). Retirar la cubierta del compartimento de pilas (6). Sacar la pestaña de plástico del compartimento de pilas (6). -
Seite 90: Desmontar La Cabeza Del Termostato Usada
▸ ¡Utilizar guantes de trabajo! El montaje del dispositivo es muy sencillo y se puede lle- var a cabo sin tener que purgar el agua de la calefacción ni intervenir en el sistema de calefacción. No se necesitan herramientas especiales, ni apagar la calefacción. La tuerca de unión está... - Seite 91 la correspondiente válvula del radiador en las figuras B - D de la página desplegable. ¡Precaución! ¡Existe peligro de aplastamiento entre las mitades del adaptador! ▸ ¡Durante el montaje preste atención a no aplastarse los dedos entre las mitades del adaptador! ¡Precaución! ¡Peligro de cortes! Los adaptadores suministrados y la prolongación de empujador...
-
Seite 92: Montar Y Desmontar La Tuerca De Unión (Polonia / Austria)
Atornillar el dispositivo con la ayuda de la tuerca de unión (1) en el adaptador montado (14) o directa- mente en la válvula del radiador. Accionar el pulsador giratorio (9). La adapta- ción comienza automáticamente. El dispositivo se va adaptando a la válvula del radiador. A tal fin se abre y se cierra la válvula del radiador repeti- damente para programar los puntos finales. -
Seite 93: Navegar Por El Menú
nillarla simplemente y volver a encajarla en el sentido correcto. Si se ha encajado la tuerca de unión incorrecta (1), es necesario retirarla según se describe a continuación: Ejercer una ligera presión sobre la corona del dis- positivo con un objeto plano, por ejemplo, un des- tornillador. -
Seite 94: Manejo
Manejo En la pantalla del dispositivo se muestran todos los esta- dos de servicio. Utilice el dispositivo según se describe en los siguientes apartados. Ajustar el modo manual El modo manual le permite ajustar una temperatura fija que el dispositivo mantendrá a partir de este momento. El rango ajustable es de entre 5,0 °C y 29,5 °C. -
Seite 95: Limpieza
10. Limpieza Limpie el dispositivo con un paño seco libre de hilachas. No utilice productos de limpieza ni disolventes. La sucie- dad en las ranuras de aire, por ejemplo, pueden elimi- narse con un cepillo blando. 11. Eliminación Observe el etiquetado del material de embalaje para el reciclaje. -
Seite 96: Garantía
12. Garantía ¡ATENCIÓN! ¡IMPORTANTE DOCUMENTO DE GARANTÍA! ¡¡GUARDAR EN UN SITIO ADECUA- Estimado cliente: Este dispositivo disfruta de una garantía de 3 años desde la fecha de compra . En caso de cualquier problema o si usted necesita ayuda, llame primero a nuestra línea de asistencia telefónica: 00800 100 22 100 (internacional) En muchas ocasiones nuestro personal especializa-... -
Seite 97: Declaración De Conformidad Ue Simplificada
15. Declaración de conformidad UE simplificada Nosotros, GO Europe GmbH, Zum Kraftwerk 1, 45527 Hattingen, ALEMANIA, declaramos bajo nuestra propia responsabilidad que el producto TERMOSTATO DE RADIADOR cumple las directivas de la UE 2014/53/UE y 2011/65/UE. Encontrará el texto completo de la declaración de con- formidad UE en la siguiente dirección de Internet o esca- neando el código QR: http://productip.com/?f=11d8a7... - Seite 98 Indholdsfortegnelse 1. Indledning ........99 2. Tilsigtet brug ........99 3. Tekniske data ....... 100 4. Betjenings- og visningselementer . 101 5. Før ibrugtagning ......102 6. Montage ........102 Afmontering af det gamle termostathoved ..103 Montering af det nye termostathoved ....103 Montering/afmontering af omløbermøtrik (Polen/Østrig) ............105 7.
-
Seite 99: Indledning
Indledning Tillykke med købet af dit nye apparat. Hermed har du valgt et førsteklasses produkt. Brugervej- ledningen er en integreret del af produktet. Den indeholder vigtige oplysninger om sikkerhed, brug og bortskaffelse. Læs alle betjenings- og sikkerhedsanvisnin- ger, inden du tager produktet i brug. Brug kun produktet som beskrevet og til de angivne anvendelsesområder. -
Seite 100: Tekniske Data
Tekniske data Egenskab Værdi Type 368308_2010 3 V ⎓ (DC, jævnspænding) Forsyningsspænding Optagen effekt maks. 100 mAh Batterier 2 × Mignon (AA, LR6), 1,5 V Batteriets levetid op til 3 år Radiofrekvens 2,402 - 2,480 GHz Sendeeffekt +19 dBm Display Målenøjagtighed ±1 °C Mål (L x B x H) -
Seite 101: Betjenings- Og Visningselementer
Betjenings- og visningselementer På den udfoldelige side i denne brugervejledning kan du se en oversigt over betjenings- og visningselementerne. Omløbermøtrik Temperaturføler Display Ladeindikator Varmeperioder (ugedage) Tast til skift mellem varme-/sparetemperatur Tast Mode/Menu Batterirum Varmetemperatur Sparetemperatur Åbent vindue-funktion AUTO / MANU (automatisk/manuel modus) Feriefunktion Varmeperioder (klokkeslæt) Drejeknap... -
Seite 102: Før Ibrugtagning
Termostathoved Kærv Adapter Forlænger til ventilstift Før ibrugtagning Før du kan bruge apparatet, skal du fjerne plastik- strimlen fra batterierummet (6). Fjern dækslet fra batterirummet (6). Træk plastikstrimlen ud af batterirummet (6). Sæt dækslet på batterirummet (6). Indstil dato og klokkeslæt. Vent et øjeblik, apparatet forbereder sig på... -
Seite 103: Afmontering Af Det Gamle Termostathoved
Omløbermøtrikken (1), som er fast forbundet med ap- paratet, passer til alle radiatorventiler med gevindmålet M30 × 1,5 mm fra de mest kendte producenter, f.eks. Heimeier, MNG, Junkers, Landis+Gyr (Duodyr), Ho- neywell-Braukmann, Oventrop type A, Oventrop AV6, Schlösser, Comap D805, Valf, Sanayii, Mertik Maxitrol, Watts, Wingenroth (Wiroflex) R.B.M, Tiemme, Jaga, Sie- mens og Idmar. - Seite 104 Forsigtig! Fare for snitsår! De medfølgende adaptere og forlæn- geren til ventilstiften kan have skarpe kanter. ▸ Afgrat brudstedet på den anvendte adapter med et passende hjælpe- middel. Kærvene (13) sørger for, at adapteren (14) sidder per- fekt. Skub om nødvendigt den passende adapter (14) på...
-
Seite 105: Montering/Afmontering Af Omløbermøtrik (Polen/Østrig)
Montering/afmontering af omløbermøtrik (Polen/Østrig) Ved levering til Polen og Østrig er omløbermøtrikken (1) ikke formonteret. Det skal kontrolleres med den medføl- gende gevindlære, hvilken omløbermøtrik (1) der skal an- bringes på radiatorventilen. Sæt omløbermøtrikken (1) på radiatorventilen, ind- til der høres et klik og omløbermøtrikken (1) kan bevæge sig frit. -
Seite 106: Betjening
Display Forklaring Tidsprogram Aktuel ventilposition Nulstilling til fabriksindstillinger Tilpasning af temperaturen til lokale for- hold og temperaturbehov Vinduesfunktion Omstilling mellem sommer-/vintertid Indstilling af dato og klokkeslæt Betjening Alle driftstilstande vises på apparatets display. Be- tjen apparatet som beskrevet i følgende afsnit. Indstilling af manuel modus I manuel modus indstilles en fast temperatur, som holdes konstant af apparatet. -
Seite 107: Lidl Home-App
Lidl Home-app Installation af app Før du kan betjene apparatet med Lidl Online Manual Lidl Home App Home-appen, skal du installere Lidl Ho- me-appen. Download Lidl Home-appen fra App Store eller Google Play. 10. Rengøring Rengør apparatet med en tør, trævlefri klud. Brug ingen rengørings- eller opløsningsmidler. -
Seite 108: Garanti
Defekte eller opbrugte batterier skal genanven- des iht. direktiv 2006/66/EF og dets ændrin- ger. Aflever batterier og/eller apparatet til de tilbudte indsamlingssteder. Emballagen består af miljøvenlige materialer, som kan bortskaffes via de lokale genbrugsstationer. Du kan få oplysning om muligheder for bortskaf- felse af det udtjente apparat på... -
Seite 109: Servicepartner
13. Servicepartner GSL mbH Am Weimarer Berg 6 DE-99510 Apolda TYSKLAND 14. Producent GO Europe GmbH Zum Kraftwerk 1 DE-45527 Hattingen TYSKLAND www.go-europe.com 15. Forenklet EU- overensstemmelseserklæring Vi, GO Europe GmbH, Zum Kraftwerk 1, 45527 Hattingen, TYSKLAND, erklærer under eneansvar, at produktet RADIATORTERMOSTAT, er i overensstemmelse med EU-direktiverne 2014/53/EU og 2011/65/EU. - Seite 110 Lieferumfang: Scope of Delivery Heizkörperthermostat Radiator thermostat Adapter Danfoss RA, RAV, RAVL Adapters: Danfoss RA, RAV, RAVL bei Lieferung nach Österreich und In the case of supply to Austria Polen zusätzlich: Überwurfmutter and Poland also: union nuts M28 und M30; Schablone für M28 and M30;...
- Seite 111 Rozsah dodávky: Rozsah dodávky: termostat topných těles termostat vykurovacieho telesa adaptér Danfoss RA, RAV, RAVL adaptér Danfoss RA, RAV, RAVL při dodávce do Rakouska a Pol V prípade dodávky do Rakúska a ska dodatečně: převlečná Poľska navyše: prevleč ná matica matice M28 a M30;...
- Seite 113 Rozsah dodávky: Rozsah dodávky: termostat topných těles termostat vykurovacieho telesa adaptér Danfoss RA, RAV, RAVL adaptér Danfoss RA, RAV, RAVL při dodávce do Rakouska a Pol V prípade dodávky do Rakúska a ska dodatečně: převlečná Poľska navyše: prevleč ná matica matice M28 a M30;...
- Seite 114 GO Europe GmbH Zum Kraftwerk 1 DE-45527 Hattingen GERMANY www.go-europe.com Stand der Informationen 08/2021 - Ident.-Nr. 01202108 Information Status 08/2021 - Ident.-No. 01202108 Mise à jour des informations 08/2021 - N° d‘ident. : 01202108 Versie van de informatie 08/2021 - ID-nr. 01202108 Stav informací...