Instruction Manual Electric Patio Heater (GS09) UK User instructions - please keep for future references TECHNICAL INFORMATION Wattage: 900w/1200w/2100w Element type: Infrared Halogen Expected Life span elements: 5000 hrs. Weight: 14,4 kg Ingress Protection Rating: IP44 Certificates: CE, GS, PAH, ROHS...
Seite 3
36. Two Dark points may exist on the surface of the heating elements during the first few minutes after it is turned on. This is normal, and will not affect the performance of the unit. 37. A tilt switch is fitted inside the unit for safety purpose www.sunred.nl...
Seite 4
Step 1: Fix the Bottom Tube to the base using 3pcs M6*10 bolts. Step 2: Place the Decoration Cover onto the Bottom Tube. Step 3: Feed the Power Cord through the Base and the Bottom Tube, and pull through around 2m of cable. www.sunred.nl...
Seite 5
Step 6: Feed the power cord through the middle tube and top tube. Connect the power cord plug to the socket with the heater head. Step 7: Push the Heater Head onto the Top Tube and fix in position using the 2*10mm screws. Step 8: Fix the Power Cord on the base by using 4*15mm screws. Complete! www.sunred.nl...
15. U dient toezicht te houden op kinderen om zeker te zijn dat zij het toestel niet als speelgoed gebruiken. www.sunred.nl...
Seite 8
Stap 5 : Leid de kabel en stekker die aan het hoofd van de straler zitten van onder af door de bodemstandaard, de middelste en de bovenste buis, plaats de stekker in het hoofd van de terrasstraler en plaats de trekontlasting om de stekker heen. www.sunred.nl...
Seite 9
Stap 7: Bevestig het snoer met de kabelklemmen en vier 15 mm schroefjes onderaan de voet. Schakelaar POSITIE I 900 W POSITIE II 1200 W POSITIE III 2100 W www.sunred.nl...
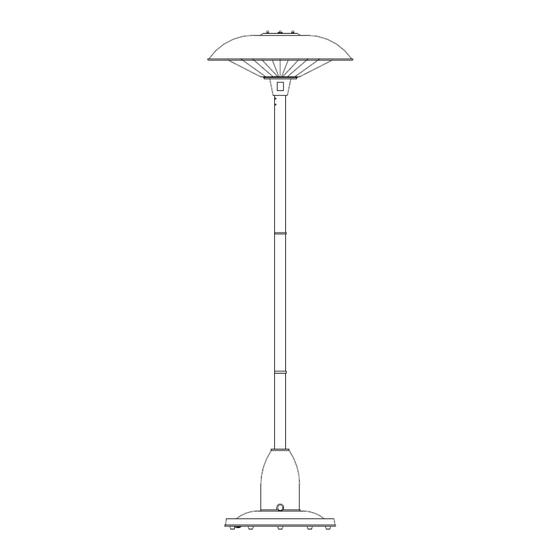
Bedienungsanleitung Elektrischer Heizofen (GS09) DE Bedienungsanleitung - Bitte bewahren Sie diese an einem sicheren Ort auf TECHNISCHE SPEZIFIKATION Stromversorgung 220-240V ~ 50 Hz Ausgangsleitung max. 2.100 W Nettogewicht 14,4 kg Isolierung Klasse I Element Type: Infrarot Halogen Lebensdauer Elemente : ca. 5000 St.
Seite 11
Führen Sie das Stromkabel durch die Basis und das unterste Gestell. Ziehen Sie ca. 2m Kabel heraus. Schrauben Sie das mittlere Teil des Gestells an das untere Gestell. Schrauben Sie das oberste Teil des Gestells an das untere und mittlere Gestell. www.sunred.nl...
Seite 12
Ziehen Sie das Stromkabel durch das ganze Gestell und verbinden Sie es mit dem Anschluß am Heizkopf. Befestigen Sie den Heizkopf an der Spitze des Gestells mit den 2*10 mm Schrauben 8. Fixieren Sie das Stromkabel an der Basis mit den 4*15mm Schrauben. www.sunred.nl...
Seite 13
Wärmeentwicklung. 38 Ein Notschaltknopf ist innen angebracht. Falls das Gerät umkippt, schaltet dieser den Heizer sofort aus. 39 Die Räder sind nur zum verschieben und positionieren des Heizer gedacht. Bevor dieser eingeschaltet wird, entfernen Sie die Räder. www.sunred.nl...
Seite 14
Jede Wartung oder Reparatur des Halogenstrahlers sollte nur von Fachpersonal durchgeführt werden. Technische Spezifikationen Stromspannung 220-240V~ 50Hz Max 2100 Watt Leistung Gewicht 14,6 kg Isolationsklasse I Höhe 210 cm Konformitätserklärung Der Halogenheizer erfüllt folgende Standards: IEC/EN55014-1; IEC/EN 55014-2; IEC/EN61000-3-2; IEC/EN61000-3-3; IEC/ EN60335-1; IEC/EN60335-2-30 www.sunred.nl...
CHAUFFAGE EXTERIEUR HALOGENE (GS09) NOTICE UTILISATEUR FR Instructions d’emploi - veuillez garder pour de futures références. INFORMATION TECHNIQUE Puissance: 900w/1200w/2100w Typ d’éléments: Infrarouge Halogène Durée de vie prévue des éléments: 5000 hrs. Poids: 14,4 kg Qualification IP: IP44 Certificats: CE, GS, PAH, ROHS Cordon d’alimentation: 2 Mètres...
Seite 16
18. Il convient de surveiller les enfants pour s’assurer qu’ils ne jouent pas avec l’appareil. www.sunred.nl...
Seite 17
Etape 2: Placer la corolle de décoration sur le tube. Etape 3: Placer le couvercle de décoration sur le mêt. Etape 4: Connecter le tube médian en le vissant au tube inférieur. Etape 5: Connecter le tube supérieur en le vissant sur le tube inférieur. www.sunred.nl...
Seite 18
Etape 7: Placer la tête sur la colonne et fixer avec les écrous 2*10mm Etape 8: Fixer le cordon d’alimentation avec les vis 4*15mm. Modèle monté ! UTILISATION VOTRE PRODUIT DISPOSE DE 3 POSITIONS DE CHAUFFAGE, A VOTRE CONVENANCE. POSITION I 900 W POSITION II 1200 W POSITION III 2100 W www.sunred.nl...
Seite 19
Manual Ceiling Hung electric Heater (UK) Handleiding Plafondmodel elektrische Heater (NL) Handbuch Infrarot Halogen Heizung mit Kette (DU) Manual Radiateur infrarouge électrique (FR) OutTrade BV De Grift 1A 7711 EP Nieuwleusen Tel +31 (0)529-482808 Fax +31 (0)529-484910 Email info@outtrade.nl Website www.outtrade.nl www.sunred.nl...