
Verwandte Anleitungen für auna MD-140-BT


Inhaltszusammenfassung für auna MD-140-BT
- Seite 1 Auna MD-140-BT Autoradio MP3 USB SD RDS AUX PLL BT 10007164 http://www.auna-multimedia.com...
- Seite 2 Inhalt Bedienungsanleitung User Manual Mode d‘emploi Istruzioni Manual de instrucciones http://www.auna-multimedia.com m u l t i m e d i a...
-
Seite 3: Inhaltsverzeichnis
4~8 Ohm Maximale Leistungsabgabe ≥ 16 W x 4 Stromversorgung DC 12 V Abmessungen (Länge x Höhe x Breite) 182 mm (L) x 52 mm (H) x 145 mm (T) http://www.auna-multimedia.com m u l t i m e d i a... -
Seite 4: Sicherheitshinweise
Die Lautsprecherkabel sollten etwa 30 mm Abstand zur Antenne oder dem Verlängerungskabel der Antenne ha- ben. • Halten Sie sich genau an das Anschlussdiagramm, um Lausprecher und Gerät sicher und korrekt zu verbinden. http://www.auna-multimedia.com m u l t i m e d i a... -
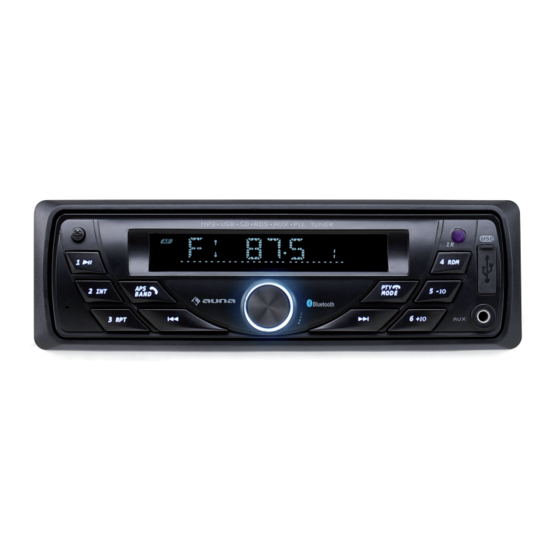
Seite 5: Frontblende Und Funktionstasten
11 Anrufe annehmen 12 Lautstärke erhöhen 13 Titelauswahl/Sendersuche 14 Taste 3/Titel wiederholen 15 Lautstärke verringern 16 Taste 7/PTY Einstellung 17 Taste 6 18 Soundeffekt auswählen 19 Taste 0/BAND (Frequenzbereich) http://www.auna-multimedia.com m u l t i m e d i a... -
Seite 6: Grundfunktionen Der Tasten
SD/MMC Kartenhalter (13): Sobald Sie eine SD/MMC Karte mit passenden Audioformaten einstecken, spielt das Radio die Musik automatisch ab. RESET-Taste (14): Um das Radio bei Fehlfunktion auf die Werkseinstellungen zurückzusetzen, drücken Sie zuerst auf diesen Knopf und starten Sie danach das Radio. http://www.auna-multimedia.com m u l t i m e d i a... -
Seite 7: Installation Und Demontage
Lösen Sie den Gewindebolzen am Montagewinkel. Schieben Sie die Schlüs- sel zur Demontage in die entsprechenden Öffnungen links und rechts am Hauptgerät und ziehen Sie es heraus. Entfernen Sie dann die Strom- und Lautsprecherkabel, sowie die Antennenver- bindung. http://www.auna-multimedia.com m u l t i m e d i a... -
Seite 8: Anschlüsse Und Kabelverbindungen
Die Lautsprecherkabel sollten etwa 30 mm Abstand zur Antenne oder dem Verlängerungskabel der Antenne ha- ben. • Halten Sie sich genau an das Anschlussdiagramm, um Lausprecher und Gerät sicher und korrekt zu verbinden. http://www.auna-multimedia.com m u l t i m e d i a... -
Seite 9: Bt Funktionen
Teilt die Sender nach Sparten ein. Drücken Sie aus jedem Modus heraus die SEL Taste um zu PTY zu gelangen. Drücken Sie dann erneut auf die SEL Taste, um in die PTY Einstellungen zu gelangen. Benutzen dann Sie die Nummerntasten, um die Sparte auszuwählen (Jede Taste beinhaltet 3 Sparten). http://www.auna-multimedia.com m u l t i m e d i a... -
Seite 10: Fehlersuche Und Fehlerbehebung
Entsorgung von Batterien. Durch regelkonforme Entsorgung schützen Sie die Umwelt und die Gesundheit ihrer Mitmenschen vor negativen Konsequenzen. Konformitätserklärung Hersteller: CHAL-TEC Vertriebs- + Handels GmbH, Wallstraße 16, 10179 Berlin. Dieses Produkt entspricht den folgenden Europäischen Richtlinien: 2004/108/EG (EMV) 2011/65/EG (RoHS) 2006/95/EG (LVD) http://www.auna-multimedia.com m u l t i m e d i a... -
Seite 11: Frequenzbereich
Maximum output power ≥ 16 W x 4 Power supply DC 12 V Dimensions (Length x Height x Depth) 182 mm (L) x 52 mm (H) x 145 mm (D) http://www.auna-multimedia.com m u l t i m e d i a... -
Seite 12: Installation Cautions
The speaker wires should be approximately 30mm away from the antenna and antenna extension cable; • Please follow the diagrams to connect correctly so as to safeguard either the speaker or the said product. http://www.auna-multimedia.com m u l t i m e d i a... -
Seite 13: Product Description And Controls
13 Track selection/station search button 14 Digit 3/repeat playback button 15 Volume – button 16 Digit 7 button 17 Digit 6 button 18 Sound effect selector 19 Digit 0/waveband button http://www.auna-multimedia.com m u l t i m e d i a... -
Seite 14: Basic Operations
Tracks in relevant formats will be automatically played back once a SD/MMC card is inserted. Reset button (14) To reset the system in case of system failure, press such button first and then reboot the system. http://www.auna-multimedia.com m u l t i m e d i a... -
Seite 15: Installation And Dismantling
Later on, detach the power-supply cable and speaker wires and then the antenna connector. http://www.auna-multimedia.com m u l t i m e d i a... -
Seite 16: Connections And Wiring
• The speaker wires should be approximately 30mm away from the antenna and antenna extension cable; Please follow the diagrams below to connect correctly so as to safeguard either the speaker • or the said product: http://www.auna-multimedia.com m u l t i m e d i a... -
Seite 17: Bt Operations
PTY type shows to enter the other PTY state. Then, use the number buttons (1~6) to select the PTY type (note: each number buttons contains three types). http://www.auna-multimedia.com m u l t i m e d i a... -
Seite 18: Troubleshooting
Declarartion of Conformity Manufacturer: CHAL-TEC GmbH, Wallstraße 16, 10179 Berlin. This product is conform to the followring European Directives: 2004/108/EG (EMC) 2011/65/EG (RoHS) 2006/95/EG (LVD) http://www.auna-multimedia.com m u l t i m e d i a... -
Seite 19: Fiche Technique
Résistance du haut-parleur 4~8 Ohm Puissance ≥ 16 W x 4 Alimentation électrique DC 12 V Dimensions (largeur x hauteur x profondeur) 182 mm (L) x 52 mm (H) x 145 mm (P) http://www.auna-multimedia.com m u l t i m e d i a... -
Seite 20: Consignes De Sécurité
Les câbles des haut-parleurs doivent être à une distance d’environ 30 mm de l’antenne et du câble de rallonge de l’antenne. • Respecter scrupuleusement le schéma des branchements pour raccorder correctement les haut-parleurs avec l’appareil. http://www.auna-multimedia.com m u l t i m e d i a... - Seite 21 POWER / touche de sélection / volume / sélection de 6 13 Emplacement pour carte SD/MMC la sonnerie / RDS / rétroéclairage Titre suivant / recherche avant 7 14 Touche RESET http://www.auna-multimedia.com m u l t i m e d i a...
- Seite 22 Touche 5 Touche 6 Touche 8 / activer AF Sélectionner un effet sonore Touche 9 / activer TA Touche 0 / BAND (bande de fréquence) Sélection de la sonnerie 10 http://www.auna-multimedia.com m u l t i m e d i a...
- Seite 23 Touche RESET (14) : pour restaurer les paramétrages par défaut de la radio en cas de dysfonctionnement, appuyer d’abord sur cette touche puis remettre la radio en marche. http://www.auna-multimedia.com m u l t i m e d i a...
- Seite 24 à droite et à gauche de l’appareil principal et sortir celui-ci. Détacher ensuite les câbles d’alimentation et des haut-par- leurs, de même que les fils pour l’antenne. http://www.auna-multimedia.com m u l t i m e d i a...
- Seite 25 Les câbles des haut-parleurs doivent être à une distance d’environ 30 mm de l’antenne et du câble de rallonge de l’antenne. • Respecter scrupuleusement le schéma des branchements pour raccorder correctement les haut-parleurs avec l’appareil. http://www.auna-multimedia.com m u l t i m e d i a...
-
Seite 26: Fonctions Rds
Classe les stations de radio par catégories. Quel que soit le mode, appuyer sur la touche SEL jusqu’à faire apparaître « PTY ». Puis utiliser le pavé numérique pour sélectionner les catégories (chaque touche correspond à 3 catégories). http://www.auna-multimedia.com m u l t i m e d i a... -
Seite 27: Identification Et Résolution Des Problèmes
Déclaration de conformité Fabricant : Chal-Tec GmbH, Wallstraße 16, 10179 Berlin, Allemagne. Ce produit est conforme aux directives européennes suivantes : 2004/108/CE (CEM) 2011/65/UE (RoHS) 2006/95/CE (LVD) http://www.auna-multimedia.com m u l t i m e d i a... -
Seite 28: Istruzioni
4~8 Ohm Potenza massima ≥ 16 W x 4 Alimentazione DC 12 V Dimensioni (lunghezza x altezza x largehezza) 182 mm (L) x 52 mm (H) x 145 mm (T) http://www.auna-multimedia.com m u l t i m e d i a... -
Seite 29: Avvertenze Di Sicurezza
I cavi degli altoparlanti devono avere una distanza di 30 mm con l’antenna o con la prolunga dell’antenna. • Attenersi al diagramma di collegamento per collegare correttamente gli altoparlanti e il dispositivo. http://www.auna-multimedia.com m u l t i m e d i a... -
Seite 30: Pannello Frontale E Tasti Funzione
14 Tasto 3/ ripetere brano 15 Diminuire il volume 16 Tasto 7 / Impostazione PTY 17 Tasto 6 18 Selezionare l’effetto suono 19 Tasto 0 / BAND (raggio frequenza) http://www.auna-multimedia.com m u l t i m e d i a... -
Seite 31: Funzioni Di Base Dei Tasti
Porta scheda SD/MMC (13): appena si inserisce una scheda SD/MMC contenente file audio compatibili, la radio ripro- duce automaticamente la musica. Tasto RESET (14): premere questo tasto e riavviare la radio per riportare la radio alle impostazioni di fabbrica in caso di malfunzionamento. http://www.auna-multimedia.com m u l t i m e d i a... -
Seite 32: Installazione E Smontaggio
Allentare il bullone filettato sulla staffa di montaggio. Far scorrere le chiavi di smontaggio poste sulle aperture a sinistra e destra del dispositivo ed estrarre quest’ultimo. Quindi rimuovere i cavi di alimentazione, i cavi degli altoparlanti e il collegamento dell‘antenna. http://www.auna-multimedia.com m u l t i m e d i a... -
Seite 33: Collegamenti E Connessione Dei Cavi
Il cavo degli altoparlanti deve avere una distanza di 30 mm dall‘antenna o dalla prolunga all‘antenna. • Attenersi allo schema di collegamento per collegare gli altoparlanti e il dispositivo in modo sicuro e corretto. http://www.auna-multimedia.com m u l t i m e d i a... -
Seite 34: Funzioni Bt
Suddivide i canali per categoria. Premere il tasto SEL in qualsiasi modalità per accedere alle impostazioni PTY. Premere di nuovo il tasto SEL per accedere alle impostazioni PTY. Quindi utilizzare i tasti numerici per selezionare la categoria (ogni tasto comprende 3 divisioni). http://www.auna-multimedia.com m u l t i m e d i a... -
Seite 35: Ricerca E Risoluzione Degli Errori
Dichiarazione di conformità Produttore: Chal-Tec GmbH, Wallstraße 16, 10179 Berlino, Germania. Questo prodotto è conforme alle seguenti direttive europee: 2004/108/EG (EMC) 2011/65/EG (RoHS) 2006/95/EG (LVD) http://www.auna-multimedia.com m u l t i m e d i a... -
Seite 36: Datos Técnicos
Potencia máxima suministrada ≥ 16 W x 4 Fuente de alimentación DC 12 V Dimensiones (Largo x Alto x Ancho) 182 mm (L) x 52 mm (A) x 145 mm (A) http://www.auna-multimedia.com m u l t i m e d i a... -
Seite 37: Indicaciones De Seguridad
El cable del altavoz debe tener unos 30 mm de distancia con la antena o con el cable de extensión de la antena. • Fije bien los diagramas de interconexión para conectar el dispositivo y el altavoz correctamente. http://www.auna-multimedia.com m u l t i m e d i a... -
Seite 38: Panel Frontal Y Teclas De Función
13 Elegir pista / Búsqueda de emisoras 14 Tecla 3 / Repetir pista 15 Bajar volumen 16 Tecla 7/ Configuración PTY 17 Tecla 6 18 Elegir efecto de sonido 19 Tecla 0 / BAND (radioespectro) http://www.auna-multimedia.com m u l t i m e d i a... -
Seite 39: Funciones Básicas De Las Teclas
SD/MMC con un formato de audio compatible. Tecla RESET (14): Para reiniciar la radio en caso de mal funcionamiento y volver a las funciones preconfiguradas, pulse primero este botón y luego encienda la radio. http://www.auna-multimedia.com m u l t i m e d i a... -
Seite 40: Instalación Y Desmontaje
Retire los cables de alimentación y del altavoz, así como la conexión de antena. http://www.auna-multimedia.com m u l t i m e d i a... -
Seite 41: Conexiones Y Empalme De Cables
El cable del altavoz debe tener unos 30 mm de distancia con la antena o con el cable de extensión de la antena. • Fije bien los diagramas de interconexión para conectar el dispositivo y el altavoz correctamente. http://www.auna-multimedia.com m u l t i m e d i a... -
Seite 42: Funciones Bt
Divide las emisoras por categoría. En cualquier modo, pulse la tecla SEL para elegir PTY. Vuelve a pulsar la tecla SEL para entrar en configuración de PTY. Utilice las teclas numéricas para elegir las categorías (cada tecla contiene 3 ca- tegorías). http://www.auna-multimedia.com m u l t i m e d i a... -
Seite 43: Dichiarazione Di Conformità
Dichiarazione di conformità Fabricante: CHAL-TEC GmbH, Wallstraße 16, 10179 Berlín, Allemagne Este producto cumple con las siguientes directivas europeas: 2004/108/CE (Compatibilidad electromagnética) 2011/65/UE (Refundición RoHS2) 2006/95/CE (Baja tensión) http://www.auna-multimedia.com m u l t i m e d i a...