Herunterladen Inhalt Inhalt Diese Seite drucken

Werbung

Verfügbare Sprachen
  • DE

Verfügbare Sprachen

  • DEUTSCH, seite 1
GRILLPOT
Elektro-Grill
Electric Grill
Parrilla eléctrica
Grill électrique
Griglia elettrica
10028784
www.klarstein.com

Werbung

Inhaltsverzeichnis
loading

Inhaltszusammenfassung für Klarstein GRILLPOT

  • Seite 1 GRILLPOT Elektro-Grill Electric Grill Parrilla eléctrica Grill électrique Griglia elettrica 10028784 www.klarstein.com...
  • Seite 3: Inhaltsverzeichnis

    Sehr geehrter Kunde, wir gratulieren Ihnen zum Erwerb Ihres Gerätes. Lesen Sie die folgenden Hinweise sorgfältig durch und befolgen Sie diese, um möglichen Schäden vorzubeugen. Für Schäden, die durch Missachtung der Hinweise und unsachgemäßen Gebrauch entstehen, übernehmen wir keine Haftung. Scannen Sie den folgenden QR-Code, um Zugriff auf die aktuellste Bedienungsanleitung und weitere Informationen rund um das Produkt zu erhalten.
  • Seite 4: Sicherheitshinweise

    SICHERHEITSHINWEISE • Schließen Sie das Gerät so an, dass der Netzstecker jederzeit leicht zugänglich ist. • Untersuchen Sie das Netzkabel regelmäßig auf Beschädigungen. Falls das Netzkabel beschädigt ist, muss es vom Hersteller oder einem autorisierten Fachbetrieb oder einer ähnlich qualifizierten Person ersetzt werden. •...
  • Seite 5: Geräteübersicht

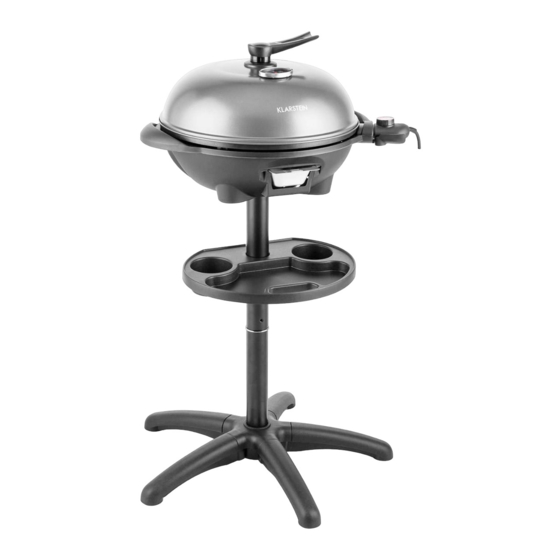
    GERÄTEÜBERSICHT Grillhaube Griffe der Haube Grillplatte Fettauffangschale Gerätebasis Zubehör-Ablage Oberes Stativrohr Verzierung Unteres Stativrohr 10 A Standfuß B Standbasis 11 Griff der Gerätebasis 12 Öffnung für die Gerätesteckdose 13 Lampe für die Temperaturanzeige 14 Abnehmbarer Temperaturregler mit Kabel 15 Gerätesteckdose 16 Unterlegscheibe 17 Schrauben 18 Thermometer...
  • Seite 6: Zusammenbau

    ZUSAMMENBAU Stecken Sie die Füße (10A) fest in den Legen Sie die Unterlegscheibe Sockel (10B). Wenn ein Fuß richtig (16) auf den Sockel und ziehen einrastet klickt es. Sie die Schrauben (17) auf der Unterlegscheibe fest, um den Sockel und die Standfüße fest miteinander zu verbinden.
  • Seite 7 Schrauben Sie die Hälfte des Verbinden Sie den Sockel (10) und das Stangengewindes (a) in das untere untere Stativrohr (9) miteinander, um Stativrohr (9). und verbinden Sie beide den Grillständer zu vervollständigen. Rohre miteinander. Stellen Sie sicher, Der Grill kann auch ohne den Ständer dass Sie fest miteinander verschraubt verwendet werden.
  • Seite 8 Stellen Sie die Fettauffangschale(4) Stellen Sie die Grillplatte (3) auf in die Halterung, die zur Gerätebasis das Gerät (5). Führen Sie die gehört. Gerätesteckdose (15) in die dafür vorgesehene Öffnung (12). Stellen Sie anschließend die Grillplatte waagerecht auf die Gerätebasis. Montieren Sie den Griff (1) in die Führen Sie das Thermometer (18) Grillhaube mit der Schraube (e), der...
  • Seite 9: Bedienung

    Drücken Sie den abnehmbaren Die Grillhaube (2) können Sie öffnen Temperaturregler (14) so weit Sie und zur Seite drehen, indem Sie sie an können nach oben in den Sockel des der Kante der Grillplatte einhaken. Gerätebasis. BEDIENUNG Bevor Sie das Gerät zum ersten Mal benutzen, entfernen Sie die Verpackung und reinigen Sie die Grillplatte (3), Fettauffangschale (4) und die Grillhaube (1) vollständig.
  • Seite 10 Garzeiten Hier ist eine Tabelle der empfohlenen Garzeiten. Für verschiedene Gewichte und Größen des Grillguts wer- den verschiedene Garzeiten benötigt, abhängig davon, ob Sie mit oder ohne Grillhaube grillen. Grillgut Temperatureinstellung Garzeit (in Minuten) Steak/Rind 15-20 Lamm 12-18 Hähnchenkeulen 25-30 Kotelett 20-25 Hähnchenflügel...
  • Seite 11: Reinigung Und Pflege

    REINIGUNG UND PFLEGE Wichtige Hinweise • Ziehen Sie immer zuerst den Stecker aus der Steckdose, bevor Sie das Gerät reinigen. • Achten Sie darauf, dass kein Wasser ins Gehäuse eindringt, es könnte einen Kurzschluss auslösen. • Tauchen Sie den Grill, das Kabel und den Stecker nicht in Wasser oder andere Flüssigkeiten.
  • Seite 12: Hinweise Zur Entsorgung

    HINWEISE ZUR ENTSORGUNG Wenn es in Ihrem Land eine gesetzliche Regelung zur Entsorgung von elektrischen und elektronischen Geräten gibt, weist dieses Symbol auf dem Produkt oder auf der Verpackung darauf hin, dass dieses Produkt nicht im Hausmüll entsorgt werden darf. Stattdessen muss es zu einer Sammelstelle für das Recycling von elektrischen und elektronischen Geräten gebracht werden.
  • Seite 13 Dear Customer, Congratulations on purchasing this device. Please read the following instructions carefully and follow them to prevent possible damages. We assume no liability for damage caused by disregard of the instructions and improper use. Scan the QR code to get access to the latest user manual and more product information.
  • Seite 14: Safety Instructions

    SAFETY INSTRUCTIONS • Connect the device so that the mains plug is easily accessible at all times. • Inspect the power cord regularly for damage. If the power cord is damaged, it must be replaced by the manufacturer or an authorized service center or a similarly qualified person.
  • Seite 15: Device Overview

    DEVICE OVERVIEW Metal grill hood Handle of hood Grill Plate Fat collecting bowl Base of appliance Condiment tray Upper stand tube Decoration Nether stand tube 10 A Stand foot B Stand base 11 Handle of base 12 Opening for appliance socket 13 Temperature indicator lamp 14 Detachable temperature regulator with cable...
  • Seite 16: Installation

    INSTALLATION Install the stand feet (10A) into the Place the washer (16) onto the stand stand base (10B) properly. That will be base, and then install the screws (17) a “click” sound when the stand foot is into the washer to fix the stand feet fixed completely and stand base firmly.
  • Seite 17 Install half of the threaded rod (a) in Connect the grill stand base (10) and the nether tube (9) Put the decoration the neth- er tube (9) together to form (8) on the nether tube (9) and assem- the complete grill stand. (The grill can ble both tubes to- gether;...
  • Seite 18 Put the fat collecting bowl (4) into the Place the grill plate (3) on the base of bracket supplied for it in the base of the ap- pliance (5). First of all insert the the appliance, buckle the hole of fat appliance socket (15) into the opening collecting bowl onto the screw to fix it intended for it (12), then set the grill...
  • Seite 19: Operation

    Push the detachable temperature The metal hood (2) can be opened and regulator (14) as far as it will go into placed on the side by being hooked up the grill’s appliance socket. on the edge of grill plate OPERATION Before using the appliance for the first time, remove the packaging and clean the grill plate (3), grease drip tray (4) and grill hood (1) completely.
  • Seite 20 Cooking times Here is a table of recommended cooking times. Different cooking times are required for different weights and sizes of food, depending on whether you are grilling with or without a grill hood. Food to be grilled Temperature grade Cooking time (in setting minutes)
  • Seite 21: Cleaning And Care

    CLEANING AND CARE Important Hints: • Pull the mains plug out of the socket with earthing contact before cleaning. • Make sure that no liquids penetrate the housing. • Never submerge the tabletop grill in water or other liquids. • Do not use any aggressive cleaners such as alkaline- or chlorine-based cleaners and sharp or metallic cleaning utensils such as knives, hard scrapers or similar.
  • Seite 22: Disposal Considerations

    DISPOSAL CONSIDERATIONS If there is a legal regulation for the disposal of electrical and electronic devices in your country, this symbol on the product or on the packaging indicates that this product must not be disposed of with household waste. Instead, it must be taken to a collection point for the recycling of electrical and electronic equipment.
  • Seite 23 Estimado cliente: Le felicitamos por la adquisición de este producto. Lea atentamente el siguiente manual y siga cuidadosamente las instrucciones de uso con el fin de evitar posibles daños. La empresa no se responsabiliza de los daños ocasionados por un uso indebido del producto o por haber desatendido las indicaciones de seguridad.
  • Seite 24: Indicaciones De Seguridad

    INDICACIONES DE SEGURIDAD • Conecte el aparato de modo que el enchufe esté accesible en todo momento. • Examine el cable periódicamente para detectar daños. Si el cable de alimentación está dañado, deberá ser sustituido por el fabricante, una empresa autorizada o una persona cualificada. •...
  • Seite 25: Descripción Del Aparato

    DESCRIPCIÓN DEL APARATO Tapa de la barbacoa Asas de la tapa Parrilla Bandeja colectora Base del aparato Balda para accesorios Tubo superior del soporte Elemento decorativo Tubo inferior del soporte 10 Base de soporte A Base de soporte B 11 Asa de la base del aparato 12 Orificio para la toma de corriente del aparato 13 Indicador luminoso de...
  • Seite 26: Montaje

    MONTAJE Encaje las patas (10A) en el zócalo Coloque la arandela (16) en el zócalo (10B). Cuando la pata encaje y apriete los tornillos (17) contra la correctamente, escuchará un clic. arandela para unir el zócalo con las patas de manera firme.
  • Seite 27 Enrosque la mitad de la varilla roscada Una el zócalo (10) y el tubo inferior del (a) en el tubo inferior del soporte (9) y soporte (9) para completar la base de una ambos tubos entre sí. Asegúrese la barbacoa. de que ambas piezas estén bien La barbacoa puede utilizarse con o sin sujetadas.
  • Seite 28 Coloque la bandeja colectora (4) en el Coloque la parrilla (3) sobre el aparato soporte correspondiente de la base (5). Guíe la toma de corriente del del aparato. aparato (15) por el orificio previsto (12). A continuación, coloque la parrilla en posición horizontal sobre la base.
  • Seite 29: Funcionamiento

    Presione el regulador de temperatura La tapa de la barbacoa (2) puede extraíble (14) lo más hacia arriba abrirse y girarse hacia un lado, de posible en el zócalo de la base del modo que quedará colgando de un aparato. lado de la parrilla.
  • Seite 30 Tiempos de cocción A continuación le presentamos una tabla con los tiempos de cocción recomendados. Para distintos pesos y tamaños de alimento se necesitan tiempos de cocción diferentes, en función de si cocina con o sin tapa. Alimento Ajuste de temperatura Tiempo de cocción (en minutos) Bistec/ternera...
  • Seite 31: Limpieza Y Cuidado

    LIMPIEZA Y CUIDADO Notas importantes • Desenchufe primero el aparato antes de limpiarlo. • Asegúrese de que no se filtre agua al interior de la carcasa, pues podría ocasionar un cortocircuito. • No sumerja la parrilla, el cable ni el enchufe en agua ni en ningún otro líquido. •...
  • Seite 32: Indicaciones Sobre La Retirada Del Aparato

    INDICACIONES SOBRE LA RETIRADA DEL APARATO Si en su país existe una disposición legal relativa a la eliminación de aparatos eléctricos y electrónicos, este símbolo estampado en el producto o en el embalaje advierte que no debe eliminarse como residuo doméstico. Debe depositarse en un punto de recogida de reciclaje de aparatos eléctricos y electrónicos.
  • Seite 33 Cher client, chère cliente, Toutes nos félicitations pour l’acquisition de ce nouvel appareil. Lisez attentivement les indications suivantes et suivez-les pour éviter d'éventuels dommages. Nous ne saurions être tenus pour responsables des dommages dus au non-respect des consignes et à la mauvaise utilisation de l’appareil.
  • Seite 34: Consignes De Sécurité

    CONSIGNES DE SÉCURITÉ • Connectez l'appareil de manière à ce que la prise d'alimentation reste facilement accessible à tout moment. • Contrôlez régulièrement le bon état du câble d'alimentation. Si le cordon d'alimentation est endommagé, il doit être remplacé par le fabricant, un centre de service agréé...
  • Seite 35: Aperçu De L'appareil

    APERÇU DE L'APPAREIL Couvercle du barbecue Poignées du couvercle Plaque de cuisson Bac collecteur de graisse Base de l'appareil Étagère pour les accessoires Tube de support supérieur Décoration Tube de support inférieur 10 Pied A B Base du pied 11 Poignée de la base de l'appareil 12 Ouverture pour la prise de l'appareil 13 Lampe d'affichage de la...
  • Seite 36: Assemblage

    ASSEMBLAGE Insérez fermement les pieds (10A) Placez la rondelle (16) sur la base et dans la base (10B). Lorsqu'un pied serrez les vis (17) sur la rondelle pour s'engage correctement, il émet un clic. fixer la base et les pieds ensemble.
  • Seite 37 Vissez la moitié du filetage de la Reliez la base (10) et le tube du tige (a) dans le tube inférieur du support inférieur (9) ensemble pour support (9) et connectez les deux compléter le support du barbecue. tubes ensemble. Assurez-vous qu'ils Le barbecue peut également être sont bien vissés ensemble.
  • Seite 38 Placez le bac collecteur de graisse (4) Placez la plaque de cuisson (3) sur dans le support qui appartient à la l'appareil (5). Insérez la prise de base de l'appareil. l'appareil (15) dans l'ouverture prévue (12). Placez ensuite la plaque de cuisson horizontalement sur la base de l'appareil.
  • Seite 39: Utilisation

    Poussez le régulateur de température Vous pouvez ouvrir le couvercle du amovible (14) aussi loin que possible barbecue (2) et le tourner sur le côté dans la base de la base de l'appareil. en l'accrochant sur le bord de la plaque de cuisson.
  • Seite 40 Temps de cuisson Voici un tableau des durées de cuisson recommandées. Différents temps de cuisson sont nécessaires en fonction du poids et de la taille des aliments, selon que vous grillez avec ou sans le couvercle. Aliments à griller Réglage de la Temps de cuisson (en température minutes)
  • Seite 41: Nettoyage Et Entretien

    NETTOYAGE ET ENTRETIEN Remarques importantes • Retirez toujours la fiche de la prise avant de nettoyer l'appareil. • Ne laissez jamais de l'eau entrer dans le boîtier pour éviter les courts-circuits. • Ne plongez pas le cordon d'alimentation, la fiche ou l'appareil dans l'eau ou dans d'autres liquides.
  • Seite 42: Informations Sur Le Recyclage

    INFORMATIONS SUR LE RECYCLAGE Si l'élimination des appareils électriques et électroniques est réglementée dans votre pays, ce symbole sur le produit ou sur l'emballage indique qu'il ne doit pas être jeté avec les ordures ménagères. Vous devez l'acheminer vers un point de collecte pour le recyclage des équipements électriques et électroniques.
  • Seite 43 Gentile Cliente, La ringraziamo per aver acquistato il dispositivo. La preghiamo di leggere attentamente le seguenti istruzioni per l’uso e di seguirle per evitare possibili danni. Non ci assumiamo alcuna responsabilità per danni scaturiti da una mancata osservanza delle avvertenze di sicurezza e da un uso improprio del dispositivo.
  • Seite 44: Avvertenze Di Sicurezza

    AVVERTENZE DI SICUREZZA • Collegare il dispositivo in modo che la spina possa essere raggiunta facilmente in ogni momento. • Controllare regolarmente se il cavo di alimentazione è danneggiato. Se il cavo di alimentazione è danneggiato, deve essere sostituito dal produttore, da un'azienda tecnica autorizzata o da una persona con qualifica equivalente.
  • Seite 45: Descrizione Del Prodotto

    DESCRIZIONE DEL PRODOTTO Copertura della griglia Impugnature della copertura Piastra di cottura Vaschetta di raccolta del grasso Base del dispositivo Appoggio per gli accessori Tubo superiore dello stativo Decorazione Tubo inferiore dello stativo 10 Piede d'appoggio A Base d'appoggio B 11 Impugnatura della base del dispositivo 12 Apertura per la presa del...
  • Seite 46: Montaggio

    MONTAGGIO Inserire i piedi d'appoggio (10A) nella Posizionare la rondella (16) sul base fissa (10B). Quando un piede si basamento e stringere le viti (17) aggancia correttamente, si sente un sulla rondella, in modo da collegare clic. saldamente piedi d'appoggio e basamento.
  • Seite 47 Avvitare la metà della filettatura Collegare il basamento (10) e il tubo dell'asta (a) nel tubo inferiore inferiore dello stativo (9), in modo da dello stativo (9) e collegare i due completare il supporto della griglia. tubi. Assicurarsi che siano avvitati La griglia può...
  • Seite 48 Posizionare la vaschetta di raccolta del Posizionare la piastra di cottura (3) sul grasso (4) nel supporto che fa parte dispositivo (5). Far passare la presa del della base del dispositivo. dispositivo (15) nell'apposita apertura (12). Posizionare poi la piastra di cottura in orizzontale sulla base del dispositivo.
  • Seite 49: Utilizzo

    Premere la manopola della La copertura (2) può essere aperta e temperatura rimovibile (14) verso l'alto ruotata lateralmente, agganciandola al nel basamento del dispositivo per bordo della piastra di cottura. quanto possibile. UTILIZZO Prima di utilizzare il dispositivo per la prima volta, rimuovere l'imballaggio e pulire piastra di cottura (3), vaschetta di raccolta del grasso (4) e copertura (1) completamente.
  • Seite 50 Tempi di cottura Qui presentiamo una tabella con i tempi di cottura consigliati. Se si utilizza la copertura o meno, per pietanze con peso e dimensioni diversi, sono necessari diversi tempi di cottura. Pietanza Impostazione della Tempo di cottura (in temperatura minuti) Bistecca/manzo...
  • Seite 51: Pulizia E Manutenzione

    PULIZIA E MANUTENZIONE Note importanti • Staccare la spina dalla presa prima di pulire il dispositivo. • Assicurarsi che non penetri acqua nell'alloggiamento, altrimenti potrebbero esserci cortocircuiti. • Non immergere griglia, cavo e spina in acqua o altri liquidi. • Non utilizzare detergenti aggressivi e oggetti metallici o appuntiti, come coltelli o raschietti, per pulire il dispositivo.
  • Seite 52: Avviso Di Smaltimento

    AVVISO DI SMALTIMENTO Se nel vostro Paese sono vigenti regolamenti legislativi relativi allo smaltimento di dispositivi elettrici ed elettronici, questo simbolo sul prodotto o sull'imballaggio indica che non è consentito smaltire questo prodotto nei rifiuti casalinghi. Il dispositivo deve invece essere portato in un centro di raccolta per il riciclaggio di dispositivi elettrici ed elettronici.

Diese Anleitung auch für:

10028784

Inhaltsverzeichnis