Herunterladen Diese Seite drucken

Werbung

Verfügbare Sprachen
  • DE

Verfügbare Sprachen

  • DEUTSCH, seite 1
DIGITAL TIMER
Mod.-Nr.: 304579
Mod.-Nr.: 304580

Werbung

loading

Inhaltszusammenfassung für BEARWARE 304579

  • Seite 1 DIGITAL TIMER Mod.-Nr.: 304579 Mod.-Nr.: 304580...
  • Seite 2 Table of contents 1. Deutsch ....................... 3 2. Italiano ......................13 3. Español ......................23 4. Français ......................33 5. English ....................... 43 GER: Aktuelle Informationen, Treiber, Bedienungsanleitungen und Daten- blätter finden Sie auf www.ganzeinfach.de in unserem Download-Bereich. ENG: Latest information, drivers, user manuals and data sheets can be found at www.ganzeinfach.de in our download area.
  • Seite 3 Vielen Dank, dass Sie sich für ein Produkt von BEARWARE entschieden haben. Damit Sie auch lange Freude mit Ihrem erworbenen Gerät haben werden, lesen Sie sich bitte die nachfolgende Kurzanleitung aufmerksam durch. Prüfen Sie vor Inbetriebnahme der gelieferten Ware, ob diese vollständig, fehlerfrei und unbe- schädigt ist.
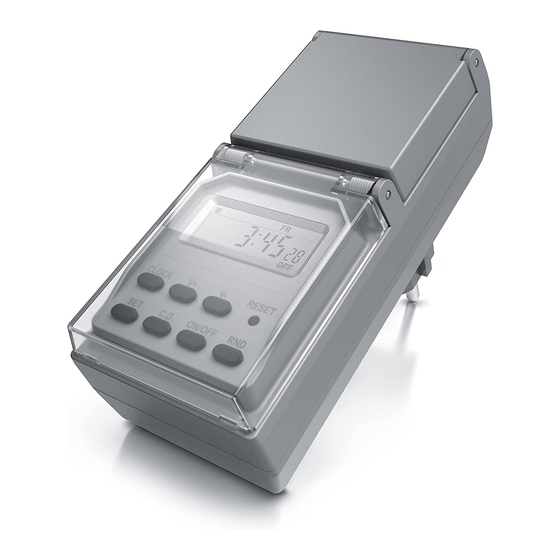
  • Seite 4: Bedienelemente

    3.1 Bedienelemente Bezeichnung Programmanzeige Wochentagsanzeige Uhrzeitanzeige Schaltoption (ON / AUTO / OFF) “CLOCK”-Taste (AM/PM Wechsel + Uhrzeit anzeigen) “V+”-Taste (Wert erhöhen) “V-”-Taste (Wert verringern) “RESET”-Taste (Zurücksetzen) “SET”-Taste (Einstellungen) “CD”-Taste (Countdown) “ON/OFF”-Taste (Schaltoptionen wählen) “RND”-Taste (Zufallsfunktion) Deutsch...
  • Seite 5 4. Wichtige Nutzungshinweise Schließen Sie kein Gerät an, bei der die Stromstärke 16 (3) A überschritten wird. Stellen Sie stets sicher, dass der Stecker jedes Gerätes vollständig in den Gerä- teanschluss der Zeitschaltuhr eingesteckt ist. Sollte eine Reinigung des Produktes notwendig sein, so trennen Sie die Zeitschaltuhr vollständig vom Stromnetz und wischen Sie das Gerät mit einem trockenen Tuch ab.
  • Seite 6 Die einzelnen Wochentage werden im LC-Display der Zeitschaltuhr in Form der englischen Abkürzungen angezeigt. Welche Abkürzung, welchem Wochentag entpricht, ist in folgender Tabelle ersichtlich: Samstag Montag Sonntag Dienstag Mittwoch Donnerstag Freitag Die nachfolgende Tabelle stellt eine Übersicht der wählbaren Kombinationen an den jeweiligen Wochentagen dar.
  • Seite 7 Betätigen Sie nach dem Aufladen die RESET-Taste mit einem spitzen Gegenstand, um die aktuelle Konfiguration der Zeitschaltuhr zu löschen bzw. vollständig zurückzusetzen. Das Gerät ist danach betriebsbereit. Wie Sie die einzelnen Ein- stellungen vornehmen können, erfahren Sie in den folgenden Abschnitten dieser Anleitung.
  • Seite 8 Drücken Sie anschließend erneut die „V+“-Taste. Sie können dann die nächste Programmzeit einstellen, zu der das angeschlossene Gerät ausgeschaltet werden soll (OFF). Konfigurieren Sie die Uhrzeit und die Wochentage wie im vorherigen Schritt. Hinweis: Beachten Sie, dass die Wochentage für das Einschalten und das Ausschalten separat einzustellen sind.
  • Seite 9 Drücken Sie kurz die Taste, um zwischen den verschiedenen Modi zu wechseln. Die Display-Anzeige wechselt hierbei zwischen “AUTO”, “ON” und “OFF”. Bitte beachten Sie, dass bei der Umstellung von “ON” oder “OFF” auf “AUTO” der letzte Schaltzustand solange erhalten bleibt, bis eines der eingestellten Schaltpro- gramme einen Schaltvorgang auslöst.
  • Seite 10 Drücken Sie die Taste „SET“, um die Countdown-Funktion einzustellen. Stellen Sie zuerst ein, wann die Countdownfunktion nach Ablauf der Zeit das Gerät ein- (ON) oder ausschalten (OFF) soll. Bestätigen Sie Ihre Eingabe mit der „SET“-Taste. Wäh- len Sie mithilfe der „V+“ und „V-“-Tasten anschließend die Stunden und danach die Minuten aus.
  • Seite 11 14. Entsorgungshinweise Elektrische und elektronische Geräte dürfen nach der europäischen WEEE Richt- linie nicht mit dem Hausmüll entsorgt werden. Deren Bestandteile müssen ge- trennt der Wiederverwertung oder Entsorgung zugeführt werden, weil giftige und gefährliche Bestandteile bei unsachgemäßer Entsorgung die Umwelt nachhal tig schädigen können.
  • Seite 12 WEEE Richtlinie 2012/19/EU WEEE Register-Nr: DE 67896761 Hiermit erklärt die Firma WD Plus GmbH, dass sich die Geräte 304579 und 304580 in Über- einstimmung mit den grundlegenden Anforderungen und den übrigen einschlägigen Bestim- mungen befindet. Eine vollständige Konformitätserklärung erhalten Sie bei: WD Plus GmbH, Wohlenbergstraße 16, 30179 Hannover...
  • Seite 13 Thank you for choosing a BEARWARE product. Please read the following user man- ual carefully so as to get the most from the product you have purchased. Before using the product, first check that the delivered item is complete, accurate and undamaged.
  • Seite 14: Operating

    3.1 Operating elements Discription Program display Weekday display Time display Switching option (ON / AUTO / OFF) "CLOCK" button (AM/PM change + display time) "V+" button (increase value) "V-" button (decrease value) "RESET" button (reset) "SET" button (settings) "CD" button (countdown) "ON/OFF"...
  • Seite 15 4. Important tips Do not connect any devices, where the current of 16 (3) A is exceeded. Make sure that the device plug is fully inserted into the timer port. If you need to clean the product, first disconnect the timer from the mains completely and wipe the device using a dry cloth.
  • Seite 16 The individual days of the week are shown in the timer LC display in the form of English abbreviations. The following table shows the abbreviations and the corresponding day of the week: Saturday Monday Sunday Tuesday Wednesday Thursday Friday The table below shows an overview of the combinations that can be selected for the respective days of the week.
  • Seite 17 After charging, press the RESET button using a pointed object to clear or com- pletely reset the current configuration of the timer. The device is now ready for use. The following sections of this manual describe how to make the individual settings.
  • Seite 18 Then press the "V+" button again. You can then set the next program time at which the connected device has to be switched off (OFF). Configure the time and days of the week as described in the previous step. Note: Please remember that the days of the week for switching on and switching off have to be configured separately.
  • Seite 19 Press the button to change between the different modes. The display changes between "AUTO", "ON" and "OFF". Please note that when changing from "ON" or "OFF" to "AUTO", the last timer state is retained until one of the configured timer programmes triggers a change. 10.
  • Seite 20 Press the "SET" button to configure the countdown function. First, configure when the countdown function should switch the device on (ON) or off (OFF) after the time has elapsed. Confirm your entry using the "SET" button. Then use the "V+" and "V-" buttons to select the hours and then the minutes. Confirm using the "SET"...
  • Seite 21 14. Disposal instructions In line with the European WEEE directive, electrical and electronic devices should not be disposed of along with domestic waste. Their components must be sent for recycling or disposal separately, as improper disposal of toxic and dangerous components could permanently damage the environment.
  • Seite 22 WEEE directive 2012/19/EU WEEE Register no.: DE 67896761 WD Plus GmbH hereby certifies that the devices 304579 and 304580 comply with the funda- mental requirements and all other relevant stipulations. A complete conformity statement can be obtained from: WD Plus GmbH, Wohlenbergstraße 16, 30179 Hannover...
  • Seite 23 Nous vous remercions d'avoir choisi un produit BEARWARE. Pour que vous puissiez profiter longtemps de votre appareil acquis, veuillez lire attentivement le mode d'emploi suivant. Avant la mise en service du produit livré, vérifiez s'il est complet, sans défauts et intact.
  • Seite 24 3.1 Éléments de commande N° Désignation Affichage de programmes Affichage du jour de la semaine Affichage de l'heure Option de commutation (ON / AUTO / OFF) Touche « CLOCK » (changement AM/PM + afficher l’heure) Touche « V + » (augmenter la valeur) Touche «...
  • Seite 25 4. Consignes d'utilisation importantes Ne connectez aucun appareil dans lequel l'intensité de courant dépasse 16(3) A. Assurez-vous que la fiche de chaque dispositif soit entièrement insérée dans le port pour dispositifs de l'horloge programmable. Si un nettoyage du produit s'avère nécessaire, débranchez complètement l'horloge programmable et essuyez le dispositif avec un chiffon sec.
  • Seite 26 Les différents jours de la semaine sont indiqués sur l'écran LC de l'horloge programmable sous la forme de leurs abréviations anglaises. Quelle abréviation correspond à quel jour de la semaine est indiqué dans le tableau suivant : samedi Lundi Dimanche Mardi Mercredi Jeudi...
  • Seite 27 Après la recharge, actionnez la touche RESET à l'aide d'un objet pointu, pour effa- cer ou réinitialiser complètement la configuration actuelle de l'horloge program- mable. L'appareil est ensuite opérationnel. Les suivantes sections de ce mode d'emploi vous indiquerons comment vous pouvez réaliser les différents réglages. 7.
  • Seite 28 Appuyez ensuite à nouveau sur la touche « V+ ». Vous pouvez régler la prochaine heure de programmation à laquelle l’appareil connecté doit être éteint (OFF). Configurez l'heure et les jours de semaine comme dans l'étape précédente. Remarque : Notez que les jours de semaine pour la mise en marche et l'arrêt doivent être réglés séparément.
  • Seite 29 Appuyez brièvement sur la touche pour naviguer entre les différents modes. L'affichage sur l'écran change ce faisant entre « AUTO », « ON » et « OFF ». Veuillez noter que lors du changement de « ON » ou « OFF » à « AUTO », le dernier état de commutation se maintient jusqu'à...
  • Seite 30 Appuyez sur la touche« SET » pour configurer la fonction compte à rebours. Configurez d’abord quand la fonction de compte à rebours doit être mise en marche (ON) ou arrêtée (OFF) une fois le temps écoulé. Confirmez votre saisie en appuyant sur la touche «...
  • Seite 31 14. Informations sur la mise au rebut de vos appareils Les appareils électriques et électroniques ne doivent pas, selon la directive euro- péenne DEEE, être jetés dans les ordures ménagères. Leurs composants doivent être éliminés ou recyclés séparément, car des composants toxiques ou dangereux pourraient endommager l'environnement à...
  • Seite 32 Directive DEEE 2012/19/UE Numéro de registre DEEE : DE 67896761 La société WD Plus GmbH déclare par la présente que les appareils 304579 et 304580 sont conformes aux exigences fondamentales et aux autres dispositions pertinentes de la direc- tive. Pour obtenir une déclaration de conformité complète, adressez-vous à : WD Plus GmbH, Wohlenbergstraße 16, 30179 Hanovre...
  • Seite 33 Grazie per aver scelto un prodotto di BEARWARE. Per utilizzare con soddisfazione l'apparecchio acquistato, si prega di leggere attentamente le seguenti istruzioni per l’uso. Prima della messa in funzione della merce consegnata, verificare che sia integra, esente da difetti e non danneggiata.
  • Seite 34 3.1 Elementi di comando Descrizione Visualizzazione programma Visualizzazione giorno della settimana Visualizzazione ora Opzione di commutazione (ON/AUTO/OFF) Tasto “CLOCK” (visualizzazione di cambio tra AM/PM + orario) Tasto “V+” (aumenta il valore) Tasto “V-” (riduce il valore) Tasto "RESET” (ripristino) Tasto "SET” (impostazioni) Tasto "CD”...
  • Seite 35 4. Importanti informazioni sull'utilizzo Non collegare apparecchi in cui l'amperaggio supera i 16 (3) A. Assicurarsi sempre che la spina di ogni apparecchio sia completamente inserita nella presa del timer. Se dovesse risultare necessaria la pulizia del prodotto, scollegare il timer dalla rete elettrica e pulire l'unità...
  • Seite 36 I giorni della settimana sono visualizzati sul display LC del timer nella forma di abbreviazioni inglesi. L’abbreviazione dei giorni si può consultare nella tabella seguente: Sabato Lunedì Domenica Martedì Mercoledì Giovedì Venerdì La tabella seguente fornisce una panoramica delle combinazioni selezionabili nei rispettivi giorni della settimana.
  • Seite 37 Una volta completata l’operazione di carica, azionare il tasto RESET con un oggetto appuntito per eliminare o ripristinare completamente la configurazione corrente del timer. Successivamente il dispositivo è pronto per il funzionamento. Per effettuare le impostazioni, fare riferimento alle seguenti sezioni della presente guida.
  • Seite 38 Successivamente premere di nuovo il tasto “V+”. È quindi possibile impostare il programma orario in cui l’apparecchio collegato deve essere spento (OFF). Configurare l'ora e i giorni della settimana come nel passo precedente. Nota: va osservato che i giorni della settimana devono essere impostati separa- tamente per l'accensione e per lo spegnimento.
  • Seite 39 Premere brevemente il tasto per passare da una modalità all'altra. La visualizza- zione sul display passa da "AUTO", "ON" e "OFF". Si prega di notare che quando si passa da "ON" o "OFF" a "AUTO", l'ultimo stato di commutazione viene mantenuto fino a quando uno dei programmi impostati innesca un'operazione di commutazione.
  • Seite 40 Premere il tasto "SET" per attivare la funzione Countdown. Innanzitutto impostare quando la funzione di countdown dopo lo scadere del tempo impostato, deve accendere (ON) o spegnere (OFF) l’apparecchio. Confermare l’immissione pre- mendo il tasto "SET". Selezionare infine le ore e poi i minuti con l'ausilio dei tasti “V+”...
  • Seite 41 14. Indicazioni per lo smaltimento Secondo la direttiva europea RAEE, le apparecchiature elettriche ed elettroniche non possono essere smaltite con i rifiuti domestici. I loro componenti devono essere consegnati separatamente al centro di riciclaggio o smaltimento, in quanto gli eventuali componenti tossici e pericolosi possono inquinare permanentemen- te l'ambiente in caso di smaltimento improprio.
  • Seite 42 Direttiva RAEE 2012/19/UE Numero reg. RAEE: DE 67896761 Con la presente la ditta WD Plus GmbH dichiara che l'apparecchio 304579 e 304580 è con- forme ai requisiti essenziali e alle rimanenti disposizioni in materia. Una dichiarazione di conformità completa è disponibile presso: WD Plus GmbH, Wohlenbergstraße 16, 30179...
  • Seite 43 Muchas gracias por escoger un producto de BEARWARE. Para que pueda disfru- tar durante mucho tiempo de su adquisición, le rogamos que lea atentamente las siguientes instrucciones de uso. Antes de ponerlo en marcha, compruebe que el producto suministrado no presenta defectos ni daños.
  • Seite 44 3.1 Elementos de mando N.º Denominación Visualización de los programas Visualización del día de la semana Indicador de la hora Opción de conmutación (ON / AUTO / OFF) Botón «CLOCK» (cambiar AM/PM + visualizar la hora) Botón «V+» (aumentar el valor) Botón «V-»...
  • Seite 45 4. Indicaciones de uso importantes No conecte ningún aparato que supere una corriente de 16(3) A. Asegúrese en todo momento que el enchufe de cada aparato esté bien insertado en la conexión para dispositivos del temporizador. Si es necesario limpiar el aparato, separe el temporizador de la red de alimentación y límpielo con un paño seco.
  • Seite 46 Cada día de la semana aparecerá en la pantalla LC del temporizador con las siglas correspondientes en inglés. La tabla siguiente muestra qué sigla se corresponde con cada día de la semana: Sábado Lunes Domingo Martes Miércoles Jueves Viernes La tabla siguiente presenta un resumen de las combinaciones de los días de la semana que se pueden escoger.
  • Seite 47 Tras la carga, pulse el botón RESET con un objeto puntiagudo para restablecer o eliminar la configuración actual del temporizador. A continuación, el aparato está listo para ser utilizado. En los apartados siguientes le mostramos cómo llevar a cabo todas las configuraciones. 7.
  • Seite 48 Vuelva a pulsar brevemente el botón «V+». Luego puede configurar la siguiente hora del programa en la que debe apagarse el aparato conectado (OFF). Configure la hora y los días de la semana como se describe arriba. Indicación: Tenga en cuenta que los días de la semana deben configurarse por separado para el procedimiento de encendido y de apagado.
  • Seite 49 Pulse el botón brevemente para cambiar entre los distintos modos. La pantalla cambia entre «AUTO», «ON» y «OFF». Por favor, tenga en cuenta que al cambiar de «ON» u «OFF» a «AUTO» se mantendrá el último estado de conmutación hasta que el programa active la conmutación.
  • Seite 50 Pulse el botón «SET» para activar la función de cuenta atrás. Configure en primer lugar en qué momento se debe encender (ON) o apagar (OFF) el aparato una vez transcurrido el tiempo configurado. Confirme la información introducida con el botón «SET». Configure luego la hora y los minutos con los botones «V+» y «V-». Confírmela con el botón «SET».
  • Seite 51 14. Indicaciones de eliminación Los dispositivos eléctricos y electrónicos no deben eliminarse con los residuos domésticos según la directiva europea WEEE. Sus componentes deben separarse para el reciclaje o su eliminación, ya que los componentes peligrosos y venenosos pueden producir daños al medio ambiente en caso de una eliminación inadecua- Como usuario, está...
  • Seite 52 Directiva WEEE 2012/19/UE Número de registro WEEE: DE 67896761 La empresa WD Plus GmbH declara por la presente que los aparatos 304579 y 304580 satis- face los requisitos esenciales y el resto de disposiciones pertinentes. Solicite una declaración de conformidad completa en: WD Plus GmbH, Wohlenbergstraße 16, 30179 Hannover (Ale- mania) Español...
  • Seite 53 Notes...
  • Seite 54 WD Plus GmbH • Wohlenbergstraße 16 • D-30179 Hannover...

Diese Anleitung auch für:

304580