Herunterladen Inhalt Inhalt Diese Seite drucken
Klarstein VALDERAMA 10029347 Bedienungsanleitung

Klarstein VALDERAMA 10029347 Bedienungsanleitung

Vorschau ausblenden Andere Handbücher für VALDERAMA 10029347:

Werbung

Verfügbare Sprachen

Verfügbare Sprachen

VALDERAMA
Deckenventilator
Ceiling Fan
Ventilateur de plafond
Ventilador de techo
Ventilatore a soffitto
10029347 10029348
www.klarstein.com

Werbung

Inhaltsverzeichnis
loading

Inhaltszusammenfassung für Klarstein VALDERAMA 10029347

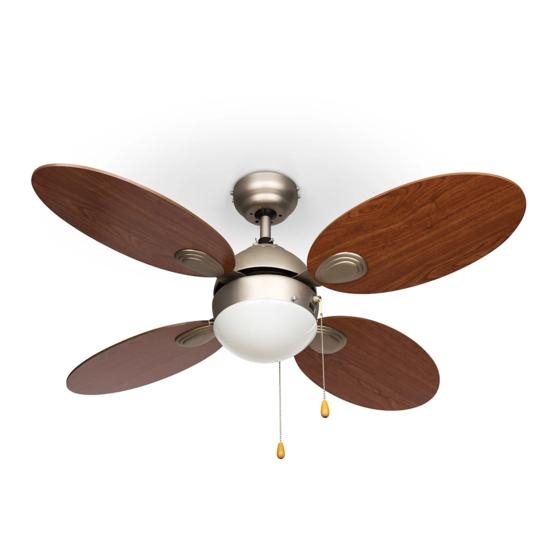
  • Seite 1 VALDERAMA Deckenventilator Ceiling Fan Ventilateur de plafond Ventilador de techo Ventilatore a soffitto 10029347 10029348 www.klarstein.com...
  • Seite 3: Inhaltsverzeichnis

    Sehr geehrter Kunde, wir gratulieren Ihnen zum Erwerb Ihres Gerätes. Lesen Sie die folgenden Hinweise sorgfältig durch und befolgen Sie diese, um möglichen Schäden vorzubeugen. Für Schäden, die durch Missachtung der Hinweise und unsachgemäßen Gebrauch entstehen, übernehmen wir keine Haftung. Scannen Sie den folgenden QR-Code, um Zugriff auf die aktuellste Bedienungsanleitung und weitere Informationen rund um das Produkt zu erhalten.
  • Seite 4: Sicherheitshinweise

    SICHERHEITSHINWEISE • Befestigen Sie den Ventilator niemals an einer Steckdose, sondern an der Decke selbst. • Der Mindestabstand zwischen den Ventilatorblättern und dem Boden muss mehr als 2,3 m betragen. Die Mindesttragfähigkeit des Hakens, an dem der Ventilator aufgehängt wird, muss 100 kg betragen. •...
  • Seite 5: Installation

    INSTALLATION Befestigen Sie die Befestigen Sie die Schließen Sie die Montageplatte mit zwei Ventilator-Bauteile an Kabel von der Schrauben, Federringen der Montageplatte. Stromquelle und der und Unterlegscheiben Richten Sie das Montagehalterung zu an einem Deckenbalken. Kugelgelenk des den Anschlussklemmen Der Deckenbalken Ventilators an der folgendermaßen an: muss stark genug...
  • Seite 6 Befestigen Sie den Befestigen Sie die Befestigen Sie die Birnen Flügelhalter und die Ventilatorhalterung an der Lampenfassung Abdeckplatte mit mit Federringen und (max. 42 W E27, nicht im drei Schrauben und Schrauben am Motor. Lieferumfang enthalten). Federscheiben am Ventilatorflügel. Ziehen Sie alle Befestigen Sie die Schrauben fest und beiden Zugschnüre, und...
  • Seite 7: Inbetriebnahme Und Bedienung

    INBETRIEBNAHME UND BEDIENUNG • Schalten Sie den Strom ein, bevor Sie den Ventilator starten. • Der Ventilator startet, sobald Sie den 3-Stufen-Schalter bedienen, der über die Verlängerungskette mit dem Motor verbunden ist. • Ziehen Sie an der Verlängerungskette des Lichtschalters, um das Licht ein- und auszuschalten.
  • Seite 8: Hinweise Zur Entsorgung

    HINWEISE ZUR ENTSORGUNG Wenn es in Ihrem Land eine gesetzliche Regelung zur Entsorgung von elektrischen und elektronischen Geräten gibt, weist dieses Symbol auf dem Produkt oder auf der Verpackung darauf hin, dass dieses Produkt nicht im Hausmüll entsorgt werden darf. Stattdessen muss es zu einer Sammelstelle für das Recycling von elektrischen und elektronischen Geräten gebracht werden.
  • Seite 9: Technical Data

    Dear Customer, Congratulations on purchasing this device. Please read the following instructions carefully and follow them to prevent possible damages. We assume no liability for damage caused by disregard of the instructions and improper use. Scan the QR code to get access to the latest user manual and more product information.
  • Seite 10: Safety Instructions

    SAFETY INSTRUCTIONS • Never attach the fan to a power point,but to the ceiling itself. • The minimum distance between the blades of the fan and the floor must be more than 2.3 m. The minimum carrying capacity of the hook from which the fan is hung must be 100 kg.
  • Seite 11 INSTALLATION Fasten the mounting Attach the fan Connect the cables from the power source and plate to a ceiling joist components to the mounting bracket to the with two screws, lock mounting plate. Align terminals as follows: washers and washers. the ball joint of the fan The ceiling joist must with the suspension lug...
  • Seite 12 Fasten the blade holder Fasten the fan bracket Attach the bulbs to the and the cover plate to the motor with spring lamp holder (max. 42 W to the fan blade with washers and screws. E27, not included). three screws and spring washers.
  • Seite 13: Commissioning And Operation

    COMMISSIONING AND OPERATION • Turn on the power before starting the fan. • The fan will start as soon as you operate the 3-position switch, which is connected to the motor via the extension chain. • Pull the light switch extension chain to turn the light on and off. The fan will rotate at 3 different speeds depending on how many times you pull the extension chain: •...
  • Seite 14: Disposal Considerations

    DISPOSAL CONSIDERATIONS If there is a legal regulation for the disposal of electrical and electronic devices in your country, this symbol on the product or on the packaging indicates that this product must not be disposed of with household waste. Instead, it must be taken to a collection point for the recycling of electrical and electronic equipment.
  • Seite 15: Fiche Technique

    Chère cliente, cher client, Toutes nos félicitations pour l’acquisition de ce nouvel appareil. Veuillez lire attentivement et respecter les instructions de ce mode d’emploi afin d’éviter d’éventuels dommages. Nous ne saurions être tenus pour responsables des dommages dus au non-respect des consignes et à la mauvaise utilisation de l’appareil.
  • Seite 16: Consignes De Sécurité

    CONSIGNES DE SÉCURITÉ • Ne connectez jamais le ventilateur à une prise électrique, mais au plafond lui-même. • La distance minimale entre les pales du ventilateur et le sol doit être supérieure à 2,3 m. La capacité de charge minimale du crochet sur lequel le ventilateur est suspendu doit être de 100 kg.
  • Seite 17 INSTALLATION Fixer la plaque de Fixer la tige du Relier le câble d’ a limentation au moteur montage avec deux vis, ventilateur à la plaque grâce au domino, deux rondelles élas- de montage. Aligner la en respectant l’ o rdre tiques et deux rondelles coupole du ventilateur suivant :...
  • Seite 18 Fixer les supports des Fixer le support du Installer les ampoules pales et les caches avec ventilateur avec des (max. 42 W E27, non trois vis et trois rondelles rondelles élastiques et fournies) dans les élastiques aux pales du des vis au moteur. douilles de lampe.
  • Seite 19: Mise En Marche Et Utilisation

    MISE EN MARCHE ET UTILISATION • Mettre le courant avant de démarrer l’appareil. • Le ventilateur démarre à partir du moment où l’interrupteur à 3 vitesses est actionné par la chaînette de prolongation reliée au moteur. • Tirer sur la chaînette de prolongation de l’interrupteur de lumière pour éteindre ou allumer la lumière.
  • Seite 20: Informations Sur Le Recyclage

    INFORMATIONS SUR LE RECYCLAGE S‘il existe une réglementation pour l‘élimination ou le recyclage des appareils électriques et électroniques dans votre pays, ce symbole sur le produit ou sur l‘emballage indique que cet appareil ne doit pas être jeté avec les ordures ménagères.
  • Seite 21: Dati Tecnici

    Gentile Cliente, La ringraziamo per aver acquistato il dispositivo. La preghiamo di leggere attentamente le seguenti istruzioni per l’uso e di seguirle per evitare possibili danni tecnici. Non ci assumiamo alcuna responsabilità per danni scaturiti da una mancata osservazione delle avvertenze di sicurezza e da un uso improprio del dispositivo.
  • Seite 22: Avvertenze Di Sicurezza

    AVVERTENZE DI SICUREZZA • Non fissare mai il ventilatore a una presa elettrica, ma al soffitto stesso. • La distanza minima tra le pale del ventilatore e il pavimento deve essere maggiore di 2,3 m. La capacità di carico minima del gancio a cui viene fissato il ventilatore deve essere di 100 kg.
  • Seite 23 MONTAGGIO Fissare la piastra di Fissare i componenti del Collegare alla morsettiera i cavi montaggio alla trave ven- tilatore alla piastra della fonte di alimen- del soffitto utilizzando di montaggio. Allineare tazione e della staffa di due viti, le rondelle il giunto sferico del montaggio come segue: elastiche e le rondelle.
  • Seite 24 Fissare il sopporto Fissare il supporto del Fissare le lampadine al per le pale e la piastra ventilatore al motore portalampada (max. 42 decorativa utilizzando le utilizzando le rondelle W E27 non incluse nella rosette elastiche e le viti. elastiche e le viti. consegna).
  • Seite 25: Messa In Funzione E Utilizzo

    MESSA IN FUNZIONE E UTILIZZO • Prima di mettere in funzione il ventilatore, collegarlo alla corrente. • Il ventilatore si mette in funzione dopo aver premuto l’interruttore a 3 velocità posto sulla catena di coman- do collegata al motore. • Per accendere e spegnere la luce, tirare la catena di comando dell’interruttore della luce.
  • Seite 26 AVVISO DI SMALTIMENTO Se nel proprio paese si applicano le regolamentazioni inerenti lo smaltimento di dispositivi elettrici ed elettronici, questo simbolo sul prodotto o sulla confezione segnala che questi prodotti non possono essere smaltiti con i rifiuti normali e devono essere portati a un punto di raccolta di dispositivi elettrici ed elettronici.

Diese Anleitung auch für:

Valderama 10029348

Inhaltsverzeichnis