Automation Dr. Nix QNix 5500 Schnellstartanleitung
Vorschau ausblenden
Andere Handbücher für QNix 5500:
- Betriebsanleitung (19 Seiten) ,
- Bedienungsanleitung (16 Seiten)
Werbung
Verfügbare Sprachen
Verfügbare Sprachen
Quicklinks
Werbung

Verwandte Anleitungen für Automation Dr. Nix QNix 5500


Inhaltszusammenfassung für Automation Dr. Nix QNix 5500
- Seite 1 SCHNELLSTARTANLEITUNG QUICK START GUIDE QNix 5500 ® QUALITÄT „MADE IN GERMANY“...
- Seite 2 Gerät: Vor der Reinigung Gerät ausschalten! www.q-nix.com/support com/support 1.6 Disposal Verwenden Sie ein feuchtes, fusselfreies Tuch Automation Dr. Nix GmbH & Co KG Automation Dr. Nix GmbH & Co KG Dispose of used batteries and the device in und milde Reinigungsmittel, bei Verschmutzun- Robert-Perthel-Strasse 2...
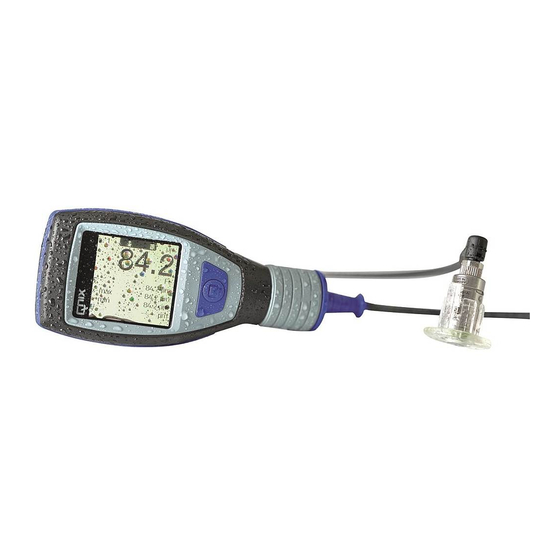
- Seite 4 QNix 5500 ® 2. Geräteübersicht Batteriefach (Rückseite) Farbdisplay Bedientaste • Gerät ein- oder ausschalten • Gerätespeicher resetten • Start der Justierung • Substratumschaltung • Zurücksetzen der Benutzer- Sondenaufnahme justierung auf Werksjustierung. Sondenhalter mit Sonde 3. Inbetriebnahme 3.1. Batterie einlegen Das Gerät enthält 2 Batterien Typ Mignon AA (LR6 / FR 6 / AM3). Das Batteriefach befindet sich auf der Rückseite des Gerätes.
- Seite 5 Sondenhalter bzw. Sondenkabel aus der Sondenaufnahme entnehmen • Zum Entriegeln Sondenaufnahme gegen den Uhrzeigersinn drehen. Das Pfeilsymbol auf dem Sondenhalter zeigt auf das off ene Schlosssymbol an der Sondenaufnahme. • Sondenhalter aus der Aufnahme herausziehen. Sonde in den Sondenhalter einsetzen •...
- Seite 6 QNix 5500 ® 3.3. Justierung durchführen (Nullung) Bei der Inbetriebnahme des Messgerätes, nach einem Batteriewechsel oder bei unterschiedlichen Mess- aufgaben ist eine Benutzerjustierung (Nullung) erforderlich. Verwenden Sie zum Nullen das unbeschich- tete Originalsubstrat oder alternativ die mitgelieferten Referenzplatten. Justierung starten •...