Inhaltsverzeichnis
Werbung
Verfügbare Sprachen
Verfügbare Sprachen
Quicklinks
DS1096-120A
TELECAMERA COMPATTA AHD 2 MPX DAY&NIGHT OTTICA FISSA 2.8MM
AHD 2 MPX DAY&NIGHT COMPACT CAMERA WITH 2.8MM FIXED LENS
2MPX AHD TAG & NACHT KOMPAKTKAMERA 2.8MM
CAMÉRA AHD 2MPX DAY & NIGHT OPTIQUE FIXE 2.8MM
TELECAMERA COMPATTA AHD 2 MPX DAY&NIGHT AUTOFOCUS 2.8-12MM
AHD 2 MPX DAY&NIGHT COMPACT CAMERA WITH 2.8-12MM AUTOFOCUS LENS
2MPX AHD TAG & NACHT KOMPAKTKAMERA AUTOFOCUS 2.8-12MM
CAMÉRA AHD 2MPX DAY & NIGHT OPTIQUE AUTOFOCUS 2.8-12MM
Sch./Ref./Typ/Réf. 1096/210
Sch./Ref./Typ/Réf. 1096/212
MANUALE D'USO
USER MANUAL
BEDIENUNGSANLEITUNG
MANUEL D'UTILISATION
Mod.
1096
Werbung
Inhaltsverzeichnis

Verwandte Anleitungen für urmet 096/210


Inhaltszusammenfassung für urmet 096/210
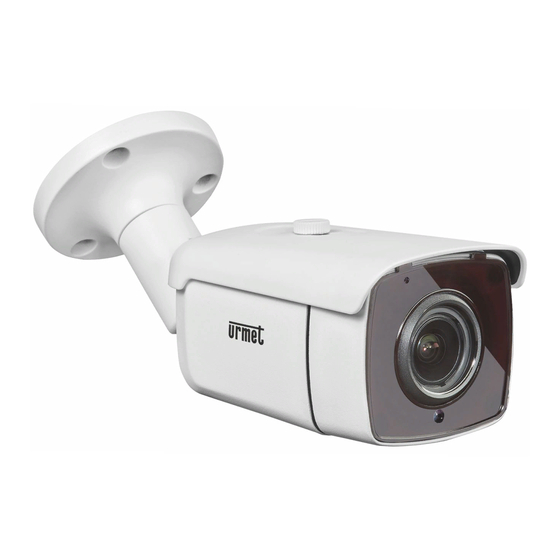
- Seite 1 Mod. 1096 DS1096-120A TELECAMERA COMPATTA AHD 2 MPX DAY&NIGHT OTTICA FISSA 2.8MM AHD 2 MPX DAY&NIGHT COMPACT CAMERA WITH 2.8MM FIXED LENS 2MPX AHD TAG & NACHT KOMPAKTKAMERA 2.8MM CAMÉRA AHD 2MPX DAY & NIGHT OPTIQUE FIXE 2.8MM Sch./Ref./Typ/Réf. 1096/210 TELECAMERA COMPATTA AHD 2 MPX DAY&NIGHT AUTOFOCUS 2.8-12MM AHD 2 MPX DAY&NIGHT COMPACT CAMERA WITH 2.8-12MM AUTOFOCUS LENS 2MPX AHD TAG &...
-
Seite 2: Dati Generali
ITALIANO ITALIANO PRECAUZIONI D’USO • Assicurarsi dell’integrità dell’apparecchio dopo averlo tolto dall’imballo. • Prima di effettuare qualsiasi operazione di pulizia o di manutenzione disinserire l’apparecchio dalla rete di alimentazione elettrica. Non usare prodotti spray per la pulizia dell’apparecchio. • Controllare che la temperatura d’esercizio sia nei limiti indicati e che l’ambiente non sia particolarmente umido. - Seite 3 CARATTERISTICHE HARDWARE Distanza 2 / max 30m IR ON illuminazione (m) Ingressi / Uscite audio Ingressi / Uscite Allarme CARATTERISTICHE TECNICHE 1096/212 DATI GENERALI 500mA±5% Assorbimento max 12 VCC (+/−10%) Alimentazione Dimensioni (L x A x P) 180x62x62 mm Peso (g) 320g Tipo di case Bullet...
-
Seite 4: Contenuto Della Confezione
Nota Bene Le caratteristiche tecniche possono essere soggette a variazione senza alcun preavviso. CONTENUTO DELLA CONFEZIONE • N°1 Telecamera con staffa per installazione a parete • N°1 Chiave a brugola • N°1 Manuale d’uso. Nota Bene La composizione degli accessori a corredo può essere variata senza alcun preavviso. NORME D’INSTALLAZIONE •... -
Seite 5: Installazione
Telecomando Urmet 1092/310 o tramite l’interfaccia UTC/PTZ dei dispositivi HVR del catalogo Urmet che lo prevedono. La movimentazione dello zoom e la regolazione del fuoco avvengono utilizzando i tasti freccia del Telecomando o dell’interfaccia grafica del telecomando degli HVR:... -
Seite 6: Utilizzo Del Menu
Utilizzando interfaccia UTC/PTZ, tramite l’uso del Telecomando Urmet 1092/310 o dei dispositivi HVR del catalogo Urmet che lo prevedono, è possibile accedere al menu OSD delle telecamere premendo il tasto centrale del Telecomando o dell’interfaccia grafica del telecomando degli HVR e poi scorrere i menu tramite i tasti freccia. -
Seite 7: Menu Principale
MENU PRINCIPALE MENU DAY-NIGHT VIDEO SETTING LANGUAGE ENGLISH RESET SAVE-EXIT EXIT Nota Bene Con i valori di default, la telecamera utilizza una regolazione di luminosità che non si adatta a tutte le tipologie di installazione. Se necessario, variare la funzione luminosità disponibile all’interno del menu AE (descritto oltre). - Seite 8 Questo menu consente di variare le funzioni relative all’ottica della telecamera. Selezionando questa voce si accede al seguente sottomenu EXPOSURE (ESPOSIZIONE): EXPOSURE BRIGHTNESS EXPOSURE MODE GLOBAL GAIN RETURN BRIGHTNESS (LUMINOSITA’) Varia la luminostà dell’immagine a monitor. Valori impostabili tra 1 e 20. EXPOSURE MODE (MODO ESPOSIZIONE) Un oggetto inquadrato con forte luce proveniente da dietro solitamente appare scuro e poco visibile rispetto al resto dell’immagine.
- Seite 9 WB (BILANCIAMENTO DEL BIANCO) Questa funzione consente di selezionare le modalità di bilanciamento del bianco. Selezionando questa voce è possibile scegliere fra le opzioni: La modalità Auto Tracking White permette una regolazione automatica basata sulla rilevazione dell’ambiente circostante (esterno o interno). La modalità...
- Seite 10 DAY/NIGHT - VARIAZIONE DEL FUNZIONAMENTO DELLA TELECAMERA IN FUNZIONE DELLA VARIAZIONE DI LUCE PRESENTE SULLA SCENA La telecamera, che normalmente riprende le immagini a colori, in condizioni di scarsa illuminazione, commuta automaticamente il suo funzionamento da “colore” a “bianco/nero”. In questo modo viene ottimizzata la qualità...
-
Seite 11: Pulizia Del Dispositivo
Uscita video interlacciata standard CVBS • Uscita video in modalità TVI o CVI. Gli standard CVI/TVI possono essere utilizzati con dispositivi di terze parti di cui Urmet non può garantire la completa compatibilità. FORMAT Scelta per lo standard video: PAL o NTSC DWDR (DIGITAL WIDE DYNAMIC RANGE) La funzione DWDR è... -
Seite 12: General Data
ENGLISH PRECAUTIONS • Make sure that the device is intact after removing it from the package. • Disconnect the device from the mains before cleaning or maintenance. Do not use spray products to clean the device. • Check that the working temperature is within the indicated range and that the environment is not particularly humid. - Seite 13 HARDWARE FEATURES No. of IR LEDs / Lighting distance 2 / max 30m IR ON Audio Inputs / Outputs Alarm Inputs / Outputs TECHNICAL SPECIFICATION 1096/212 GENERAL DATA 500mA±5% Max absorption Power supply 12 VCC (+/−10%) Dimensions (L x D ) 180x62x62 mm Weight (g) 320g...
-
Seite 14: Accessories Provided
Important note: Product specifications may be subject to change without prior notice. ACCESSORIES PROVIDED • N°1 guide pattern (drilling template). • N°1 Allen wrench • Instruction manual. Important note: Accessories may be changed without prior notice. INSTALLATION SPECIFICATIONS • Avoid pointing the lens directly towards the sun or intense sources of light also when the camera is off. -
Seite 15: Installation
INSTALLATION Make sure that no units are powered before starting the installation procedure. POSITIONING AND CONNECTIONS Loosen the locking ring on the bracket and the screw Position the bracket on horizontal, vertical and transversal axes point the camera in the desired direction. - Seite 16 It is also possible to move the zoom and manually adjust the focus through the 1092/310 Remote or through the UTC interface of the HVR devices in the Urmet catalogue. The zoom can be moved and the focus can be adjusted using the arrow keys of the Remote or of the HVR remote control graphic interface.
- Seite 17 MAIN MENU MENU DAY-NIGHT VIDEO SETTING LANGUAGE ENGLISH RESET SAVE-EXIT EXIT Note With default values, the camera uses a brightness adjustment that is not suitable for all installations. Change BRIGHTNESS in the menu EXPOSURE (see below), if necessary. Option Value Description This option allows to make adjustments regarding the exposure of the camera and the brightness (see...
- Seite 18 MENU ITEMS DESCRIPTION This function lets you vary the options of the camera optics. Select this menu item to access the following submenus: EXPOSURE BRIGHTNESS EXPOSURE MODE GLOBAL GAIN RETURN BRIGHTNESS This varies the brightness of the image on the monitor. Values can be set from 1 to 20. BACKLIGHT - BACK LIGHT COMPENSATION An object with a strong light in the background usually appears dark and not so visible if compared with the rest of image.
- Seite 19 AWB - WHITE BALANCING This function is used to select white balancing mode. Select this menu item to choose among the options The Auto Tracking White function allows an automatic adjustment based on surrounding environment detection. The MWB mode operates a manual white balance that highlights the gray variations of the image. MODE RGAIN BGAIN...
-
Seite 20: Cleaning The Device
Video output in TVI or CVI mode, only for 1080P resolutions. The correct working of these standards depends upon the compatibility of the conncted devices, that can be guaranteed only for the devices of Urmet catalogue. FORMAT Selection of PAL or NTSC DWDR The function D-WDR is the digital version of WDR (Wide Dynamic Range). -
Seite 21: Generelle Daten
DEUTSCH VORSICHTSMASSNAHMEN • Nach dem Auspacken des Gerätes muss sichergestellt werden, dass es sich in einwandfreiem Zustand befindet. • Ausführen jeglicher Reinigungs- oder Wartungsarbeiten, Gerät Stromversorgungsnetz trennen. Für die Reinigung des Geräts keine Sprays verwenden. • Sicherstellen, dass die Betriebstemperatur innerhalb der genannten Grenzen liegt und keine besonders feuchten Umgebungsbedingungen vorherrschen. - Seite 22 Lichtregelung (IR SMART) HARDWARE MERKMALE Anzahl IR LEDs / Reichweite(m) 2 / 30 m IR EIN Audio Eingänge/Ausgänge NEIN Alarm Eingänge/Ausgänge NEIN TECHNISCHE MERKMALE 1096/212 GENERELLE DATEN 500 mA±5% Max. Leistungsaufnahme 12 V DC (+/−10%) Spannungsversorgung Abmessungen (L x H x T) 180x62x62 mm Gewicht (g) 320 g...
-
Seite 23: Mitgeliefertes Zubehör
MITGELIEFERTES ZUBEHÖR: • N.1 Bohrschablone. • N°1 Innensechskantschlüssel • Bedienungsanleitung Hinweis Die Zusammenstellung der Zubehörteile kann ohne jegliche Vorankündigung geändert werden. INSTALLATIONSBESTIMMUNGEN • Vermeiden Sie es, das Objektiv au ch bei ausgeschalteter Kamera direkt gegen die Sonne oder intensiver Lichteinstrahlung zu richten. Das aufzunehmende Objekt darf sich nicht im Gegenlicht befinden. -
Seite 24: Positionierung Und Anschlüsse
INSTALLATION Stellen Sie vor Beginn der Installation sicher, dass alle anzuschließenden Einheiten von der Versorgung getrennt sind. POSITIONIERUNG UND ANSCHLÜSSE Lösen Sie den Sicherungsring und die Befestigungsschrauben Bringen Sie das Gerät in die gewünschte Position. Positionieren Sie im Fall von Kompaktkameras die Halterung so, dass die gewählten Bilder aufgenommen werden. -
Seite 25: Verwendung Des Menüs
Auf diesen sind außerdem die Bewegung des Zooms und die Scharfeinstellung von Hand über die Fernsteuerung Cod. Urmet 1092/310 oder über die UTC-Schnittstelle der HVR-Geräte aus dem Katalog von Urmet, die dies vorsehen, möglich. Die Bewegung des Zooms und die Scharfeinstellungen erfolgen über die Pfeiltasten der Grafikschnittstelle der die Fernsteuerung... - Seite 26 HAUPTMENÜ MENU DAY-NIGHT VIDEO SETTING LANGUAGE ENGLISH RESET SAVE-EXIT EXIT Hinweis den Standardwerten nutzt die Kamera eine Helligkeitseinstellung, die sich nicht allen Installationsumgebungen anpasst. Gegebenenfalls die innerhalb des Menüs EXPOSURE (weiter unten beschrieben) verfügbare Helligkeitsfunktion ändern. Option Wert Erklärung Diese Option ermöglicht die Ausführung von Einstellungen, die sich auf die Belichtung der Kamera und auf die Helligkeitseinstellung beziehen (siehe Untermenü).
-
Seite 27: Exposure Mode (Belichtungsmodus)
EXPOSURE BRIGHTNESS EXPOSURE MODE GLOBAL GAIN RETURN BRIGHTNESS (HELLIGKEIT) Ändert die Bildhelligkeit auf dem Monitor. Die Werte können von 1 bis 20 eingegeben werden. EXPOSURE MODE (BELICHTUNGSMODUS) Ein ausgewählter Gegenstand mit starken von hinten kommenden Licht erscheint normalerweise dunkel und im Vergleich zum Rest des Bildes schlecht sichtbar. Die in diesem Menü auswählbare BACKLIGHT- Funktion gestattet, dieses Problem zu beseitigen und einen guten Ausgleich des ausgewählten Bereichs zu erzielen und so die Helligkeit zu erhöhen, wenn der Bereich dunkel erscheint oder zu verringern, wenn er zu hell ist. - Seite 28 Die Auto Tracking White Funktion erlaubt die automatische Anpassung basierend auf der Erkennung der Umgebung. Die Betriebsart Manual White Balance führt einen manuellen Weißabgleich aus. MODE RGAIN BGAIN RETURN Manuelle Einstellung der roten (RGAIN) und blauen (BGAIN) Farbe, die unter den Werten 1 bis 16 zu wählen ist Beachten: eswird empfohlen, möglichst die Option ATW zu verwenden.
-
Seite 29: Reinigung Des Geräts
Videoausgang im Modus TVI oder CVI. Die korrekte Funktionsweise mit diesen Standards hängt von der Kompatibilität mit den angeschlossenen Geräten ab, die a priori nur mit den Geräten aus dem Katalog von Urmet garantiert werden kann. FORMAT (VIDEOFORMAT) Auswahl für den Videostandard: PAL oder NTSC DWDR Die Funktion D-WDR ist die digitale Version von WDR (Wide Dynamic Range). - Seite 30 FRANÇAIS PRÉCAUTIONS D’UTILISATION • S’assurer que l’appareil est en parfait état après l’avoir sorti de son emballage. • Avant d’effectuer toute opération de nettoyage ou d’entretien, veiller à débrancher l’appareil du secteur d’alimentation électrique. Pour le nettoyage de l’appareil, ne pas utiliser de produit en spray. •...
- Seite 31 Caractéristique HARDWARE No. de LED IR intégrées / 30 m IR allumé Distance de vision (m) Entrées/Sorties Audio Entrées/Sorties d’Alarme CARACTÉRISTIQUES TECHNIQUES 1096/212 Générales Consommation max. 500mA±5% Tension d’alimentation 12 VCC (+/−10%) Dimensions (L x H x P) 180x62x62 mm Poids (g) 320 g Logement...
-
Seite 32: Accessoires Fournis
ACCESSOIRES FOURNIS • Un gabarit de fixation pour percements. • Une clé Allen • Manuel d’utilisation Remarque La composition des accessoires fournis peut varier sans préavis. CONSIGNES D'INSTALLATION • Éviter d’orienter directement l’objectif vers le soleil ou vers des sources de lumière interne y compris quand la caméra est éteinte ;... -
Seite 33: Positionnement Et Branchement
Télécommande Urmet 1092/310 ou par l’interface UTC/PTZ des dispositifs HVR du catalogue Urmet le prévoyant. Le déplacement du zoom et le réglage de la mise au point peuvent être effectués à l’aide des touches flèches de la Télécommande ou de l’interface graphique de la télécommande des HVR : le zoom peut être réglé... -
Seite 34: Utilisation Du Menu
UTILISATION DU MENU La caméra utilise un menu à plusieurs niveaux qui permet d’activer/désactiver les réglages ainsi que de les modifier. DESCRIPTION DU SYSTÈME DES MENUS Une fois la commande d’accès au menu transmise la fenêtre initiale d’accès s’affiche sur l’écran. Une fois l’option voulue sélectionnée, il est possible de modifier le paramètres. -
Seite 35: Menu Principal
MENU PRINCIPAL MENU DAY-NIGHT VIDEO SETTING LANGUAGE ENGLISH RESET SAVE-EXIT EXIT Remarque Avec les valeurs par défaut, la caméra utilise un réglage de luminosité qui n’est pas adapté à tous les types d’installation. Au besoin, régler la fonction luminosité dans le menu EXPOSURE (voir plus bas). Option Valeur Explication... - Seite 36 Ce menu permet de modifier les fonctions relatives à l’optique de la caméra. En sélectionnant cette option, on accède au sous-menu suivant EXPOSURE (EXPOSITION) : EXPOSURE BRIGHTNESS EXPOSURE MODE GAIN RETURN BRIGHTNESS (LUMINOSITÉ) Varie la luminosité de l’image affichée à l’écran. Valeurs réglables entre 1 et 20. BACKLIGHT (RÉTRO-ÉCLAIRAGE) –...
- Seite 37 WB (ÉQUILIBRAGE DU BLANC) Cette fonction permet de sélectionner la modalité d’équilibrage du blanc. La sélection de ce réglage permet de choisir une des options du tableau qui suit. La modalité Auto Tracking White Balance permet un réglage automatique basé sur la détection de l’environnement (extérieur ou intérieur).
- Seite 38 Sortie vidéo à haute définition 1080P AHD (Analog High Definition) • Sortie vidéo interfacée standard CVBS • Sortie vidéo en mode TVI ou CVI. À ne pas utiliser avec les produits de la gamme Urmet FORMAT (FORMAT VIDEO) Option choisie pour le standard vidéo : PAL ou NTSC DS1096-120A...
-
Seite 39: Nettoyage Du Dispositif
D-WDR (DIGITAL WIDE DYNAMIC RANGE) La fonction D-WDR est la version numérique de la fonction WDR (Wide Dynamic Range) : elle permet un meilleur équilibrage de la luminosité entre les zones claires et les zones sombres de façon à obtenir une image plus uniforme. - Seite 40 URMET S.p.A. Area tecnica 10154 TORINO (ITALY) servizio clienti +39. 011.23.39.810 VIA BOLOGNA 188/C http://www.urmet.com Telef. +39. 011.24.00.000 (RIC.AUT.) e-mail: info@urmet.com +39. 011.24.00.300 - 323 MADE IN CHINA Prodotto in Cina su specifica URMET Made in China to URMET specification DS1096-120A...