Herunterladen Inhalt Inhalt Diese Seite drucken

Werbung

Verfügbare Sprachen
  • DE

Verfügbare Sprachen

  • DEUTSCH, seite 1

Werbung

Inhaltsverzeichnis
loading

Inhaltszusammenfassung für auna Clubmaster Tube 0034995

  • Seite 3: Inhaltsverzeichnis

    Sehr geehrter Kunde, wir gratulieren Ihnen zum Erwerb Ihres Geräts. Lesen Sie die folgenden Hinweise sorgfältig durch und befolgen Sie diese, um möglichen Schäden vorzubeugen. Für Schäden, die durch Missachtung der Hinweise und unsachgemäßen Gebrauch entstehen, übernehmen wir keine Haftung. Scannen Sie den QR-Code, um Zugriff auf die aktuellste Bedienungsanleitung und weitere Informationen rund um das Produkt zu erhalten.
  • Seite 4: Sicherheitshinweise

    WARNUNG VORSICHT: DAS GEHÄUSE NICHT ÖFFNEN, UM EINEN STROMSCHLAG UND ERNSTE PERSONENVERLETZUNGEN ZU VERMEIDEN. IM INNEREN KEINE VOM KUNDEN ZU WARTENDEN KOMPONENTEN. WENDEN SIE SICH AUSSCHLIESSLICH AN QUALIFIZIERTE FACHLEUTE. WARNUNG. UM DIE GEFAHR EINES BRANDS ODER EINES STROMSCHLAGS ZU VERRINGERN, DAS GERÄT NICHT IN WASSER, REGEN ODER FEUCHTIGKEIT AUSZUSETZEN.
  • Seite 5 Feuchtigkeit in Berührung gebracht werden. • Stellen Sie sicher, dass keine Flüssigkeit über die Geräte- und Geräteöffnungen gelangt. • Bewegen Sie das Gerät vorsichtig, vermeiden Sie Stöße. • Stellen Sie das Gerät nicht in der Nähe einer Wärmequelle (z. B. Heizkörper) auf.
  • Seite 6 • Das Gerät muss in in gemäßigten Klimazonen eingesetzt werden. • Explosionsgefahr durch unsachgemäßen Batteriewechsel. • Der Hauptstecker muss leicht zugänglich bleiben. • Die Belüftung darf nicht dadurch behindert werden, dass die Belüftungsöffnung mit Gegenständen wie Zeitungen, Tischdecken, Vorhängen usw. abgedeckt wird. •...
  • Seite 7: Installation

    INSTALLATION...
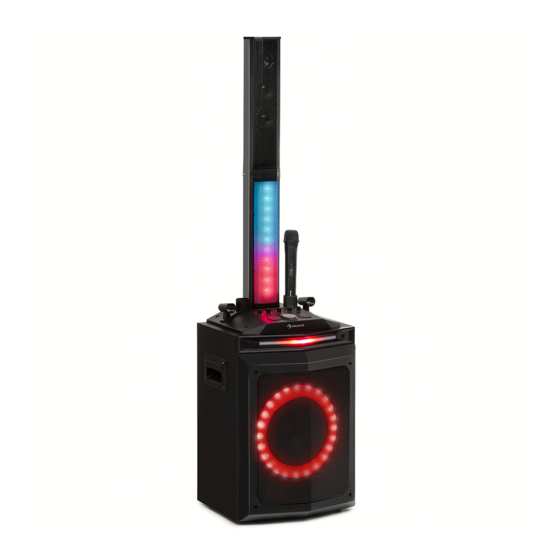
  • Seite 8: Geräteübersicht

    GERÄTEÜBERSICHT Rückseite MIC1 MIC2 LINE IN 200mA AC 100-240V~, AC INPUT 50/60Hz MIC 1: MIC 1-Anschluss MIC 2: MIC 2-Anschluss AC: AC 100 – 240 V ~ 50/60 Hz LINE IN: Line-In-Anschluss USB: USB-Anschluss Draufsicht POW ER MUTE...
  • Seite 9  - Drücken Sie diese Taste, um im USB/BT Modus zum nächsten Titel zu gelangen. IR-Fernbedienungssensor STANDBY Betriebsleuchte Display - zur Anzeige des aktuellen Status Lichtmodus – Drücken Sie mehrfach diese Taste, um zwischen LED 1, LED 2, LED 3 und OFF zu wechseln. MUTE –...
  • Seite 10: Fernbedienung

    FERNBEDIENUNG SOURCE /CH- /CH+ /TU+ /TU- Standby; An-/Austaste Halten Sie diese Taste im USB-/ Zahlentasten 0 – 9: Diese BT Modus zum Vorspulen Tasten werden verwendet, um gedrückt. im USB-Modus direkt einen Drücken Sie diese Taste, um im Titel abzuspielen. Wenn Sie USB/BT Modus zum nächsten beispielsweise Titel 12 abspielen Titel zu gelangen.
  • Seite 11: Bt-Kopplung Und Bedienung

    BT-KOPPLUNG UND BEDIENUNG • Schalten Sie alle BT-Geräte aus, die zuvor mit diesem Gerät gepaart (verknüpft) wurden. • Schalten Sie die BT-Funktionen auf Ihrem Telefon oder Musik-Player ein. • Schalten Sie dieses Gerät ein und stellen Sie es den BT-Modus ein. „bL“ blinkt auf der LED-Anzeige auf und zeigt an, dass sich das Gerät im Kopplungsmodus befindet.
  • Seite 12: Hinweise Zur Entsorgung

    HINWEISE ZUR ENTSORGUNG Mülltonne auf Rädern) auf dem Produkt, gilt die Europäische Richtlinie 2012/19/EU. Diese Produkte dürfen nicht mit dem normalen Hausmüll entsorgt werden. Informieren Sie sich über die örtlichen Regelungen zur getrennten Sammlung elektrischer und elektronischer Gerätschaften. Richten Sie sich nach den örtlichen Regelungen und entsorgen Sie Altgeräte nicht über den Hausmüll.
  • Seite 13: Technical Data

    Dear Customer, Congratulations on purchasing this equipment. Please read this manual carefully and take care of the following hints to avoid damages. Any failure caused by ignoring the items and cautions mentioned in the instruction manual are not covered by our warranty and any liability. Scan the QR code to get access to the latest user manual and other information about the product.
  • Seite 14: Safety Instructions

    WARNING Triangle with lightning plus explanation as follows: DANGEROUS VOLTAGE: The lightning flash with arrowhead symbol within the equilateral triangle is intended to alert the user to the presence of uninsulated dangerous voltage within the product’s enclosure that may be of sufficient magnitude to constitute a risk of electric shock to persons.
  • Seite 15 • Do not place the device near from a heat source (e.g. radiator). Do not expose it to the sun. • Plug the device as indicate on this information form. • This device has a connection with overload protection. Replacement should only be done by an experienced technician or the device manufacturer.
  • Seite 16: Installation

    INSTALLATION...
  • Seite 17: Overview

    OVERVIEW Back MIC1 MIC2 LINE IN 200mA AC 100-240V~, AC INPUT 50/60Hz MIC1 : Wired Mic1 input socket MIC2 : Wired Mic2 input socket AC INPUT : AC 100-240V~, 50/60Hz LINE IN: Line in input socket USB : USB input socket Draufsicht POW ER MUTE...
  • Seite 18 NEXT : Press this key to goto next track in USB/BT modes. IR (remote sensor) STANDBY Indicator light LED DISPLAY : To display speaker status. LIGHT MODE : Press this key to change the Linght mode between LED1, LED2, LED3, OFF MUTE : Silences the music playback on Media Panel sources.
  • Seite 19: Remote Control

    REMOTE CONTROL SOURCE /CH- /CH+ /TU+ /TU- STANDBY : Stand by ON/OFF Fast rewind at USB input mode. key. Choose tuning channel 0~9 NUMERIC KEYS: These keys Fast forward song. are used to play a track directly Fast forward in USB input mode. in USB source mode.
  • Seite 20: Bt Pairing And Connection

    BT PAIRING AND CONNECTION • Turn off any BT devices previously paired (linked) with this unit. • Turn on the BT features on your phone or music player. • Turn on and set this unit to BT mode. The flashing :“ ” on LED display indicates it is in pairing mode.
  • Seite 21: Disposal Considerations

    DISPOSAL CONSIDERATIONS According to the European waste regulation 2012/19/EU this symbol on the product or on its packaging indicates that this product may not be treated as household waste. Instead it should be taken to the appropriate collection point for the recycling of electrical and electronic equipment.
  • Seite 23: Fiche Technique

    Chère cliente, cher client, Toutes nos félicitations pour l’acquisition de ce nouvel appareil. Veuillez lire attentivement et respecter les instructions de ce mode d’emploi afin d’éviter d’éventuels dommages. Nous ne saurions être tenus pour responsables des dommages dus au non-respect des consignes et à...
  • Seite 24: Consignes De Sécurité

    MISE EN GUARDE ATTENTION : POUR RÉDUIRE LES RISQUES DE CHOCS ÉLECTRIQUES, NE DÉMIONTEZ AUCUN CACHE. L‘APPAREIL NE CONTIEN AUCUNE PIÈCE À ENTRETENIR. ADRESSEZ- VOUS UNIQUEMENT À DES PERSONNELS QUALIFIÉS POUR LA MAINTENANCE. MISE EN GARDE : POUR RÉDUIRE LE RISQUE D'INCENDIE ET DE CHOC ÉLECTRIQUE, NE PLONGEZ PAS L'APPAREIL DANS L'EAU ET NE L'EXPOSEZ PAS À...
  • Seite 25 contact avec de l'humidité. • Assurez-vous qu'aucun liquide ne rentre dans l'appareil par ses ouvertures. • Déplacez soigneusement l'appareil en évitant les chocs. • Ne placez pas l'appareil à proximité d'une source de chaleur (par exemple un radiateur). Ne l'exposez pas au soleil. •...
  • Seite 26 • Risque d'explosion en cas de remplacement incorrect de la pile. • Remplacez les piles uniquement par un type identique ou équivalent. • La fiche principale doit rester facilement accessible. • La ventilation ne doit pas être obstruée en couvrant l'ouverture de ventilation avec des objets tels que des journaux, des nappes, des rideaux, etc.
  • Seite 27: Installation

    INSTALLATION...
  • Seite 28: Aperçu De L'appareil

    APERÇU DE L'APPAREIL Dos de l'appareil MIC1 MIC2 LINE IN 200mA AC 100-240V~, AC INPUT 50/60Hz MIC 1: prise du MIC 1 MIC 2: prise du MIC 2 AC: AC 100 – 240 V ~ 50/60 Hz LINE IN: prise Line In USB: port USB Vue de dessus POW ER...
  • Seite 29  - appuyez sur cette touche pour passer au titre suivant en mode USB/BT. Capteur IR de la télécommande STANDBY Voyant de fonctionnement Display – affichage de l'état actuel Mode éclairage – appuyez plusieurs fois sur cette touche pour passer de LED 1 à...
  • Seite 30: Télécommande

    TÉLÉCOMMANDE SOURCE /CH- /CH+ /TU+ /TU- Standby; touche de marche/ rapidement. arrêt Appuyez sur cette touche pour Touches numériques 0 – 9: passer au titre suivant en mode ces touches servent à accéder USB/BT. directement à un titre en mode Pour augmenter le volume USB.
  • Seite 31: Couplage Bt Et Utilisation

    COUPLAGE BT ET UTILISATION • Éteignez tous les appareils BT qui ont déjà été couplés (connectés) avec cet appareil. • Activez les fonctionnalités BT sur votre téléphone ou lecteur de musique. • Allumez cet appareil et réglez-le en mode BT. "bL" clignote sur l'affichage LED et indique que l'appareil est en mode d'appairage.
  • Seite 32: Informations Sur Le Recyclage

    INFORMATIONS SUR LE RECYCLAGE Vous trouverez sur le produit l’image ci-contre (une poubelle sur roues, barrée d‘une croix), ce qui indique que le produit se trouve soumis à la directive européenne 2012/19/UE. Renseignez-vous sur les dispositions en vigueur dans votre région concernant la collecte séparée des appareils électriques et électroniques.
  • Seite 33: Datos Técnicos

    Estimado cliente, Le felicitamos por la compra de este producto y le agradecemos su confianza. Lea atentamente el manual de instrucciones para evitar posibles daños. No nos responsabilizamos de los daños causados si no se han tenido en cuenta las instrucciones de este manual.
  • Seite 34: Instrucciones De Seguridad

    ADVERTENCIA CUIDADO: NO ABRIR LA CARCASA, EVITE UNA ELECTROCUCIÓN O DAÑOS PERSONALES. NO SE PUEDE REPARAR NINGUNO DE LOS COMPONENTES INTERIORES. DIRÍJASE A PERSONAL CUALIFICADO PARA LAS REPARACIONES. ADVERTENCIA: PARA EVITAR EL RIESGO DE INCENDIO O DE CORTOCIRCUITO NO ACERQUE EL APARATO AL AGUA, LA LLUVIA O HUMEDAD. Triángulo con un rayo para la siguiente advertencia: TENSIÓN PELIGROSA: El relámpago con punta de flecha dentro de un triángulo equilátero tiene por objeto alertar al usuario de la presencia...
  • Seite 35 y el equipo. • Mueva el dispositivo con cuidado, evite los choques. • No coloque la unidad cerca de una fuente de calor (por ejemplo, un radiador). No lo exponga al sol. • Conecte el dispositivo como se describe en este manual. •...
  • Seite 36 • Preste atención a los aspectos ambientales de la eliminación de las baterías. • La unidad es adecuada para su uso en climas moderados. • La sustitución inadecuada de las pilas puede provocar una explosión. Reemplazar sólo con el mismo tipo o equivalente. •...
  • Seite 37 INSTALACIÓN...
  • Seite 38: Descripción Del Aparato

    DESCRIPCIÓN DEL APARATO Parte posterior MIC1 MIC2 LINE IN 200mA AC 100-240V~, AC INPUT 50/60Hz MIC 1: enchufe MIC 1 MIC 2: enchufe MIC 2 AC: AC 100 – 240 V ~ 50/60 Hz LINE IN: enchufe Line In USB: puerto USB Vista desde arriba POW ER MUTE...
  • Seite 39  - Pulse para pasar al siguiente título en el modo USB/BT. Sensor IR del mando a distancia STANDBY Luz indicadora de operación Visualización - visualización del estado actual Modo de luz - presione repetidamente para cambiar entre el LED 1, LED 2, LED 3 y APAGADO.
  • Seite 40: Mando A Distancia

    MANDO A DISTANCIA SOURCE /CH- /CH+ /TU+ /TU- En espera; botón de encendido/ rápidamente. apagado Púlselo para pasar al siguiente Teclas numéricas 0 - 9: Estas título en el modo USB/BT. teclas se utilizan para acceder Para aumentar el volumen directamente a un título en 10 Mantenga pulsado para el modo USB.
  • Seite 41 ACOPLAMIENTO Y USO DEL BT • Apague todos los dispositivos de BT que fueron previamente emparejados (vinculados) a este dispositivo. • Activa las funciones de BT en tu teléfono o reproductor de música. • Encienda este dispositivo y póngalo en modo BT. "bL" parpadea en la pantalla LED e indica que el dispositivo está...
  • Seite 42: Retirada Del Aparato

    RETIRADA DEL APARATO Si el aparato lleva adherida la ilustración de la izquierda (el contenedor de basura tachado), entonces rige la directiva europea 2012/19/UE. Este producto no debe arrojarse a un contenedor de basura común. Infórmese sobre las leyes territoriales que regulan la recogida separada de aparatos eléctricos y electrónicos.
  • Seite 43: Dati Tecnici

    Gentile cliente, La ringraziamo per aver acquistato il nostro prodotto. La preghiamo di leggere attentamente le seguenti istruzioni e di seguirle per evitare eventuali danni. Si declina ogni responsabilità per danni derivati da una mancata osservazione delle istruzioni e da un uso improprio del dispositivo.
  • Seite 44: Avvertenze Di Sicurezza

    AVVERTENZA ATTENZIONE: NON APRIRE L’ALLOGGIAMENTO PER EVITARE SCOSSE ELETTRICHE E LESIONI GRAVI. LE COMPONENTI INTERNE NON NECESSITANO DI MANUTENZIONE DA PARTE DEL CLIENTE. RIVOLGERSI ESCLUSIVAMENTE A TECNICI QUALIFICATI. AVVISO. PER DIMINUIRE IL RISCHIO DI INCENDIO O SCOSSE ELETTRICHE, NON ESPORRE IL DISPOSITIVO ALL’ACQUA, PIOGGIA O UMIDITA’ Il triangolo con il fulmine ha il seguente significato: TENSIONE ELETTRICA PERICOLOSA: Il simbolo del fulmine con la punta a freccia all’interno di un triangolo equilatero ha la funzione di mettere...
  • Seite 45 • Assicurarsi che l’acqua non penetri nelle aperture del dispositivo. • Spostare il dispositivo con attenzione ed evitare urti. • Non collocare il dispositivo vicino a una fonte di calore (p. es. calorifero) e non esporlo al sole. • Collegare il dispositivo come descritto nel manuale di istruzioni. •...
  • Seite 46 • Il dispositivo è adatto all’uso in zone climatiche miti. • Pericolo di esplosione in caso di sostituzione scorretta delle batterie. Sostituire solo con un tipo identico o equivalente. • Il tasto di accensione deve essere facilmente accessibile. • Prima della messa in esercizio, impostare il volume al minimo.
  • Seite 47 INSTALLAZIONE...
  • Seite 48: Descrizione Del Dispositivo

    DESCRIZIONE DEL DISPOSITIVO Parte posteriore MIC1 MIC2 LINE IN 200mA AC 100-240V~, AC INPUT 50/60Hz MIC 1: collegamento MIC 1 MIC 2: collegamento MIC 2 AC: AC 100 – 240 V ~ 50/60 Hz LINE IN: collegamento Line In USB: porta USB Vista dall’alto POW ER MUTE...
  • Seite 49  - Premere questo tasto per accedere al prossimo brano in modalità USB/BT. Sensore telecomando IR STANDBY Spia Display – per visualizzare lo stato attuale Modalità luce – Premere ripetutamente questo tasto per passare da LED1, a LED2, LED 3 e OFF. TWS –...
  • Seite 50 TELECOMANDO SOURCE /CH- /CH+ /TU+ /TU- Standby; tasto on/off modalità USB/BT per mandare Tasti numerici da 0 a 9: si avanti il brano. utilizzano per riprodurre un Premere questo tasto in brano direttamente in modalità modalità USB/BT per accedere USB. Se ad esempio si vuole al prossimo brano.
  • Seite 51 ACCOPPIAMENTO BT E UTILIZZO • Spegnere tutti i dispositivi BT che sono stati precedentemente accoppiati (collegati) con questo dispositivo. • Attivare tutte le funzioni BT su smartphone o lettore musicale. • Accendere il dispositivo e impostare la modalità BT. Sul display a LED lampeggia “bL”...
  • Seite 52: Smaltimento

    SMALTIMENTO Se sul prodotto è presente la figura a sinistra (il cassonetto dei rifiuti sbarrato), si applica la direttiva europea 2012/19/UE. Questi prodotti non vanno smaltiti con i rifiuti generici urbani. Informarsi sulle disposizioni vigenti in merito alla raccolta differenziata di dispositivi elettrici ed elettronici.

Inhaltsverzeichnis