Herunterladen Inhalt Inhalt Diese Seite drucken
LENCO Concerto DIR-2000 Benutzerhandbuch
Vorschau ausblenden Andere Handbücher für Concerto DIR-2000:

Werbung

Verfügbare Sprachen
  • DE

Verfügbare Sprachen

Model Lenco Concerto DIR-2000
User manual (2.1 WiFi Internet Radio with Bluetooth®, DAB+ and
Spotify Connect)
Gebruiksaanwijzing (2.1 WiFi Internet radio with Bluetooth®, DAB+ en
Spotify Connect)
Benutzerhandbuch (2.1 WiFi Internet Radio mit Bluetooth®, und
Spotify Connect)
Mode d'emploi (Radio Internet 2.1 avec Bluetooth®, DAB+ et Sportify
Connect)
Manual del usuario (Radio Internet WI-FI 2.1 con Bluetooth®, DAB+ y
Spotify Connect)

Werbung

Inhaltsverzeichnis
loading

Inhaltszusammenfassung für LENCO Concerto DIR-2000

  • Seite 1 Model Lenco Concerto DIR-2000 User manual (2.1 WiFi Internet Radio with Bluetooth®, DAB+ and Spotify Connect) Gebruiksaanwijzing (2.1 WiFi Internet radio with Bluetooth®, DAB+ en Spotify Connect) Benutzerhandbuch (2.1 WiFi Internet Radio mit Bluetooth®, und Spotify Connect) Mode d’emploi (Radio Internet 2.1 avec Bluetooth®, DAB+ et Sportify Connect) Manual del usuario (Radio Internet WI-FI 2.1 con Bluetooth®, DAB+ y...
  • Seite 2: Inhaltsverzeichnis

    Index English......................(3) Nederlands....................(41) Deutsch.......................(81) Français.....................(123) Español......................(165) Version 1.0...
  • Seite 3: English

    English CAUTION: Usage of controls or adjustments or performance of procedures other than those specified herein may result in hazardous radiation exposure. This unit should not be adjusted or repaired by anyone except qualified service personnel. PRECAUTIONS BEFORE USE KEEP THESE INSTRUCTIONS IN MIND: Do not use this device near water.
  • Seite 4 excessive build-up of heat or any other unexpected phenomena, you should disconnect the plug from the main power socket immediately. 14. This device must operate on a power source as specified on the specification label. If you are not sure of the type of power supply used in your home, consult your dealer or local power company.
  • Seite 5 32. This device is not intended for use by people (including children) with physical, sensory or mental disabilities, or a lack of experience and knowledge, unless they’re under supervision or have received instructions about the correct use of the device by the person who is responsible for their safety.
  • Seite 6 Identification of Parts and Controls...
  • Seite 7 Description Functions 3.2” TFT Screen Color display Buttons and Controls Standby/Mode Menu/Info Tuning- : FM Tuning- / Downward selection on the sub-menu Tuning+ : FM Tuning+ / Upward selection on the sub-menu Preset Back Reel: Volume and Navigate and press to OK Antenna Rod antenna On/Off switch...
  • Seite 8 Warnings - Do not ingest the battery, Chemical Burn Hazard - The included remote control: - This product contains 2 x AAA battery. If the battery is swallowed, it can cause severe internal burns. - Keep new and used batteries away from children. - If the battery compartment does not close securely, stop using the product and keep it away from children.
  • Seite 9 Increase volume Decrease volume Switch speaker on/off 0..9 Call up favorites/memory; Input letters and numbers Call up info Saved/Recall stations, BT pairing Getting Started Remove all packaging from the device. Retain the packaging. If you dispose of it please do so according to local regulations. The following items are included: ...
  • Seite 10 The first time you turn the device on, it will go straight into the Wizard Setup menu. Select YES to continue the setup. For the details of the Wizard Setup, you may refer to Section 5.2.1. If NO is selected, you will be asked if you would like to run the wizard next time.
  • Seite 11 Open the UPnP platform Windows Media Player (version 11 or later). Alternatively, other platforms or server such as Windows Media Connection may be used. Allow to share your media to the device (default name: Lenco Concerto) Add the audio files and folders that you want to share with the device to the media library.
  • Seite 12: Setup Wizard

    5.2.1 Setup Wizard  Time/date Display format Select 12 or 24 as your desired time format. Auto-update The time and date can be updated manually or automatically from DAB, FM or network. Auto-update is available in DAB, FM or Internet mode. The time will only be updated when in a corresponding mode, so it is best to select a mode that you use regularly.
  • Seite 13  Network Wlan region Select the Wlan region to obtain the optimal Wlan connectivity: Most of Europe. Scanning for the network The device is compatible with all common network protocols and encryption methods. It searches and lists out all available networks.
  • Seite 14 available AP. Use one of the following methods for connection: Push button The device prompts you to press the connect button on the router. It then scans for a ready Push Button Connect network and connects. The device generates an 8-digit code number, which you enter into the wireless router, access point, or an external registrar.
  • Seite 15 It will show ‘Setup wizard completed’ on screen if the setup is done successfully. If the connection has failed, the device returns to a previous screen for you to try again. Press OK to exit the setup wizard. 5.2.2 Equalizer Allows you to select different equalizers: Normal, Flat, Jazz, Rock, Movie, Classic, Pop and News.
  • Seite 16 Secondary DNS.  Wlan region Select the Wlan region to obtain the optimal Wlan connectivity: Canada, Spain, France, Japan, Singapore, Australia, and Republic of Korea.  Manual settings Choose a wireless network connection and enable or disable DHCP (Dynamic Host Configuration Protocol). ...
  • Seite 17: Factory Reset

    5.2.5 Language English is set as the default language. You may select your own desired language. 5.2.6 Factory reset A factory reset resets all user settings back to default settings. All the presets, time, date and network configuration will be lost. However, the current software version of the device can be stored as it is registered with the internal radio portal.
  • Seite 18: Last Listened

    When you select Internet radio, the device directly contacts the Frontier Silicon Internet radio portal (which is supported by v-tuner) and will obtain a list of stations. The portal also allows you to personalize multiple lists of your favorite stations. While listening to an Internet radio station, you can press the Back button on the device/remote control to quickly return to the last visited branch of the menu tree.
  • Seite 19: My Added Stations

    5.3.3 Favorites Favorites are stored in the Internet radio portal, and are available through all Internet radios registered on the same account. Before the favorites can be used, the radio has to be registered with the Internet radio portal. To register your device, choose Station list > Help > Get access code to get your radio’s unique portal access code.
  • Seite 20: Now Playing Information

    5.3.5 Presets Presets are stored in the radio and cannot be accessed by other radios. To store an Internet radio preset, press and hold PRESET on the device or on the remote control until the display shows the Save preset screen. Select one of the 10 presets to save the currently playing station by pressing the OK key for a long time.
  • Seite 21 Step 2. Open the Spotify app on your phone, tablet or PC, and play any song. Step 3. If you’re using the app on a phone - tap the song image in the bottom left of the screen. For tablet and PC move to step 4. Step 4.
  • Seite 22: Shared Media

    Code Supported Min. Max. 1.536 mbit/s 48 kbit/s 1.536 mbit/s FLAC v1.2.1 24bit 48 KHz 24bit 48 KHz 24bit 48 KHz 320 kbit/s 8 kbit/s 576 kbit/s 320 kbit/s 8 kbit/s 320 kbit/s 320 kbit/s 4 kbit/s 384 kbit/s 5.5.1 Shared media If you have set up shared media, an entry consisting of <computer name>: <Shared media name>...
  • Seite 23 device. Browse folders with the navigate reel and Back button, or direction keys on the remote control. The display shows folder and file names (not necessarily track names). Once you have found a track you want to play, press the navigate reel on the device or press on the remote control.
  • Seite 24 for the music list and control playback from the device. This topic will introduce another way to do the music streaming which is not necessary to control playback on the device. You can share the music files from a PC, Android mobile or tablet, and directly use your PC, Android mobile, tablet or iPhone / iPad to control music playback on the device.
  • Seite 25 Select any music in the library and choose Play to “Lenco Concerto” A box of music playback pops up for the streaming.
  • Seite 26 5.6.2 Control on Smartphone / Tablet You may search (with keyword: DLNA) and install any free or commercial DLNA apps from Google Play or Apple Store if you are using Android mobile, tablet or iPhone / iPad. It is suggested to use BubbleUPnp or Twonky Beam on Android mobile, tablet;...
  • Seite 27: Scanning For Stations

    5.7.1 Scanning for stations The first time you select DAB radio mode, or if the station list is empty, the device will automatically perform a full station scan. You may also perform a scan manually to update the list of stations for the following possible reasons: Available stations might change from time to time.
  • Seite 28 by pressing the OK key for a longer time. Select one of the 10 presets to save the currently playing station. To select a preset, press PRESET on the device or on the remote control, then select one of the listed preset stations. When a preset station is playing, it shows 2 etc.) at the bottom of the screen.
  • Seite 29 FM radio mode receives analogue radio from the FM band and displays RDS (Radio Data System) information about the station and broadcast's location. To search for a station, press OK. The frequency display starts to run up as the device scans the FM band. Alternatively, you can scan up or down by pressing and holding the buttons TUNING- or TUNING+ on the device.
  • Seite 30 When you go to the Bluetooth mode, it is under pairing (the BT icon on the bottom is flashing). You can turn on your smart phone/ tablet/ other Bluetooth device for pairing. The Bluetooth pairing name is “Lenco Concerto”. You can control the music playback on your BT device. It is supported by play/pause, Next track/Prev track on the remote control.
  • Seite 31 5.10 AUX IN Aux in mode plays audio files from an external source such as an MP3 player. To play an audio file with the Aux in mode follow the steps below: Turn the volume low on both the device and, if adjustable, the audio source device.
  • Seite 32 Select the alarm number (1 or 2) then configure the following parameters: Enable: on/off, Frequency: Daily, Once, Weekends or Weekdays, Time Mode: Buzzer, Internet Radio, DAB, FM or Spotify (If alarm wake up set by Spotify, it is activated by buzzer and then press play Spotify connect apps to play.) Preset: Last listened 1-10, Volume: 0-20...
  • Seite 33: Undok App

    Concerto Radio in your local Wifi network. Tap the device found to make the connection. When prompted, enter the current PIN code. The default PIN is “1234”. (You can view and edit the current PIN on the Lenco Concerto itself) With the UNDOK app you can: Change the source/mode...
  • Seite 34 NOTE: Be aware that if another smartphone/tablet is connecting to the Lenco Concerto with the UNDOK app. The original connection will be lost, because only one connection can be active at a time. Since Undok is a thirdparty software, Lenco can’t be held responsible for changes in functionality of the app.
  • Seite 35 Troubleshooting Error Remedy The device does not switch Check if the power adaptor is connected properly. No sound. 1. Turn on the sound as it may be muted 2. Increase the volume. 3. Pull any connected headphone or speaker from the connector sockets. No network connection can 1.
  • Seite 36 provider for information. 4. The link of the manually added station is not correct, make sure it is correct and re-enter. Hiss in FM mode 1. Check/move the FM aerial. 2. Move the radio. No stations available / 1. Move the radio. burbling / intermittent in 2.Rescan local stations only (high-strength).
  • Seite 37 no matter in which mode, it will cause malfunction. Reboot the device if necessary. Strong electromagnetic interference may interfere and cause malfunctions to the device. If the display indicates a problem, move the device away from near devices which cause electromagnetic interference or reset the device.
  • Seite 38: Spdif Out

    Specification Model number Lenco Concerto Description Internet radio with DAB/DAB+/FM/Bluetooth Display 3.2", 320 x 240, TFT colour display Network supported IEEE 802.11 b/g/n wireless (WiFi) BT and wifi frequency ranges Bluetooth: 2402 - 2480MHz Wi-Fi: 2412 - 2472MHz Encrypted key...
  • Seite 39 (both during and after the warranty period) you should contact your local dealer. Important note: It is not possible to send products that need repairs to Lenco directly. Important note: If this unit is opened or accessed by a non-official service center in any way, the warranty expires.
  • Seite 40 In so doing, you will help to conserve natural resources and improve standards of environmental protection in treatment and disposal of electrical waste (Waste Electrical and Electronic Equipment Directive). Service For more information and helpdesk support, please visit www.lenco.com Lenco Benelux BV, Thermiekstraat 1a, 6361 HB, The Netherlands.
  • Seite 41: Nederlands

    Nederlands LET OP: Gebruik van bedieningen of afstellingen of uitvoer van procedures anders dan gespecificeerd in deze documentatie kan leiden tot blootstelling aan schadelijke straling. Dit apparaat dient uitsluitend te worden aangepast of gerepareerd door gekwalificeerd onderhoudspersoneel. VOORZORGSMAATREGELEN VOOR GEBRUIK ONTHOUD DE VOLGENDE INSTRUCTIES: Gebruik dit apparaat niet in de buurt van water.
  • Seite 42 11. Gebruik het toestel niet in vochtige ruimtes, zoals badkamers, stomende keukens of in de buurt van zwembaden. 12. Gebruik dit apparaat niet wanneer condensatie kan optreden. 13. Alhoewel dit apparaat met grote zorg gefabriceerd en verschillende keren geïnspecteerd is voordat het de fabriek verlaat, is het nog steeds mogelijk dat er problemen optreden, zoals met alle elektrische apparaten.
  • Seite 43 26. Het apparaat mag niet worden blootgesteld aan druppels of spatten en zorg ervoor dat er geen met vloeistof gevulde voorwerpen, zoals vazen, op of nabij het apparaat zijn geplaatst. 27. * Om de verbinding met de stroomaansluiting volledig te verbreken, moet de stekker van het apparaat uit het stopcontact worden gehaald, omdat de stekker van het apparaat de hoofdschakelaar is.
  • Seite 44 41. * Gebruik nooit een beschadigde voedingskabel of stekker of een los stopcontact. Dit vormt namelijk een risico op brand of elektrische schokken. 42. Langdurige blootstelling aan luid geluid van persoonlijke muziekspelers kan leiden tot tijdelijke of permanente gehoorbeschadiging. INSTALLATIE •...
  • Seite 45 Nee. Omschrijving Functies 8,1 cm TFT-scherm Kleurenscherm Knoppen en Standby/Mode bedieningselementen Menu/Info Tuning-: FM-afstemming-/Neerwaartse selectie in het submenu Tuning+: FM-afstemming+/Opwaartse selectie in het submenu Voorkeuze Back Draaiknop: Volume en Navigatie en druk erop voor OK Antenne Staafantenne On/Off-schakelaar In-/uitschakelen Aansluiting 3,5 mm aansluiting voor de oortelefoon oortelefoon Line In...
  • Seite 46 Afstandsbediening 1. Schuif de klep van het batterijvak omlaag om deze te verwijderen. 2. Installeer de batterijen in het batterijvak zoals afgebeeld. Let hierbij op de juiste polariteit (+/-). 3. Plaats de klep terug op het batterijvak van de afstandsbediening. Let op: Oneigenlijk of onjuist gebruik van batterijen kan corrosie of lekkage van de batterij veroorzaken, die brand, persoonlijk...
  • Seite 47 Stand-by-functie Ga naar het hoofdmenu Menu-toets Muziekspeler: Vorige track Muziekspeler: Afspelen/Pauze Toon instellen Cursor omhoog-knop Cursor naar links-knop Selecties bevestigen Rechter cursortoets Cursor omlaag-knop Slaap- en snooze-functie Lijst herhalen/Willekeurig afspelen Het instellen van het alarm Muziekspeler: Volgende track Muziekspeler: Stop Volume verhogen Volume verlagen Schakel de luidspreker...
  • Seite 48 0..9 favorieten/geheugen oproepen; Letters en cijfers invoeren Informatie oproepen Stations opgeslagen/herroepen, BT-koppeling Aan de slag Verwijder al het verpakkingsmateriaal van het apparaat. Bewaar de verpakking. Als u het weggooit, doe dat dan volgens de plaatselijke voorschriften. De volgende items zijn inbegrepen: ...
  • Seite 49 De eerste keer dat u het apparaat aanzet, zal het direct naar het menu van de installatiewizard gaan. Selecteer YES (JA) om de installatie voort te zetten. Voor de details van de installatiewizard, verwijzen wij u naar paragraaf 5.2.1. Als u NO (NEE) selecteert, wordt u gevraagd of u de wizard de volgende keer wilt draaien.
  • Seite 50: Hoofdmenu

    Het volgende is een voorbeeld van het instellen met Windows XP en Windows Media Player 11. Sta toe dat uw media wordt gedeeld met het apparaat (standaardnaam: Lenco Concerto) Voeg de audio-bestanden en mappen die u met het apparaat wilt delen toe aan de mediabibliotheek.
  • Seite 51: Systeeminstellingen

    5.2 Systeeminstellingen 5.2.1 Installatiewizard  Tijd/datum Weergaveformaat Kies 12 of 24 als uw gewenste tijdsformaat. Automatische update De tijd en datum kunnen handmatig of automatisch via DAB, FM of het netwerk worden bijgewerkt. Een automatische update is beschikbaar in DAB, FM of in de internetmodus. De tijd zal alleen in een overeenkomstige modus worden bijgewerkt, dus kunt u het beste een modus selecteren die u regelmatig gebruikt.
  • Seite 52 weergegeven als dd-mm-jjjj en uu:mm. Het aan te passen cijfer knippert. Pas elk cijfer met de navigatiebediening op het apparaat aan of gebruik omhoog/omlaag op de afstandsbediening. Zodra het cijfer is ingesteld, drukt u op de draaiknop op het apparaat of druk op op de afstandsbediening om verder te gaan.
  • Seite 53 wordt de sleutel in de bovenkant van het scherm weergegeven. Er zijn voor de navigatiebediening drie opties toegankelijk op het apparaat: Terug vóór het eerste karakter (BKSP), OK en Annuleren. WPS-beveiligd netwerk WPS versleutelde netwerken worden geïdentificeerd door WPS aan het begin van de netwerknaam wanneer het apparaat de beschikbare toegangspunten zoekt.
  • Seite 54  Voltooiing Het apparaat probeert verbinding te maken met het geselecteerde netwerk. Het zal 'Setup wizard completed' (Installatiewizard voltooid) weergeven op het scherm als de installatie succesvol is uitgevoerd. Als de verbinding is mislukt, keert het apparaat terug naar het vorige scherm, zodat u het opnieuw kunt proberen.
  • Seite 55 Druk enter om te zoeken naar AP SSID, voer vervolgens de WEP/WPA-sleutel in of kies Push Button/Pin/WPS overslaan om verbinding met het draadloze netwerk te maken.  PBC WLAN-instelling Push Button Configuration, dit is om de AP te verbinden die WPS (Wi-Fi Protected Setup) ondersteunt.
  • Seite 56 Als u ervoor kiest om het netwerk in verbinding te laten blijven, zal de wifi-verbinding niet worden verbroken, zelfs niet als het apparaat in stand-by staat. Anders is de verbinding alleen beschikbaar als het apparaat is ingeschakeld. Met deze optie is het apparaat gereed voor DLNA streaming in elke functionele modus.
  • Seite 57: Internetradio

    5.2.8 Info Bekijk de fabriekssoftwareversie en de radio-ID. 5.2.9 Achtergrondverlichting Als het apparaat is ingeschakeld, kunt u hiermee de achtergrondverlichting op Hoog, Medium of Laag instellen. De duur van de time-out kan worden aangepast, waardoor de radio naar de stand-by achtergrondverlichting schakelt wanneer hij niet wordt gebruikt.
  • Seite 58 5.3.1 Het laatst beluisterd Als de internetradiomodus opnieuw start, wordt het laatst beluisterde station geselecteerd. Om een ander recent gebruikt station te selecteren, druk hier op enter om het weergegeven station te selecteren. De meest recente stations verschijnen in de top van de lijst.
  • Seite 59 uw e-mailadres, wachtwoord, radiomodel. Als u al een account hebt en u wilt een extra radio toevoegen, log dan in op uw account en kies My preferences (Mijn voorkeuren) > Add another Wi-Fi radio (Voeg een andere wifi-radio toe). Zodra uw radio is geregistreerd bij het portaal, kunt u direct gebruik maken van de favoriete internetradio's en stations toevoegen.
  • Seite 60: Spotify Connect

    roepen. 5.3.6 Afspeelinformatie Terwijl de streaming plaatsvindt, toont het scherm zijn naam en beschrijving. Om meer informatie te bekijken, drukt u op MENU/INFO op het apparaat of op INFO op de afstandsbediening. Telkens als u op INFO drukt, wordt een ander soort informatie weergegeven, steeds herhalend naam/beschrijving, genre/locatie, betrouwbaarheid, codec/sampling rate, afspeelbuffer en de datum van vandaag.
  • Seite 61 5.5 Muziekspeler De muziekspeler-modus speelt audiobestanden af in MP3-, WMA-, WAV- of AAC-formaat vanaf een computer in het lokale netwerk. Tijdens het afspelen van muziek, kunt u op op het apparaat drukken of op op de afstandsbediening. U kunt ook MENU/INFO op het apparaat ingedrukt houden of op MENU op de afstandsbediening drukken om direct terug te keren naar het laatst geopende submenu binnen de menustructuur.
  • Seite 62 hebt die media delen, worden de alternatieven opgesomd. Selecteer de gedeelde media die u wilt afspelen. De menu's worden nu vanuit de gedeelde mediaserver gegenereerd. Het eerste menu toont een lijst van mediatypen, bijvoorbeeld Muziek, Video, Foto's en Afspeellijsten. Het apparaat kan alleen muziek en afspeellijsten afspelen.
  • Seite 63 5.5.3 Herhaal/willekeurig afspelen Hiermee kunt u tracks herhalen of in willekeurige volgorde afspelen. Druk voor de snelkoppeling op REPEAT/SHUFFLE op de afstandsbediening. 5.5.4 Afspeelinformatie Terwijl een track wordt afgespeeld, toont het scherm de track en de artiest (UPnP). Er is ook een voortgangsbalk met de cijfers voor de verstreken en de totale tijd van de track.
  • Seite 64 Change advanced sharing settings (Geavanceerde deelinstellingen wijzigen) > Media streaming options (opties mediastreaming) Open Windows Media Player om Allow remote control of my Player (Sta afstandsbediening vanaf mijn speler toe) in te schakelen. Selecteer muziek in de bibliotheek en kies afspelen op “Lenco Concerto”...
  • Seite 65 Een afspeelschermpje komt op voor het afspelen van de streaming. 5.6.2 Bediening op de smartphone/tablet U kunt zoeken (met trefwoord: DLNA) en installeer een van de gratis of betaalde DLNA-apps uit de Google Play of Apple Store als u een Android-mobiel, tablet of iPhone/iPad gebuikt.
  • Seite 66 Selecteer speler Selecteer server (BubbleUPnp) OPMERKING: Sommige apps geven geen ondersteuning voor het streamen van muziek vanaf de iPhone/iPod, maar de iPhone/iPod kan nog wel worden gebruikt voor de bediening van het streamen van muziek vanaf andere servers. Sommige apps staan u toe op meerdere spelers tegelijk​ muziek af te spelen. Sommige apps kunt een afspeellijst maken als u verschillende liedjes kiest.
  • Seite 67 Beschikbare stations kunnen van tijd tot tijd wijzigen. Een lege of onvolledige lijst van beschikbare stations kan het gevolg zijn van een slechte ontvangst tijdens de scan. Om alleen de zenders met een goede signaalsterkte in de lijst op te slaan. Om een handmatige scan te starten, kiest u Volledige scan.
  • Seite 68 U kunt maximaal 10 van uw favoriete stations in het geheugen opslaan. Dit stelt u in staat snel en gemakkelijk uw favoriete stations 0 tot 9 op te roepen met behulp van de cijfertoetsen op de afstandsbediening. 5.7.3 Afspeelinformatie Terwijl de streaming wordt afgespeeld, toont het scherm zijn naam, de DLS-uitzendinformatie (Dynamic Label Segment) van het station en de realtimeinformatie, zoals de programmanaam, titel van de track en contactgegevens.
  • Seite 69 Om een station te zoeken, druk op OK. De weergave van de frequentie start als het apparaat de FM-band scant. U kunt voor- of achteruit scannen door het ingedrukt houden van de toetsen TUNING- of TUNING+ op het apparaat. 5.8.1 Voorkeuze Om een FM-voorkeuzestation op te slaan, houd PRESET op het apparaat ingedrukt of druk op...
  • Seite 70 U kunt uw smartphone, tablet of andere Bluetooth-apparaat inschakelen om te koppelen. De Bluetooth-naam voor de koppeling is "Lenco Concerto". U kunt het afspelen van de muziek via uw BT-apparaat bedienen. Op de afstandsbediening wordt afspelen/pauzeren, volgende track/vorige track ondersteund. Houd ingedrukt om de BT-koppeling te verbreken.
  • Seite 71 5.10 AUX IN In de Aux in-modus speelt de radio audio van een externe bron af, zoals een MP3-speler. Om een audiobestand af te spelen via de Aux-ingangmodus volgt u de volgende stappen: Zet het volume laag op het apparaat en op het apparaat van de audiobron, indien mogelijk.
  • Seite 72 Selecteer het alarmnummer (1 of 2) en configureer vervolgens de volgende parameters: Enable (Schakel): aan/uit, Frequency (Frequentie): Dagelijks, Eenmaal, Weekend of Weekdagen, Time (Tijd) o Mode (Modus): Zoemer, Internetradio, DAB, FM of Spotify (Als het wekalarm op Spotify is ingesteld, wordt het door de zoemer geactiveerd en druk vervolgens op speel Spotify Connect-app om af te spelen.) Preset (Voorkeuze): Laatst beluisterd 1-10,...
  • Seite 73: Extra Opties

    5.13.4 UNDOK-app De Lenco Concerto kan door de APP worden bediend via IOS of Android Smartphone/Tablet. U dient de UNDOK-app te installeren die te vinden is in de Apple App Store of de Google Play Store. Scan de QR-code voor uw systeem om de UNDOK-app automatisch te downloaden.
  • Seite 74 UNDOK-app. Dat de oorspronkelijke verbinding verloren gaat, omdat er slechts één verbinding tegelijkertijd actief kan zijn. Aangezien Undok een software van derden is, kan Lenco niet verantwoordelijk worden gehouden voor wijzigingen in de functionaliteit van de app. Voor vragen over de UNDOK-app kunt u een e-mail sturen naar undok@frontiersmart.com...
  • Seite 75 6. Probleemoplossing Fout Oplossing Het apparaat gaat niet aan. Controleer of de voedingsadapter goed is aangesloten. Geen geluid. Zet het geluid aan, omdat het gedempt kan zijn Verhoog het volume. Haal de aangesloten koptelefoon of luidspreker uit de aansluitingen. Er kan geen Controleer de WLAN-functie.
  • Seite 76 provider om meer informatie. De koppeling met het handmatig toegevoegde station is niet juist. Zorg ervoor dat het correct is en voer het opnieuw in. Geruis in de FM-modus Controleer/verplaats de FM-antenne. Verplaats de radio. In de DAB-modus zijn geen Verplaats de radio.
  • Seite 77 ongeacht in welke modus het zich bevindt, leiden tot storingen. Start indien nodig het apparaat opnieuw. Sterke elektromagnetische interferentie kan verstorend zijn en storingen aan het apparaat veroorzaken. Als het scherm problemen geeft, zet het apparaat dan weg van apparaten in de buurt, die elektromagnetische interferentie veroorzaken of reset het apparaat.
  • Seite 78 Specificaties Lenco Concerto Modelnummer Internetradio met DAB/DAB+/FM/Bluetooth Omschrijving 8,1 cm, 320 x 240, TFT-kleurenscherm Scherm IEEE 802.11 b/g/n draadloos (wifi) Netwerk ondersteund Bluetooth: 2402 - 2480 MHz Frequentiebereiken BT en Wifi: 2412 - 2472 MHz wifi WEP, WPA, WPA2 (PSK), WPS...
  • Seite 79 Dit product is geschikt voor dit doel binnen alle EU-landen. Garantie Lenco biedt service en garantie aan overeenkomstig met de Europese wetgeving. Dit houdt in dat u, in het geval van reparaties (zowel tijdens als na de garantieperiode), uw lokale handelaar moet contacteren.
  • Seite 80 Als u dit doet, helpt u de natuurlijke hulpbronnen te behouden en de standaard van milieubescherming te verbeteren bij de behandeling en verwijdering van elektrisch afval (Afgedankte Elektrische en Elektronische Apparatuur). Service Bezoek voor meer informatie en helpdeskondersteuning www.lenco.com Lenco Benelux BV, Thermiekstraat 1a, 6361 HB, Nederland.
  • Seite 81: Deutsch

    Deutsch ACHTUNG: Die zweckentfremdete Bedienung, Benutzung oder Einstellung der Prozeduren kann zu gefährlichen Unfällen durch Strahlen führen. Dieses Gerät darf außer von qualifizierten Fachleuten von niemand anderem repariert oder eingestellt werden. VORSICHTSMASSNAHMEN VOR DER BENUTZUNG BEFOLGEN SIE IMMER FOLGENDE ANWEISUNGEN: Benutzen Sie das Gerät nicht in der Nähe von Wasser.
  • Seite 82 10. Warnung! Niemals Gegenstände durch die Lüftungsschlitze oder Öffnungen in das Gerät stecken. Im Gerät sind hohe Spannungen vorhanden und das Einführen von Gegenständen kann zu Stromschlag bzw. zu Kurzschlüssen der internen Teile führen. Aus dem gleichen Grund kein Wasser oder Flüssigkeiten in das Gerät geben. 11.
  • Seite 83 Zweckentfremdung oder Modifikation des Geräts oder durch Wechseln der Batterien. 24. Unterbrechen Sie die Verbindung nicht während einer Formatierung oder einer Datenübertragung. Bei Unterbrechung drohen Datenverlust und Datenbeschädigung. 25. Wenn das Gerät eine USB-Wiedergabefunktion besitzt, dann stecken Sie den USB-Stick direkt in das Gerät. Verwenden Sie kein USB-Verlängerungskabel, weil die erhöhte Störanfälligkeit zu Datenverlust führen könnte.
  • Seite 84 enthaltener Warnungen und Vorwarnung entstehen, werden nicht durch die Garantie abgedeckt. 35. Entfernen Sie niemals das Gehäuse dieses Geräts. 36. Stellen Sie dieses Gerät niemals auf andere elektrische Geräte. 37. Verwenden oder bewahren Sie dieses Produkt nicht an Orten auf, in denen es direkter Sonneneinstrahlung, Hitze, übermäßigem Staub oder Vibration ausgesetzt ist.
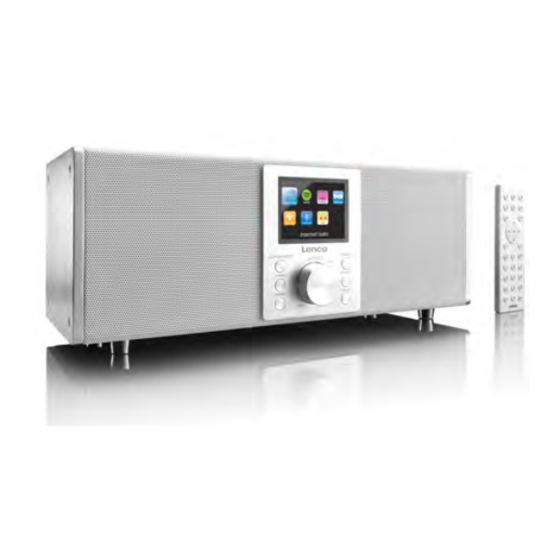
  • Seite 85 3. Identifikation von Teilen und Bedienelementen Beschreibung Funktionen 3,2” TFT-Bildschirm Farbdisplay Tasten und Standby/Mode Bedienelemente Menu/Info Tuning- : FM-Tuning-/Im Untermenü Auswahl nach unten Tuning+ : FM-Tuning-/Im Untermenü Auswahl nach oben Speicherplätze Back...
  • Seite 86 Regler: Lautstärkeanpassung und Navigation, zur Auswahl drücken Antenne Stabantenne On/Off-Schalter Ein-/Ausschalten Kopfhörer-Buchse 3,5 mm Buchse für Kopfhörer-Anschluss Line-In 3,5-mm-Buchse für Line-In Line Out 3,5-mm-Buchse für Line-Out DC IN Stromversorgung SPDIF OUT SPDIF-Buchse für Audio in Verbindung mit HiFi-Systemen USB-Anschluss Anschluss für USB-Stick, externe Festplatte oder MP3-Spieler für die Musikwiedergabe Fernbedienung 1.
  • Seite 87 Standby-Funktion Zurück zum Hauptmenü Menü-Taste Musik-Player: Titel zurückspringen Musik-Player: Wiedergabe/Pause Klangeinstellung Cursor-aufwärts-Taste Cursor-links-Taste Auswahlbestätigung Cursor-rechts-Taste Cursor-abwärts-Taste Schlafautomatik und Schlummerfunktion Wiedergabeliste wiederholen/mischen Weckrufeinstellung Musik-Player: Titel vorspringen Musik-Player: Stopp Lautstärke erhöhen Lautstärke verringern Lautsprecher ein/ausschalten Speicherlatz/Favorit 0 – 9 abrufen, Eingabe von Ziffern und Buchstaben Informationen abrufen...
  • Seite 88 Sender speichern/aufrufen, Bluetooth-Kopplung Warnungen - Nehmen Sie niemals die Batterie ein, Verätzungen wären die Folge Die mitgelieferte Fernbedienung: - Dieses Produkt enthält 2 Batterien vom Typ AAA. Das Verschlucken der Batterie kann zu schweren inneren Verbrennungen führen. - Neue und gebrauchte Batterien von Kindern fernhalten. - Verwenden Sie dieses Produkt nicht weiter und halten Sie es von Kindern fern, wenn das Batteriefach nicht sicher schließt.
  • Seite 89 über das WEP-, WPA- oder WPA2-Sicherheitspasswort verfügen, um die Verbindung zu aktivieren. Sie können auch die WPS-Funktion (Funktion für die WiFi geschützte Einrichtung) für eine einfache Kopplung des Netzwerkgerätes mit dem Gerät verwenden. Überprüfen Sie, ob die Kontrollleuchten am Netzwerkgerät sich in einem betriebsfähigen Zustand befinden. Schließen Sie das Gerät an der Stromversorgung an.
  • Seite 90 Nachfolgend ein Beispiel für die Einrichtung mit Windows XP und Windows Media Player 11. Erlauben Sie die Medienfreigabe für das Gerät (Standardname: Lenco Concerto) Fügen Sie der Medienbibliothek die Audiodateien und -ordner hinzu, die Sie mit dem Gerät freigeben möchten.
  • Seite 91: Betrieb

    5. Betrieb 5.1 Hauptmenü Im Hauptmenü können Sie die folgenden Modi auswählen: Internetradio, IN, Schlaf und Spotify Connect, Media Player, DAB, FM, Bluetooth, AUX Alarm 5.2 Systemeinstellungen 5.2.1 Einrichtungs-Assistent  Zeit/Datum Anzeigeformat Wählen Sie das gewünschte Anzeigeformat als 12-Stunden oder 24-Stunden-Anzeige.
  • Seite 92 Nur für Netzwerk-Einstellung Zeitzone, Sommerzeit Richten Sie Ihre Zeitzone ein (Standard-Zeitzone GMT +1:00). Aktivieren Sie die Option „Sommerzeit“, wenn diese in Ihrem Land zutrifft. Manuelle Aktualisierung Wenn Sie „Keine Aktualisierung“ auswählen, fordert der Assistent Sie zur manuellen Einrichtung der Uhrzeit und des Datums auf. Das Datum und die Uhrzeit werden im Format TT-MM-JJJJ und HH:MM angezeigt.
  • Seite 93 Standard verschlüsseltes Netzwerk Um den Netzwerkschlüssel einzugeben, verwenden Sie die Navigationssteuerung an dem Gerät oder die Richtungstasten auf der Fernbedienung, um den Cursor durch die Zeichen zu bewegen und drücken Sie zur Bestätigung . Durch die Auswahl der einzelnen Zeichen wird der Schlüssel am oberen Rand der Anzeige dargestellt. Es stehen drei Optionen zur Verfügung indem die Navigationssteuerung an der Geräterückseite vor dem ersten Zeichen gedreht wird –...
  • Seite 94 o WPS überspringen Geben Sie den Schlüssel für ein Standard-verschlüsseltes Netzwerk ein. Weitere Informationen zur Einrichtung eines mit WPS verschlüsselten Netzwerks finden Sie in den Anweisungen zu Ihrem WPS-Router.  Fertigstellung Das Gerät versucht sich mit dem ausgewählten Netzwerk zu verbinden.
  • Seite 95 5.2.2 Equalizer Erlaubt die Auswahl verschiedener Equalizer: Normal (Normal), Flat (Flach), Jazz (Jazz), Rock (Rock), Movie (Film), Classic (Klassik), Pop (Pop) und News (Nachrichten). Sie können auch Ihre eigenen Equalizer mit individuellen Bass-, Höhen- und Lautstärkeeinstellungen erstellen. Um schnell zu dem Equalizer-Menü zu gelangen, drücken Sie auf der Fernbedienung 5.2.3 Network (Netzwerk)
  • Seite 96: Beibehalten Der Netzwerkverbindung

     Manuelle Einstellungen Wählen Sie eine Netzwerkverbindung und aktivieren oder deaktivieren Sie DHCP (Dynamic Host Configuration Protocol/Dynamisches Host-Konfigurationsprotokoll)).  Netzwerkprofil Das Gerät verfügt über eine Erinnerungsfunktion, um sich die letzten vier Drahtlosnetzwerke zu merken, mit denen es verbunden war. Das Gerät wird sich automatisch mit einem dieser Netzwerke verbinden, das gefunden wurde und verfügbar ist.
  • Seite 97 5.2.6 Factory reset (Zurücksetzen auf Werkseinstellungen) Ein Zurücksetzen auf die Werkseinstellungen stellt alle Einstellungen zurück auf die Standardeinstellungen. Alle Senderspeicher, die Zeit, das Datum und die Netzwerkkonfiguration gehen verloren. Die aktuelle Softwareversion des Gerätes kann gespeichert werden, wenn sie mit dem internen Radioportal registriert wird. Es werden ebenfalls alle Favoriten im Internetradio gespeichert.
  • Seite 98: Zuletzt Gehört

    Internetradio Das Gerät kann über eine Breitband-Internetverbindung Tausende auf Radiostationen und Podcasts aus der ganzen Welt eingestellt werden. Wenn Sie das Internetradio auswählen, greift das Gerät direkt auf das Internetradioportal „Frontier Silicon“ (das von dem V-Tuner unterstützt wird) zu und erhält eine Liste der Sender. Dieses Portal ermöglicht ebenfalls, die Liste Ihrer Lieblingssender zu personalisieren.
  • Seite 99 5.3.2 Senderliste Durchsuchen Sie Internetsendungen die in verschiedene Kategorien (Standort, Genre, Populär und Neu) unterteilt sind. Sie können Sender auch nach Stichworten suchen. 5.3.3 Favoriten Die Favoriten sind im Internetradioportal gespeichert und stehen für alle Internetradios zur Verfügung, die unter dem gleichen Konto registriert sind.
  • Seite 100: Meine Hinzugefügten Sender

    Wenn Sie bereits über ein Konto verfügen und ein zusätzliches Radio hinzufügen möchten, melden Sie sich an Ihrem Konto an und wählen „My preferences“ (Meine Einstellungen) > „Add another Wi-Fi radio“ (Weiteres WLAN-Radio hinzufügen) aus. Sobald Ihr Radio mit dem Portal registriert ist, können Sie die Internetradio-Favoriten verwenden und neue Sender hinzufügen.
  • Seite 101: Spotify Connect Dieses Gerät Mit Spotify Connect Verwenden

    ermöglicht Ihnen, auf die Favoritensender 0-9 schnell und einfach zuzugreifen, indem Sie die Zifferntasten auf der Fernbedienung verwenden. 5.3.6 Informationen zur aktuellen Wiedergabe Während ein Stream abgespielt wird, zeigt die Seite den Namen und die Beschreibung des Streams an. Um weitere Informationen anzuzeigen, drücken Sie am Gerät MENU/INFO oder auf der Fernbedienung INFO.
  • Seite 102: Musik-Player

    Schritt 5. Wählen Sie Ihr Gerät aus der Liste aus. Wenn Sie es nicht sehen können, prüfen Sie, ob es sich im selben WiFi-Netzwerk wie Ihr Telefon, Tablet oder Ihr PC befindet. Alles erledigt! Viel Spaß beim Hören. Lizenzierung Die Spotify Software unterliegt Lizenzen von Drittanbietern, die hier gefunden werden können: www.spotify.com/connect/third-party-licenses.
  • Seite 103 verschiedenen Audioformate, die von dem Gerät unterstützt werden. Code Unterstützt Min. Max. 1,536 mbit/s 48 mbit/s 1,536 mbit/s FLAC v1.2.1 24 bit 48 KHz 24 bit 48 KHz 24 bit 48 KHz 320 mbit/s 8 mbit/s 576 mbit/s 320 mbit/s 8 mbit/s 320 mbit/s 320 mbit/s...
  • Seite 104: Usb-Wiedergabe

    Drücken Sie zur Wiedergabe des gewünschten Titels OK. Ein kurzer Druck gibt den Titel sofort wieder. 5.5.2 USB-Wiedergabe Von diesem Punkt an, werden die Menüs von den Ordnern des USB-Gerätes erzeugt. Sie können die Ordner mit dem Navigationsregler und der Zurück-Taste oder den Richtungstasten auf der Fernbedienung durchsuchen.
  • Seite 105: Steuerung Über Pc

    5.6 DMR (DLNA-Streaming) Freigegebene Musik nach Abschnitt 5.5.1 ist eine Möglichkeit, Musik zu streamen, indem Sie nach der Musikliste suchen und die Wiedergabe über das Gerät steuern. Dieses Thema stellt eine andere Möglichkeit for, um Musik zu streamen, die nicht erfordert, dass die Wiedergabe auf dem Gerät gesteuert wird.
  • Seite 106 Starten Sie den Windows Media Player und aktivieren Sie Allow remote control of my Player (Die Remotekontrolle des Players erlauben). Wählen Sie aus der Bibliothek eine beliebige Musik aus und wählen Sie Wiedergabe über „Lenco Concerto”...
  • Seite 107 Ein Fenster der Musikwiedergabe wird für das Streaming geöffnet. 5.6.2 Steuerung über Smartphone/Tablet Sie können (mit dem Stichwort: DLNA) bei Google Play oder im Apple Store nach kostenlosen oder gewerblichen DLNA-Apps suchen und diese installieren, wenn Sie ein Android-Handy, ein Tablet-PC oder ein iPhone/iPad verwenden.
  • Seite 108: Sendersuche

    Wählen Sie den Player Wählen Sie den Server (BubbleUPnp) HINWEIS: Möglicherweise unterstützen nicht alle APPs das Musikstreaming vom iPhone/iPod, jedoch kann das iPhone/iPod zur Kontrolle des Musikstreamings von anderen Servern genutzt werden. Einige Apps erlauben die Musikwiedergabe an mehrere Player gleichzeitig. Einige Apps können eine Wiedergabeliste erstellen, wenn Sie mehrere Songs auswählen.
  • Seite 109 wenn die Liste der Sender leer ist, führt das Gerät automatisch einen vollständigen Senderscan aus. Sie können aus einem der folgenden Gründe zur Aktualisierung der Senderliste einen Scan manuell ausführen: Verfügbare Sender können sich gelegentlich ändern. Eine leere oder unvollständige Liste der verfügbaren Sender kann das Ergebnis eines schlechten Empfangs während des Scans sein.
  • Seite 110 Um einen Senderspeicher auszuwählen, an dem Gerät PRESET oder auf der Fernbedienung drücken und dann einen der aufgelisteten Senderspeicher auswählen. Wenn ein Senderspeicher wiedergegeben wird, wird am unteren Rand der Anzeige 2 etc.) angezeigt. Sie können bis zu 10 Favoritensender im Speicher speichern. Dies ermöglicht Ihnen, auf die Favoritensender 0-9 schnell und einfach zuzugreifen, indem Sie die Zifferntasten auf der Fernbedienung verwenden.
  • Seite 111: Speicherplätze

    Gültigkeit zu ändern. Die Ensembleliste gruppiert Sender, die auf dem gleichen Ensemble ausgestrahlt werden. Zuerst gültige Listen und gültige Sender, dann alphanumerisch und dann Off-Air-Sender. 5.8 FM Der FM-Radiomodus empfängt analoges Radio von dem FM-Band und zeigt RDS (Radio Datensystem) Informationen über den Sender und den Broadcast-Ort.
  • Seite 112 verwenden. 5.8.2 Informationen zur aktuellen Wiedergabe Während der Stream abgespielt wird, zeigt der Bildschirm seine Frequenz, oder sofern RDS-Informationen vorhanden sind, den Sendernamen und weitere RDS-Informationen wie Programmname, Titel und Kontaktinformationen an. Stereo-Sendungen werden mit einem Symbol an der Seitenoberkante angezeigt. Um weitere Informationen über eine Sendung anzuzeigen, drücken Sie am Gerät MENU/INFO oder INFO auf der Fernbedienung.
  • Seite 113 (das BT-Symbol am unteren Rand blinkt). Sie können Ihr Smartphone/Tablet oder Bluetooth-Geräte zum Koppeln aktivieren. Der Name der Bluetooth-Kopplung ist „Lenco Concerto“. Sie können die Musikwiedergabe auf Ihrem BT-Gerät steuern. Es wird mit Wiedergabe/Pause, Nächster Titel/Vorheriger Titel auf der Fernbedienung unterstützt. Halten Sie gedrückt, um die BT-Kopplung freizugeben.
  • Seite 114 5.11 Sleep (Abschaltautomatik) Wählen Sie im Hauptmenü Sleep (Schlaf) aus oder drücken Sie auf der Fernbedienung SLEEP, um die Einschlafautomatik einzustellen. Wählen Sie die Zeit für die Abschaltautomatik aus: Sleep OFF (Abschaltautomatik aus), 15 MINS (15 min), 30 MINS (30 min), 45 MINS (45 min) oder 60 MINS (60 min). Nach der Auswahl der gewünschten Zeit für die Abschaltautomatik kehrt das System zurück in das Hauptmenü.
  • Seite 115: Zusätzliche Funktionen

    HiFi-Lautsprechersystem für verbesserte Klangqualität. 5.13.4 App UNDOK Der Lenco Concerto kann über die APP mit iOS- oder Android-Smartphones/Tablet-PCs gesteuert werden. Dafür müssen Sie die App UNDOK installieren, die Sie im Apple App Store oder Google Playstore finden. Scannen Sie den QR-Code für Ihr System, um...
  • Seite 116 Für iOS-Systeme (Google Play) (Apple Store) Vergewissern Sie sich vor der Benutzung der App UNDOK, dass sich der Lenco Concerto und das Smartphone/der Tablet-PC im selben Netzwerk befinden. Starten Sie die App UNDOK. Nach der Initialisierung der App scannt sie in Ihrem lokalen WLAN nach dem Radio Lenco Concerto.
  • Seite 117 Lenco keine Verantwortung für Änderungen der Funktionalitäten der App übernehmen kann, weil UNDOK eine Drittanbieter-Software ist. Für Fragen bezüglich der App UNDOK können Sie uns eine E-Mail senden an: undok@frontiersmart.com Fehlerdiagnose Fehler Abhilfe Das Gerät schaltet nicht ein. Überprüfen Sie, ob das Netzteil ordnungsgemäß...
  • Seite 118 Keine Stationen gefunden. Überprüfen Sie sowohl das Netzwerk als auch den AP und die Firewall. Vielleicht ist die Station gerade nicht auf Sendung. Versuchen Sie es später noch einmal oder wählen Sie eine andere Station. Der Link zur Station hat sich geändert oder die Station hat die Sendung eingestellt –...
  • Seite 119 ausgewählt werden Ihr Smartphone oder Tablet. Sie benötigen ein Spotify Premium-Konto, um Spotify Connect verwenden zu können. Musik wird weiterhin von Starten Sie die Spotify-App neu. dem Gerät wiedergegeben, nachdem die Spotify-App geschlossen wurde. Andere unbekannte Das Gerät kann nach einiger Betriebszeit, Ursachen.
  • Seite 120 Technische Daten Modellnummer Lenco Concerto Beschreibung Internetradio mit DAB/DAB+/FM/Bluetooth Anzeige 3,2", 320 x 240, TFT Farbdisplay unterstütztes Netzwerk IEEE 802.11 b/g/n wireless (WiFi) Bluetooth- und Bluetooth: 2402 – 2480 MHz WLAN-Frequenzbereich WLAN: 2412 – 2472 MHz Verschlüsselter WEP, WPA, WPA2 (PSK), WPS Netzwerkschlüssel...
  • Seite 121 Umgebung verwendet werden. Es eignet sich zur Verwendung in allen EU Ländern. Garantie Lenco bietet Leistungen und Garantien im Einklang mit Europäischem Recht. Im Falle von Reparaturen (sowohl während als auch nach Ablauf der Garantiezeit) sollten Sie deshalb Ihren Einzelhändler kontaktieren.
  • Seite 122 Sie, natürliche Ressourcen zu schonen und Umweltschutzstandards zur Verwertung und Entsorgung von Altgeräten aufrecht zu halten (Waste Electrical and Electronic Equipment Directive). Service Weitere Informationen und Unterstützung erhalten Sie unter www.lenco.com Lenco Benelux BV, Thermiekstraat 1a, 6361 HB, Die Niederlande.
  • Seite 123: Français

    Français ATTENTION : L’utilisation de commandes ou de réglages ou l’exécution de procédures autres que ceux spécifiés dans ce manuel peut entraîner une exposition à des rayonnements dangereux. Cet appareil ne doit pas être réglé ou réparé par quiconque d’autre que du personnel qualifié.
  • Seite 124 10. Mise en garde ! N’introduisez jamais un objet dans l’appareil par les ouvertures et les fentes de ventilation. Étant donné que des tensions élevées sont présentes à l’intérieur du produit, l'insertion un objet peut entraîner une électrocution et/ou court-circuiter les composants internes.
  • Seite 125 22. Pour nettoyer l’appareil, servez-vous d’un chiffon doux et sec. N’utilisez pas de solvant ni d’autre liquide à base de pétrole. Pour enlever les taches importantes, vous pouvez vous servir d’un chiffon humide imbibé d’une solution de détergent diluée. 23. Le fournisseur n’est pas responsable des dommages ou pertes de données causés par un dysfonctionnement, une utilisation abusive, une modification de l’appareil ou un remplacement des piles.
  • Seite 126 instable ou par la non-observation de tout autre avertissement ou précaution contenus dans ce mode d’emploi. 35. Ne retirez jamais le boîtier de l’appareil. 36. Ne placez jamais cet appareil sur un autre appareil électrique. 37. N’utilisez et ne rangez pas ce produit au soleil, à la chaleur, à la poussière ou à...
  • Seite 127 Identification des pièces et des commandes N° Description Fonctions Écran TFT de 3,2 pouces Affichage couleur Boutons et commandes Standby/Mode Menu/Info Tuning- : syntonisation(-) FM/sélection vers le bas dans un sous-menu Tuning+ : syntonisation(+) FM/sélection vers le haut dans un sous-menu Préréglage Back Molette : réglage du volume et...
  • Seite 128 Prise écouteurs Connecteur 3,5 mm pour casque d’écoute Line In Connecteur 3,5 mm d’entrée de ligne Line Out Connecteur 3,5 mm de sortie de ligne ENTRÉE CC Alimentation électrique SPDIF OUT Connecteur SPDIF de connexion à une entrée audio d’une chaîne Hi-Fi Port USB Branchement d’un lecteur USB, d’un disque dur externe ou d’une lecteur...
  • Seite 129 Fonction de veille Aller au menu d’accueil Bouton du menu Lecteur musical : Revenir en arrière dans le morceau Lecteur musical : Lecture/pause Régler la tonalité Bouton curseur haut Bouton curseur gauche Pour confirmer la sélection Bouton curseur droit Bouton curseur bas Fonction de veille/répétition du réveil...
  • Seite 130 Allumer/éteindre le haut-parleur 0..9 Rappel des favoris/de la mémoire ; saisie des lettres et des chiffres Rappeler les informations Stations enregistrées/Rappeler les stations, appairage BT Prise en main Retirez tous les emballages de l’appareil. Conservez l’emballage. Respectez la règlementation locale en cas de mise au rebut. Les éléments suivants sont fournis : ...
  • Seite 131 À la première mise sous tension de l’appareil, l’assistant du menu de configuration démarrera. Sélectionnez YES (OUI) pour procéder à la configuration. Pour plus d’informations sur l’assistant de configuration, veuillez vous reporter au paragraphe 5.2.1. Si vous sélectionnez NO (NON), vous serez invité...
  • Seite 132: Menu Principal

    L’exemple ci-dessous s’applique à la configuration de Windows XP et de Windows Media Player 11. Autorisez le partage de vos supports multimédia avec l’appareil (nom par défaut : Lenco Concerto) Ajoutez les dossiers et les fichiers audio que vous souhaitez partager avec l’appareil dans la bibliothèque multimédia.
  • Seite 133: Réglages Système

    5.2 Réglages système 5.2.1 Assistant de configuration  Heure/date Format d’affichage Sélectionnez le format sur 12 ou 24 heures que vous souhaitez. Mise à jour automatique L’heure et la date peuvent être réglées manuellement ou automatiquement à partie de la radio numérique (DAB), la radio FM ou le réseau.
  • Seite 134 Mise à jour manuelle Si vous sélectionnez « No update » (Mise à jour désactivée), l’assistant vous invitera à régler l’heure et la date manuellement. La date et l’heure sont affichées au format jj-mm-aaaa et hh:mm. Le chiffre à régler clignotera. Réglez chaque chiffre avec la commande de navigation de l’appareil ou les touches haut/bas de la télécommande.
  • Seite 135 télécommande pour faire défiler les caractères, puis appuyez sur pour confirmer. À chaque caractère sélectionné, la clé est complétée dans la partie supérieure de l’affichage. Il est possible de tourner la commande de navigation pour sélectionner les trois options suivantes : BKSP (Effacer), OK et Cancel (Annuler).
  • Seite 136 réseau WPS, veuillez vous reporter aux instructions concernant la fonction WPS de votre routeur.  Résultat L’appareil tente de se connecter au réseau sélectionné. Il affichera « Setup wizard completed » (Fin de l’assistant de configuration) à l’écran si la configuration a réussi. Si la connexion échoue, l’appareil reviendra à...
  • Seite 137 5.2.3 Réseau  Assistant réseau L’entrée permet de rechercher le nom du point d’accès réseau (AP SSID), de saisir la clé WEP/WPA ou de choisir l’une des options Push Button (Bouton-poussoir)/Pin (Code PIN)/Skip WPS (Ignorer WPS) pour se connecter au réseau sans fil. ...
  • Seite 138 supprimer les réseaux indésirables en tournant la commande de navigation et en appuyant sur OK, puis en confirmant par YES (OUI).  Rester connecté au réseau Si vous choisissez de rester connecté au réseau, la connexion au réseau Wi-Fi restera active même si l’appareil est en mode veille. Sinon, la connexion ne sera disponible que lorsque l’appareil est allumé.
  • Seite 139 5.2.7 Mise à jour du logiciel Une mise à jour du logiciel peut être disponible pour corriger des problèmes ou ajouter des fonctions. L’appareil recherchera, par défaut, automatiquement et régulièrement, la disponibilité de mises à jour. Vous pouvez également vérifier manuellement la disponibilité de mises à jour. Si une nouvelle version du logiciel est disponible, vous en serez averti.
  • Seite 140 Alors que vous écoutez une station radio Internet, vous pouvez appuyer sur le bouton Back de l’appareil ou de la télécommande pour revenir rapidement à la dernière branche visitée de l’arborescence de menus. Vous pouvez aussi appuyer sur le bouton MENU/INFO de l’appareil ou la touche MENU de la télécommande pour accéder au premier menu du mode radio Internet.
  • Seite 141 même compte. Avant d’utiliser les favoris, la radio doit être enregistrée avec le portail de radio Internet. Pour enregistrer votre appareil, choisissez Station list (Liste des stations) > Help (Aide) > Get access code (Obtenir un code d’accès) pour obtenir votre code d’accès unique au portail de radio. (ne confondez pas le code d’accès au portail et l’identifiant radio des réglages système).
  • Seite 142: Stations Préréglées

    vous souhaiteriez écouter une station non répertoriée. Il est possible d’ajouter votre propre station via le portail. 5.3.5 Stations préréglées Les stations préréglées sont mémorisées dans la radio et ne sont pas accessibles à d’autres radios. Pour stocker une station radio Internet préréglée, appuyez et maintenez enfoncé...
  • Seite 143 Une meilleure façon d’écouter la radio chez soi Le service de connexion à Spotify permet de reproduire la musique du service Spotify à travers vos haut-parleurs ou votre téléviseur, en utilisant l’application Spotify comme une télécommande. Vous aurez besoin d’une inscription au service Spotify Premium pour l’utiliser, voir les détails au verso).
  • Seite 144 Lors de la lecture, vous pouvez appuyer sur de l’appareil ou de la télécommande. Vous pouvez également maintenir enfoncée la touche MENU/INFO sur l’appareil ou appuyer sur la touche MENU sur la télécommande pour revenir rapidement à la dernière branche visitée de l’arborescence du menu.
  • Seite 145 Music (Musique), Video (Vidéo), Pictures (Images) et Playlists (Listes de lecture). L’appareil n’est en mesure que de reproduire de la musique et des listes de lecture. Une fonction de recherche est à votre disposition pour rechercher des pistes de la même façon que la recherche de stations radio Internet. Pour le type Music (Musique), il est possible de choisir des pistes en les sélectionnant par Genre, Artiste, Album, Compositeur ou Classement.
  • Seite 146 5.5.3 Mode répétition/aléatoire Il est possible de répéter des pistes ou de les lire dans un ordre aléatoire. Appuyez simplement sur REPEAT/SHUFFLE de la télécommande. 5.5.4 Informations sur la station écoutée Lors de la lecture d’une piste, l’écran affiche le numéro de piste et l’artiste (uPnP).
  • Seite 147 Il est possible de partager des fichier musicaux d’un ordinateur, d’un téléphone mobile Android, d’une tablette et d’utiliser directement votre ordinateur, téléphone mobile Android, tablette ou iPhone/iPad pour contrôler la lecture musicale de l’appareil. Il s’agit de la technologie de diffusion en continu DLNA.
  • Seite 148 Sélectionnez la musique dans la bibliothèque et choisissez Play to (Lecture vers) « Lenco Concerto » Une boîte de dialogue de lecture musicale apparaît pour la diffusion en continu. 5.6.2 Contrôle depuis un téléphone intelligent/une tablette Vous devez lancer une recherche (avec le mot-clé : DLNA) et installer l’une des applications gratuites ou payantes DLNA depuis les magasins...
  • Seite 149 Il est suggéré d’utiliser BubbleUPnp ou VLC pour Mobile sur un mobile ou une tablette Android ; ou utilisez VLC pour Mobile sur iPhone/iPad. Voici les procédures pour lire de la musique partagée sur l’application : 1. Sélectionnez l’appareil comme lecteur. 2.
  • Seite 150: Recherche Des Stations

    5.7.1 Recherche des stations La première fois que vous sélectionnez le mode radio DAB ou si la liste des stations est vide, l’appareil exécutera automatiquement une recherche complète des stations. Il est également possible d’exécuter une recherche manuelle pour actualiser la liste des stations dans les cas suivants : Les stations disponibles changent de temps en temps.
  • Seite 151 5.7.2 Stations préréglées Pour stocker une station radio DAB+ préréglée, appuyez et maintenez enfoncé le bouton PRESET ou appuyez sur la touche de la télécommande jusqu’à ce que l’affichage montre l’écran d’enregistrement d’une station préréglée en appuyant longuement sur la touche OK. Sélectionnez l’une des 10 présélections pour enregistrer la station en cours d’écoute.
  • Seite 152 (arrêt/faible/élevé) au cas où vous écoutez de la musique à gamme dynamique élevée dans un environnement bruyant.  Ordre des stations L’option vous permet de trier la liste des stations DAB+ selon un ordre alphanumérique, leur ensemble ou leur validité. Le critère ensemble réunit des groupes de stations diffusées ensemble.
  • Seite 153 Pour sélectionner une station préréglée, appuyez sur la bouton PRESET de l’appareil ou de la télécommande, puis choisissez l’une des stations préréglées de la liste. Lors de l’écoute d’une station préréglée, elle est signalée au bas de l’écran par etc.). Il est possible de mémoriser vos 10 stations préférées.
  • Seite 154: Entrée Auxiliaire

    Bluetooth au bas de l’écran se met à clignoter). Vous devez activer la fonction Bluetooth sur votre téléphone intelligent/tablette/autre dispositif Bluetooth pour l’appariement. Le nom d’appariement Bluetooth est « Lenco Concerto ». Il est possible de contrôler la lecture musicale sur votre appareil Bluetooth.
  • Seite 155 Appuyez sur MODE ou sélectionnez AUX IN (ENTRÉE AUXILIAIRE) dans le menu principal. Réglez à votre convenance le volume du l’appareil (et si nécessaire du lecteur source). 5.11 Veil. Pour régler la minuterie de sommeil, sélectionnez Sleep (Sommeil) dans le menu principal ou appuyez sur SLEEP de la télécommande.
  • Seite 156: Fonctions Supplémentaires

    suivants : Enable (Activer) : marche/arrêt, Fréquency (Fréquence) : Daily (Quotidien), Once (Une fois), Weekends (Fin de semaine) or Weekdays (Jour de la semaine), Time (Heure) o Mode : Buzzer (Avertisseur), Internet Radio (Radio Internet), DAB, FM ou Spotify (si le mode de réveil est réglé sur Spotify, l’avertisseur est activé, puis vous devez appuyer sur la lecture dans l’application de connexion à...
  • Seite 157: Application Undok

    5.13.4 Application UNDOK La radio Lenco Concerto peut être commandée par application à l’aide d’un smartphone/d’une tablette IOS ou Android. Vous devez installer l’application UNDOK, disponible dans l’App Store d’Apple ou le Playstore de Google. Numérisez le code QR correspondant à votre système pour télécharger automatiquement l’application UNDOK...
  • Seite 158 Lenco Concerto avec l’application UNDO. La connexion d’origine sera perdue, car seule une connexion peut être active à la fois. Étant donné qu’Undok est un logiciel tiers, Lenco ne peut être tenu responsable des modifications apportées aux fonctionnalités de l’application.
  • Seite 159 Dépannage Erreur La solution L’appareil ne s’allume pas. Vérifiez si l’adaptateur d’alimentation est correctement branché. Pas de son. Activez le son car il est peut-être coupé Augmentez le volume. Retirez tout casque d’écoute ou haut-parleur des connecteurs. Impossible d’établir une Vérifiez la fonction WLAN.
  • Seite 160 manuellement n’est pas correcte. Corrigez-la et ressaisissez-la. Sifflements en mode FM Contrôlez/déplacez l’antenne FM. Déplacer la radio. Aucun station Déplacer la radio. disponible/bruit Recherchez les stations locales sourd/intermittent en mode uniquement (forte puissance). DAB. Vérifiez la couverture DAB. L’alarme ne fonctionne pas. Activez l’alarme.
  • Seite 161 Des interférences électromagnétique intenses peuvent perturber le fonctionnement de l’appareil d’où un mauvais fonctionnement. Si l’afficheur indique un problème, éloignez l’appareil des équipements pouvant produire des interférences électromagnétiques ou réinitialisez l’appareil.
  • Seite 162 Caractéristique Numéro du modèle Lenco Concerto Description Radio Internet avec DAB/DAB+/FM/Bluetooth Affichage écran couleur TFT 3,2", 320 x 240 Réseau pris en charge sans fil IEEE 802.11 b/g/n (Wi-Fi) Plages de fréquence BT et Bluetooth : 2402 à 2480 MHz wifi Wi-Fi: 2412 à...
  • Seite 163 à cet usage pour tous les pays de I’UE. Garantie Lenco propose un service et une garantie conformément à la législation européenne, ce qui signifie qu’en cas de besoin de réparation (aussi bien pendant et après la période de garantie), vous pouvez contacter votre revendeur le plus proche.
  • Seite 164 électriques (Directive sur les déchets des équipements électriques et électroniques). Service Pour en savoir plus et obtenir de l’assistance, visitez www.lenco.com Lenco Benelux BV, Thermiekstraat 1a, 6361 HB, Pays-Bas.
  • Seite 165: Español

    Español PRECAUCIÓN: El uso de los controles o ajustes o el funcionamiento de los procedimientos excepto a aquellos especificados aquí pueden provocar una exposición peligrosa a la radiación. Esta unidad no debe ajustarse o repararse por ninguna persona salvo personal de servicio cualificado. PRECAUCIONES PREVIAS AL USO TENGA ESTAS INSTRUCCIONES EN MENTE: No use este dispositivo cerca del agua.
  • Seite 166 cortocircuito de sus componentes internos. Por el mismo motivo, no derrame agua o líquidos en el producto. 11. No lo utilice en zonas húmedas, como cuartos de baño, cocinas en las que se forme vapor ni cerca de piscinas. 12. No use este dispositivo cuando se pueda producir condensación. 13.
  • Seite 167 24. No interrumpa la conexión cuando el dispositivo esté formateando o transfiriendo archivos. En caso contrario, los datos se pueden estropear o perder. 25. Si la unidad dispone de función de reproducción USB, se debe conectar la memoria USB directamente en la unidad. No use un cable de extensión USB ya que puede causar interferencias lo que puede provocar un fallo en los datos.
  • Seite 168 37. No utilice ni guarde el producto en lugares expuestos a la luz solar directa, a altas temperaturas, a la vibración ni en ambientes excesivamente polvorientos. 38. Mantenga las bolsas de plástico fuera del alcance de los niños. 39. Use únicamente los dispositivos/accesorios especificados por el fabricante.
  • Seite 169 Identificación de piezas y controles Nº Descripción Funciones Pantalla TFT de 3,2” Pantalla a color Standby/Mode Botones y controles Menu/Info Tuning- : Selección de sintonización - FM /Descendente en el submenú Tuning+ : Selección de sintonización + FM /Ascendente en el submenú Presintonizada Traseras Rueda: Volumen y navegación y pulse OK...
  • Seite 170 toma de auriculares Toma de 3.5mm para la conexión de auriculares Line In Toma de 3.5mm para entrada de línea Salida de Línea Toma de 3.5mm para salida de línea Entrada CC Alimentación CC SPDIF OUT Toma SPDIF para audio en conexión con el Sistema Hi-Fi Puerto USB Conecte la unidad USB, disco duro portátil...
  • Seite 171 Función en espera Ir al menú principal Botón de menú Reproductor de música: Retroceder a la pista Reproductor de música: Reproducir/Pausa Configurar tono Botón de cursor hacia arriba Botón de cursor hacia la izquierda Confirma la selección Botón de cursor hacia la derecha Botón de cursor hacia abajo...
  • Seite 172 0..9 Llamada a favoritos/memoria; introduzca letras y números Información de llamadas Emisoras guardadas/recordadas; emparejamiento BT Puesta en marcha Retire todo el envase del dispositivo. Guarde el envase. Si se deshace de él, por favor, hágalo siguiendo la normativa local. Se incluyen los siguientes elementos: ...
  • Seite 173 La primera vez que encienda el dispositivo, entrará directamente en el menú del asistente de configuración. Seleccione YES (SÍ) para continuar la configuración. Para obtener más detalles del asistente de configuración, puede remitirse a la Sección 5.2.1. Si se selecciona NO (NO) se le preguntará si desea iniciar el asistente la próxima vez.
  • Seite 174: Menú Principal

    Lo siguiente es un ejemplo de configuración con Windows XP y Windows Media Player 11. Permite compartir archivos multimedia con el dispositivo (nombre por defecto: Lenco Concerto) Añada los archivos de audio y carpetas que desee compartir con el dispositivo en la biblioteca multimedia.
  • Seite 175: Configuración Del Sistema

    5.2 Configuración del sistema 5.2.1 Asistente de configuración  Hora fecha Formato de pantalla Seleccione 12 o 24 como formato de hora que desee. Actualización automática La fecha y la hora se pueden actualizar manual o automáticamente desde DAB, FM o la red. La actualización automática está disponible en modo DAB, FM o Internet.
  • Seite 176  Network (Red) Región Wlan Selecciona la región Wlan para obtener la conectividad Wlan óptima: La mayoría de Europa. Búsqueda de una red El dispositivo es compatible con todos los protocolos de red habituales y método de encriptación. Busca y enumera todas las redes disponibles.
  • Seite 177 Botón El dispositivo le indica que pulse el botón de conexi9on del router. Posteriormente busca un botón de conexión de red y se conecta. El dispositivo genera un número de código de 8 dígitos, que introduce en el router inalámbrico, punto de acceso o registro externo.
  • Seite 178 Mostrará ‘Setup wizard completed’ (Asistente de configuración completado) en la pantalla si la configuraciones ha realizado con éxito. Si ha fallado la conexión, el dispositivo vuelve a la pantalla anterior paras que lo vuelva a intentar. Pulse OK para salir del asistente de configuración.
  • Seite 179  Ver configuración Vea la información de la red conectada actual: Conexión activa, dirección MAC, región Wlan, DHCP, SSID, dirección IP, máscara de subred, dirección de pasarela, DNS primario y DNS Secundario.  Región Wlan Selecciona la región Wlan para obtener la conectividad Wlan óptima: Canadá, España, Francia, Japón, Singapur, Australia, y República de Corea.
  • Seite 180 5.2.4 Hora/Fecha Fije la hora manualmente o actualice automáticamente el formato de hora, zona horaria y luz diurna. 5.2.5 Idioma El inglés está fijado como el idioma por defecto. Puede seleccionar el propio idioma que desee. 5.2.6 Factory reset (Restaurar valores de fábrica) Una restauración de los valores de fábrica reinicia toda la configuración del usuario a los valores por defecto.
  • Seite 181: Radio Por Internet

    5.2.9 Backlight (Retroiluminación) Le permite cambiar el nivel de retroiluminación a alto, medio o bajo en el modo de encendido. Se puede ajustar la duración del tiempo de desconexión, lo que permite que la radio se cambie al nivel de retroiluminación en espera cuando no vaya a usarse.
  • Seite 182 usada, entre aquí para seleccionar la emisora enumerada. Las emisoras más recientes aparecen en la parte superior de la lista. 5.3.2 Lista emisoras Busca en emisiones de Internet que se categorizan en diferentes categorías, Ubicación, Género, Popular y Noticias. Asimismo puede seleccionar la emisora con palabras clave.
  • Seite 183 contraseña, Modelo de radio. Si ya dispone de una cuenta y desea añadir una radio adicional, inicie sesión en su cuenta y seleccione My preferences (mis preferencias) > Add another Wi-Fi radio (Añadir otra radio Wi-Fi). Una vez que la radio está registrada en el portal, puede usar inmediatamente los favoritos de su radio de Internet u añadir emisoras.
  • Seite 184 Puede almacenar hasta 10 de sus emisoras favoritas en la memoria. Esto le permitirá acceder a sus emisoras favoritas 0-9 rápida y fácilmente usando los botones numéricos del mando a distancia. 5.3.6 Información sobre lo que se está reproduciendo ahora Cuando se está...
  • Seite 185: Reproductor De Música

    Licencias El software de Spotify está sujeto a licencias de terceras personas que se encuentran aquí: www.spotify.com/connect/third-party-licenses. 5.5 Reproductor de música El modo reproductor de música reproduce archivos de audio en formatos MP3, WMA, WAV o AAC desde un ordenador en la red local. Mientras reproduce música puede pulsar en el dispositivo o en el mando a distancia.
  • Seite 186: Reproducción De Usb

    5.5.1 Archivos multimedia compartidos Si ha configurado los archivos multimedia compartidos, se mostrará una entrada que consiste en <computer name (Nombre del ordenador)>: <Shared media name (Nombre de archivo multimedia compartido)> . Si tiene más de un ordenador compartiendo contenidos, aparecerán todos en una lista. Seleccione el archivo multimedia compartido que desee reproducir.
  • Seite 187 navegación y el botón Atrás o las teclas de dirección en el mando a distancia. La pantalla muestra los nombre de la carpeta y del archivo (no necesariamente los nombres de las pistas). Una vez que haya encontrado la pista que desee reproducir, pulse la bobina de navegación o pulse en el mando a distancia.
  • Seite 188 La música compartida en la Sección 5.5.1 es una forma de reproducir música en la que se busca la lista de música y controla la reproducción desde el dispositivo. Este tema presenta otra manera de reproducir música donde no es necesario controlar la reproducción del dispositivo. Puede compartir archivos de música desde un PC, móvil o tableta Android, y directamente usar el PC, móvil o tableta Android o iPhone/iPad para controlar la reproducción de música del dispositivo.
  • Seite 189 Seleccione cualquier tipo de música de la biblioteca y elija reproducir en “Lenco Concerto” Aparece una caja de reproducción de música para la reproducción.
  • Seite 190 5.6.2 Control sobre el Smartphone/Tableta Puede buscar (con palabra clave: DLNA) e instalar aplicaciones comerciales gratuitas o comerciales de DLNA desde Google Play o Apple Store si usa un móvil, tableta Android o un iPhone/iPad. Se sugiere que emplee BubbleUPnp o VLC for Mobile en un móvil o tablet Android;...
  • Seite 191 5.7 DAB El modo DAB recibe radio digital DAB/DAB+ y muestra información sobre la emisora, reproducción y reproducción de pistas. 5.7.1 Búsqueda de emisoras La primera vez que selecciona el modo radio DAB o si la lista de emisoras está vacía, el dispositivo realiza automáticamente una búsqueda completa de emisoras.
  • Seite 192 emisoras y pulse OK para confirmarlo. La pantalla mostrará información de la emisora seleccionada, pista o se mostrará como emisión. 5.7.2 Presintonías Para guardar una presintonía DAB+, mantenga pulsado PRESET en el dispositivo o en el mando a distancia hasta que la pantalla muestre la pantalla de Presintonía guardada pulsando la tecla OK durante un periodo prolongado de tiempo.
  • Seite 193 5.7.4 Configuración  Compresión de tasa dinámica (DRC) Le permite comprimir la gama dinámica de audio (desconectada/baja/alta), si escucha música con una gama dinámica alta en un entorno ruidoso.  Orden de emisoras Le permite volver a establecer el orden de la lista de emisoras DAB+ para que sea bien alfanumérico, de grupos o válida.
  • Seite 194: Configuración

    Para seleccionar una presintonía, pulse PRESET en el dispositivo o en el mando a distancia; posteriormente seleccione una de las emisoras presintonizadas que se enumeran. Cuando se reproduce una emisora presintonizada, muestra 2 etc.) en la parte inferior de la pantalla. Puede almacenar hasta 10 de sus emisoras favoritas en la memoria.
  • Seite 195 (parpadea el icono BT en la parte inferior). Puede encender su smartphone/tableta/otros dispositivo Bluetooth para emparejarlo. El nombre del emparejamiento Bluetooth es “Lenco Concerto”. Puede controlar la reproducción de música en el dispositivo BT. Es compatible mediante reproducción/pausa/Pista siguiente/Pista anterior en el ando a distancia.
  • Seite 196 Pulse MODE o seleccione AUX IN (ENTRADA AUXILIAR) en el menú principal. Ajuste el volumen del dispositivo (y, si es necesario, del dispositivo fuente de audio) según requiera. 5.11 Sleep (Apagado) Para fijar el temporizador de sueño, seleccione Sleep (Sueño) en el menú principal o pulse SLEEP en el mando a distancia.
  • Seite 197 siguientes parámetros: Enable (Activar): Conectado/Desconectado, Frequency (Frecuencia): Diariamente, una vez, fines de semana o días laborables, Time (Hora) o Mode (Modo): Pitido, radio de Internet, DAB, FM o Spotify (si la hora de la alarma se ha fijado mediante Spotify, se activa mediante un pitido y posteriormente, pulse las aplicaciones de reproducir Spotify connect para reproducirlo.) Preset (Presintonizada): Última escuchada 1-10,...
  • Seite 198 HiFi para mejorar el rendimiento del sonido. 5.13.4 Aplicación UNDOK El Lenco Concerto se puede controlar por medio de una aplicación vía IOS o Smartphone/Tablet Android. Debe instalar la aplicación UNDOK, que se puede encontrar en la tienda de aplicaciones de Apple o en la Google Playstore.
  • Seite 199 Lenco Concerto con la aplicación UNDOK. Se perderá la conexión original, porque solo puede estar activa una conexión a la vez. Ya que Undok es un software de una empresa externa, Lenco no se hace responsable de los cambios en la funcionalidad de la aplicación. Si tiene alguna pregunta sobre la aplicación UNDOK, puede enviar un correo...
  • Seite 200 Coloque el dispositivo más próximo al router. Asegúrese de que la contraseña es correcta. No se encuentra ninguna emisora. Compruebe la red, así como el punto de acceso y el cortafuegos. La emisora puede no estar disponible en ese momento, inténtelo más tarde o seleccione otra emisora.
  • Seite 201 No puede seleccionarse el Asegúrese de que el dispositivo dispositivo desde la aplicación está conectado a la misma red Spotify. inalámbrica que su Smartphone o tableta. Necesitará una cuenta Spotify Premium para usar Spotify Connect. La música continúa Reinicie la aplicación Spotify. reproduciéndose en el dispositivo cuando cierra la aplicación Spotify.
  • Seite 202 7. Especificaciones Número de modelo Lenco Concerto Descripción Radio de Internet con DAB/DAB+/FM/Bluetooth Pantalla Pantalla a color 3.2", 320 x 240, TFT Red soportada IEEE 802.11 b/g/n inalámbrica (WiFi) Alcances de frecuencia BT y Bluetooth: 2402 – 2480 MHz wifi Wi-Fi: 2412 –...
  • Seite 203 UE. Garantía Lenco ofrece servicio y garantía en cumplimiento con las leyes de la Unión Europea, lo cual implica que, en caso de que su producto precise ser reparado (tanto durante como después del periodo de garantía), deberá contactar directamente con su distribuidor.
  • Seite 204 (Directiva sobre la Eliminación de Equipos Eléctricos y Electrónicos). Service (Servicio) Para obtener más información y soporte del departamento técnico, por favor, visite la página web www.lenco.com Lenco Benelux BV, Thermiekstraat 1a, 6361 HB, Países Bajos.

Inhaltsverzeichnis