Inhaltsverzeichnis
Werbung
Verfügbare Sprachen
Verfügbare Sprachen
Quicklinks
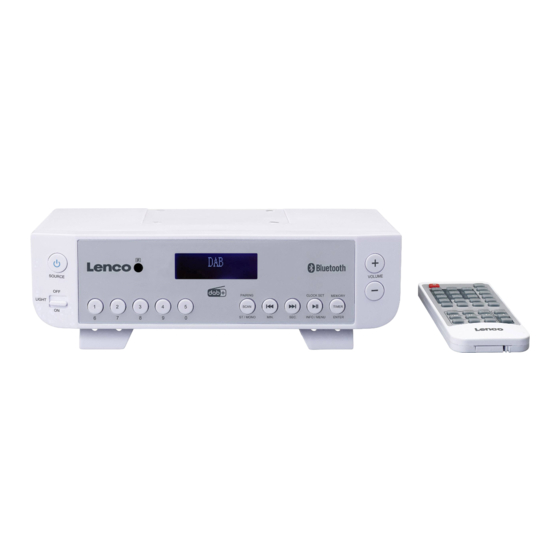
Model KCR-200
User manual – Kitchen radio DAB+/FM with bluetooth, light and timer
Gebruikershandleiding – Keukenradio DAB+/FM met Bluetooth, verlichting en timer
Bedienungsanleitung – Küchenradio DAB+ / FM mit Bluetooth, Beleuchtung und Zeitschaltuhr
Mode d'emploi - Radio de cuisine DAB+/FM avec Bluetooth, éclairage et minuteur
Manual de usuario – Radio de cocina DAB+/FM con Bluetooth, iluminación y temporizador
Werbung
Inhaltsverzeichnis

Verwandte Anleitungen für LENCO KCR-200


Inhaltszusammenfassung für LENCO KCR-200
- Seite 1 Model KCR-200 User manual – Kitchen radio DAB+/FM with bluetooth, light and timer Gebruikershandleiding – Keukenradio DAB+/FM met Bluetooth, verlichting en timer Bedienungsanleitung – Küchenradio DAB+ / FM mit Bluetooth, Beleuchtung und Zeitschaltuhr Mode d’emploi - Radio de cuisine DAB+/FM avec Bluetooth, éclairage et minuteur...
-
Seite 2: Inhaltsverzeichnis
Index English ....................................3 Nederlands ................................... 19 Deutsch ....................................35 Français ....................................51 Español ....................................67 Version: 1.0... -
Seite 3: English
English KCR-200 CAUTION: Usage of controls or adjustments or performance of procedures other than those specified herein may result in hazardous radiation exposure. This unit should not be adjusted or repaired by anyone except qualified service personnel. PRECAUTIONS BEFORE USE KEEP THESE INSTRUCTIONS IN MIND: Do not use this device near water. -
Seite 4: Accessories
34. Make sure the unit is adjusted to a stable position. Damage caused by using this product in an unstable position or by failure to follow any other warning or precaution contained within this user manual will not be covered by warranty. 35. - Seite 5 MOUNTING THE SET UNDER A CABINET Decide the location to install the unit in the cabinet/shelf. Since the unit’s speakers are located on the left edge side and right edge side respectively, it is recommended to reserve enough space to avoid blocking the sound. Once the location is decided, you can use the drill hole paper template (supplied) as a guide hole location to drill the holes.
-
Seite 6: Numeric Buttons
FRONT PANEL 1. STANDBY / SOURCE Press to turn on the unit. When it is turned on, press this button will toggle between DAB+, FM and Bluetooth mode. Press and hold to turn off and go to Standby mode 2. LIGHT ON / OFF Slide to turn on or turn off the downward lighting 3. -
Seite 7: Remote Control
REMOTE CONTROL STANDBY NUMERIC BUTTONS TUNE TUNE INFO SCAN MENU BT PREVIOUS BT NEXT BT PLAY/PAUSE TIMER MIN. SEC. VOLUME + VOLUME – MUTE ST / MONO MEMORY / ENTER PAIRING SLEEP CLOCK SET SOURCE Remote Control Battery Installation A CR2025 battery is already installed in the remote control unit. Before using, pull out the battery insulation sheet as shown below. - Seite 8 To replace a new battery, please refer to the figure shown below. When inserting a battery, be sure to do so in the proper direction. Battery case Pull out the battery case Push in according to this direction CR2025 battery •...
-
Seite 9: Installing The Batteries
INSTALLING THE BATTERIES FOR CLOCK BACKUP The clock will be maintained during a power failure by installing 2 x AAA / LR03 batteries (not supplied). Once the power is restored, check the clock to make sure it is accurate and set it again if necessary. INSTALLING THE BATTERIES 1. - Seite 10 Storing DAB+ Presets You can save up to 20 DAB+ stations. 1. Tune to the station you wish to store. 2. Press and hold the MEMORY button on the unit (the MEMORY button on the remote control). Preset channel number is displayed. 3.
- Seite 11 Displaying DAB+ Station Information There are several types of information as listed below. To change the display information, press the INFO / MENU button (the INFO button on the remote control) repeatedly. 1. Radio Text scrolling Shows music titles or program details provided by the broadcaster 2.
-
Seite 12: Fm Radio Operation
FM RADIO OPERATION Auto Scan 1. Turn on the unit in FM mode. 2. Press and hold the SCAN button on the unit (or press the SCAN button on the remote control) to start auto-scanning and saving the available channels (max. 20 storage). Preset channel number “S”... - Seite 13 Recall Stored FM Presets (Through Menu Operation) 1. Press and hold the INFO / MENU button on the unit (or press the MENU button on the remote control) to access the menu operation. 2. Press the button on the unit (the button on the remote control) until “Preset Recall”...
-
Seite 14: Bluetooth Audio
2. If the unit has never been paired with a Bluetooth device before or cannot find the last paired device, the display will keep flashing. Turn on the Bluetooth function of your device and enable the search until “Lenco KCR-200” is found. Select “Lenco KCR-200” on the Bluetooth device to make connection. -
Seite 15: Time Setup
TIME SETUP This setup allows you to setup 4 different display modes. They are set Time/Date, time update mode, set 12/24 hour display and set date format. Set 12/24 Hour Display 1. Turn on the unit in DAB mode or FM mode. 2. -
Seite 16: Language Setup
Set Time/Date 1. Turn on the unit in DAB mode or FM mode. 2. Press and hold the INFO / MENU button on the unit (or press the MENU button on the remote control) to access the menu control. 3. Press the button until “System”... - Seite 17 Trouble Shooting No power • Ensure that the mains cable is connected securely. • Ensure that the unit is switched on. The remote control does not function • Use the remote control near to the unit. • Point the remote control at the remote control sensor on the unit. •...
-
Seite 18: Technical Specifications
• Our product is improved ceaselessly and the specification and function may be changed without prior notice. GUARANTEE Lenco offers service and warranty in accordance with the European law, which means that in case of repairs (both during and after the warranty period) you should contact your local dealer. -
Seite 19: Nederlands
Nederlands KCR-200 LET OP: Gebruik van bedieningen of afstellingen of uitvoer van procedures anders dan gespecificeerd in deze documentatie kan leiden tot blootstelling aan schadelijke straling. Dit apparaat dient uitsluitend te worden aangepast of gerepareerd door gekwalificeerd onderhoudspersoneel. VOORZORGSMAATREGELEN VOOR GEBRUIK ONTHOUD DE VOLGENDE INSTRUCTIES: Gebruik dit apparaat niet in de buurt van water. - Seite 20 31. Het nominale specificatielabel is te vinden op het paneel aan de onder- of achterkant van het apparaat. 32. Dit apparaat is niet bestemd voor gebruik door mensen (inclusief kinderen) met fysieke, zintuiglijke of geestelijke gebreken of gebrek aan kennis en ervaring, tenzij zij onder toezicht staan of instructies hebben over het juiste gebruik van het apparaat hebben gekregen van de persoon die verantwoordelijk is voor hun veiligheid.
- Seite 21 Let op Als de batterij onjuist wordt geplaatst, bestaat er explosiegevaar. Vervang de batterij alleen door een zelfde of vergelijkbare soort batterij. DE SET ONDER EEN KASTJE MONTEREN Bepaal op welke plek u het apparaat onder het kastje/de schap wilt installeren. Omdat de luidsprekers van het apparaat aan de linker- en rechterzijden zijn geplaatst, raden wij u aan genoeg ruimte over te laten zodat het geluid niet wordt geblokkeerd.
-
Seite 22: Voorpaneel
VOORPANEEL 1. STAND-BY /BRON Indrukken om het apparaat in te schakelen. Als het is ingeschakeld, drukt u op deze toets om te wisselen tussen de modi DAB+, FM en Bluetooth. Indrukt houden om uit en op stand-by te schakelen 2. LICHT AAN/UIT Schuiven om de naar onder gerichte verlichting in of uit te schakelen 3. - Seite 23 AFSTANDSBEDIENING Stand-by NUMERIEKE TOETSEN AFSTEMMEN AFSTEMMEN INFO SCAN MENU BT VORIGE BT VOLGENDE BT START/PAUZE TIMER MINIMAAL SEC. VOLUME + VOLUME – DEMP Kanaal+ Kanaal- ST/MONO GEHEUGEN/ENTER KOPPELEN SLAPEN KLOKINSTELLING BRON De batterij in de afstandsbediening installeren Er is al een CR2025 batterij geïnstalleerd in de afstandsbediening. Trek vóór gebruik de isolatiestrip van de batterij af, zoals hieronder staat afgebeeld.
- Seite 24 Raadpleeg a.u.b. de afbeelding hieronder als u de batterij door een nieuwe wilt vervangen. Let a.u.b. op de juiste polariteitrichting wanneer u een batterij installeert. Batterijhouder De batterijhouder uittrekken In deze richting indrukken CR2025 batterij • Als deze afstandsbediening interferentie ontvangt van andere apparatuur, dan zal de werking ervan worden aangetast. •...
-
Seite 25: De Batterijen Installeren
INSTALLEREN VAN DE BATTERIJEN VOOR KLOK BACK-UP De klok zal worden gehandhaafd tijdens een stroomstoring door het installeren van 2 x AAA/LR03 batterijen (niet meegeleverd). Nadat de stroom eenmaal is hersteld, controleer dan of de klok nog steeds nauwkeurig is en stel eventueel opnieuw in. DE BATTERIJEN INSTALLEREN 1. - Seite 26 DAB+-stationsgeheugens opslaan U kunt tot op 20 DAB+-stations opslaan. 1. Stem af op het station dat u wilt opslaan. 2. Houdt de toets MEMORY ingedrukt op het apparaat (de toets MEMORY op de afstandsbediening). Het nummer van voorkeuzekanaal wordt weergegeven. 3.
- Seite 27 DAB+-stationsinformatie weergeven Er zijn verschillende soorten informatie beschikbaar, zoals hieronder vermeld. Om de informatie van het display te veranderen, druk herhaaldelijk op de toets INFO/MENU (de toets INFO op de afstandsbediening). 1. Scrollende radiotekst Toont muziektitels of programmadetails verstrekt door de zender 2.
-
Seite 28: Fm-Radiobediening
FM-RADIOBEDIENING Automatische scan 1. Schakel het apparaat in op FM-modus. 2. Houdt de toets SCAN ingedrukt op het apparaat (of druk op de toets SCAN in op de afstandsbediening) om te beginnen met automatisch scannen en de beschikbare kanalen op te slaan (max. opslag 20). Nummer voorkeuzekanaal “S”... - Seite 29 Opgeslagen FM-stationsgeheugens herroepen (via Menu-bediening) 1. Houdt de toets INFO/MENU op het apparaat ingedrukt (of druk op de toets MENU op de afstandsbediening) om toegang te krijgen tot het menubediening. 2. Druk op de toets op het apparaat (de toets op de afstandsbediening) totdat “Preset Recall (Voorkeuze Herroepen)”...
-
Seite 30: Bluetooth-Audio
2. Als het apparaat nog nooit eerder is gepaard met een Bluetooth-apparaat of het laatste gepaarde apparaat niet kan vinden, dan zal de display blijven knipperen. Schakel de Bluetooth-functie van uw apparaat in en laat deze zoeken totdat “Lenco KCR-200” is gevonden. -
Seite 31: Tijd Instellen
TIJD INSTELLEN U kunt met deze instelling 4 verschillende weergavemodi instellen. Deze modi zijn Tijd-/datuminstelling, Tijdupdate, 12/24 uurformaat en Datumformaat. 12/24 uurformaat instellen 1. Schakel het apparaat in op DAB- of FM-modus. 2. Houdt de toets INFO/MENU op het apparaat ingedrukt (of druk op de toets MENU op de afstandsbediening) om toegang te krijgen tot het menu. -
Seite 32: De Softwareversie Controleren
Instellen tijd en datum 1. Schakel het apparaat in op DAB- of FM-modus. 2. Houdt de toets INFO/MENU op het apparaat ingedrukt (of druk op de toets MENU op de afstandsbediening) om toegang te krijgen tot het menu. 3. Druk op de toets totdat “System (Systeem)”... - Seite 33 ENERGIEBESPARING Als gevolg van ErP fase 2 vereisten en bescherming van het milieu, zal het apparaat automatisch uitschakelen en in de stand-bymodus zodra er geen muziek in Bluetooth-modus is afgespeeld de afgelopen 15 minuten. Wanneer het apparaat is uitgeschakeld wegens ErP, dan kunt u op de toets STANDBY drukken om het apparaat weer in te schakelen. Probleemoplossing Geen spanning •...
-
Seite 34: Technische Specificaties
GARANTIE Lenco biedt service en garantie aan overeenkomstig met de Europese wetgeving. Dit houdt in dat u, in het geval van reparaties (zowel tijdens als na de garantieperiode), uw lokale handelaar moet contacteren. Belangrijke opmerking: Het is niet mogelijk om producten die moeten worden gerepareerd rechtstreeks naar Lenco te sturen. -
Seite 35: Deutsch
Deutsch KCR-200 ACHTUNG: Eine andere als die hier beschriebene Bedienung, Einstellung oder Verwendung der Funktionen kann zu gefährlicher Strahlenbelastung führen. Dieses Gerät darf nur von qualifizierten Fachkräften und niemand anderem repariert oder eingestellt werden. VORSICHTSMASSNAHMEN VOR DER BENUTZUNG BEFOLGEN SIE IMMER FOLGENDE ANWEISUNGEN: Benutzen Sie das Gerät nicht in der Nähe von Wasser. - Seite 36 30. Das Gerät darf nur bei gemäßigten Temperaturen verwendet werden. Sehr kalte und heiße Umgebungen sind zu vermeiden. 31. Das Typenschild befindet sich auf der Unter- oder Rückseite des Gerätes. 32. Dieses Gerät ist nicht zur Benutzung durch Personen (auch Kinder) mit physischen, sensorischen oder mentalen Beeinträchtigungen oder ohne ausreichender Erfahrung vorgesehen, es sei denn, sie werden durch eine verantwortliche Person beaufsichtigt oder wurden in die ordnungsgemäße Bedienung des Gerätes durch eine für ihre Sicherheit verantwortlichen Person eingewiesen.
-
Seite 37: Montage Des Geräts Unter Einen Schrank
Achtung Explosionsgefahr bei falsch eingesetzter Batterie. Nur mit Batterien des gleichen oder entsprechenden Typs ersetzen. MONTAGE DES GERÄTS UNTER EINEN SCHRANK Entscheiden Sie, an welchem Standort Sie das Gerät im Schrank/Regal montieren möchten. Da sich die Gerätelautsprecher an der rechten und linken Seitenkante befinden, wird empfohlen, ausreichend Platz vorzusehen, um zu vermeiden, dass der Ton blockiert wird. -
Seite 38: Vorderansicht
VORDERANSICHT 1. STANDBY /QUELLE Drücken Sie die Taste, um das Gerät einzuschalten. Wenn es eingeschaltet ist, drücken Sie diese Taste, um zwischen DAB+, FM- und Bluetooth-Modus zu wechseln. Halten Sie die Taste gedrückt, um das Gerät auszuschalten und den Standby-Modus aufzurufen 2. -
Seite 39: Fernbedienung
FERNBEDIENUNG BEREITSCHAFTSMODUS ZIFFERNTASTEN ABSTIMMEN ABSTIMMEN INFO SENDERSUCHLAUF MENÜ VORHERIGER BLUETOOTH-TITEL NÄCHSTER BLUETOOTH-TITEL BLUETOOTH WIEDERGABE/PAUSE ZEITSCHALTUHR MIN. SEK. LAUTSTÄRKE + LAUTSTÄRKE - STUMM SENDER+ SENDER- ST/MONO SPEICHER/EINGABE KOPPELN EINSCHLAFAUTOMATIK UHREINSTELLUNG QUELLE Batterie in die Fernbedienung einlegen In der Fernbedienung befindet sich bereits eine CR2025-Knopfzelle. Entfernen Sie wie nachstehend gezeigt vor der Inbetriebnahme die Isolationsfolie von der Batterie. - Seite 40 Folgen Sie für das Ersetzen der Batterie nachfolgender Abbildung. Achten Sie beim Einlegen der Batterie auf die richtige Ausrichtung der Batterie. Batteriefach Batteriefach herausziehen In die angezeigte Richtung drücken CR2025-Knopfzelle • Wenn die Fernbedienung und andere Geräte sich gegenseitig stören, kann dies ihren Betrieb beeinflussen. •...
-
Seite 41: Einlegen Der Batterien Für Den Uhr-Ausfallschutz
EINLEGEN DER BATTERIEN FÜR DEN UHR-AUSFALLSCHUTZ Die Uhrzeit bleibt während eines Stromausfalls erhalten, wenn Sie 2 x AAA/LR03 Batterien (nicht im Lieferumfang enthalten) einlegen. Sobald die Stromversorgung wiederhergestellt ist, überprüfen Sie die Uhr auf ihre Richtigkeit und stellen Sie sie bei Bedarf wieder ein. - Seite 42 DAB+-Radiosender speichern Sie können bis zu 20 DAB+-Radiosender speichern. 1. Stellen Sie den Radiosender ein, den Sie speichern möchten. 2. Halten Sie die Taste MEMORY am Gerät gedrückt (die Taste MEMORY auf der Fernbedienung). Die vorbelegte Sendernummer wird angezeigt. 3. Drücken Sie die Taste oder am Gerät (die Taste TUNE /TUNE...
-
Seite 43: Weitere Dab+-Menübedienung
Anzeige von DAB+-Radiosenderinformationen Unten sind die verschiedenen Arten von Informationen aufgeführt. Um die Anzeigeinformationen zu ändern, drücken Sie wiederholt die Taste INFO/MENU (Taste INFO auf der Fernbedienung). 1. Radio-Lauftext Zeigt Musiktitel oder Programmdetails, die vom Rundfunkanbieter übertragen werden 2. Signalleiste Stärke des empfangenen Signals. -
Seite 44: Fm-Radiobedienung
FM-RADIOBEDIENUNG Automatischer Suchlauf 1. Wechseln Sie in den FM-Modus. 2. Halten Sie die Taste SCAN am Gerät gedrückt (oder drücken Sie SCAN auf der Fernbedienung), um die automatische Suche zu starten und die verfügbaren Sender zu speichern (max. 20 Speicherplätze). Vorbelegte Sendernummer „S“... -
Seite 45: Radiotext
Abrufen von FM Voreinstellungen (über Menübedienung) 1. Halten Sie die Taste INFO/MENU am Gerät gedrückt (oder drücken Sie die Taste MENU auf der Fernbedienung), um die Menübedienung aufzurufen. 2. Drücken Sie die Taste oder am Gerät (Taste TUNE /TUNE auf der Fernbedienung), bis „Preset Recall“ (Voreinstellung abrufen angezeigt wird und drücken Sie anschließend ENTER. -
Seite 46: Einschlaffunktion
2. Wenn das Gerät noch nie mit einem Bluetooth-Gerät verbunden war oder das zuletzt verbundene Gerät nicht finden kann, dann blinkt die Anzeige weiter. Schalten Sie die Bluetooth-Funktion Ihres Gerätes ein und aktivieren Sie die Suche, bis „Lenco KCR-200“ gefunden wurde. Wählen Sie auf dem Bluetooth-Gerät „Lenco KCR-200“, um eine Verbindung herzustellen. Geben Sie, falls erforderlich, den Zugangscode „0000“... -
Seite 47: Zeit Einstellen
ZEIT EINSTELLEN Diese Einstellung bietet Ihnen die Einstellung von 4 verschiedene Anzeigemodi. Eingestellt werden Zeit/Datum, Zeitaktualisierungsmodus, 12/24 Stundenanzeige und Datenformat einstellen. 12/24 Stundenanzeige einstellen 1. Wechseln Sie hierfür in den DAB- oder FM-Modus. 2. Halten Sie die Taste INFO/MENU am Gerät gedrückt (oder drücken Sie die Taste MENU auf der Fernbedienung), um auf die Menüsteuerung zuzugreifen. -
Seite 48: Spracheinstellung
Uhrzeit/Datum einstellen 1. Wechseln Sie hierfür in den DAB- oder FM-Modus. 2. Halten Sie die Taste INFO/MENU am Gerät gedrückt (oder drücken Sie die Taste MENU auf der Fernbedienung), um auf die Menüsteuerung zuzugreifen. 3. Drücken Sie die Taste oder , bis „System“... -
Seite 49: Energie Sparen
ENERGIESPAREN Aufgrund der Anforderungen ErP Stufe 2 und zum Schutz der Umwelt geht das Gerät automatisch in den Standby-Modus, wenn im Bluetooth-Modus 15 Minuten lang keine Musik wiedergegeben wurde. Wenn das Gerät auf Grund des ErP ausgeschaltet wird, können Sie die Taste STANDBY drücken, um das Gerät wieder einzuschalten. Fehlersuche Kein Strom •... -
Seite 50: Technische Spezifikationen
Änderungen. GARANTIE Lenco bietet Leistungen und Garantien im Einklang mit Europäischem Recht. Im Falle von Reparaturen (sowohl während als auch nach Ablauf der Garantiezeit) sollten Sie deshalb Ihren Einzelhändler kontaktieren. Wichtiger Hinweis: Es ist nicht möglich, Produkte für Reparaturen direkt an Lenco zu schicken. -
Seite 51: Français
Français KCR-200 ATTENTION : L’utilisation de commandes ou de réglages ou l’exécution de procédures autres que ceux spécifiés dans ce manuel peut entraîner une exposition à des rayonnements dangereux. Cet appareil ne doit pas être réglé ou réparé par quiconque d’autre que du personnel qualifié. - Seite 52 31. La plaque signalétique se situe en dessous ou à l’arrière de l’appareil. 32. Cet appareil n’est pas destiné à être utilisé par des personnes (enfants compris) souffrant de handicaps physiques, sensoriels ou mentaux, ou manquant d’expérience et de connaissances, sauf si elles sont sous surveillance ou ont reçu des instructions sur l’utilisation correcte de l’appareil par la personne qui est responsable de leur sécurité.
- Seite 53 Attention Risque d’explosion si les piles sont mal remplacées. Remplacez les piles par des piles d’un type identique ou équivalent. FIXATION DE L’ENSEMBLE SOUS UN PLACARD Déterminez l’endroit où installer l’appareil dans le placard/l’étagère. Étant donné que les haut-parleurs de l’appareil sont placés respectivement du côté...
-
Seite 54: Pavé Numérique
FAÇADE 1. VEILLE /SOURCE Appuyez dessus pour mettre en marche l’appareil. Lorsque l’appareil est allumé, appuyez sur cette touche pour alterner entre les modes DAB+, FM et Bluetooth. Maintenez appuyée pour passer en mode veille 2. ALLUMER/ÉTEINDRE L’ÉCLAIRAGE Faites glisser pour allumer ou éteindre l’éclairage vers le bas 3. - Seite 55 TÉLÉCOMMANDE MISE EN VEILLE PAVÉ NUMÉRIQUE SYNTONISER SYNTONISER INFO RECHERCHE MENU BT PRÉCÉDENT BT SUIVANT BT LECTURE/PAUSE MINUTERIE MIN. SEC. VOLUME + VOLUME – SOURDINE STATION+ STATION- ST/MONO MÉMOIRE/ENTRÉE APPAIRAGE SOMMEIL RÉGLAGE DE L’HORLOGE SOURCE Installation de la pile de la télécommande Une pile CR2025 est déjà...
- Seite 56 Pour installer une pile neuve, consultez la figure ci-dessous. En installant une pile, veillez à suivre les instructions. Compartiment à pile Sortez le compartiment à pile Poussez dans ce sens Pile CR2025 • Si la télécommande entre en conflit avec d’autres appareils, le fonctionnement sera affecté. •...
-
Seite 57: Installation Des Piles
INSTALLATION DES PILES POUR LA SAUVEGARDE DE L’HORLOGE L’heure est maintenue en cas de panne de courant avec l’installation de 2 piles AAA/LR03 (non fournies). Une fois le courant rétabli, vérifiez l’heure pour s’assurer qu’elle est correcte et la régler si nécessaire. INSTALLATION DES PILES 1. - Seite 58 Mémorisation des présélections DAB+ Vous pouvez mémoriser 20 stations DAB+ au maximum. 1. Syntonisez la station à mémoriser. 2. Maintenez enfoncée la touche MEMORY de l’appareil (la touche MEMORY de la télécommande). Le numéro de chaîne présélectionnée est affiché. 3. Appuyez sur la touche de l’appareil (la touche TUNE /TUNE de la télécommande) sur le numéro de...
- Seite 59 Affichage des informations d’une station DAB+ Les différents types d’informations existants sont mentionnés ci-dessous. Pour changer les informations affichées, appuyez à plusieurs reprises sur la touche INFO/MENU (la touche INFO de la télécommande). 1. Défilement du texte de radio Affiche des titres de musique ou des détails de programme fournis par le diffuseur 2.
-
Seite 60: Utilisation De La Radio Fm
UTILISATION DE LA RADIO FM Recherche automatique 1. Mettez l’appareil en marche et réglez-le en mode FM. 2. Maintenez enfoncée la touche SCAN de l’appareil (ou appuyez sur la touche SCAN de la télécommande) pour lancer la recherche automatique et enregistrer les chaînes disponibles (maximum de 20 mémoires). Numéro de chaîne présélectionné... - Seite 61 Charger des présélections FM (en mode menu) 1. Maintenez enfoncée la touche INFO/MENU de l’appareil (ou appuyez sur la touche MENU de la télécommande) pour accéder au mode menu. 2. Appuyez sur la touche de l’appareil (la touche TUNE /TUNE de la télécommande) jusqu’à...
-
Seite 62: Audio Bluetooth
à clignoter. Activez la fonction Bluetooth de votre appareil et activez la recherche jusqu’à ce qu’il ait trouvé « Lenco KCR-200 ». Sélectionnez « Lenco KCR-200 » sur l’appareil Bluetooth pour établir une connexion. Saisissez le mot de passe «... - Seite 63 CONFIGURATION DE L’HEURE Cette configuration vous permet de régler 4 modes d’affichage différents. Ce sont les suivants : régler l’heure/la date, mode de mise à jour de l’heure, régler l’affichage de l’heure au format 12/24 et régler le format de date. Réglage au format 12/24 heures 1.
-
Seite 64: Configuration De La Langue
Réglage de l’heure/date 1. Mettez l’appareil en marche et réglez-le en mode DAB ou FM. 2. Maintenez enfoncée la touche INFO/MENU de l’appareil (ou appuyez sur la touche MENU de la télécommande) pour accéder aux commandes de menu. 3. Appuyez sur la touche jusqu’à... -
Seite 65: Allumer/Éteindre L'éclairage
ALLUMER/ÉTEINDRE L’ÉCLAIRAGE Faites glisser le commutateur MARCHE/ARRÊT de l’éclairage sur le panneau avant pour allumer ou éteindre l’éclairage vers le bas. ÉCONOMIE D’ÉNERGIE En raison des exigences de la phase 2 de l’ErP et de la protection de l’environnement, l’appareil se mettra automatiquement en mode veille quand aucune musique n’est lue en mode Bluetooth pendant environ 15 minutes. -
Seite 66: Caractéristiques Techniques
• Étant donné que nous améliorons constamment nos produits, leurs caractéristiques et fonctions peuvent changer sans préavis. GARANTIE Lenco propose un service et une garantie conformément à la législation européenne, ce qui signifie qu’en cas de besoin de réparation (aussi bien pendant et après la période de garantie), vous pouvez contacter votre revendeur le plus proche. -
Seite 67: Español
Español KCR-200 PRECAUCIÓN: El uso de los controles o ajustes o el funcionamiento de los procedimientos excepto a aquellos especificados aquí pueden provocar una exposición peligrosa a la radiación. Esta unidad no debe ajustarse o repararse por ninguna persona salvo personal de servicio cualificado. - Seite 68 32. Este aparato no está diseñado para su uso por personas (incluyendo niños) con discapacidades físicas, sensoriales o mentales o con falta de experiencia o conocimientos, salvo que estén bajo la supervisión o hayan recibido formación sobre el uso correcto del dispositivo por parte de una persona responsable de su seguridad. 33.
- Seite 69 Precaución Existe riesgo de explosión si la pila no se sustituye correctamente. Sustitúyala únicamente con otra del mismo tipo u otro equivalente. MONTAJE DEL CONJUNTO BAJO UN ARMARIO Decida la ubicación para instalar la unidad en el armario / estantería. Como los altavoces de la unidad están situados en el borde del lateral izquierdo respectivamente, se recomienda reservar espacio suficiente para evitar bloquear el sonido.
- Seite 70 PANEL FRONTAL 1. EN ESPERA /FUENTE Púlselo para encender la unidad. Cuando se encienda, pulsar este botón cambiará entre el modo DAB+, FM y el modo Bluetooth. Manténgalo pulsado para apagarlo y entrar en modo en espera. 2. ENCENDER/APAGAR LUZ Deslícelo para encender o apagar la iluminación inferior.
-
Seite 71: Mando A Distancia
MANDO A DISTANCIA ESPERA BOTONES NUMÉRICOS SINTONIZAR SINTONIZAR INFORMCIÓN BÚSQUEDA MENÚ BT ANTERIOR BT SIGUIENTE REPRODUCCIÓN / PAUSA DEL BT TEMPORIZADOR MÍN. SEG. VOLUMEN + VOLUMEN – SILENCIO ESTÉREO/MONO MEMORIA / INTRO EMPERTAJAMIENTO SUSPENSIÓN AJUSTAR RELOJ FUENTE Instalación de la pila del mando a distancia En la unidad del mando a distancia ya se encuentra instalada una pila CR2025. - Seite 72 Para sustituir una pila nueva, por favor, remítase a la figura que se muestra debajo. Cuando inserte una pila, asegúrese de hacerlo en la dirección correcta. Porta pilas Saque el porta pilas Empújela según esta dirección Pila CR2025 • Si el mando a distancia entra en conflicto con otros dispositivos, se verá afectado el funcionamiento. •...
-
Seite 73: Instalación De Las Pilas
INSTALACIÓN DE LAS PILAS PARA EL RESPALDO DEL RELOJ El reloj se mantendrá durante un fallo de corriente instalando 2 pilas AAA / LR03 (no incluidas). Una vez que se restaure la alimentación, compruebe el reloj para asegurarse de que está bien y vuélvalo a configurar si es necesario. INSTALACIÓN DE LAS PILAS 1. - Seite 74 Guardar presintonías DAB+ Puede guardar hasta 20 emisoras DAB+. 1. Sintonice la emisora que desee guardar. 2. Mantenga pulsado el botón MEMORY en la unidad (el botón MEMORY en el mando a distancia). Se muestra el número del canal presintonizado. 3.
- Seite 75 Mostrar la información de la emisora DAB+ Existen varios tipos que información que se enumeran a continuación. Para cambiar la información de la pantalla, pulse el botón INFO / MENU (el botón INFO en el mando a distancia) de forma reiterada. 1.
-
Seite 76: Funcionamiento De La Radio Fm
FUNCIONAMIENTO DE LA RADIO FM Búsqueda automática 1. Encienda la unidad en modo FM. 2. Mantenga pulsado el botón SCAN en la unidad (o pulse el botón SCAN en el mando a distancia) para iniciar la búsqueda automática y guardar los canales disponibles (20 de almacenamiento máximo). Número de canal presintonizado “S”... - Seite 77 Recordar presintonías FM guardadas (Mediante el funcionamiento del menú) 1. Mantenga pulsado el botón INFO / MENU en la unidad (o pulse el botón MENU en el mando a distancia) para acceder al funcionamiento del menú. 2. Pulse el botón en la unidad (el botón en el mando a distancia) hasta que se muestre “Preset Recall (Recordar presintonía)”...
-
Seite 78: Configuración Del Temporizador
Encienda la función Bluetooth de su dispositivo y active la búsqueda hasta que se encuentre “Lenco KCR-200”. Seleccione “Lenco KCR-200” en el dispositivo Bluetooth para realizar la conexión. Introduzca la contraseña “0000” si la solicita. - Seite 79 CONFIGURACIÓN DE HORA Le permite configurar 4 modos de visualización diferentes. Son Ajuste de hora/fecha, modo de actualización de hora, ajuste del modo 12/24 horas y ajuste del formato de fecha. Ajuste del modo 12/24 horas 1. Encienda la unidad en modo DAB o en modo FM. 2.
-
Seite 80: Configuración De Idioma
Fecha/Hora 1. Encienda la unidad en modo DAB o en modo FM. 2. Mantenga pulsado el botón INFO / MENU en la unidad (o pulse el botón MENU en el mando a distancia) para acceder al control de menú. 3. Pulse el botón hasta que se muestre “System (Sistema)”... -
Seite 81: Ahorro De Energía
AHORRO DE ENERGÍA Debido a las exigencias de ErP fase 2 y para proteger el medioambiente, la unidad cambiará al modo en espera automáticamente cuando no se haya reproducido música en modo Bluetooth durante aproximadamente 15 minutos. Cuando la unidad se apague debido a ErP, puede pulsar el botón STANDBY para volver a encenderla. Solución de problemas No se enciende •... -
Seite 82: Especificaciones Técnicas
GARANTÍA Lenco ofrece servicio y garantía en cumplimiento con las leyes de la Unión Europea, lo cual implica que, en caso de que su producto precise ser reparado (tanto durante como después del periodo de garantía), deberá contactar directamente con su distribuidor.