Herunterladen Inhalt Inhalt Diese Seite drucken

Werbung

Verfügbare Sprachen
  • DE

Verfügbare Sprachen

  • DEUTSCH, seite 12
I. Product Overview
1. Record Button
2. Camera Lens
3. Indicator Light
II. What's in the box?
-1×USB Cable
-2× Double-Sided Foam Mounting Adhesive Tapes
-2× Screws
-1x DC5V 1A Charger Adapter
III. Get Things Ready
User Guide
Model Number: H200
4. Power Switch
5. USB Port
6. Micro SD Card Slot

Werbung

Inhaltsverzeichnis
loading

Inhaltszusammenfassung für Wiseup H200

  • Seite 1 User Guide Model Number: H200 I. Product Overview 1. Record Button 4. Power Switch 2. Camera Lens 5. USB Port 3. Indicator Light 6. Micro SD Card Slot II. What's in the box? -1×USB Cable -2× Double-Sided Foam Mounting Adhesive Tapes -2×...
  • Seite 2: Video Recording

    3.1 Charge the camera by a DC5V 1A USB Charger for 1 hour. 3.2 Insert a micro SDHC or SDXC memory card into the camera. The memory card capacity should not exceed 64GB in max. Note: a 16GB memory card has been inserted into this camera. IV.
  • Seite 3 4.2 Press the record button once to record video, the blue light indicator will flash once and then turn off. 4.3 Press the record button once again to stop video recording, the blue indicator light will be solid on, the video files will be saved in the memory card automatically.
  • Seite 4 4.4 Slide the power switch to the position "OFF" to turn off the camera. V. Motion Activated Video Recording 5.1 Slide the power switch to the position "ON" to turn on the camera, the blue indicator light will...
  • Seite 5 be solid on, indicating that the camera has entered into the standby mode. 5.2 Press the record button twice quickly to make this camera enter into motion activated video recording mode, the blue indicator light will flash 2 times and then turn off. 5.3 The camera will start to record video automatically when motion is detected.
  • Seite 6 5.5 Slide the power switch to the position "OFF" to turn off the camera. VI. Upload Video Files 6.1 Slide the power switch to the position "OFF" to turn off the camera.
  • Seite 7 6.2 Remove the memory card from the camera. 6.3 Insert the memory card into a card reader. Note: product price doesn't include any card readers, you need to have a card reader by yourself.
  • Seite 8 6.4 Insert the card reader into a proper computer, the memory card will be recognized as a removable disk drive. All the files can be accessed in the disk drive. VII. Time Stamp Setup 7.1 Slide the power switch to the position "OFF" to turn off the camera.
  • Seite 9 7.2 Connect the camera to your computer with the USB cable. 7.3 A removable disk drive folder will appear on your computer. 7.4 Open the text file “TIME.txt”. 7.5 Write the current date and time in the text file "TIME.txt" with the correct format:...
  • Seite 10: Important Notes

    YYYY-MM-DD HH:MM:SS Y (For example: 2022-08-08 00:00:00 Y). 7.6 Save the file and then disconnect this camera from the computer. 7.7 Turn on the camera, the system will upgrade the program automatically. 7.8 If you don't need the time stamp on the video, change "Y" into "N". VIII.
  • Seite 11 9.5 This camera could record video for 60 minutes continuously on a full charge 9.6 This camera support loop video recording, it will overwrite the beginning part of the video automatically when the memory card is full. Benutzerhandbuch Modellnummer: H200 I. Produktübersicht 1. Aufnahmetaste 2. Kameraobjektiv...
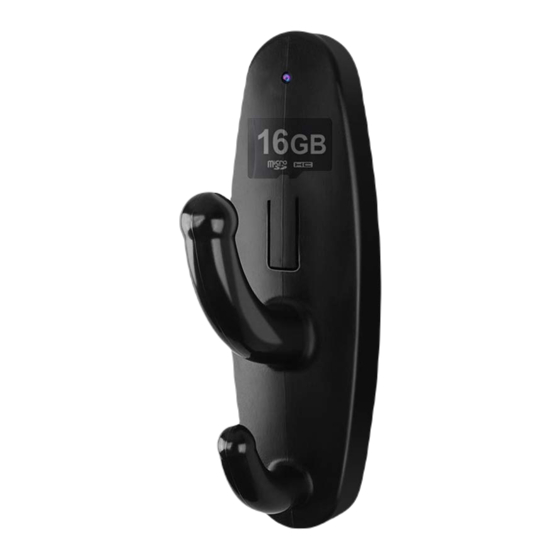
  • Seite 12 3. Kontrollleuchte 5. USB-Anschluss 4. Netzschalter 6. Micro SD-Kartensteckplatz II. Was ist in der Box? -1 × USB-Kabel -2 × doppelseitige Klebebänder zur Schaummontage -2 × Schrauben -1x DC5V 1A Ladeadapter III. Bereiten Sie die Dinge vor 3.1 Laden Sie die Kamera 1 Stunde lang mit einem DC5V 1A USB-Ladegerät auf. 3.2 Setzen Sie eine Micro-SDHC- oder SDXC-Speicherkarte in die Kamera ein.
  • Seite 13 Anzeigelampe leuchtet dauerhaft und zeigt an, dass die Kamera in den Standby-Modus eingetreten ist. 4.2 Drücken Sie die Aufnahmetaste einmal, um Videos aufzunehmen. Die blaue Lichtanzeige blinkt einmal und erlischt dann.
  • Seite 14 4.3 Drücken Sie die Aufnahmetaste erneut, um die Videoaufzeichnung zu beenden. Die blaue Anzeigelampe leuchtet dauerhaft und die Videodateien werden automatisch auf der Speicherkarte gespeichert. 4.4 Schieben Sie den Netzschalter in die Position "OFF", um die Kamera auszuschalten.
  • Seite 15: Bewegungsaktivierte Videoaufzeichnung

    V. Bewegungsaktivierte Videoaufzeichnung 5.1 Schieben Sie den Netzschalter in die Position "ON", um die Kamera einzuschalten. Die blaue Anzeigelampe leuchtet dauerhaft und zeigt an, dass die Kamera in den Standby-Modus eingetreten ist. 5.2 Drücken Sie die Aufnahmetaste zweimal schnell, um diese Kamera in den bewegungsaktivierten Videoaufzeichnungsmodus zu versetzen.
  • Seite 16 5.3 Die Kamera beginnt automatisch mit der Videoaufnahme, wenn eine Bewegung erkannt wird. 5.4 Drücken Sie die Aufnahmetaste erneut. Die Kamera kehrt in den Standby-Modus zurück. Die blaue Anzeigelampe leuchtet dauerhaft. 5.5 Schieben Sie den Netzschalter in die Position "OFF", um die Kamera auszuschalten.
  • Seite 17 VI. Laden Sie Videodateien hoch 6.1 Schieben Sie den Netzschalter in die Position "OFF", um die Kamera auszuschalten. 6.2 Entfernen Sie die Speicherkarte aus der Kamera.
  • Seite 18 6.3 Setzen Sie die Speicherkarte in einen Kartenleser ein. Hinweis: Der Produktpreis beinhaltet keine Kartenleser. Sie benötigen einen eigenen Kartenleser. 6.4 Setzen Sie den Kartenleser in einen geeigneten Computer ein. Die Speicherkarte wird als Wechseldatenträger erkannt. Auf alle Dateien kann auf dem Laufwerk zugegriffen werden.
  • Seite 19: Zeitstempel Einrichten

    VII. Zeitstempel einrichten 7.1 Schieben Sie den Netzschalter in die Position "OFF", um die Kamera auszuschalten. 7.2 Schließen Sie die Kamera mit dem USB-Kabel an Ihren Computer an.
  • Seite 20 7.3 Auf Ihrem Computer wird ein Ordner für Wechseldatenträger angezeigt. 7.4 Öffnen Sie die Textdatei “TIME.txt”. 7.5 Schreiben Sie das aktuelle Datum und die aktuelle Uhrzeit in die Textdatei "TIME.txt" mit dem richtigen Format: JJJJ-MM-TT HH: MM: SS Y (Beispiel: 2022-08-08 00:00:00 Y). 7.6 Speichern Sie die Datei und trennen Sie diese Kamera vom Computer.
  • Seite 21: Wichtige Notizen

    IX. Wichtige Notizen 9.1 Jeder Videoclip wird alle 15 Minuten im allgemeinen Videoaufzeichnungsmodus oder 5 Minuten im bewegungsaktivierten Videoaufzeichnungsmodus generiert und gespeichert. 9.2 Diese Kamera unterstützt das gleichzeitige Laden und Aufzeichnen. 9.3 Videoformat: AVI 9.4 Videoauflösung: 1920 x 1080 9.5 Diese Kamera kann bei voller Ladung 60 Minuten lang ununterbrochen Videos aufnehmen 9.6 Diese Kamera unterstützt Loop-Videoaufnahmen.
  • Seite 22: Aperçu Du Produit

    Mode d'emploi Numéro du modèle: H200 I. Aperçu du produit 1. Bouton d'enregistrement 4. Interrupteur d'alimentation 2. Objectif de la caméra 5. Port USB 3. Témoin lumineux 6. Emplacement pour carte Micro SD II. Qu'y a-t-il dans la boite? -1 × Câble USB -2 ×...
  • Seite 23 III. Préparez les choses 3.1 Chargez la camera avec un chargeur USB DC5V 1A pendant 1 heure. 3.2 Insérez une carte mémoire micro SDHC ou SDXC dans la camera. La capacité de la carte mémoire ne doit pas dépasser 64 Go au maximum. Remarque: une carte mémoire de 16 Go a été insérée dans cet appareil photo.
  • Seite 24 4.2 Appuyez une fois sur le bouton d'enregistrement pour enregistrer la vidéo, le voyant lumineux bleu clignotera une fois puis s'éteindra.
  • Seite 25 4.3 Appuyez à nouveau sur le bouton d'enregistrement pour arrêter l'enregistrement vidéo, le voyant bleu restera allumé, les fichiers vidéo seront automatiquement enregistrés sur la carte mémoire. 4.4 Faites glisser l'interrupteur d'alimentation sur la position “OFF” pour éteindre la caméra.
  • Seite 26 V. Enregistrement vidéo activé par le mouvement 5.1 Faites glisser l'interrupteur d'alimentation sur la position “ON” pour allumer la caméra, le voyant bleu restera allumé, indiquant que la caméra est entrée en mode veille. 5.2 Appuyez deux fois rapidement sur le bouton d'enregistrement pour faire entrer cette caméra en mode d'enregistrement vidéo activé...
  • Seite 27 5.3 La caméra commencera à enregistrer automatiquement la vidéo lorsqu'un mouvement est détecté. 5.4 Appuyez à nouveau sur le bouton d'enregistrement, la caméra reviendra en mode veille, le voyant bleu restera allumé. 5.5 Faites glisser l'interrupteur d'alimentation sur la position “OFF” pour éteindre la caméra.
  • Seite 28 VI. Télécharger des fichiers vidéo 6.1 Faites glisser l'interrupteur d'alimentation sur la position “OFF” pour éteindre la caméra. 6.2 Retirez la carte mémoire de la camera.
  • Seite 29 6.3 Insérez la carte mémoire dans un lecteur de carte. Remarque: le prix du produit n'inclut aucun lecteur de carte, vous devez disposer d'un lecteur de carte par vous-même. 6.4 Insérez le lecteur de carte dans un ordinateur approprié, la carte mémoire sera reconnue comme un lecteur de disque amovible.
  • Seite 30 VII. Configuration de l'horodatage 7.1 Faites glisser l'interrupteur d'alimentation sur la position “OFF” pour éteindre la caméra. 7.2 Connectez la camera à votre ordinateur avec le câble USB.
  • Seite 31: Mise En Charge

    7.3 Un dossier de lecteur de disque amovible apparaît sur votre ordinateur. 7.4 Ouvrez le fichier texte “TIME.txt”. 7.5 Écrivez la date et l'heure actuelles dans le fichier texte "TIME.txt" au format correct: AAAA-MM-JJ HH: MM: SS Y (Par exemple: 2022-08-08 00:00:00 Y). 7.6 Enregistrez le fichier, puis déconnectez cet appareil photo de l'ordinateur.
  • Seite 32 IX. Notes IMPORTANTES 9.1 Chaque clip vidéo sera généré et sauvegardé toutes les 15 minutes en mode d'enregistrement vidéo général ou 5 minutes en mode d'enregistrement vidéo activé en mouvement. 9.2 Cet appareil photo prend en charge la charge et l'enregistrement en même temps. 9.3 Format vidéo: AVI 9.4 Résolution vidéo: 1920 x 1080 9.5 Cette caméra peut enregistrer une vidéo pendant 60 minutes en continu sur une charge...
  • Seite 33: Panoramica Del Prodotto

    Guida utente Numero di modello: H200 I. Panoramica del prodotto 1. Pulsante di registrazione 4. Interruttore di alimentazione 2. Obiettivo della telecamera 5. Porta USB 3. Indicatore luminoso 6. Slot per scheda micro SD II. Cosa c'è nella scatola? -1 × Cavo USB -2 ×...
  • Seite 34: Registrazione Video

    III. Prepara le cose 3.1 Caricare la telecamera con un caricatore USB DC5V 1A per 1 ora. 3.2 Inserire una scheda di memoria micro SDHC o SDXC nella telecamera. La capacità della scheda di memoria non deve superare i 64 GB in max. Nota: in questa telecamera è stata inserita una scheda di memoria da 16 GB.
  • Seite 35 4.2 Premere una volta il pulsante di registrazione per registrare il video, l'indicatore luminoso blu lampeggerà una volta e poi si spegnerà.
  • Seite 36 4.3 Premere il pulsante di registrazione ancora una volta per interrompere la registrazione del video, la spia blu sarà accesa fissa, i file video verranno salvati automaticamente nella scheda di memoria. 4.4 Far scorrere l'interruttore di alimentazione in posizione "OFF" per spegnere la telecamera.
  • Seite 37 V. Registrazione video attivata dal movimento 5.1 Far scorrere l'interruttore di alimentazione in posizione "ON" per accendere la telecamera, l'indicatore luminoso blu sarà fisso, indicando che la telecamera è entrata in modalità standby. 5.2 Premere il pulsante di registrazione due volte velocemente per far entrare questa videocamera in modalità...
  • Seite 38 5.3 La telecamera inizierà a registrare il video automaticamente quando viene rilevato un movimento. 5.4 Premere ancora una volta il pulsante di registrazione, la telecamera tornerà in modalità standby, la spia blu sarà accesa fissa. 5.5 Far scorrere l'interruttore di alimentazione in posizione "OFF" per spegnere la telecamera.
  • Seite 39 VI. Carica file video 6.1 Far scorrere l'interruttore di alimentazione in posizione "OFF" per spegnere la telecamera. 6.2 Rimuovere la scheda di memoria dalla telecamera.
  • Seite 40 6.3 Inserire la scheda di memoria in un lettore di schede. Nota: il prezzo del prodotto non include alcun lettore di schede, è necessario disporre di un lettore di schede da solo. 6.4 Inserire il lettore di schede in un computer appropriato, la scheda di memoria verrà riconosciuta come unità...
  • Seite 41 VII. Configurazione timestamp 7.1 Far scorrere l'interruttore di alimentazione in posizione "OFF" per spegnere la telecamera. 7.2 Collegare la telecamera al computer con il cavo USB.
  • Seite 42 7.3 Una cartella di unità disco rimovibile apparirà sul tuo computer. 7.4 Aprire il file di testo "TIME.txt". 7.5 Scrivere la data e l'ora correnti nel file di testo "TIME.txt" con il formato corretto: AAAA-MM-GG HH:MM:SS Y (ad esempio: 2022-08-08 00:00:00 Y). 7.6 Salvare il file e quindi scollegare questa telecamera dal computer.
  • Seite 43: Note Importanti

    IX. Note importanti 9.1 Ciascun video clip verrà generato e salvato ogni 15 minuti in modalità di registrazione video generale o 5 minuti in modalità di registrazione video attivata dal movimento. 9.2 Questa telecamera supporta la ricarica e la registrazione allo stesso tempo. 9.3 Formato video: AVI 9.4 Risoluzione video: 1920 x 1080 9.5 Questa telecamera può...
  • Seite 44: Descripción General Del Producto

    Guía del usuario Número de modelo: H200 I. Descripción general del producto 1. Botón de grabación 4. Interruptor de encendido 2. Lente de la cámara 5. Puerto USB 3. Luz indicadora 6. Ranura para tarjeta Micro SD II. ¿Qué hay en la caja? -1 ×...
  • Seite 45: Grabación De Vídeo

    III. Prepara las cosas 3.1 Cargue la cámara con un cargador USB DC5V 1A durante 1 hora. 3.2 Inserte una tarjeta de memoria micro SDHC o SDXC en la cámara. La capacidad de la tarjeta de memoria no debe exceder los 64 GB como máximo. Nota: se ha insertado una tarjeta de memoria de 16 GB en esta cámara.
  • Seite 46 4.2 Presione el botón de grabación una vez para grabar video, el indicador de luz azul parpadeará una vez y luego se apagará.
  • Seite 47 4.3 Presione el botón de grabación una vez más para detener la grabación de video, la luz indicadora azul se mantendrá encendida, los archivos de video se guardarán en la tarjeta de memoria automáticamente. 4.4 Deslice el interruptor de encendido a la posición "OFF" para apagar la cámara.
  • Seite 48 V. Grabación de video activada por movimiento 5.1 Deslice el interruptor de encendido a la posición "ON" para encender la cámara, la luz indicadora azul estará encendida de manera fija, lo que indica que la cámara ha entrado en el modo de espera.
  • Seite 49 5.3 La cámara comenzará a grabar video automáticamente cuando se detecte movimiento. 5.4 Presione el botón de grabación una vez más, la cámara volverá al modo de espera, la luz indicadora azul permanecerá encendida. 5.5 Deslice el interruptor de encendido a la posición "OFF" para apagar la cámara.
  • Seite 50 VI. Cargar archivos de video 6.1 Deslice el interruptor de encendido a la posición "OFF" para apagar la cámara. 6.2 Retire la tarjeta de memoria de la cámara.
  • Seite 51 6.3 Inserte la tarjeta de memoria en un lector de tarjetas. Nota: el precio del producto no incluye ningún lector de tarjetas, debe tener un lector de tarjetas usted mismo. 6.4 Inserte el lector de tarjetas en una computadora adecuada, la tarjeta de memoria se reconocerá como una unidad de disco extraíble.
  • Seite 52 VII. Configuración de marca de tiempo 7.1 Deslice el interruptor de encendido a la posición "OFF" para apagar la cámara.
  • Seite 53 7.2 Conecte la cámara a su computadora con el cable USB. 7.3 Aparecerá una carpeta de la unidad de disco extraíble en su computadora. 7.4 Abra el archivo de texto “TIME.txt”. 7.5 Escriba la fecha y hora actual en el archivo de texto "TIME.txt" con el formato correcto: AAAA-MM-DD HH:MM:SS Y (por ejemplo: 2022-08-08 00:00:00 Y).
  • Seite 54: Notas Importantes

    IX. Notas importantes 9.1 Cada videoclip se generará y guardará cada 15 minutos en el modo de grabación de video general o 5 minutos en el modo de grabación de video activado por movimiento. 9.2 Esta cámara admite la carga y la grabación al mismo tiempo. 9.3 Formato de video: AVI 9.4 Resolución de video: 1920 x 1080 9.5 Esta cámara puede grabar video durante 60 minutos de forma continua con una carga completa...
  • Seite 55 ユーザーガイド モデル番号:H200 I.製品の概要 1. ビデオ録画ボタン 4. 電源スイッチ 2. カメラレンズ 5. USB ポート 3. インジケーターライト 6. マイクロ SD カードスロット II. 箱の中は何ですか? -1×USB ケーブル -2×両面フォーム取り付け粘着テープ -2×ネジ -1x DC5V1A 充電アダプター...
  • Seite 56 III. 準備をする 3.1 DC5V 1AUSB 充電器でカメラを 1 時間充電します。 3.2 マイクロ SDHC または SDXC メモリカードをカメラに挿入します。 メモリカードの容量は 最大 64GB を超えてはなりません。注:このカメラには 16GB のメモリーカードが挿入され ています。 IV. 録画 4.1 電源スイッチを「ON」の位置にスライドしてカメラの電源をオンにすると、青いインジ ケーターライトが点灯し、カメラがスタンバイモードに入ったことを示します。...
  • Seite 57 4.2 録画ボタンを 1 回押してビデオを録画すると、青色のライトインジケーターが 1 回点滅 してから消灯します。...
  • Seite 58 4.3 録画ボタンをもう一度押すと、ビデオの録画が停止します。青いインジケーターライト が点灯し、ビデオファイルがメモリカードに自動的に保存されます。 4.4 電源スイッチを「OFF」の位置にスライドさせて、カメラの電源を切ります。...
  • Seite 59 V.モーション起動ビデオ録画 5.1 電源スイッチを「ON」の位置にスライドしてカメラの電源をオンにすると、青いインジ ケーターライトが点灯し、カメラがスタンバイモードに入ったことを示します。 5.2 録画ボタンをすばやく 2 回押して、このカメラをモーション起動ビデオ録画モードにし ます。青いインジケーターライトが 2 回点滅してから、消灯します。...
  • Seite 60 5.3 動きが検出されると、カメラは自動的にビデオの録画を開始します。 5.4 もう一度録画ボタンを押すと、カメラがスタンバイモードに戻り、青いインジケーター ライトが点灯します。 5.5 電源スイッチを「OFF」の位置にスライドさせて、カメラの電源を切ります。...
  • Seite 61 VI.ビデオファイルをアップロードする 6.1 電源スイッチを「OFF」の位置にスライドさせて、カメラの電源を切ります。 6.2 カメラからメモリーカードを取り外します。...
  • Seite 62 6.3 メモリカードをカードリーダーに挿入します。注:製品価格にはカードリーダーは含ま れていません。カードリーダーはご自身でお持ちいただく必要があります。 6.4 カードリーダーを適切なコンピュータに挿入すると、メモリカードはリムーバブルディ スクドライブとして認識されます。 ディスクドライブ内のすべてのファイルにアクセスでき ます。...
  • Seite 63 VII. タイムスタンプの設定 7.1 電源スイッチを「OFF」の位置にスライドさせて、カメラの電源を切ります。 7.2 USB ケーブルでカメラをコンピューターに接続します。...
  • Seite 64 7.3 リムーバブルディスクドライブフォルダがコンピュータに表示されます。 7.4 テキストファイル”TIME.txt” を開きます。 7.5 現在の日付と時刻をテキストファイル”TIME.txt” に正しい形式で書き込みます。 YYYY-MM-DD HH:MM:SS Y(例:2022-08-08 00:00:00 Y)。 7.6 ファイルを保存してから、このカメラをコンピューターから切断します。 7.7 カメラの電源を入れると、システムがプログラムを自動的にアップグレードします。 7.8 ビデオにタイムスタンプが必要ない場合は、「Y」を「N」に変更します。 VIII. 充電 付属の USB ケーブルでカメラを DC5V1A USB 充電器アダプターに接続し、USB 充電器を AC90-230V 外部電源ソケットに接続してこのカメラを充電します。充電中は、赤と青の両方 のインジケーターライトが点灯します。 カメラが完全に充電されると、赤いインジケーター ライトがオフになり、青いインジケーターライトが点灯します。...
  • Seite 65 IX. 重要な注意事項 9.1 各ビデオクリップは、 一般的なビデオ録画モードでは 15 分ごとに、 モーション起動ビデ オ録画モードでは 5 分ごとに生成および保存されます。 9.2 このカメラは、充電と録画を同時にサポートします。 9.3 ビデオフォーマット:AVI 9.4 ビデオ解像度:1920 x 1080 9.5 このカメラは、フル充電で 60 分間連続してビデオを録画できます 9.6 このカメラはループビデオ録画をサポートしています。メモリカードがいっぱいになる と、ビデオの最初の部分が自動的に上書きされます。...

Inhaltsverzeichnis