Herunterladen Inhalt Inhalt Diese Seite drucken

Werbung

Verfügbare Sprachen
  • DE

Verfügbare Sprachen

  • DEUTSCH, seite 11
Quick Start Guide
Cruiser
www.imoulife.com

Werbung

Inhaltsverzeichnis
loading

Inhaltszusammenfassung für IMOU Cruiser

  • Seite 1 Quick Start Guide Cruiser www.imoulife.com...
  • Seite 2 Welcome Thank you for choosing IMOU. We are devoted to providing you easy smart home products. If you have problems using the product, please contact our service team before returning your product. Our service mail: service.global@imoulife.com Frequently asked questions can be found at...
  • Seite 3: Package Content

    Package content Camera ×1 Quick Start Guide ×1 Power Adapter ×1 Screw Package ×1 Mounting Waterproof Mounting Bracket ×1 Template ×1 Connector ×1 Camera introduction Wi-Fi Antenna Ethernet Port Reset Button Power LED Indicator Microphone Micro SD Card Slot Infrared LED Spotlight Lens Note:...
  • Seite 4 Speaker Note: 1. Press and hold the reset button for 10 s to reset the camera. 2. Double-press the reset button to enable camera’s hotspot. See the table below for de nitions of camera’s LED behaviors. LED Indicator Status Device Status Power o /LED turned o Rebooting after reset Booting...
  • Seite 5: Download The App

    Download the APP Imou Life Windows Tips To ensure the best possible wireless performance, please make sure there are no obstacles and electromagnetic interference between the camera and router.
  • Seite 6: Installing Camera

    Add device to the APP Setup Setup WIFI Name Password Next Done Installing Camera Note: Make sure that the mounting surface is strong enough to hold at least three times the weight of the camera and the bracket. Ceiling Mount Mounting Surface Mounting Template (U-shaped)
  • Seite 7 Peel o the U-shaped mounting template and stick it to the desired installation area. Drill holes into the mounting surface as the mounting template marks and then insert wall anchors as needed. Secure the mounting bracket to the surface with included mounting screws. Align on the top of the camera with on the bracket, then t the two parts...
  • Seite 8 Rotate the camera counterclockwise until it is locked. Make sure align with Power on the camera and then adjust its angle properly. Pole Mount Note: 1. Make sure that the pole is strong enough to hold at least three times the weight of the camera and the bracket.
  • Seite 9: Troubleshooting

    Troubleshooting Question Answer The device cannot boot • Check the LED indicator status. If the light is not in green, press and up or work as expected? hold the reset button for 10 s to reset the camera. • If the camera is online, select Device Details > Network Con g to How to connect the change the Wi-Fi connection on the app.
  • Seite 10 Kurzanleitung Cruiser www.imoulife.com...
  • Seite 11 Willkommen Vielen Dank, dass Sie sich für IMOU entschieden haben. Wir sind bestrebt, einfachere Produkte für das intelligente Heim anzubieten. Wenn Sie Probleme bei der Verwendung des Produkts haben, wenden Sie sich bitte an unser Serviceteam. Unsere Service-Mail lautet: service.global@imoulife.com Häu g gestellte Fragen nden Sie unter imoulife.com/...
  • Seite 12: Einführung In Die Kamera

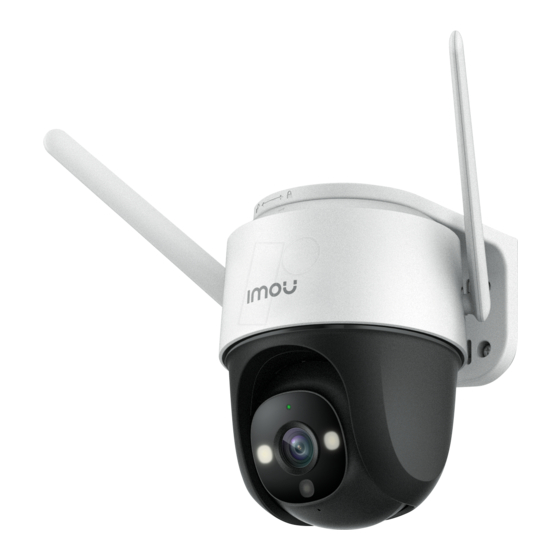
    Packungsinhalt Schrauben und Kamera ×1 Kurzanleitung ×1 Netzteil ×1 Dübe ×1 Wasserdichter Montageschablone ×1 Montagehalterung ×1 Anschluss ×1 Einführung in die Kamera Wi-Fi Antenne Ethernet- Anschluss Rücksetztaste Netzteil LED-Anzeige Mikrofon MicroSD- Kartensteckplatz Infrarot-LED Scheinwerfer Objektiv Hinweis: Trennen Sie die Kamera von der Stromversorgung, bevor Sie die SD-Karte einsetzen oder herausnehmen.
  • Seite 13 Lautsprecher Hinweis: 1. Halten Sie die Rücksetz-/Kopplungstaste 10 Sekunden lang gedrückt, um die Kamera zurückzusetzen. 2. Drücken Sie zweimal die Reset-Taste, um den Hotspot der Kamera zu aktivieren. Informationen zur Bedeutung der LED-Signale entnehmen Sie bitte der folgenden Tabelle. LED-Anzeigestatus Gerätestatus Gerät/LED ausgeschaltet Gerät fährt nach Rücksetzung hoch...
  • Seite 14: App Herunterladen

    App herunterladen Imou Life Windows Tips Um die bestmögliche Funkübertragung zu gewährleisten, stellen Sie sicher, dass zwischen Kamera und Router keine Hindernisse und elektromagnetische Störungen vorhanden sind.
  • Seite 15: Gerät Zur App Hinzufügen

    Gerät zur App hinzufügen Setup Setup WIFI Name Password Next Done Kamerainstallieren Hinweis: Stellen Sie sicher, dass die Montage äche stabil genug ist, um mindestens das dreifache Gewicht von Kamera und Halterung zu tragen. Deckenmontage Montage äche Montageschablone (U-förmig) Dübel Anbauplatte Befestigungsschraube Kamera...
  • Seite 16 Ziehen Sie die U-förmige Montageschablone ab und kleben Sie sie auf die gewünschte Montage äche. Bohren Sie entsprechend den Markierungen auf der Montageschablone Löcher in die Montage äche und setzen Sie bei Bedarf Dübel ein. Befestigen Sie die Montagehalterung mit den mitgelieferten Schrauben an der Ober äche.
  • Seite 17: Guía De Inicio Rápido

    Guía de inicio rápido Cruiser www.imoulife.com...
  • Seite 18 Drehen Sie die Kamera gegen den Uhrzeigersinn, bis sie fest sitzt. Achten Sie darauf, dass ausgerichtet ist. Schalten Sie die Kamera ein und stellen Sie ihren Winkel korrekt ein. Masthalterung Hinweis: 1. Stellen Sie sicher, dass der Mast stabil genug ist, um mindestens das dreifache Gewicht von Kamera und Halterung zu tragen.
  • Seite 19: Fehlerbehebung

    Fehlerbehebung Frage Antwort Das Gerät fährt nicht hoch • Überprüfen Sie die Status-LED. Wenn sie nicht grün leuchtet, halten oder funktioniert nicht Sie die Reset-Taste 10 Sekunden lang gedrückt, um die Kamera erwartungsgemäß? zurückzusetzen. • Wenn die Kamera online ist, wählen Sie Gerätedetails > Wie kann ich die Kamera Netzwerkkon g (Device Details >...
  • Seite 20 Bienvenido Gracias por elegir IMOU Nuestra misión es proporcionar productos fáciles de usar para un hogar inteligente. Si tiene problemas usando el producto, por favor diríjase a nuestro equipo de atención al cliente antes de devolver su producto. Nuestro correo electrónico de servicio: service.global@imoulife.com...
  • Seite 21: Contenido Del Paquete

    Contenido del paquete Guía de inicio Adaptador de Cámara ×1 Bolsa con tornillos ×1 rápido ×1 corriente ×1 plantilla de soporte de Conector a prueba montaje ×1 montura ×1 de agua ×1 Introducción a la cámara Antena Wi-Fi Puerto Ethernet Botón de reinicio Alimentación Indicador LED...
  • Seite 22 Altavoz Nota: 1. Mantenga pulsado el botón de reinicio/emparejamiento durante 10 segundos para reiniciar la cámara. 2. Pulse dos veces el botón de reinicio para habilitar el punto de acceso de la cámara. Consulte la tabla siguiente para conocer el signi cado de los diferentes LED de la cámara.
  • Seite 23 Descargue la aplicación Imou Life Windows Tips Para garantizar el mejor rendimiento inalámbrico posible, por favor asegúrese de que no hay obstáculos ni interferencias electromagnéticas entre la cámara y el enrutador.
  • Seite 24 Añadir dispositivo a la aplicación Setup Setup WIFI Name Password Next Done Instalación de la cámara Nota: Asegúrese de que la super cie de montaje sea lo su cientemente resistente para soportar al menos tres veces el peso de la cámara y el soporte. Montaje en techo Super cie de montaje Plantilla de montaje...
  • Seite 25 Despegue la plantilla de montaje en forma de U y péguela en la zona que desee. Haga ori cios en la super cie de montaje tal y como se indica en la plantilla de montaje y, a continuación, inserte los anclajes de pared según sea necesario. Sujete de forma segura el soporte de montaje a la super cie con los tornillos de montaje incluidos.
  • Seite 26 Gire la cámara hacia la izquierda hasta que quede bloqueada. Asegúrese de se alinee con Encienda la cámara y, a continuación, ajuste su ángulo correctamente. Montaje en poste Nota: 1. Asegúrese de que el poste sea lo su cientemente resistente para soportar al menos tres veces el peso de la cámara y el soporte.
  • Seite 27: Solución De Problemas

    Solución de problemas Pregunta Respuesta ¿El dispositivo no se inicia • Veri que el estado del indicador LED. Si el LED no se ilumina en verde, o no funciona mantenga pulsado el botón de reinicio durante 10 segundos para correctamente? reiniciar la cámara.
  • Seite 28: Guide De Démarrage Rapide

    Guide de démarrage rapide Cruiser www.imoulife.com...
  • Seite 29 Bienvenue Merci d’avoir choisi IMOU. Nous nous consacrons à fournir des produits pour la maison intelligente plus faciles à utiliser. Si vous rencontrez des di cultés lors de l’utilisation du produit, veuillez contacter notre équipe technique avant de renvoyer votre produit.
  • Seite 30: Contenu De L'emballage

    Contenu de l’emballage Guide de démarrage Adaptateur Paquet de vis Caméra ×1 rapide ×1 secteur ×1 ×1 gabarit de support de Connecteur montage ×1 montage ×1 étanche ×1 Introduction à la caméra Antenne Wi-Fi Port Ethernet Bouton de réinitialisation Alimentation Indicateur lumineux Microphone...
  • Seite 31 Haut-parleur Remarque: 1. Appuyez et maintenez la touche de réinitialisation/couplage pendant10 secondes pour réinitialiser la caméra. 2. Appuyez deux fois sur le bouton réinitialiser pour activer le point d’accès de la caméra. Reportez-vous au tableau ci-dessous pour la signi cation des voyants de la caméra.
  • Seite 32: Télécharger L'application

    Télécharger l’application Imou Life Windows Tips Pour garantir les meilleures performances sans l possible, veuillez vous assurer qu’il n’y a pas d’obstacles ni d’interférences électromagnétiques entre la caméra et le routeur.
  • Seite 33 Ajouter un appareil à l’application Setup Setup WIFI Name Password Next Done Installation de la caméra Remarque: Assurez-vous que la surface de montage est su samment solide pour supporter au moins trois fois le poids de l’appareil et de son support. Montage plafond Surface de montage Gabarit de montage...
  • Seite 34 Décollez le gabarit de montage en forme de U et collez-le sur le point d’installation souhaité. Percez des trous dans la surface de montage conformément aux marques du gabarit de montage, puis insérez les ancrages muraux si nécessaire. Fixez le support de montage à la surface à l’aide des vis de xation fournies. Alignez la partie supérieure de la camera avec sur le support, puis...
  • Seite 35 Tournez la caméra dans le sens antihoraire jusqu’à ce qu’elle soit verrouillée. Assurez-vous que est aligné avec Allumez la caméra, puis ajustez son angle correctement. Pole Mount Remarque: 1. Assurez-vous que le poteau est su samment solide pour supporter au moins trois fois le poids de la caméra et de son support. 2.
  • Seite 36 Fehlerbehebung Question Réponse L’appareil ne démarre pas • Véri ez l’état de l’indicateur lumineux. Si le voyant n’est pas vert, ou ne fonctionne pas maintenez le bouton de réinitialisation enfoncé pendant 10 s comme prévu ? pour réinitialiser la caméra. •...
  • Seite 37: Guida Rapida

    Guida Rapida Cruiser www.imoulife.com...
  • Seite 38 Benvenuti Grazie per aver scelto IMOU. Il nostro obiettivo è quello di fornire prodotti per la domotica più facili da utilizzare. In caso di problemi durante l’utilizzo del prodotto, si prega di contattare il nostro team di assistenza prima di restituire il prodotto.
  • Seite 39: Contenuto Della Confezione

    Contenuto della confezione Guida Telecamera ×1 Adattatore ×1 Kit di viti ×1 introduttiva ×1 Dima di Connettore Sta a di montaggio ×1 foratura ×1 impermeabile ×1 Introduzione alla telecamera Antenna Wi-Fi Porta Ethernet Tasto di ripristino Alimentazione Indicatore LED Microfono Slot per scheda micro-SD LED a infrarossi...
  • Seite 40 Altoparlante Nota: 1. Tenere premuto per 10 secondi il pulsante Reimposta/Associa per reimpostare la telecamera. 2. Premere due volte il pulsante di reset per attivare l'hotspot della telecamera. Consultare la tabella seguente per le de nizioni dei comportamenti del LED della telecamera. Stato dell’indicatore a LED Stato del dispositivo Spento/LED spento...
  • Seite 41 Scarica l'app Imou Life Windows Tips Per garantire le migliori prestazioni wireless possibili, assicurarsi che non ci siano ostacoli e interferenze elettromagnetiche tra la telecamera e il router.
  • Seite 42: Installazione Della Telecamera

    Aggiungere il dispositivo all'app Setup Setup WIFI Name Password Next Done Installazione della telecamera Nota: Veri care che la super cie di montaggio sia abbastanza resistente da sopportare almeno tre volte il peso della telecamera e della sta a. Kit per montaggio a incasso Super cie di montaggio Dima di foratura (a forma di U)
  • Seite 43 Separare la dima di foratura a forma di U e ssarla all'area di installazione prevista. Praticare fori sulla super cie sottostante, nei punti indicati sulla dima di foratura, quindi inserire i tasselli opportuni. Fissare la sta a di montaggio alla super cie con le viti di montaggio in dotazione. Allineare il simbolo sulla sommità...
  • Seite 44 Ruotare la telecamera in senso antiorario no a bloccarla. Assicurarsi che allineato con Power on the camera and then adjust its angle properly. Kit di montaggio su palo Nota: 1. Veri care che il palo sia abbastanza resistente da sopportare almeno tre volte il peso della telecamera e della sta a.
  • Seite 45: Risoluzione Dei Problemi

    Risoluzione dei problemi Domanda Risposta Il dispositivo non si avvia • Controllare il LED luminoso indicatore di stato. Se la luce non è verde, o non funziona come tenere premuto il pulsante di reset per 10 secondi per ripristinare la previsto? telecamera.
  • Seite 46 Snelstartgids Cruiser www.imoulife.com...
  • Seite 47 Welkom Bedankt dat u voor Imou heeft gekozen. Onze toewijding is om u eenvoudige Smart Home producten te bieden. Als u problemen ervaart met het gebruik van uw product, neem dan eerst contact op met onze service team: service.global@imoulife.com...
  • Seite 48: Inhoud Verpakking

    Inhoud verpakking Camera ×1 Snelstarthandleiding ×1 Spanningsadapter ×1 Schroevenset ×1 Waterdichte Montagesjabloon ×1 Montagebeugel ×1 connector ×1 Introductie camera Wi-Fi-antenne Ethernetpoort Reset-Knop Vermogen Led-indicator Microfoon MicroSD -kaartsleuf Infrarood led Spot Lens Opmerking: Ontkoppel de camera van de stroom voordat u hem installeert of de SD-kaart eruit haalt.
  • Seite 49 Luidspreker Opmerking: 1. Druk de reset-/koppelknop 10 seconden in om de camera te resetten. 2. Dubbelklik op de resetknop om de hotspot van de camera in te schakelen. Zie onderstaande tabel voor de nities van het gedrag van de led van de camera.
  • Seite 50 Download de app Imou Life Windows Tips Zorg voor de best mogelijke draadloze prestatie dat er geen obstakels en elektromagnetische interferentie tussen de camera en router aanwezig zijn.
  • Seite 51 Apparaat toevoegen aan de app Setup Setup WIFI Name Password Next Done Het installeren van de camera Opmerking: Controleer dat het montagevlak sterk genoeg is om minstens drie keer het gewicht van de camera en de montagebeugel te dragen. Montagebeugel voor plafond Montage-oppervlak Montagesjabloon (U-vormig)
  • Seite 52 Verwijder de folie van het U-vormige montagesjabloon en plak het op de gewenste installatieplaats. Boor gaten in het montagevlak volgens de markering van het montagesjabloon en duw de muurankers in de muur indien nodig. Bevestig de montagebeugel met de bijgeleverde montageschroeven op het montagevlak.
  • Seite 53 Draai de camera tegen de klok in totdat deze is vergrendeld. Zorg ervoor dat is uitgelijnd met Schakel de camera in en stel de hoek af. Opbouw voor mast Opmerking: 1. Controleer dat de mast sterk genoeg is om minstens drie keer het gewicht van de camera en de beugel te dragen.
  • Seite 54: Probleemoplossing

    Probleemoplossing Vraag Antwoord Het apparaat start niet op • Controleer de led-indicatorstatus. Als het lampje niet groen brand, zoals verwacht. houdt u de resetknop 10 seconden ingedrukt om de camera te resetten. • Als de camera online is, selecteert u Apparaatdetails > Hoe moet ik de camera Netwerkcon guratie (Device Details >...
  • Seite 55: Guia Rápido

    Guia rápido Cruiser www.imoulife.com...
  • Seite 56 Bem-vindo Obrigado por escolher a IMOU. Estamos empenhados em fornecer produtos inteligentes e simpli cados para o lar. Se tiver problemas ao utilizar o produto, contacte a nossa equipa de assistência antes de devolver o produto. O nosso e-mail de assistência: service.global@imoulife.com- Prometemos responder no prazo de 24 horas.
  • Seite 57: Conteúdo Da Embalagem

    Conteúdo da embalagem Guia de Início Conjunto Câmara ×1 Adaptador ×1 Rápido ×1 de parafusos ×1 Modelo de Suporte de Conector montagem ×1 montagem ×1 impermeável ×1 Apresentação da câmara Antena Wi-Fi Entrada Ethernet Botão "Repor" Alimentação Indicador LED Microfone Ranhura para cartões micro SD LED infravermelho...
  • Seite 58 Altifalante Nota: 1. Prima sem soltar o botão Reset/Pair durante 10 segundos para repor a câmara. 2. Prima duas vezes o botão de reiniciar para ativar o hotspot da câmara. Consulte a tabela abaixo com a explicação dos comportamentos do LED da câmara.
  • Seite 59: Transferir A Aplicação

    Transferir a aplicação Imou Life Windows Tips Para assegurar o melhor desempenho possível do sistema sem os, certi que-se de que não existem obstáculos e interferência eletromagnética entre a câmara e o router.
  • Seite 60 Adicionar o dispositivo à aplicação Setup Setup WIFI Name Password Next Done Instalar a câmara Nota: Certi que-se de que a superfície de montagem é su cientemente forte para suportar, pelo menos, três vezes o peso da câmara e do suporte. Montagem no teto Superfície de montagem Modelo de montagem...
  • Seite 61 Destaque o modelo de montagem em U e cole-o na área de instalação pretendida. Faça furos na superfície de montagem de acordo com as marcações do modelo de montagem e, em seguida, insira as buchas conforme necessário. Fixe o suporte de montagem na superfície com os parafusos de montagem incluídos.
  • Seite 62 Rode a câmara no sentido contrário ao dos ponteiros do relógio até bloquear. Certi que-se de que está alinhado com Ligue a câmara e, em seguida, ajuste o ângulo. Montagem em poste Nota: 1. Certi que-se de que o poste é su cientemente forte para suportar, pelo menos, três vezes o peso da câmara e do suporte.
  • Seite 63 Solução de problema Pergunta Resposta O dispositivo não inicia ou • Veri que o estado do indicador LED. Se a luz não estiver verde, prima não funciona como sem soltar o botão de reiniciar durante 10 s para reiniciar a câmara. esperado? •...
  • Seite 64 Cruiser www.imoulife.com...
  • Seite 65 IMOU service.global@imoulife.com : imoulife.com/support/help...
  • Seite 66 × 1 × 1 × 1 × 1 × 1 × 1 × 1...
  • Seite 68 Imou Life Windows Tips...
  • Seite 69 Setup Setup WIFI Name Password Next Done...
  • Seite 71 12V1A...
  • Seite 72 • < • • • 16.4) (auto) • 11bgn mixed Micro SD ,micro SD • micro SD • • • •...
  • Seite 73 @imouglobal service.global@imoulife.com www.imoulife.com...

Inhaltsverzeichnis