Inhaltsverzeichnis
Werbung
Verfügbare Sprachen
Verfügbare Sprachen
Quicklinks
BEDIENUNGSANLEITUNG
USER'S MANUAL
MODE D'EMPLOI
MANUAL DEL USUARIO
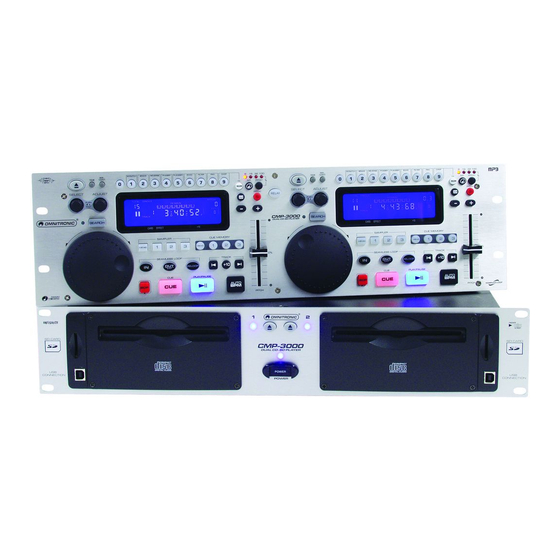
CMP-3000
Dual-CD/MP3-Player
©
Für weiteren Gebrauch aufbewahren!
Copyright
Keep this manual for future needs!
Nachdruck verboten!
Gardez ce mode d'emploi pour des
Reproduction prohibited!
utilisations ultérieures!
Réproduction interdit!
Guarde este manual para posteriores usos.
Prohibida toda reproducción.
Downloaded from
www.Manualslib.com
manuals search engine
Werbung
Inhaltsverzeichnis

Verwandte Anleitungen für Omnitronic CMP-3000


Inhaltszusammenfassung für Omnitronic CMP-3000
- Seite 1 BEDIENUNGSANLEITUNG USER'S MANUAL MODE D'EMPLOI MANUAL DEL USUARIO CMP-3000 Dual-CD/MP3-Player © Für weiteren Gebrauch aufbewahren! Copyright Keep this manual for future needs! Nachdruck verboten! Gardez ce mode d’emploi pour des Reproduction prohibited! utilisations ultérieures! Réproduction interdit! Guarde este manual para posteriores usos.
-
Seite 2: Inhaltsverzeichnis
MULTI-LANGUAGE-INSTRUCTIONS Inhaltsverzeichnis/Table of contents Sommaire/Contenido 1. EINFÜHRUNG............................... 5 2. SICHERHEITSHINWEISE..........................5 3. BESTIMMUNGSGEMÄSSE VERWENDUNG ....................7 4. GERÄTEBESCHREIBUNG .......................... 7 4.1 Features ..............................7 4.2 Abspieleinheit............................8 4.3 Steuereinheit ............................9 5. INSTALLATION ............................12 6. BEDIENUNGSHINWEISE........................... 13 6.1 Inbetriebnahme ............................13 6.2 CD Slot In............................... - Seite 3 You can find the latest update of this user manual in the Internet under: Vous pouvez trouvez la dernière version de ce mode d'emploi dans l'Internet sous: Vd. puede encontrar la versión más reciente de este manual en el Internet bajo: www.omnitronic.com 3/73 10602410_V_1_0.DOC Downloaded from www.Manualslib.com...
-
Seite 4: Einführung
- sich die letzte Version der Anleitung im Internet herunter laden 1. EINFÜHRUNG Wir freuen uns, dass Sie sich für einen OMNITRONIC CMP-3000 entschieden haben. Wenn Sie nachfolgende Hinweise beachten, sind wir sicher, dass Sie lange Zeit Freude an Ihrem Kauf haben werden. - Seite 5 Bitte überprüfen Sie vor der ersten Inbetriebnahme, ob kein offensichtlicher Transportschaden vorliegt. Sollten Sie Schäden an der Netzleitung oder am Gehäuse entdecken, nehmen Sie das Gerät nicht in Betrieb und setzen sich bitte mit Ihrem Fachhändler in Verbindung. Der Aufbau entspricht der Schutzklasse II. Das Gerät ist schutzisoliert. Der Netzstecker darf nur an eine Steckdose angeschlossen werden, deren Spannung und Frequenz mit dem Typenschild des Gerätes genau übereinstimmt.
-
Seite 6: Bestimmungsgemässe Verwendung
ACHTUNG: Zu hohe Lautstärken können das Gehör schädigen! Im Geräteinneren befinden sich keine zu wartenden Teile. Eventuelle Servicearbeiten sind ausschließlich dem autorisierten Fachhandel vorbehalten! 3. BESTIMMUNGSGEMÄSSE VERWENDUNG Bei diesem Gerät handelt es sich um einen professionellen CD-Player, mit dem sich Standard-CDs abspielen lassen. -
Seite 7: Abspieleinheit
• Geschwindigkeitsänderung über den Pitchfader wird im Display angezeigt (in % oder BPM) • Auto Beatcounter • Mit manuellem Beatcounter zur Ermittlung der Taktgeschwindigkeit in BPM • Relay-Taste zur automatischen Umschaltung auf den jeweils anderen CD-Player nach jedem Titel • Bequeme Titelwahl über Track- und +10-Taste •... -
Seite 8: Steuereinheit
Type: OMNITRONIC CMP-3000 Power supply: 220-250 V AC, 50 Hz Power consump.: 50 W 115 V 230 V 60 Hz 50 Hz www.omnitronic.com OMNITRONIC SHOWEQUIPMENT GmbH, GERMANY START DIGITAL AUDIO CONNECT TO START DIGITAL AUDIO PAUSE REMOTE CONTROL 2 PAUSE... - Seite 9 2. STEUERUNG CD-PLAYER 2 Die rechte Seite der Steuereinheit dient zur Steuerung des rechten CD-Players (2). 3. EJECT-TASTE Über die EJECT-Taste können Sie die CD auswerfen. Dazu muss sich der Player im Pause- bzw. Cue- Modus befinden. Bitte beachten Sie die Hinweise unter 6.2 CD Slot In. 4.
- Seite 10 Es lassen sich bis zu 3 Samples mit Sample-Parameter verschiedener Titel abspeichern und über die entsprechende Sampler-Taste wieder aufrufen. Die gespeicherten Samples einer CD bleiben solange erhalten, bis Sie den CD-Player abschalten oder die Samples überschreiben. Bitte beachten Sie die Hinweise unter 6.9 Sampler-Modus. 12.
-
Seite 11: Installation
Geschwindigkeitsanpassung in % umschalten. Über die AUTO BPM-Taste können Sie die Taktschläge eines Titels ermitteln. Drücken Sie dazu die Taste im Takt der Musik. Auf dem Display erscheint die Taktgeschwindigkeit in BPM. Rückseite: ® www.omnitronic.com CONNECT TO CONNECT TO MAIN UNIT MAIN UNIT 31. -
Seite 12: Bedienungshinweise
Bitte beachten Sie, dass die LCD-Anzeige nur in einem Winkel von 45° nach oben und 5° nach unten gelesen werden kann. Rackinstallation: Dieser CD-PLayer ist für ein 19"-Rack (483 mm) vorgesehen. Bei dem Rack sollte es sich um ein „Double-Door-Rack“ handeln, an dem sich sowohl die Vorder- als auch die Rückseite öffnen lassen. Das Rackgehäuse sollte mit einem Lüfter versehen sein. -
Seite 13: Play/Pause
Die Anzeige "0" bedeutet, dass die Wiedergabegeschwindigkeit nicht verändert wurde. Wenn Sie die Wiedergabegeschwindigkeit über den Pitchfader verändern (Pitch-Taste muss gedrückt sein), wird der entsprechende Prozentwert auf dem Display angezeigt. 6.4 Play/Pause Im Pausemodus steht die Zeitanzeige im Display und die Play/Pause-LED blinkt. Die Wiedergabe des ersten Titels kann durch Drücken der Play/Pause-Taste gestartet werden. -
Seite 14: Sequenzwiederholung (Loop-Funktion)
Bank/Cue-Taste gespeichert, können nur die ersten 13 Sekunden übertragen werden. Speicherung mehrerer Samples: Mit dem CMP-3000 lassen sich bis zu 3 verschiedene Samples verschiedener Titel abspeichern und über die Sampler-Taste wieder aufrufen. Drücken Sie dazu die Memo-Taste (Memo-Taste leuchtet) und die gewünschte Sampler-Taste (Sampler- Taste blinkt). -
Seite 15: Relay-Betrieb
Funktion funktioniert wieder. 6.11 Faderstart Mit dem CMP-3000 haben Sie die Möglichkeit, den jeweiligen CD-Player direkt vom Mischpult aus zu starten. Vergewissern Sie sich, dass die Start/Pause-Buchse mit der entsprechenden Buchse am Mischpult verbunden ist. Außerdem müssen die Audio Out-Buchsen mit den Line-Eingangsbuchsen des Mischpultes verbunden sein. - Seite 16 Phaser-Effekt: Beim Phaser-Effekt wird der Originalton gemäß der Parameter-Einstellung verändert. Flanger-Effekt: Der Flanger-Effekt klingt, als würde dem Originalton ein Düsentriebwerk-Klangeffekt hinzugefügt. Echo-Effekt: Beim Echo-Effekt wird dem Originalton ein Echo hinzugefügt. Filter-Effekt: Der Filter-Effekt dämpft und verzerrt das Audio-Signal. Pan-Effekt: Beim Pan-Effekt wechselt der Ton periodisch und kontinuierlich von links nach rechts und umgekehrt. Chop-Effekt: Beim Chop-Effekt wird der Ton periodisch abgeschnitten.
-
Seite 17: Betrieb Mit Sd-Karte
PS/BPM_SYNC: Phaser-Effekt mit Beatsync-Funktion PS/GAIN: Signalstärke Phaser-Effekt PS/TIME: Phaser-Parameter. Bei SYNC-OFF 0.25 Sekunden bis 8 Sekunden einstellbar; bei SYNC_ON 1/4 Takt bis 64 Takte einstellbar. FG/BPM_SYNC: Flanger-Effekt mit Beatsync-Funktion FG/GAIN: Signalstärke Flanger-Effekt FG/TIME: Flanger-Parameter. Bei SYNC-OFF 0.25 Sekunden bis 8 Sekunden einstellbar; bei SYNC_ON 1/4 Takt bis 64 Takte einstellbar. - Seite 18 Bitte wählen Sie das gewünschte Installationsverzeichnis aus. Folgen Sie den Installationsanweisungen und schließen Sie das Setup-Fenster (unter Win XP erscheint eine Fehlermeldung, die Sie wegdrücken können). Installieren Sie das Anwendungsprogramm. 2. Setup Anwendungsprogramm Bitte wählen Sie im CD-Rom Verzeichnis den Ordner DJMP3. Starten Sie die Datei Setup.exe und folgen Sie den Installationsanweisungen.
- Seite 19 Dialogfeld Laufwerksangabe Dialogfeld Ordner Dialogfeld Dateityp Dialogfeld Dateien Dialogfeld SD Card Dialogfeld File List Refresh-Taste zur Aktualisierung der Anzeige Format-Taste zum Formatieren der SD-Karte. Bitte vor der ersten Benutzung die SD-Karte immer formatieren. Exit-Taste zum Verlassen des Programms 10. Download-Taste zum Übertragen der Dateien 11.
-
Seite 20: Vorsichtsmassnahmen
7. VORSICHTSMASSNAHMEN Dieses Gerät kann nicht mit konventionellen Hifi CD-Playern verglichen werden, auch wenn sich die Geräte in ihrem Aussehen ähneln. Dieses Gerät wurde besonders stabil gebaut, um den harten Anforderungen beim Transport und bei Mobildiskotheken gewachsen sein zu können. Vibrationen durch starke Bassfrequenzen können zu einem Springen der CDs führen. -
Seite 21: Technische Daten
9. TECHNISCHE DATEN Spannungsversorgung: 115/230 V AC, 50/60 Hz ~ Gesamtanschlusswert: 20 W Typ: Doppel Compact Disc Player Geeignete CDs: Standard CDs 8 and 12 cm Quantisierung: D/A-Wandler: 1 Bit Samplingfrequenz: 44,1 kHz Frame-Genauigkeit: 1/75 sec Geschwindigkeitsanpassung: ±8 %, ±16 %, ±32 %, ±100 % Display: Titelrestspielzeit und Titelabspielzeit Klirrfaktor:... -
Seite 22: Introduction
- download the latest version of the user manual from the Internet 1. INTRODUCTION Thank you for having chosen a OMNITRONIC CMP-3000. You have acquired a reliable and powerful device. If you follow the instructions given in this manual, we can assure you that you will enjoy this device for many years. - Seite 23 If the device has been exposed to drastic temperature fluctuation (e.g. after transportation), do not switch it on immediately. The arising condensation water might damage your device. Leave the device switched off until it has reached room temperature. Please make sure that there are no obvious transport damages. Should you notice any damages on the A/C connection cable or on the casing, do not take the device into operation and immediately consult your local dealer.
-
Seite 24: Operating Determinations
There are no serviceable parts inside the device. Maintenance and service operations are only to be carried out by authorized dealers. 3. OPERATING DETERMINATIONS This device is a professional CD-player for playing CDs. This product is allowed to be operated with an alternating current of 115/230 V AC, 50/60 Hz and was designed for indoor use only. -
Seite 25: Main Unit
Type: OMNITRONIC CMP-3000 Power supply: 220-250 V AC, 50 Hz Power consump.: 50 W 115 V 230 V 60 Hz 50 Hz www.omnitronic.com OMNITRONIC SHOWEQUIPMENT GmbH, GERMANY START DIGITAL CONNECT TO START DIGITAL AUDIO AUDIO PAUSE REMOTE CONTROL 2 PAUSE... -
Seite 26: Controller
Via the Start/Pause-socket, the respective CD-player can be remotely controlled. If you are using a mixer with Faderstart-function connect the player with the Control Out-socket. Please note that these sockets must never be connected with any voltage. Please refer to 6.10 Faderstart. 9. - Seite 27 7. SINGLE-BUTTON For choosing single playback or Continuous play. The indication "SINGLE" means that the CD-player is in Single-mode. The current track is then played once and the player goes into Pause-mode at the beginning of the next track. By pressing the Single-button, the CD-player changes into normal playback mode and the display shows "CONTINUE".
- Seite 28 10. MAIN TEMPO-BUTTON With the Main Tempo-button, you can adjust the pitch of an adjusted playback speed. Press the Main Tempo-button in order to adjust the pitch (KEY is permanently lit). Adjust the desired pitch (-24 to +12) via the Adjust-control. Press the Adjust-control in order to memorize the adjusted pitch). In order to disable the pitch adjustment, press the Main Tempo-button again (KEY flashes).
-
Seite 29: Installation
Via the AUTO BPM-button, you can display the beats per minute of a track. Press the button in the rhythm of the music. The display shows the current beats per minute (BPM). Rear panel: ® www.omnitronic.com CONNECT TO CONNECT TO MAIN UNIT MAIN UNIT 31. -
Seite 30: Operation
6. OPERATION 6.1 Setup Switch the CD-player on via the Power-switch. When the device is on and the tray has no disc, "NO DISC" appears on the display. 6.2 CD Slot In Insert your CD in the CD Slot In. Make sure that you only hold the CD with 2 fingers on the edge. Avoid touching the inside area of the CD. -
Seite 31: Synchronisation Of The Playback-Speed
6.6 Synchronisation of the playback-speed You can synchronise the CD player and another signal-source while cueing with the headphones via the mixer. Possibility 1: Put the CD-player into playback-mode and cue with the headphones. Synchronise the playback-speed via the Pitchfader ot the CD-player (Pitch-button has to be pressed). Possibility 2: If the two signal-sources only differ in the bass-beat, you can synchronise via the Pitch Bend-buttons. -
Seite 32: Relay-Operation
Memorizing several samples: With the CMP-3000, you can memorize up to 3 different samples of different tracks and recall them via the Sampler-buttons. Press the Memo-button (Memo-button lit) and the desired Sampler-button (Sampler-button flashes) in order to memorize the current sample on the Sampler-button. - Seite 33 Scratch-function: The scratch-function resembles the scratching with a turntable. By turning the Scratch-wheel forwards and backwards, different scratching-effects can be produced. If you turn the Scratch-wheel continuously forwards, the playback resembles the playback-speed via the Play/Pause-button. Brake-effect: The Brake-effect-effect equals the immediate stop/brake and starting of the track of the turntable, if the Play/Pause-button is pressed.
-
Seite 34: Operation With Sd-Card
If you have your SD-card packed with MP3-files, insert the card into the SD-card slot. Press the SD-card button and start playback from your SD-card. If you want to download MP3-files from your harddisc to your SD-card, you may use the CMP-3000 as card writer and the enclosed software for data transmission. - Seite 35 13. Connect the CD player and computer with USB cable before switching on CD player. 14. Switch on the CD player. 15. When Windows detects your CD player, the New Device Found dialog box appears. 16. Please select Driver directory on installation CD 17.
-
Seite 36: Precautions
The drive box: Show the selected drive. 15. The directory box: Show the selected directory. 16. The file type box: Select the type of file you would like to show. 17. The file box: Show the files in selected directory. 18. -
Seite 37: Cleaning And Maintenance
transports of mobile discotheques. We recommend to put the CD player on plastic foam or on rubber feet in order to avoid skipping, which is caused by vibrations of low frequencies. The same thing holds true if the CD player is mounted in a rack an the rack is exposed to such frequencies. Should you have further problems, please refer to the chart below. -
Seite 38: Technical Specifications
9. TECHNICAL SPECIFICATIONS Power supply: 115/230 V AC, 50/60 Hz ~ Power consumption: 20 W Type: Dual Compact Disc Player Available disc: Standard CDs 8 and 12 cm Quantisation: D/A-converter: 1 Bit Sampler frequency: 44.1 kHz Frame-accuracy: 1/75 sec Pitch adjustment: ±8 %, ±16 %, ±32 %, ±100 % Display: Remaining track time and track playback time... -
Seite 39: Introduction
- transmettre le mode d'emploi à un éventuel acheteur ou utilisateur de l'appareil - télécharger la version ultérieure du mode d'emploi d'Internet 1. INTRODUCTION Nous vous remercions d'avoir choisi un OMNITRONIC CMP-3000. Vous êtes en possession d'un appareil très capaz. Sortez le OMNITRONIC CMP-3000 de son emballage. - Seite 40 L'appareil ne devrait pas être mis en service lorsqu'il à été transporté d'un endroit froid à un endroit chaud. Il se forme de la condensation qui pourrait endommager l'appareil. Laissez celui-ci atteindre la température ambiante avant de le mettre en service. Avant tout, assurez-vous que l'appareil n'a pas subi de dommages lors de son transport.
-
Seite 41: Emploi Selon Les Préscriptions
Avant la mise en marche de l'appareil, assurez-vous que tous les faders et tous les régulateurs de volumes soient en position "0" ou au minimum. ATTENTION: Allumez toujours l'amplificateur en dèrnier lieu et éteignez-le en premier! Tenez compte du fait que tout dommage résultant d'une modification manuelle sur cet appareil n'est pas couvert par la garantie. -
Seite 42: Bloc Des Lecteurs
• Gamme de vitesse de lecture ajustable à ±8 %, ±16 %, ±32 % ou ±100 % • Avec fonction Main Tempo • Ajustement de la vitesse grâce au Pitchfader indiqué à l'affichage (en % ou BPM) • Auto Beatcounter •... -
Seite 43: Bloc De Commande
Type: OMNITRONIC CMP-3000 Power supply: 220-250 V AC, 50 Hz Power consump.: 50 W 115 V 230 V 60 Hz 50 Hz www.omnitronic.com OMNITRONIC SHOWEQUIPMENT GmbH, GERMANY START DIGITAL AUDIO CONNECT TO START DIGITAL AUDIO REMOTE CONTROL 2 PAUSE PAUSE... - Seite 44 2. SECTION DE CONTROLE 2 (UNIT 2) Toute la partie droite du contrôleur, permet de commander les fonctions du lecteur CD se trouvant sur la partie droite (2) du bloc des lecteurs. 3. TOUCHE EJECT Avec la touche EJECT, vous pouvez arrêter ou ouvrier le tiroir d'accès de la CD. Veuillez faire attention aux instructions sous 6.2 CD Slot In.
- Seite 45 Les Samples mémorisés d’une CD restent inchangés aussi longtemps jusqu’à ce que vous arrêtez le lecteur CD ou recouvrez les Samples. Veuillez faire attention aux instructions sous 6.9 Mode de Sampler. 12. TOUCHE CUE MEMORY Il est possible à mémoriser jusqu'à 3 Points Cue de différentes plages et les appeler grâce à la touche Cue Memory respective.
-
Seite 46: Installation
Grâce à la touche AUTO BPM, vous pouvez afficher le rhytme des graves d'une plage. Pressez la touche dans le tacte de la musique. L'afficheur indique la vitesse des tactes en AUTO BPM. Dos: ® www.omnitronic.com CONNECT TO CONNECT TO MAIN UNIT MAIN UNIT 31. -
Seite 47: Utilisation
Attention: Assurez-vous que le lecteur CD est mis hors de tension (touche Power en position sortie) avant de brancher-le pour éviter de désagrements de vos enceintes. Connectez le lecteur CD à votre tâble de mixage avec le câble cinch et via les sorties Audio Out. Assurez- vous que l'occupation gauche/droite (couleur rouge/blanc) des appareil est la même. -
Seite 48: Changement De Plages
6.5 Changement de plages Avec le touches Track, il est possible de choisir la plage souhaitée. Pour effectuer la lecture d'une plage à son debut, il faut tout d'abord selectionner la plage souhaitée en agissant sur une des touches Track jusqu'à l’apparition sur I'afficheur du n° de celle concernée. En maintenir la touche Track respective, le lecteur mouve d'un n°... -
Seite 49: Mode De Sampler
Bank/Cue, seulement les premières 13 secondes peuvent être transmises. Mémorisation de plusieurs Samples: Avec le CMP-3000, vous pouvez mémoriser jusqu'à 3 Samples différents de différentes plages et les appeler grâce à la touche Sampler. Dans ce but, appuyez sur la touche Memo (touche Memo allumée) et la touche Sampler souhaitée (touche Sampler clignote). -
Seite 50: Effets
Cue/Play Veuillez faire attention que cette sélection est une fonction Faderstart point Cue. Ça signifie que le lecteur CD commence la lecture après l'actionnement du canal réspectif et va en mode de pause et retourne au point Cue après l'actionnement repitié. Conditions pour le fonctionnement à... - Seite 51 Effect parameter setting: Effect Menu Note Default Scope BRAKE BK/START_T 20 (1 unit = 0.1 sec) 0 ~100 (0.1 ~ 10 sec) BK/STOP_T 20 (1 unit = 0.1 sec) 0 ~100 (0.1 ~ 10 sec) PHASER PS/BPM_SYNC ON / OFF PS/GAIN 50 (%) 0 ~ 100 (%)
-
Seite 52: Maniement Avec Sd-Card
If you have your SD-card packed with MP3-files, insert the card into the SD-card slot. Press the SD-card button and start playback from your SD-card. If you want to download MP3-files from your harddisc to your SD-card, you may use the CMP-3000 as card writer and the enclosed software for data transmission. - Seite 53 26. Follow the on screen instructions to complete the setup (The warning box will appear, if operating system is Win XP. Don’t worry and continue setup.) 27. Continue setup the application program after installation of the driver finishes. 2. Application Setup There are three directories on installation CD.
-
Seite 54: Precautions
The drive box: Show the selected drive. 28. The directory box: Show the selected directory. 29. The file type box: Select the type of file you would like to show. 30. The file box: Show the files in selected directory. 31. -
Seite 55: Nettoyage Et Maintenance
disco mobile. Il est donc recommandé pour eviter des sauts de lecture, dès aux vibrations des fréquences tres basses de rajouter des pieds amortis si le lecteur est simplement posé, ou de caler avec de la mousse le coffret des platines si celui est mis dans un rack qui peut engendrer des vibrations pour les mêmes raisons. -
Seite 56: Caractéristiques Techniques
9. CARACTERISTIQUES TECHNIQUES Alimentation: 115/230 V AC, 50/60 Hz ~ Puissance de rendement: 20 W Type: Lecteur CD double Compatibilité: CDs standards 8 et 12 cm Quantification: Convertisseur D/A: 1 Bit Fréquence de sampling: 44,1 kHz Précision de frame: 1/75 sec Adaptation de vitesse: ±8 %, ±16 %, ±32 %, ±100 % Affichage:... -
Seite 57: Introducción
-mantener el manual durante la vida del producto -pasar el manual a cada sucesivo poseedor o usuario del producto -descargar la última versión del manual del Internet 1. INTRODUCCIÓN Gracias por haber elegido un OMNITRONIC CMP-3000. Desembale su CMP-3000. 2. INSTRUCCIONES DE SEGURIDAD ¡PRECAUCIÓN! ¡Tenga cuidado cuando opere con este aparato. - Seite 58 Si el aparato ha estado expuesto a grandes cambios de temperatura (p.e. tras el transporte), no lo enchufe inmediatamente. La condensación de agua producida podría dañar su aparato. Deje el aparato desconec- tado hasta que llegue a la temperatura ambiente. Antes de la puesta en marcha inicial, por favor asegúrese de que no hay daños causados durante el transporte.
-
Seite 59: Instrucciones De Manejo
3. INSTRUCCIONES DE MANEJO Este aparato es un CD-player profesional para jugar CDs. El aparato sólo es permitido para una conexion con una tensión alternativa de 115/230 V AC, 50/60 Hz y ha sido diseñado para ser usado en interiores. No agite el aparato. -
Seite 60: Unidad Principal
Type: OMNITRONIC CMP-3000 Power supply: 220-250 V AC, 50 Hz Power consump.: 50 W 115 V 230 V 60 Hz 50 Hz www.omnitronic.com OMNITRONIC SHOWEQUIPMENT GmbH, GERMANY START DIGITAL AUDIO CONNECT TO START DIGITAL AUDIO PAUSE REMOTE CONTROL 2 PAUSE... -
Seite 61: Controlador
10. CASQUILLOS DE SALIDA DE AUDIO (AUDIO OUT) La señal de música de estos casquillos es análoga. Conecte la salida a la entrada respectiva de su mezclador. 11. CONTROL REMOTE Conecte el controlador mediante estos casquillos. Asegúrese de que conecta el CD-Player Unidad 1 al controlador Unidad 1 y el CD-Player Unidad 2 con el controlador Unidad 2. - Seite 62 8. TECLA SEARCH Para activar la función de recambio. 9. RUEDA SCRATCH Modo Playback: Mediante la rueda Scratch puede ajustar temporalmente la velocidad de playback en ±16 %. Modo de pausa: En el modo de pausa la secuencia actual se repite tan pronto como gire la rueda Scratch. Mediante la rueda Scratch puede buscar lentamente en una canción hacia delante y hacia atrás.
- Seite 63 18. TECLA 8/16/32/100% Mediante la tecla Pitch (el LED off), Vd. puede quitar el ajuste de la velocidad de lectura. Vd. puede seleccionar el rango del ajuste de la velocidad de lectura entre ±8 %, ±16 %, ±32 % o ±100 % con este tecla.
-
Seite 64: Instalación
Panel trasero: ® www.omnitronic.com CONNECT TO CONNECT TO MAIN UNIT MAIN UNIT 31. CASQUILLOS CONECTORES Conecte aquí la unidad principal. 5. INSTALACIÓN Instale el CD-player sobre una superficie plana o en su rack. Asegúrese de que el ángulo de inclinación no sea superior a 15°, ya que en caso de que sea superior el CD no puede leer correctamente. -
Seite 65: Manejo
6. MANEJO 6.1 Puesta en marcha Conecte el CD-player mediante el interruptor de alimentación. Cuando el aparato está encendido y no hay disco en la bandeja en la pantalla aparece, "NO DISC". 6.2 CD Slot In Inserte su CD en el CD Slot In. Maneje el CD sólo por el borde con 2 dedos. Evite tocar la parte interior del La LED CD brilla cuando hay un CD en el CD Slot In y el CD-player está... -
Seite 66: Sincronización De La Velocidad De Lectura
Por favor tenga en cuenta que el CD-player trae la canción en el modo en el que usted pulsó la tecla Track. Si el CD-player está en el modo de lectura en la canción 1 por ejemplo y usted pulsa la tecla » el lector salta a la canción 2 y comienza a sonar inmediatamente. -
Seite 67: Modo De Sampler
Bank/Cue, sólo los primero 13 segundos pueden ser transmitidos. Memorizar algunos samples: Con el CMP-3000, Vd. puede memorizar hasta 3 samples de canciones diferentes y llamarlos mediante la tecla Sampler respectiva. Pulse la tecla Memo (tecla Memo brilla) y la tecla Sampler deseada (tecla Memo parpadea) para memorizar el sample actual en la tecla Sampler. -
Seite 68: Efectos
6.12 Efectos Los efectos diferentes pueden ser activados mediante la tecla On/Off y selectados mediante la tecla Select. Los parametros de efecto pueden ser ajustados mediante la rueda Scratch. Función Scratch: La función scratch parece mucho al scratching con un tocadisco. Vd. puede crear diferentes efectos scratch en girar la rueda Scratch hacia adelante y hacia detrás. -
Seite 69: Operación Con Sd-Card
If you have your SD-card packed with MP3-files, insert the card into the SD-card slot. Press the SD-card button and start playback from your SD-card. If you want to download MP3-files from your harddisc to your SD-card, you may use the CMP-3000 as card writer and the enclosed software for data transmission. - Seite 70 31. Connect the CD player and computer with USB cable before switching on CD player. 32. Switch on the CD player. 33. When Windows detects your CD player, the New Device Found dialog box appears. 34. Please select Driver directory on installation CD 35.
- Seite 71 The drive box: Show the selected drive. 41. The directory box: Show the selected directory. 42. The file type box: Select the type of file you would like to show. 43. The file box: Show the files in selected directory. 44.
-
Seite 72: Precauciones
7. PRECAUCIONES Este CD player no puede ser comparado con Hifi CD players convencionales- incluso si tienen casi la misma apariencia. Este lector está construido mucho más estable para poder soportar el estenuante uso en la carretera y los consistentes transportes de las discotecas móviles. Recomendamos colocar el CD player sobre goma espuma o sobre pies de goma para evitar los saltos que son causados por vibraciones de bajas frecuencias. -
Seite 73: Especificaciones Técnicas
9. ESPECIFICACIONES TÉCNICAS Alimentación: 115/230 V AC, 50/60 Hz ~ Consumo: 20 W Tipo: Compact Disc player doble CDs utilizables: CDs standards de 8 y 12 cm Cuantificación: Convertidor D/A: 1 Bit Frecuencia de muestreo: 44,1 kHz Precisión de frame: 1/75 sec Ajuste de frequencia: ±8 %, ±16 %, ±32 %, ±100 %...