Inhaltsverzeichnis
Werbung
Verfügbare Sprachen
Verfügbare Sprachen
Quicklinks
Werbung
Inhaltsverzeichnis

Verwandte Anleitungen für Rollei Skibrille 135 Full-HD


Inhaltszusammenfassung für Rollei Skibrille 135 Full-HD
-
Seite 2: Technical Specifications
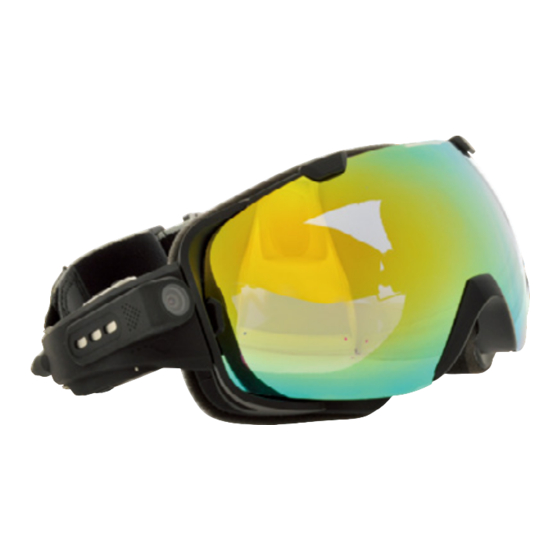
Thanks for purchasing this wearable camera goggle, please read this manual before use Technical Specifications • Sensor resolution 5 Mega pixels CMOS. Rollei Ski Goggles/Skibrille 135 Full - HD • Support Micro SD/SDHC Class 4 card or above and compatible up to 32GB (not included). -
Seite 3: Product Design
Product design Using your camera Main parts of the camera 1. To start recording A) Wear the camera goggle and focus on what you would like to record. B) Short press on/off button to power on the camera, when the green LED Camera indicators are on and there is a short vibration, it means the camera is in standby mode. -
Seite 4: Connecting A Computer
3. Choose update with “Y” means you can update the new data, default setting is “N”, 5. The camera will automatically use the new date and time when you switch the restart the camera to activate the setting goggles on the next time. 6. - Seite 5 Other camera accessories may not be waterproof. Please notice following cautions: (Don’t use the camera in extreme temperatures as this may cause the camera to Do not disassemble. malfunction). Do not crush and expose the rechargeable battery to any shock or force such as hammering, dropping or stepping on it.
-
Seite 6: Specifications
Specifications Image Sensor 5 mega pixels CMOS sensor Pixels for taking pictures Resolution 1920x1080P@30fps ; 1280x720P@60fps Rollei Ski Goggles/Skibrille 135 Full - HD Power supply Embedded 660mAh Li-polymer Battery Power duration 1.5 hours Power Consumption <1.5W Memory Support Max high speed 32 GB TF Card... -
Seite 7: Technische Daten
2. Bedienungsanleitung Vielen Dank, dass Sie sich für den Kauf dieser Skibrille mit Kamera entschieden haben. Bitte 3. USB-Kabel lesen Sie sich diese Anleitung vor der Verwendung sorgfältig durch. 4. Pinzette aus Kunststoff Technische Daten Produktdesign • Sensorauflösung 5 Megapixel CMOS. Wichtigste Komponenten der Kamera •... -
Seite 8: Verwendung Der Kamera
Verwendung der Kamera 4. Auflösung Sie können Sie die Auflösung zwischen 1080p und 720p umschalten. 1. Die Aufnahme starten A) Setzen Sie die Kamera-Skibrille auf und blicken Sie in die Richtung, in der Setting.txt Sie aufnehmen möchten. B) Drücken Sie kurz die Ein/Aus-Taste, um die Kamera einzuschalten. Wenn 1. -
Seite 9: An Einen Computer Anschließen
Zeit einstellen An einen Computer anschließen 1. Erstellen Sie ein txt-Dokument namens „settime.txt“ mit Microsoft Word, Sie können Ihre Videoaufnahmen und Fotos auf einen Computer hochladen, wenn Wordpad oder einer anderen Textverarbeitungssoftware. sowohl der Computer als auch die Kamera eingeschaltet sind. 2. -
Seite 10: Haftungsausschluss
die Karte in den Kartenschlitz. Die Karte wird dann freigegeben. Verwenden Sie die Kunststoffpinzette, um die microSD-Karte vollständig herauszunehmen. Entfernen Sie die microSD-Karte, bevor Sie die Kamera für längere Zeit lagern. Bewahren Sie diese an einem gut belüfteten Ort auf. Haftungsausschluss Die Garantie deckt nur Herstellungsfehler ab. - Seite 11 Technische Daten Bildsensor 5 Megapixel CMOS-Sensor Pixel für Fotoaufnahmen Auflösung 1920x1080p bei 30 fps; 60 fps bei 1280x720P Μάσκα σκι Rollei 135 Full HD Stromversorgung eingebauter 660mAh Li-Polymer-Akku Akkulaufzeit 1,5 Stunden Stromverbrauch <1,5 W Speicher Kompatibel mit High-Speed TF-Karte (max. 32 GB)
-
Seite 12: Περιεχόμενο Συσκευασίας
2. Οδηγίες χρήσης Σας ευχαριστούμε που επιλέξατε αυτήν τη φορητή βιντεοκάμερα-μάσκα σκι. Παρακαλούμε 3. Καλώδιο USB διαβάστε προσεκτικά τις οδηγίες πριν από τη χρήση 4. Πλαστική λαβίδα Τεχνικά χαρακτηριστικά Σχεδιασμός προϊόντος Ανάλυση αισθητήρα CMOS 5 Megapixel. Περιγραφή βιντεοκάμερας: Υποστηρίζει κάρτα Micro SD/SDHC κατηγορίας 4 ή ανώτερης και συμβατή για •... -
Seite 13: Μενού Ρυθμίσεων
Χρήση της βιντεοκάμερας 4. Ανάλυση Μπορείτε να ρυθμίσετε την ανάλυση σε 1080p και 720p. 1. Έναρξη βιντεοσκόπησης A) Φορέστε τη βιντεοκάμερα-μάσκα σκι και εστιάστε το αντικείμενο της Αρχείο Setting.txt βιντεοσκόπησης. B) Πατήστε σύντομα το πλήκτρο λειτουργίας για να ενεργοποιήσετε τη 1. -
Seite 14: Ρύθμιση Ώρας
Ρύθμιση ώρας Σύνδεση σε υπολογιστή 1. Δημιουργήστε ένα αρχείο .txt με την ονομασία settime.txt με το Microsoft Word, Με τη σύνδεση της βιντεοκάμερας σε υπολογιστή μπορείτε να μεταφέρετε τα το Word Pad ή κάποιο άλλο πρόγραμμα επεξεργασίας κειμένου. εγγεγραμμένα βίντεο και τις φωτογραφίες σας στον υπολογιστή. 2. -
Seite 15: Αποποίηση Ευθύνης
υποδοχή κάρτας. Η κάρτα απελευθερώνεται. Χρησιμοποιήστε την πλαστική λαβίδα για να αφαιρέσετε πλήρως την κάρτα Micro SD. Αν πρόκειται να αποθηκεύσετε τη βιντεοκάμερα για μεγάλο χρονικό διάστημα, αφαιρέστε την κάρτα Micro SD. Φυλάξτε την σε ένα καλά αεριζόμενο σημείο. Αποποίηση ευθύνης Η... - Seite 16 Τεχνικά χαρακτηριστικά Αισθητήρας εικόνας Αισθητήρας CMOS 5 Megapixel Pixel στη φωτογράφηση Ανάλυση 1920x1080P στα 30fps, 1280x720P στα 60fps Rollei Ski Goggles/Gafas de esquiar 135 Full - HD Ενσωματωμένη μπαταρία πολυμερών ιόντων λιθίου Τροφοδοσία τάσης 660 mAh Διάρκεια τροφοδοσίας 1,5 ώρα...
-
Seite 17: Especificaciones Técnicas
Diseño del producto Gracias por haber adquirido estas gafas para esquiar con cámara portátil. Lea el manual de instrucciones antes de utilizarlas. Principales piezas de la cámara Especificaciones técnicas Cámara Resolución del sensor CMOS de 5 megapíxeles • Compatibles con tarjeta microSD/SDHC clase 4 o superior y de hasta 32 GB (no incluida) Almacenamiento de vídeo •... -
Seite 18: Uso De La Cámara
Uso de la cámara Configuración.txt 1. Iniciar la grabación 1. Conecte la cámara al PC usando el cable USB. A) Póngase las gafas con cámara y enfoque lo que desea grabar. 2. Para acceder a la configuración .txt debe abrir la unidad de disco extraíble. B) Pulse brevemente el botón de encendido/apagado para encender la cámara. - Seite 19 textos cree un documento .txt y llámelo “settime.txt”. y la cámara. 2. Abra ese nuevo documento de texto e introduzca la hora local con el formato 1. Encienda la cámara. que aparece a continuación. Por ejemplo: si la hora local en Londres es 2.
-
Seite 20: Exención De Responsabilidad
① . No abrir. tarjeta microSD y después inicie la grabación. ② . Abrir el puerto USB tal como lo indica la flecha de dirección. Compruebe si la cámara recibe suficiente corriente. Si la cámara está funcionando No coloque la cámara en lugares mojados o polvorientos porque ello podría dañar con poca potencia, cargue la cámara y después inicie la grabación. - Seite 21 Merci d’avoir fait l’acquisition de ces lunettes caméra portatives. Veuillez lire le présent manuel avant toute utilisation. Caractéristiques techniques Lunettes de ski Rollei 135 full HD • Résolution de 5 mégapixels du capteur CMOS. • Prise en charge d’une carte MicroSD/SDHC de classe 4 ou supérieure, compatible jusqu’à...
-
Seite 22: Menu Paramètres
2. Manuel Utilisation de votre caméra 3. Câble USB 1. Commencer l’enregistrement 4. Pince plastique A) Mettez les lunettes caméra et faites la mise au point sur l’objet de votre enregistrement. Conception du produit B) Appuyez brièvement sur le bouton marche/arrêt pour mettre la caméra en Éléments principaux de la caméra marche. - Seite 23 4. Résolution Paramétrer l’heure Modifiez la résolution en choisissant entre 1 080 p et 720 p. 1. Créez un document .txt nommé « settime.txt » à l’aide de Microsoft Word, de Word Pad ou de tout autre logiciel de traitement de texte. Setting.txt 2.
-
Seite 24: Connecter Un Ordinateur
Connecter un ordinateur ① . Ne pas ouvrir ② . Ouvrir le port USB selon les instructions, dans le sens de la flèche Une fois l’ordinateur et la caméra activés, vous pouvez charger sur un ordinateur la N’ouvrez pas la caméra en milieu humide et poussiéreux, cela peut endommager séquence vidéo et les photographies enregistrées. -
Seite 25: Spécifications
Absence de son ou volume faible Vérifiez si le paramètre audio est correct. Rollei Ski Goggles/Skibrille 135 Full – HD síszemüveg Vérifiez dans l’ordinateur si le paramètre audio est correct et essayez de visionner d’autres vidéos pour vérifier la présence de son. -
Seite 26: M Szaki Adatok
3. USB-kábel Köszönjük, hogy megvásárolta ezt a hordható kamera-szemüveget, és kérjük, hogy 4. Műanyag csipesz használat előtt olvassa el a jelen használati utasítást. A termék kialakítása Műszaki adatok A kamera fő részei • Érzékelő felbontása 5 megapixeles CMOS. • Támogatja a 4-es osztályú vagy újabb Micro SD/SDHC kártyát, és max. 32 GB-ig kompatibilis vele (nem tartozék). -
Seite 27: Beállítás Menü
A kamera használata 4. Felbontás Változtassa a felbontást 1080p és 720p között. 1. A felvétel elindítása A) Vegye fel a kamera-szemüveget és fókuszáljon arra, amit rögzíteni szeretne. Setting.txt B) A kamera bekapcsolásához nyomja meg röviden a be/ki gombot, amikor a zöld LED-kijelzők világítanak és egy rövid vibrációt érez, az azt jelenti, hogy a 1. -
Seite 28: Töltés Usb-Kábellel
Időbeállítás Csatlakozás számítógéphez 1. A Microsoft Word, Jegyzettömb vagy bármely egyéb szövegszerkesztő program A rögzített videofelvételt és fényképeket feltöltheti egy számítógépre, ha segítségével hozzon létre egy „settime.txt” elnevezésű .txt dokumentumot. engedélyezte a számítógép és kamera lehetőséget. 2. Nyissa meg az új szöveges dokumentumot, adja meg a helyi pontos időt a 1. - Seite 29 ① . Ne nyissa ki a kamerát, majd kezdje meg a felvételt. ② . Az USB-portot a nyíl által jelzett irányban nyissa ki Nincs hang, vagy kicsi a hangerő. Ne tegye a kamerát nedves vagy poros helyre, mert az károsíthatja a fájlt, vagy Ellenőrizze, hogy megfelelő-e a hangbeállítás.
-
Seite 30: Specifiche Tecniche
Grazie per aver acquistato questa maschera con videocamera indossabile. La invitiamo a leggere il presente manuale prima dell'uso Specifiche tecniche Maschera da sci Rollei/Skibrille 135 Full - HD • Risoluzione del sensore CMOS da 5 Mega pixel. • Supporto scheda Micro SD/SDHC Classe 4 o superiore e compatibile fino a 32 GB (non inclusa). -
Seite 31: Usare La Videocamera
3. Cavo USB Usare la videocamera 4. Pinza di plastica 1. Iniziare a registrare A) Indossare la maschera videocamera e inquadrare ciò che si desidera registrare. Design del prodotto B) Premere brevemente il pulsante on/off per accendere la videocamera. Parti principali della videocamera Quando gli indicatori LED verdi si accendono e si avverte una breve vibrazione, significa che la videocamera è... - Seite 32 Cambiare la risoluzione tra 1080p e 720p. Impostazione dell'ora 1. Creare un documento .txt nominato “settime.txt” con Microsoft Word, Word Pad o qualsiasi altro software di scrittura. Setting.txt 2. Aprire il nuovo documento di testo, inserire l'ora locale esatta in base al seguente 1.
- Seite 33 1. Accendere la videocamera. ① . Non aprire 2. Collegare la fotocamera al computer utilizzando il cavo USB. ② . Aprire la porta USB seguendo la direzione della freccia 3. Dopo l'avvenuto collegamento, verrà visualizzata l'unità rimovibile. Non lasciare la videocamera in luoghi polverosi e umidi per evitare di danneggiare 4.
- Seite 34 videocamera e successivamente procedere alla registrazione. Nessun suono o volume basso. Controllare che le impostazioni audio siano corrette. Controllare che l'impostazione audio del PC sia corretta e provare a riprodurre altri video per controllare la presenza del suono. La videocamera non riesce a ricaricarsi Controllare che l'adattatore di alimentazione funzioni bene osservando la spia LED.