Bedienungsanleitung AV Pilot II Geräteansicht Tastatur Bedienungsphilosophie Der Run-Mode (Normaler Betriebszustand) Der Set-Mode (Einstell-Funktion) Der Option-Mode (Konfigurations-Funktion) Inbetriebnahme Der Höhenmesser Allgemeines Wie funktioniert ein Höhenmesser ? Höhenmesser 1 (ALT 1) SET-Mode des Höhenmessers 1 OPTION-Mode des Höhenmessers 1 Höhenmesser 2 (ALT 2) SET-Mode des Höhenmessers 2...
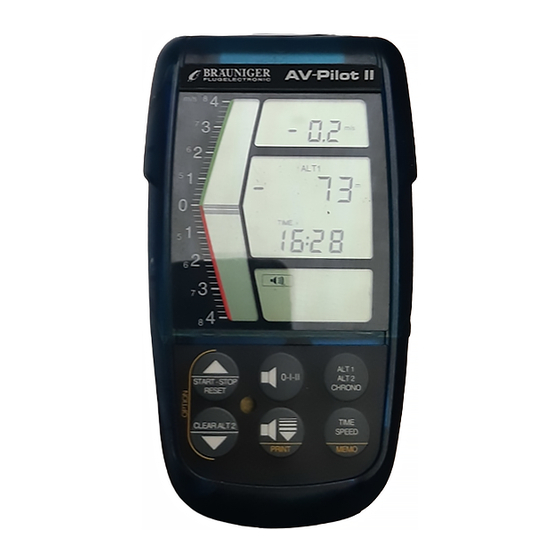
Bedienungsanleitung AV Pilot II Bedienungsphilosophie Die Philosophie aller BräunigerGeräte ist die Bedienung möglichst einfach zu halten. Deshalb ist jeder Taste nur eine Funktion zugeordnet, das heisst mit jeder Taste kann eine Funktion angezeigt, ein- bzw. ausgeschaltet werden. Um eine Einstellung der Funktion zu ändern drückt man die entsprechende Funktionstaste lang.
Bedienungsanleitung AV Pilot II Inbetriebnahme Das Gerät wird am Ein/Aus-Schalter eingeschaltet. Nach dem Einschalten führt das Gerät einen Selbsttest durch und geht anschliessend in den Run-Mode. Die Geräteeinstellungen nach dem Einschalten entsprechen denen beim letzten Ausschalten. Nach dem Einschalten zeigt das Gerät den ungefähren Ladestand der Batterie in der Vario- Balkenanzeige an.
Bedienungsanleitung AV Pilot II Höhenmesser 1 (ALT 1) Der Höhenmesser 1 zeigt die Absoluthöhe, das heisst die Höhe über Meer an. Mit der Funktionstaste ALT 1 kann zwischen der Anzeige des Höhemessers 1, des Höhenmes- ALT 2 CHRONO sers 2 und der Stoppuhr umgeschaltet werden. Durch langes Drücken dieser Taste erfolgt der Wechsel in den Set-Mode.
Bedienungsanleitung AV Pilot II Höhenmesser 2 (ALT2) Der Höhenmesser ALT 2 kann wahlweise als Absoluthöhenmesser oder als Relativ- höhenmesser benutzt werden. Im Betrieb als Absoluthöhenmesser ist seine Funktion genau gleich, wie die des 1. Höhen- messers. Der 2. Absoluthöhenmesser kann nun z.B. die Höhe in Feet anzeigen und der 1. die Höhe in Meter.
Bedienungsanleitung AV Pilot II Vario Vario-Akustik Durch wiederholtes Drücken der Taste können zwei Lautstärken eingestellt werden oder 0-I-II die Akustik ganz ausgeschaltet werden. Während die Taste gedrückt wird, ertönt ein Ton 0-I-II in der gewählten Lautstärke. Analoge Vario-Balkenanzeige Die Vario-Balkenanzeige reicht bis ± 8 m/s in zwei Skalendurchgängen. Die Einheit der Skala entspricht immer 0.2 m/s.
Bedienungsanleitung AV Pilot II Option-Mode des Varios VARIO In der ersten Ebene des Option-Modes kann die VARIO 4 Sec. Integrationszeit des Digital-Varios geändert werden. Die Werte liegen in 5 Sekunden-Schrit- VARIO SET-MODE ten zwischen 5 und 35 Sekunden und erschei- nen blinkend auf der Digital- Varioanzeige.
Bedienungsanleitung AV Pilot II Zeitmessung und Temperaturanzeige Uhrzeit (Echtzeituhr) TIME Im unteren Display mit kann zwischen Zeit- und MEMO-Anzeige umgeschaltet werden. SPEED MEMO Die Uhrzeit, das Datum und das Jahr können im Set-Mode eingestellt werden. Stoppuhr (CHRONO) Die Stoppuhr wird im oberen Display angezeigt. Und kann mit...
Bedienungsanleitung AV Pilot II TIME/TEMP Option-Mode der Zeitmessung und Tem- peraturanzeige TIME 4 Sec. In der ersten Ebene des Option-Modes kann die SET - MODE TIME Temperaturanzeige ein- oder ausgeschaltet Zeit einstellen werden. Ist sie eingeschaltet, so blinkt der TEMP Indikator neben einem TIME Indikator.
Bedienungsanleitung AV Pilot II ANHANG Lieferumfang Im Lieferumfang enthalten sind: • Gerät AV Pilot II • Beinhalterung • Schutzhülle • Handbuch Als Zubehör ist erhältlich: • diverse Halterungen Wasserschaden Bei einem Wasserschaden entfernen Sie sofort die Batterien. Bei Salzwasserschäden, spülen Sie das Instrument mit handwarmem Süsswasser gründlich aus.
Seite 13
Bedienungsanleitung AV Pilot II Downloaded from www.Manualslib.com manuals search engine...
Kurzanleitung AV Pilot II Function overview AV Pilot II Résumé des principales fonctions AV Pilot II Brevario AV Pilot II Taste Taste Taste 4. Sek 4. Sec START - STOP RESET Touch Touch Touch 4. Sec Tasto CLEAR ALT 2...
Seite 15
Operating Instructions AV Pilot II Instrument overview Keyboard Operating philosophy Run mode (normal operating mode) Setting mode (for adjustments) Option mode Commissioning The altimeter General remarks How does an altimeter work? Altimeter 1 (ALT 1) Altimeter 1setting mode Altimeter 1option mode...
Operating Instructions AV Pilot II Instrument overview On/Off switch Analog vario bar display Digital vario display INDICATOR display TIME / SPEED / MEMO display Altimeter & stopwatch display Keyboard Keyboard START-STOP-RESET ALT 1 0-I-II Variosound/Attenuation ALT 2 START - STOP...
Operating Instructions AV Pilot II Operating philosophy The philosophy behind all Bräuniger instruments is to keep everything as simple as possible. This is why each key has only one function, i.e. a function can be displayed and switched on or off with each key. In order to alter a function, you press and hold down the relevant function key.
Operating Instructions AV Pilot II Commissioning Switch on the instrument with the On/Off switch. On being switched on, the instrument goes through a self-test routine and then enters run mode. When switched on, the instrument settings correspond to those valid when the instrument was last switched off.
Operating Instructions AV Pilot II When the weather changes fast (e.g. cold fronts), air pressure can change in the course of a day by up to 5 mbar. This represents a change in altitude of 40 meters! Another method of calibrating an altimeter is by entering the current QNH. What is the QNH? In flying circles, a general zero point is needed to enable all aircraft at the same altitude to also have the same altitude on their altimeters.
Operating Instructions AV Pilot II N. B.: Incorrect manipulation of the correction value of the pressure sensor will result in false altitude readings! Never alter the basic settings of the altimeter unless you have good reason to do so (in your own interest)! In option mode, the indicators OPTION and ALT 1 appear and the relevant number of the modu- le is shown at the top of the display.
Operating Instructions AV Pilot II Vario Vario sound levels Two sound levels can be set or the sound system switched off completely by repeatedly pres- sing the key. While the key is pressed, a tone will sound at the desired level.
Operating Instructions AV Pilot II Vario option mode The integration time of the digital vario can be VARIO altered at the first level of option mode. The values are in 5-second steps between 5 and 35 VARIO 4 Sec. seconds and appear flashing in the digital vario display.
Operating Instructions AV Pilot II Time measurement and temperature display Clock time (real-time clock) In the lower display, the key is used to toggle between, time and MEMO display. ALT 1 ALT 2 CHRONO The time, the date and the year can be set in setting mode.
Operating Instructions AV Pilot II Time measurement and temperature display option mode The temperature display can be switched on or off at the first level of option mode. If it is swit- ched on, the TEMP indicator will flash as well as a TIME indicator. When the temperature dis- play is switched off, only the TIME indicator is on.
Operating Instructions AV Pilot II APPENDIX Scope of supply The following items are included: • AV Pilot II instrument • Leg clip • Protective sleeve • Manual The following are available as accessories: • Various attachment fixtures Water damage If the instrument is damaged by water, remove the batteries at once. In the case of salt water, rinse the instrument thoroughly with handwarm fresh water.
Seite 26
Operating Instructions AV Pilot II Downloaded from www.Manualslib.com manuals search engine...
Seite 27
Mode d’emploi AV Pilot II Description de l’instrument Touches du clavier Philosphie d’utilisation Mode RUN (mode d’utilisation normale) Mode SET (mode de réglage) Mode OPTION (mode de configuration) Mise sous tension L’altimètre Généralités Comment fonctionne un altimètre ? Altimètre 1 (ALT 1) Mode SET de l’altimètre 1...
Mode d’emploi AV Pilot II Description de l’instrument 1. Commutateur de mise sous tension / arrêt 2. Affichage du vario analogique linéarisé 3. Affichage du vario digital (intégrateur) 4. Display de l’indicateur 5. Display des fonctions TIME / SPEED / MEMO 6.
Mode d’emploi AV Pilot II Philosphie d’utilisation La philosophie de tous les instruments Bräuniger est de conserver une utilisation aussi convi- viale que possible. Dans cette optique, une seule fonction est attribuée à chaque touche, cela signifie que chaque touche de fonction permet l’affichage et l’activation/désactivation d’une fonction spécifique.
Mode d’emploi AV Pilot II Mise sous tension L’instrument est mis sous tension en enclenchant le commutateur de mise sous tension/arrêt. Après la mise sous tension, l’instrument procède à un auto-test puis se met en mode RUN. Les réglages effectués juste avant d’éteindre l’instrument sont toujours en vigueur lors de la prochaine mise sous tension.
Mode d’emploi AV Pilot II Qu’est ce que le QNH ? Dans le vol libre, un point nul commun pour tous est nécessaire. En effet, il est primordial qu’à une hauteur identique, la même altitude soit affichée sur tous les altimètres. Cette altitude absolue est le QNH.
Mode d’emploi AV Pilot II Cette variation provient d’une altération de la sonde de pression due à la vieillesse. Elle se stabilise cependant après 2-3 ans. Attention: Une fausse manipulation lors de la correction de la valeur de la sonde de pression entraîne un affichage erroné...
Mode d’emploi AV Pilot II VARIO Vario acoustique En pressant à plusieurs reprises sur la touche 0-I-II deux tonalités de volume différentes peuvent être sélectionnées ou le son peut être complètement stoppé. Pendant la pression sur la touche une tonalité vous indiquant le volume en cours se fait entendre.
Mode d’emploi AV Pilot II Mode Option du vario VARIO Dans le premier menu du mode OPTION, le temps VARIO 4 Sec. d’intégration du vario digital peut être modifié. Il peut être réglé entre 5 et 35 secondes, en paliers de 5 secondes.
Mode d’emploi AV Pilot II Mesure du temps et affichage de la température Heure courante (heure réelle) TIME La touche de fonction permet de commuter entre l’affichage de l’heure et de la fonction SPEED MEMO MEMO. Ces données apparaissent à l’écran inférieur de l’instrument.
Mode d’emploi AV Pilot II Mode OPTION de la mesure du temps et de l’af- TIME/TEMP fichage de la température Dans le premier menu du mode option l’affichage de TIME 4 Sec. la température peut être activé/désactivé. Si il est activé, l’indicateur TEMP clignote à...
Mode d’emploi AV Pilot II ANNEXE Livraison : Le set de livraison comprend : • un instrument AV Pilot II • une fixation pour la jambe • une housse de protection • un mode d’emploi Les accessoires suivants sont disponibles : •...
Seite 38
Mode d’emploi AV Pilot II Downloaded from www.Manualslib.com manuals search engine...
Seite 39
Instruzioni per l’uso AV Pilot II Descrizione dello instrumento Tastiera Filosofia di utilizzo Run mode (utilizzo normale) Set mode (funzione taratura) Option mode (funzioni di configurazione) Messa inesercizio (utilizzazione) L'Altimetro In generale come funziona un'altimetro Altimetro 1 (ALT 1)) Set mode dell'altimetro 1...
Instruzioni per l’uso AV Pilot II Descrizione dello strumento 1. Interruttore acceso/spento 2. Quadrante variometro analogico 3. Quadrante variometro digitale 4. Indicatore generale 5. Display delle funzioni speed/time/memory 6. Display dell'altimetro 7. Tastiera Tastiera START-STOP-RESET ALT 1 0-I-II Suono del Vario / Volume...
Instruzioni per l’uso AV Pilot II Filosofia di Utilizzo Per esempio, le differenti unità) o le funzioni possono essere regolati in dif- ferenti MENU. Una descrizione più dettagliata si trova nella descrizione di ogni funzione.Per entrare nella funzione OPTION- MODE (quando ci si trova nel settore di una funzione) bisogna premere simultaneamente i due tasti gialli della tastiera marcati OPTION (fig.
Instruzioni per l’uso AV Pilot II plice perché vi sono ancora altri fattori che influenzano la pressione atmosferica. La pressio- ne varia seconda la temperatura e naturalmente secondo l'evoluzione meteorologica. In un determinato luogo a livello mare (QNH) la pressione atmosferica oscilla fra 950 e 1050 hpa a seconda della meteo.
Instruzioni per l’uso AV Pilot II re il vostro QNH. Per esempio se il valore indicato dal vostro strumento é troppo alto di 20 hPA sarà necessario inserire il valore - 20 hPA per correggere la variazione.Queste variazioni pos- sono sorgere con l'invecchiamento del sensore di pressione e si stabilizzano dopo due o tre anni.
Seite 44
Instruzioni per l’uso AV Pilot II 1.6 m/s 4 m/s 5 m/s Indicazione digitale del Vario L'indicazione digitale del vario segnala il tasso di salita medio. L'indicazione viene costante- mente calcolata e attualizzata ogni secondo ed indica sempre il valore medio del tasso di sali- ta degli ultimi X secondi.Il tempo X nel quale il valore medio viene calcolato (tempo di integra-...
Instruzioni per l’uso AV Pilot II Tasso di caduta allarme discendenza La tonalità del tasso di caduta é un suono conti- nuo che dipende dal tasso di caduta e dalla sog- lia dell’allarme discendenza predefinito. Il suono di discendenza può essere inserito e disinserito tra-...
Instruzioni per l’uso AV Pilot II Temperatura TIME/TEMP L'indicazione della temperatura é una funzione supplementare dell'orologio. Quest'indicazione TIME 4 Sec. può essere inserita o disinserita. Qualora é inseri- SET - MODE ta apparirà ogni 30 secondi nel display dell'orolo- TIME regolazione orologia gio per qualche secondo (l'intervallo di tempo può...
Instruzioni per l’uso AV Pilot II SET MODE DEL LIBRO DI VOLO Nel SET-MODE possiamo cancellare tutti i voli in MEMO memoria, e nel DISPLAY MEMO sarà visibile la sigla CL. Premendo il tasto per 4 secondi si ALT 1 MEMO 4 Sec.
Seite 48
Instruzioni per l’uso AV Pilot II Downloaded from www.Manualslib.com manuals search engine...
Technical specifications AV-PILOT-II – COMFORT-II Altimeter Display 1 – Absolute altitude up to 10.000 m (30'000 ft). Zero adjustment within weather-dependent tolerances. Resolution 1m (3 feet) over entire range of measurement. Diplay: Meter oder feet. Display 2 – Relative altitude or absolute altitude up to 10.000 m (30'000 ft). Zero adjustment possible up to 10.000 m by pressing a key to display gain or loss in altitude immediately.
Different peak values and flight data from up to 20 flights can be saved. Automatic memory administration ( oldest data always released for the most recent recordings ) Recording peak values/ flight data: maximum altitude 1 and 2 maximum vario climb and descend value date and time flight duration ( the max.