Werbung
Quicklinks
For mounting the scanning head, please refer to the separate Mounting Instructions.
Per il montaggio della testina fare riferimento al relativo manuale.
ERA 4202/4202 C
ERA 4402/4402 C
ERA 4802/4802 C
Mounting Instructions
Istruzioni di montaggio
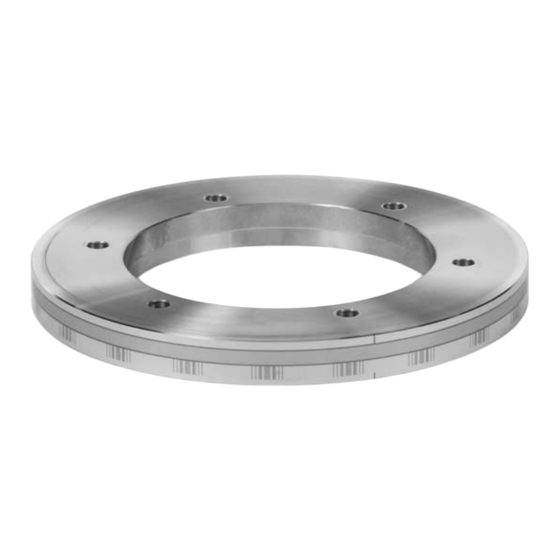
Teilungstrommel
Scale Drum
Tambour gradué
Tamburo graduato
Tambor graduado
ERA 4x02
3/2016
Werbung

Verwandte Anleitungen für HEIDENHAIN ERA 4 02 Serie


Inhaltszusammenfassung für HEIDENHAIN ERA 4 02 Serie
- Seite 1 ERA 4202/4202 C ERA 4402/4402 C ERA 4802/4802 C Mounting Instructions Istruzioni di montaggio Teilungstrommel Scale Drum Tambour gradué Tamburo graduato Tambor graduado For mounting the scanning head, please refer to the separate Mounting Instructions. Per il montaggio della testina fare riferimento al relativo manuale. ERA 4x02 3/2016...
- Seite 2 Inhalt . Contents . Sommaire . Indice . Indice Seite Page 3 Warnings 6 Dimensions 8 General notes on the centering procedure 10 Mounting 15 Distance-coded scale drum Pagina Page 3 Avvertenze 6 Dimensioni 8 Istruzioni generali di centratura 10 Montaggio 15 Tamburo graduato con impulsi a distanza zero a distanza codificata Página...
- Seite 3 Warnhinweise . Warnings . Recommandations . Avvertenze . Advertencias Try not to touch the graduation! (otherwise clean with isopropyl alcohol) on toccare la graduazione.
- Seite 4 Warnhinweise . Warnings . Recommandations . Avvertenze . Advertencias Achtung: Note: – Mounting and commissioning is to be conducted by a qualified specialist under compliance with local safety regulations. – The system must be disconnected from power! – All mounting surfaces must be clean and free of burrs. The specified shaft tolerances must be complied with. –...
- Seite 5 Attenzione: – Il montaggio e la messa in funzione devono essere eseguiti da personale qualificato nel rispetto delle norme di sicurezza locali. – L’impianto deve essere spento! – Tutte le superfici di montaggio devono essere pulite e prive di bava. Devono essere rispettate le tolleranze indicate dell’albero. –...
- Seite 6 Abmessungen · Dimensions · Dimensions · Dimensioni · Dimensiones Reference mark position Posizione indice di riferimento 4±0.1 6x / 12x ¬ Bearing Cuscinetto...
- Seite 7 n £ Æ Æ Æ † Æ 0.3±0.05 x 45° 0.3±0.05 x 45° Æ Æ Æ † Æ Æ Æ Æ † Æ Æ Æ Æ † Æ Æ Æ Æ † Æ Æ Æ Æ † Æ Æ Æ Æ...
- Seite 8 Allgemeine Hinweise für die Zentrierung · General notes on the centering procedure Recommended centering encoder: Capacitive sensor Alternative: Length gauge Raccomandazione per sistema di misura di centratura: sensore capacitivo In alternativa: tastatore di misura Achtung: Caution: The length gauge must not touch the incremental track or reference-mark track! Attention: Attenzione: il tastatore non deve toccare la traccia...
- Seite 9 Remarques générales relatives au centrage · Istruzioni generali di centratura · Indicaciones generales para el centraje E = 0.67 · D max E = Resulting eccentricity of the scale drum in [µm] Max. difference between the values measured at the 3 marks in [µm]. E = eccentricità...
- Seite 10 Montage · Mounting · Montage · Montaggio · Montaje The labeling must be visible. La dicitura deve essere visibile.
- Seite 11 The scale drum is pre-centered by the customer shaft. The three holes located near the marks on the outside circumference are used for mounting. Il tamburo viene precentrato sull'albero lato cliente. Per il fissaggio si utilizzano I tre fori che si trovano in prossimità delle tacche sul diametro esterno. Marks for drum centering 3 x 120°...
- Seite 12 Montage · Mounting · Montage · Montaggio · Montaje The three marks on the circumference of the scale drum are used for final centering. Make sure to position the centering encoder at the center of each mark. In order to avoid damage to the scale drum: –...
- Seite 13 For protruding customer shaft: Sull'albero sporgente lato cliente ¬ Tap lightly Battere delicatamente ¬ 5 at center of mark al centro della tacca...
- Seite 14 Montage · Mounting · Montage · Montaggio · Montaje Tighten the first three screws incrementally. Serrare gradualmente le prime tre viti. = 1.15 Nm = 5.2 Nm Tighten the other screws crosswise and incrementally until the rated torque is reached. Stringere le viti restanti alternativamente e con momento di serraggio Nm.
- Seite 15 ¬ Angle Encoders Without Integral Bearing, “Measuring principles” section. http://www.heidenhain.fr/fr_FR/documentation-et-informations/cataloges/ ¬ ¬ Per ulteriori informazioni sugli indici di riferimento a distanza codificata vedi http://www.heidenhain.it/it_IT/documentazione-informazioni/cataloghi/ ¬ Categorie: Sistemi di misura angolari ¬ Sistemi di misura angolari senza cuscinetto, vedi capitolo: „principi di misura“ ¬...
- Seite 16 DR. JOHANNES HEIDENHAIN GmbH 83301 Traunreut, Germany Technical support Measuring systems { TNC support NC programming PLC programming { Lathe controls www.heidenhain.de *I_592984-92*...