Herunterladen Inhalt Inhalt Diese Seite drucken

Werbung

Verfügbare Sprachen

Verfügbare Sprachen

Gebruiksaanwijzing
afzuigkap
Mode d'emploi
hotte aspirante
Bedienungsanleitung
Dunstabzugsabhaube
Instructions for use
cooker hood
WU50211BM
WU70211BM

Werbung

Inhaltsverzeichnis
loading

Inhaltszusammenfassung für Atag WU50211BM

  • Seite 1 Gebruiksaanwijzing afzuigkap Mode d’emploi hotte aspirante Bedienungsanleitung Dunstabzugsabhaube Instructions for use cooker hood WU50211BM WU70211BM...
  • Seite 2 Handleiding NL 3 - NL 10 Notice d’utilisation FR 3 - FR 10 Bedienungsanleitung DE 3 - DE 10 Manual EN 3 - EN 10 Gebruikte pictogrammen - Pictogrammes utilisés Verwendete Symbole - Pictograms used Belangrijk om te weten - Important à savoir Wissenswertes - Important information Tip - Conseil - Tipp - Tip...
  • Seite 3: Inhaltsverzeichnis

    INHOUD Uw afzuigkap Inleiding Afvoersystemen Beschrijving Gebruik Bediening Controlelampjes vetfilter Controlelampjes koolstoffilter Onderhoud Reinigen Vetfilters verwijderen Het koolstoffilter plaatsen LED verlichting Milieuaspecten Apparaat, koolstoffilter en verpakking afvoeren NL 3...
  • Seite 4: Uw Afzuigkap

    UW AFZUIGKAP Inleiding Gefeliciteerd met uw keuze voor deze ATAG afzuigkap. In het ontwerp van dit product heeft eenvoudige bediening en optimale gebruiksvriendelijkheid centraal gestaan. De afzuigkap doet zijn werk geruisloos en zuigt met maximale effectiviteit af. Kookluchtjes behoren hiermee voorgoed tot het verleden.
  • Seite 5: Beschrijving

    UW AFZUIGKAP Beschrijving 1. Verlichting 2. Bediening a. Druktoets verlichting b. Druktoets aan/uit en eerste snelheid c. Druktoets tweede snelheid d. Druktoets derde snelheid e. Druktoets vierde snelheid 3. Vetfilters NL 5...
  • Seite 6: Bediening

    GEBRUIK Bediening Ventilator in- en uitschakelen 1. Druk op een snelheidstoets 0/1, 2, of 3. De afzuigkap schakelt in op de corresponderende stand. Het controlelampje (L1, L2 of L3) gaat branden. 2. Druk (twee keer) op snelheidstoets 0/1. De afzuigkap schakelt uit. Verlichting in- en uitschakelen Druk op de verlichtingstoets om de verlichting in of uit te schakelen.
  • Seite 7: Controlelampjes Vetfilter

    GEBRUIK Controlelampjes vetfilter Controlelampje L1 gaat branden Nadat de motor 30 uur heeft gewerkt, gaat het controlelampje L1 branden; het vetfilter moet worden gereinigd (zie hoofdstuk ‘Onderhoud’). • Bij het inschakelen van de afzuigkap brand het controlelampje L1 gedurende 30 seconden. •...
  • Seite 8: Reinigen

    ONDERHOUD Reinigen Let op! Maak, voor ieder onderhoud, eerst de afzuigkap spanningsloos door de stekker te verwijderen uit het stopcontact of door de hoofdschakelaar van de woning uit te schakelen. De kap moet regelmatig schoon gemaakt worden, zowel binnen als buiten (tenminste met dezelfde regelmaat waarmee de vetfilters gereinigd worden).
  • Seite 9: Vetfilters Verwijderen

    ONDERHOUD Vetfilters verwijderen 1. Druk het handgreepje van het filter in en verwijder het vetfilter. Het koolstoffilter plaatsen Gebruik een koolstoffilter als de afzuigkap niet is aangesloten op een afvoerkanaal. Centreer het koolstoffilter op het motorhuisdeksel en bevestig deze door het filter een slag te draaien. Belangrijk: •...
  • Seite 10: Milieuaspecten

    MILIEUASPECTEN Apparaat, koolstoffilter en verpakking afvoeren Door het product op de juiste wijze af te voeren voorkomt u mogelijke negatieve gevolgen voor het milieu en de volksgezondheid, die kunnen optreden als u dit op de verkeerde manier doet. Voor relevante informatie kunt u terecht bij uw gemeente.
  • Seite 11 SOMMAIRE Votre hotte d'aspiration Introduction Systèmes d'évacuation Description Utilisation Commande Témoins du filtre à graisse Témoins du filtre à charbon Entretien Nettoyage Retrait des filtres à graisse Remplacement du filtre à charbon Système d’éclairage à LED Environnement Mise au rebut de l’appareil, filtre à charbon et de l’emballage FR 3...
  • Seite 12: Votre Hotte D'aspiration

    VOTRE HOTTE D'ASPIRATION Introduction Nous vous félicitons d'avoir choisi cette hotte d'aspiration ATAG. La souplesse et la simplicité de l'utilisation sont les principes qui ont guidé son développement. Cette hotte fait son travail avec efficacité et aspire l'air avec une efficience maximale. Les odeurs de cuisine envahissantes appartiennent définitivement au passé.
  • Seite 13: Description

    VOTRE HOTTE D'ASPIRATION Description 1. Éclairage Commande a. Touche de l’éclairage b. Touche marche/arrêt et première vitesse c. Touche deuxième vitesse d. Touche troisième vitesse e. Touche quatrième vitesse 2. Filtre à graisse FR 5...
  • Seite 14: Commande

    UTILISATION Commande Allumer et éteindre le ventilateur 1. Appuyez sur la touche de vitesse 0/1, 2 ou 3. La hotte d'aspiration s'allume à la puissance choisie. La lumière (L1, L2 ou L3) s'allument. 2. Appuyez (deux fois) sur la touche de vitesse 0/1. La hotte s'éteint.
  • Seite 15: Témoins Du Filtre À Graisse

    UTILISATION Témoins du filtre à graisse La lumière (L1) s’allument. Quand le moteur a accumulé 30 heures de fonctionnement, la lumière s’allument en signe d’alerte, indiquant qu’il faut nettoyer le filtre à graisse (voir le chapitre « Entretien »). • Lorsque vous allumez la hotte aspirante, la lumière (L1) s’allument pendant 30 secondes.
  • Seite 16: Nettoyage

    ENTRETIEN Nettoyage Attention ! Avant tout entretien, déconnectez l'alimentation électrique de la hotte, soit en débranchant la fiche d'alimentation, soit en coupant le courant au niveau de l'interrupteur principal du logement. La hotte doit être nettoyée régulièrement, à l'intérieur comme à l'extérieur (au moins aussi souvent que les filtres à...
  • Seite 17: Retrait Des Filtres À Graisse

    ENTRETIEN Retrait des filtres à graisse 1. Appuyez sur la poignée du filtre et retirez le filtre à graisse. Remplacement du filtre à charbon Utilisez un filtre à charbon lorsque la hotte d'aspiration n'est pas raccordée sur un canal d'évacuation. Placer le filtre à...
  • Seite 18 ENVIRONNEMENT Mise au rebut de l'appareil, filtre à charbon et de l'emballage En vous conformant à une procédure d'enlèvement correcte de ce produit, vous aiderez à prévenir tout effet nuisible à l'environnement et à la santé, qu'une manipulation inappropriée de celui-ci pourrait autrement provoquer.
  • Seite 19 INHALT Ihre Dunstabzugshaube Einleitung Absaugsysteme Beschreibung Gebrauch Bedienung Kontrollleuchten für Fettfilter Kontrollleuchten für Kohlefilter Pflege Reinigung Fettfilter entfernen Montage des Kohlefilters LED-Beleuchtung Umweltaspekte Gerät, Kohlefilter und Verpackung entsorgen DE 3...
  • Seite 20: Ihre Dunstabzugshaube

    IHRE DUNSTABZUGSHAUBE Einleitung Herzlichen Glückwunsch zum Kauf dieser Dunstabzugshaube von ATAG. Beim Entwurf dieses Produktes haben wir besonders die simple Bedienung und optimale Benutzerfreundlichkeit in den Mittelpunkt gestellt. Die Dunstabzugshaube arbeitet geräuschlos und mit maximalem Wirkungsgrad. Kochgerüche gehören damit endgültig der Vergangenheit an.
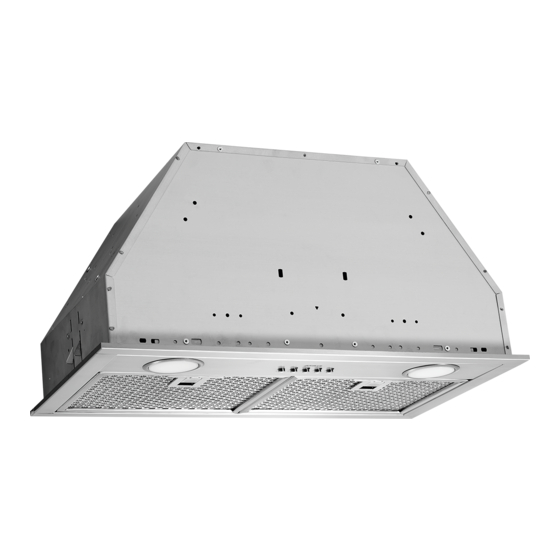
  • Seite 21: Beschreibung

    IHRE DUNSTABZUGSHAUBE Beschreibung 1. Beleuchtung 2. Bedienung a. Drucktaste für die Beleuchtung b. Drucktaste Ein/Aus und Absaugstufe 1 c. Drucktaste Absaugstufe 2 d. Drucktaste Absaugstufe 3 e. Drucktaste Absaugstufe 4 3. Fettfilter DE 5...
  • Seite 22: Gebrauch

    GEBRAUCH Bedienung Ein- und Ausschalten des Lüfters 1. Drücken Sie die Taste für die Absaugstufe 0/1, 2 oder 3. Die Dunstabzugshaube schaltet sich auf der entsprechenden Stufe ein. Die Kontrolllampe (L1, L2 oder L3) leuchtet auf. 2. Drücken Sie zweimal die Absaugstufentaste 0/1. Die Dunstabzugshaube schaltet sich aus.
  • Seite 23: Kontrollleuchten Für Fettfilter

    GEBRAUCH • Drücken Sie Taste mit der blinkenden Kontrollleuchte und halten Sie sie 2 Sekunden lang gedrückt, um die Timerfunktion wieder auszuschalten. Kontrollleuchten für Fettfilter Die kontrolllampe (L1) leuchtet auf. Wenn der Motor 30 Stunden lang in Betrieb war, leuchtet die Kontrolllampe auf;...
  • Seite 24: Pflege

    PFLEGE Reinigung Achtung! Machen Sie das Gerät vor jeder Wartung spannungsfrei, indem Sie den Stecker aus der Steckdose ziehen oder den Hauptschalter der Wohnung ausschalten. Die Abzugshaube muss innen und außen regelmäßig gereinigt werden (mindestens ebenso häufig, wie die Fettfilter gereinigt werden). Verwenden Sie keine Produkte, die Scheuermittel enthalten.
  • Seite 25: Fettfilter Entfernen

    PFLEGE Den Fettfilter entfernen 1. Drücken Sie den Handgriff des Filters ein und nehmen Sie den Fettfilter heraus. Den Kohlefilter austauschen Verwenden Sie einen Kohlefilter, wenn die Abzugshaube nicht an einen Abluftkanal angeschlossen ist. Der Kohlefilter auf den Motordeckel zentrieren und einen Schlag drehen.
  • Seite 26: Umweltaspekte

    UMWELTASPEKTE Gerät, Kohlefilter und Verpackung entsorgen Indem Sie dafür sorgen, dass dieses Gerät ordnungsgemäß entsorgt wird, tragen Sie dazu bei, mögliche negative Auswirkungen auf die Umwelt und die menschliche Gesundheit zu vermeiden, die durch eine nicht vorschriftsmäßige Entsorgung verursacht werden können. erhalten Sie Informationen bei den zuständigen Behörden vor Ort.
  • Seite 27 CONTENTS Your cooker hood Introduction Exhaust systems Description Operation Grease filter indicator lights Carbon filter indicator lights Maintenance Cleaning Removing grease filters Fitting the carbon filter LED lighting Environmental aspects Disposal of appliance, carbon filter and packaging EN 3...
  • Seite 28: Your Cooker Hood

    YOUR COOKER HOOD Introduction Congratulations on choosing this ATAG cooker hood. This product is designed with simple operation and optimum comfort in mind. The cooker hood works silently and extracts at maximum efficiency. With this hood, cooking odours are a thing of the past.
  • Seite 29: Description

    YOUR COOKER HOOD Description 1. Lighting 2. Operating a. Lighting button b. On/off and first speed button c. Second speed button d. Third speed button e. Fourth speed button 3. Grease filter EN 5...
  • Seite 30: Use

    Operating instructions Switching the fan on and off 1. Press the 0/1, 2 or 3. The cooker hood switches on at the corresponding speed. The indicator light (L1, L2 or L3) will light up. 2. Press the 0/1 speed button (twice). The cooker hood switches off.
  • Seite 31: Grease Filter Indicator Lights

    Grease filter indicator lights The indicator light (L1) lights up After the motor has run for 30 hours, the indicator light will light up; the grease filter needs cleaning (see ‘Maintenance’ chapter). • When the cooker hood is turned on, the indicator light will light up for 30 seconds.
  • Seite 32: Maintenance

    MAINTENANCE Cleaning Note! Before each servicing, first disconnect the cooker hood by removing the plug from the wall socket or by switching off the main switch of the residence. The hood must be cleaned regularly, both inside as well as outside (with at least the same regularity as used for cleaning the grease filters).
  • Seite 33: Removing Grease Filters

    MAINTENANCE Removing grease filters 1. Push in the handle of the filter and remove the grease filter. Replacing the carbon filter Use a carbon filter if the cooker hood is not connected to an exhaust duct. Centre the carbon filter on the motor frame and turn it to mount it to the motor frame.
  • Seite 34: Environmental Aspects

    ENVIRONMENTAL ASPECTS Disposal of appliance, carbon filter and packaging By ensuring this product is disposed of correctly, you will help prevent potential negative consequences for the environment and human health, which could otherwise be caused by inappropriate waste handling of this product. The local authorities can provide you with the relevant information.
  • Seite 35 EN 11...
  • Seite 36 *713910* 713910...

Diese Anleitung auch für:

Wu70211bm

Inhaltsverzeichnis