Inhaltsverzeichnis
Werbung
Verfügbare Sprachen
Verfügbare Sprachen
Quicklinks
Werbung
Inhaltsverzeichnis

Verwandte Anleitungen für De Dietrich DHE1146A


Inhaltszusammenfassung für De Dietrich DHE1146A
- Seite 1 GUIDE D'UTILISATION GUIDE TO INSTALLATION MANUAL DE UTILIZACIÓN GUIA DE UTILIZAÇÃO BETRIEBSANLEITUNG OTTE DÉCOR ECORATIVE AMPANA EXTRACTORA DECORATIVA XAUSTOR DECORATIVO EKOR UNSTABZUGSHAUBE...
-
Seite 2: Inhaltsverzeichnis
SOMMAIRE CONSEILS ET SUGGESTIONS ........................4 CARACTERISTIQUES............................5 INSTALLATION ..............................6 UTILISATION ..............................8 ENTRETIEN ................................ 9 INDEX RECOMMENDATIONS AND SUGGESTIONS..................... 12 CHARACTERISTICS............................13 INSTALLATION ............................... 14 USE..................................16 MAINTENANCE............................... 17 INDICE CONSEJOS Y SUGERENCIAS........................20 CARACTERÍSTICAS............................21 INSTALACIÓN ..............................22 USO .................................. -
Seite 4: Conseils Et Suggestions
CONSEILS ET SUGGESTIONS La présente notice d'emploi vaut pour plusieurs versions de l'appareil. Elle peut contenir des descrip- tions d'accessoires ne figurant pas dans votre appareil. INSTALLATION • Le fabricant décline toute responsabilité en cas de dommage dû à une installation non correcte ou non conforme aux règles de l’art. -
Seite 5: Caracteristiques
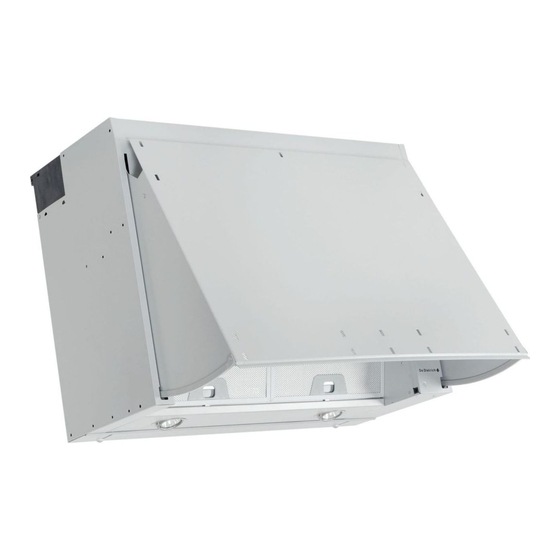
CARACTERISTIQUES Encombrement Composants Réf. Q.té Composants de Produit Corps Hotte équipé de: Comandes, Lumière, Groupe Ventilateur, Filtres Flasque ø120 mm Réf. Q.té Composants pour l ’installation Brides Fixation Corps Hotte équerre de sûreté Chevilles Q.té Documentation Manuel d’instructions... -
Seite 6: Installation
INSTALLATION FIXATION DU PANNEAU FRONTAL SUR LA VISIERE • Sortir la visière métallique en la tournant en avant et en déblo- quant en même temps le dispositif d’arrêt qui se trouve à gau- che de la hotte. • Percer le panneau en utilisant le gabarit en carton spécialement prévu, puis fixer ledit panneau contre la visière à... -
Seite 7: Branchement Electrique
Branchements SORTIE AIR VERSION EVACUATION En cas d’installation en version évacuation, brancher la hotte à la ø 120 tuyauterie de sortie via un tube rigide ou flexible de ø 120 mm, au choix de l’installateur. • Fixer le tube par des colliers appropriés. Le matériau néces- saire n’est pas fourni. -
Seite 8: Utilisation
UTILISATION Tableau des commandes Touche Fonction Display Presser le bouton pour allumer / étein- dre la lumière. Presser une fois pour choisir une lu- mière faible, deux fois pour une lu- mière normale, et une dernière fois pour éteindre la lumière. Presser pour augmenter la vitesse. -
Seite 9: Entretien
ENTRETIEN Filtres anti-graisse NETTOYAGE FILTRES ANTI-GRAISSE METALLIQUES AUTOPORTEURS • Lavables au lave-vaisselle, ils doivent être lavés environ tous les 2 mois d’emploi ou plus fréquemment en cas d’emploi par- ticulièrement intense. • Retirer les filtres l’un aprés l’autre, en les poussant vers la par- tie arrière du groupe et en tirant simultanément vers le bas. - Seite 10 ANOMALIES DE FONCTIONNEMENT SYMPTOMES SOLUTIONS Vérifiez que: • il n’y a pas de coupure de courant. La hotte ne fonctionne pas... • une vitesse a été effectivement sélectionnée. Vérifiez que: • la vitesse moteur sélectionnée est suffisante pour la quantité de fumée et de vapeur dégagée. La hotte a un rendement insuffisant...
- Seite 11 1 11...
-
Seite 12: Recommendations And Suggestions
RECOMMENDATIONS AND SUGGESTIONS The Instructions for Use apply to several versions of this appliance. Accordingly, you may find descriptions of individual features that do not apply to your specific appliance. INSTALLATION • The manufacturer will not be held liable for any damages resulting from incorrect or im- proper installation. -
Seite 13: Characteristics
CHARACTERISTICS Dimensions Components Ref. Q.ty Product Components Hood Body, complete with :Controls, Light, Blower, Filters Flange ø120 mm Ref. Q.ty Installation Components Hood Body Fixing Brackets Safety Squares Wall Plugs Screws Q.ty Documentation Instruction Manual 1 13... -
Seite 14: Installation
INSTALLATION FIXING OF THE FRONTAL PANEL TO THE VISOR • Pull out the metal visor and, at the same time, unlock the lever on the left side of the hood. • Use the cardboard template when drilling the front panel. Fix the panel to the visor using the screws supplied. -
Seite 15: Electrical Connection
Connections DUCTED VERSION AIR EXHAUST SYSTEM When installing the ducted version, connect the hood to the ø 120 chimney using either a flexible or rigid pipe ø120 mm, the choice of which is left to the installer. • Fix the pipe in position using sufficient pipe clamps (not sup- plied). -
Seite 16: Use
Control Board Key Function Display By pressing this key turn on and off lighting. Press once to turn the dimmer light on. Press twice to turn the normal light setting on. Press again to turn off the lighting. Increases the suction speed 1 –... -
Seite 17: Maintenance
MAINTENANCE Grease filters CLEANING METAL SELF- SUPPORTING GREASE FILTERS • The filters must be cleaned every 2 months of operation, or more frequently for particularly heavy usage, and can be washed in a dishwasher. • Remove the filters one at a time by pushing them towards the back of the group and pulling down at the same time. - Seite 18 TROUBLESHOOTING SYMPTOMS SOLUTIONS Ensure that: • The power is not cut off. The hood is • A speed has been selected. not working... Ensure that: • The selected motor speed is sufficient for the quantity of smoke and vapours to be cleared. The hood is not operating effectively...
- Seite 19 1 19...
-
Seite 20: Consejos Y Sugerencias
CONSEJOS Y SUGERENCIAS Las presentes instrucciones de servicio son válidas para diferentes modelos de aparato; por ello puede ser posible que se describan detalles y características de equipamiento que no concuerden íntegramente con las de su aparato concreto. INSTALACIÓN • El fabricante declina cualquier responsabilidad debida a los daños provocados por una instalación incorrecta o no conforme con las reglas. -
Seite 21: Características
CARACTERÍSTICAS Dimensiones Componentes Réf. Cant. Componentes del Producto Cuerpo campana con: Mandos, Iluminación, Filtros, Grupo Aspiración. Arandela ø120 mm Réf. Cant. Componentes de Instalación Placas sujeción Cuerpo Campana Escuadras de Seguridad Tacos Tornillos Cant. Documentación Manual Instrucciones 2 21... -
Seite 22: Instalación
INSTALACIÓN SUJECION DEL PANEL FRONTAL A LA VISERA • Sacar la visera metálica girándola hacia delante, desblocando al mismo tempo el tope situado a la izquierda de la campana. • Agujerear el panel usando la máscara de cartón y sujetarlo a la visera con los tornillos incluídos en los accesorios. - Seite 23 Conexiones SALIDA DEL AIRE VERSIÓN ASPIRANTE Para la instalación de la versión aspirante, conectar la campana al ø 120 tubo de salida mediante un tubo rígido o flexible de ø120 mm, a discreción del instalador. • Fijar el tubo con abrazaderas adecuadas. Este material no se proporciona en dotación.
-
Seite 24: Uso
Tablero de mandos Tecla Función Display Enciende y apaga la luz: Presión 1: luces ON max intensidad Presión 2: luces Dimmer Presión 3: luces OFF Incrementa la velocidad de ejercicio. 1 – 2 – 3 Apretando la tecla durante 3 segundos Visualiza H y el punto situado activa / desactiva la velocidad intensiva. -
Seite 25: Mantenimiento
MANTENIMIENTO Filtros antigrasa LIMPIEZA DE LOS FILTROS ANTIGRASA METÁLICOS • Se pueden lavar en el lavavajillas y requieren un lavado cada 2 meses aproximadamente o más a menudo si su uso es muy in- tenso. • Quitar los filtros uno por vez, operando en los enganches co- rrespondientes. - Seite 26 ANOMALÍAS DE FUNCIONAMIENTO SÍNTOMAS SOLUCIONES Compruebe que: • No hay un corte de corriente. La campana no funcio- na... • Se ha seleccionado una velocidad. Compruebe que: • La velocidad del motor que ha seleccionado es suficiente para la cantidad de humo y el El rendimiento de la cam- vapor de agua producido.
- Seite 27 2 27...
-
Seite 28: Conselhos E Sugestões
CONSELHOS E SUGESTÕES Estas instruções de serviço aplicam-se a vários modelos de aparelhos. É por isso, possível que se encontrem descritas várias características de equipamento que não dizem respeito ao seu aparelho. INSTALAÇÃO • O fabricante declina toda e qualquer responsabilidade pelos danos decorrentes de uma instalação não correcta ou feita não em conformidade com as normas da boa técnica. -
Seite 29: Características
CARACTERÍSTICAS Dimensões Componentes Ref. Qtd. Componentes do Produto Corpo do exaustor equipado com: Comandos, luz, filtros, grupo aspirador. Flange de ø120 mm Ref. Qtd. Componentes de Instalação Suportes de fixação da estrutura do exaustor Cantoneiras de segurança Buchas Parafusos Qtd. Documentos Livro de Instruções 2 29... -
Seite 30: Instalação
INSTALAÇÃO FIXAÇÃO DO PAINEL FRONTAL À VISEIRA • Extraia a viseira metálica, rodando-a para a frente e destravan- do, simultaneamente, o retentor que está do lado esquerdo do exaustor. • Fure o painel, utilizando o molde próprio de cartão, e fixe-o à viseira com os parafusos fornecidos. -
Seite 31: Ligação Eléctrica
Ligações SAÍDA DO AR PARA A VERSÃO ASPIRANTE Para a instalação na Versão Aspirante, ligue o exaustor ao tubo ø 120 de saída utilizando um tubo rígido ou flexível de ø120 mm; esta escolha deve ser feita pelo instalador. • Fixe o tubo com braçadeiras de aperto adequadas. O material necessário não é... -
Seite 32: Utilização
UTILIZAÇÃO Quadro de comandos Tecla Função Display Acende e apaga a luz: Pressão 1: luzes ON intensidade máx. Pressão 2: luzes Dimmer Pressão 3: luzes OFF Aumenta a velocidade de funcionamen- 1 – 2 – 3 Pressionada cerca de 3 segundos, a te- Visualiza H e o ponto em cla activa/desactiva a velocidade inten- baixo pisca... -
Seite 33: Manutenção
MANUTENÇÃO Filtros contra gordura LIMPAR OS FILTROS METÁLICOS CONTRA GORDURA • Os filtros deverão ser limpos de 2 em 2 meses de funcionamento, ou mais frequentemente em situações de utilização extrema e podem ser lavados na máquina de lavar louça. •... - Seite 34 ANOMALIAS DE FUNCIONAMENTO SINTOMAS SOLUÇÕES Verificar se: • não há nenhum corte de electricidade. O exaustor não funciona... • foi realmente seleccionada uma velocidade. Verificar se: • a velocidade seleccionada do motor é sufi- ciente para a quantidade de fumo e de vapor O rendimento do libertada.
- Seite 35 3 35...
-
Seite 36: Empfehlungen Und Hinweise
EMPFEHLUNGEN UND HINWEISE Diese Gebrauchsanleitung gilt für mehrere Geräte-Ausführungen. Es ist möglich, dass einzelne Ausstattungsmerkmale beschrieben sind, die nicht auf Ihr Gerät zutreffen. MONTAGE • Der Hersteller haftet nicht für Schäden, die auf eine fehlerhafte und unsachgemäße Montage zurückzuführen sind. •... -
Seite 37: Charakteristiken
CHARAKTERISTIKEN Platzbedarf Komponenten Pos. Produktkomponenten Haubenkörper mit Schaltern, Beleuchtung, Gebläse- gruppe, Filter Flansch ø 150-120 mm Pos. Montagekomponenten Befestigungsbügel Haubenkörper Metall Sicherungswinkel Bügel Schrauben Dokumentation Bedienungsanleitung 3 37... -
Seite 38: Montage
MONTAGE FIXIERUNG DER FRONTPLATTE AM LEITSCHIRM • Den metallenen Leitschirm durch Drehen und gleichzeitiges Entriegeln der Haltevorrichtung auf der linken Seite der Haube nach vorne herausziehen. • Die Platte mit Hilfe der entsprechenden Bohrschablone aus Karton bohren und mit Hilfe der mitgelieferten Schrauben am Leitschirm fixieren. -
Seite 39: Anschlüsse
Anschlüsse ANSCHLUSS IN ABLUFTVERSION Bei Abluftbetrieb kann die Haube vom Installateur wahlweise ø 120 mittels Rohr oder Schlauch (ø120 mm) an die Außenrohrleitung angeschlossen werden. • Das Rohr mit geeigneten Rohrschellen fixieren. Das hierzu erforderliche Material wird nicht mitgeliefert. • Eventuell vorhandene Aktivkohlefilter entnehmen. LUFTAUSTRITT UMLUFTVERSION •... -
Seite 40: Bedienung
BEDIENUNG Schalttafel Taste Funktion Display Schaltet die Beleuchtung ein oder aus. 1 mal Drücken zur Einschaltung des intensiven Lichtes. 2 mal Drücken zur Einschaltung der Dimmer-Lichte. 3 mal Drücken zur Lichtabschaltung. Erhöht die Geschwindigkeitsstufe. 1 – 2 – 3 Durch 3 Sekunden langes Drücken der Das Display zeigt „H“... -
Seite 41: Wartung
WARTUNG Fettfilter SELBSTTRAGENDER METALLFETTFILTER REINIGUNG • Sie müssen nach 2-monatigem Betrieb bzw. bei starkem Ein- satz auch häufiger gereinigt werden, was im Geschirrspüler möglich ist. • Die Filter nacheinander aushaken, indem sie auf die Rückseite der Gruppe geschoben und gleichzeitig nach unten gezogen werden. - Seite 42 FUNKTIONSSTÖRUNGEN SYMPTOME LÖSUNGEN Prüfen, ob: • kein Stromausfall vorliegt; Die Dunstabzugshaube • wirklich eine Drehzahl gewählt wurde. funktioniert nicht ... Prüfen, ob: • die gewählte Motordrehzahl für die abgege- bene Rauch- und Dampfmenge ausreicht; Die Dunstabzugshaube zeigt ungenügende • die Küche ausreichend belüftet ist, damit eine Leistung ...
- Seite 44 436005525_ver1...