Werbung
Quicklinks
®
D
A
CH
Aktives
Mini-Lautsprechersystem
Bitte lesen Sie diese Anleitung vor dem Betrieb gründ-
lich durch und heben Sie sie für ein späteres Nach -
lesen auf.
1 Einsatzmöglichkeiten
Dieses praktische Lautsprechersystem mit einer Ver-
stärkerleistung von 1,5 Watt besteht aus einem
Mini-Lautsprecher mit integriertem Verstärker und
einem Li-Ionen-Akkumulator zur Stromversorgung,
der über einen USB-Anschluss aufgeladen werden
kann. Das Gerät lässt sich über einen 3,5-mm-
Klinkenstecker an verschiedene Audioquellen an -
schließen (Notebooks, MP3-Player, Handys etc.).
2 Wichtige Hinweise für den Gebrauch
Das Lautsprechersystem entspricht allen erforderli-
chen Richtlinien der EU und ist deshalb mit
zeichnet.
G
Setzen Sie das Lautsprechersystem nur im Innen-
bereich ein. Schützen Sie es vor Tropf- und Spritz-
wasser, hoher Luftfeuchtigkeit und Hitze (zulässige
Einsatztemperatur 0 – 40 °C).
G
Verwenden Sie zum Reinigen nur ein trockenes,
weiches Tuch, niemals Chemikalien oder Wasser.
G
Wird das Lautsprechersystem zweckentfremdet,
falsch bedient oder nicht fachgerecht repariert, kann
keine Haftung für daraus resultierende Sach- oder
Active Miniature
GB
Speaker System
Please read these operating instructions carefully
prior to operating the unit and keep them for later ref-
erence.
1 Applications
This practical speaker system with an amplifier power
of 1.5 W consists of a miniature speaker with inte-
grated amplifier and a li-ion rechargeable battery for
power supply which can be recharged via a USB con-
nection. The unit can be connected to various audio
sources (notebooks, MP3 players, mobile phones,
etc.) via a 3.5 mm plug.
2 Important Notes
The speaker system corresponds to all required direc-
tives of the EU and is therefore marked with
G
The speaker system is suitable for indoor use only.
Protect it against dripping water and splash water,
high air humidity, and heat (admissible ambient tem-
perature range 0 – 40 °C).
G
For cleaning only use a dry, soft cloth, never use
chemicals or water.
G
No guarantee claims for the speaker system and no
liability for any resulting personal damage or material
ALIGN
®
Copyright
SP-1/SW
Personenschäden und keine Garantie für das Laut-
sprechersystem übernommen werden.
Soll das Lautsprechersystem endgültig aus
dem Betrieb genommen werden, übergeben
Sie es zur umweltgerechten Entsorgung
einem örtlichen Re cyclingbetrieb.
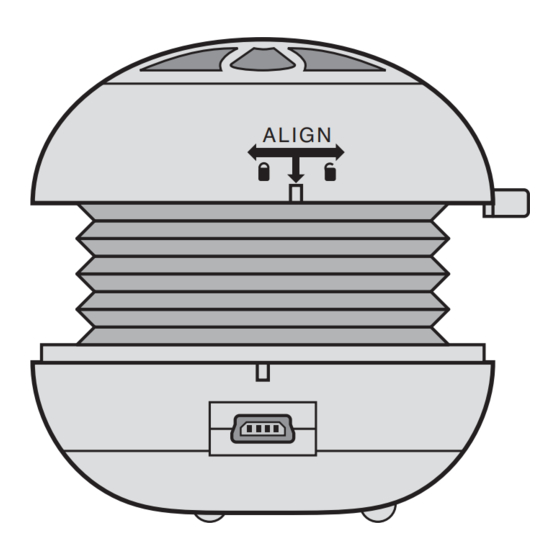
3 Inbetriebnahme
1) Das Oberteil des Lautsprechers gegen den Uhrzei-
gersinn drehen (Abb. 1). Das Ober- und das Unter-
teil lassen sich dann zur Vergrößerung des Laut-
sprechervolumens auseinanderziehen (Abb. 2).
2) Vor dem ersten Betrieb den Akku aufladen. Dazu
den Mini-USB-Stecker des beiliegenden An -
schluss kabels in die Buchse CHARGE /AUDIO (1)
stecken und den Standard-USB-Stecker in den
USB-Anschluss eines PCs oder eines anderen
gekenn-
Geräts mit einem USB-Anschluss stecken. Die
LED (2) leuchtet während des Ladens grün. Leuch-
tet sie rot, ist der Akku aufgeladen (nach ca. 2 – 3
Stunden).
3) Den 3,5-mm-Klinkenstecker des Anschlusskabels
mit einem in der Lautstärke regelbaren Audioaus-
gang einer Audioquelle verbinden (z. B. Kopfhörer-
ausgang).
4) Das Lautsprechersystem mit dem Ein- und Aus-
schalter (3) einschalten. Die LED (2) leuchtet.
damage will be accepted if the unit is used for other
purposes than originally intended, if it is not correctly
operated or not repaired in an expert way.
If the speaker system is to be put out of oper-
ation definitively, take it to a local recycling
plant for a disposal which is not harmful to the
environment.
3 Operation
1) Turn the upper part of the speaker counter-clock-
wise (fig. 1). Then the upper part and the lower part
can be pulled apart to increase the speaker volume
(fig. 2).
2) Prior to the first operation recharge the battery. For
this purpose connect the miniature USB plug of the
supplied cable to the jack CHARGE / AUDIO (1)
and connect the standard USB plug to the USB
.
connection of a PC or another unit with a USB con-
nection. The LED (2) shows green during charging.
When it shows red, the battery is recharged (after
approx. 2 to 3 hours).
3) Connect the 3.5 mm plug of the cable to an audio
output to be adjusted in volume of an audio source
(e. g. headphone output).
4) Switch on the speaker system with the on / off switch
(3). The LED (2) lights up. If the LED does not light
2.
1.
Œ
©
by MONACOR INTERNATIONAL GmbH & Co. KG, Bremen, Germany. All rights reserved.
Best.-Nr. 25.2400
5) Zum Einstellen der gewünschten Lautstärke am
6) Nach dem Betrieb das Lautsprechersystem mit
4 Technische Daten
Verstärkerleistung: . . . 1,5 W
Störabstand: . . . . . . . . > 89 dB
Stromversorgung: . . . . über eingebauten Li-Ionen-
Abmessungen: . . . . . . ∅ 52 mm × 36 / 51 mm
Gewicht: . . . . . . . . . . . 53 g
Änderungen vorbehalten.
5) To adjust the desired volume at the connected
6) After operation, switch off the speaker system with
4 Specifications
Output power: . . . . . . . 1.5 W
S / N ratio: . . . . . . . . . . . > 89 dB
Power supply: . . . . . . . via integrated li-ion rech. batt.
Dimensions: . . . . . . . . ∅ 52 mm × 36 / 51 mm
Weight: . . . . . . . . . . . . 53 g
Subject to technical modification.
ALIGN
Wenn die LED nicht leuchtet, ist der Akku leer und
muss wieder aufgeladen werden.
angeschlossenen Audiogerät den entsprechenden
Regler betätigen.
dem Schalter (3) ausschalten. Zum Transport alle
Verbindungen trennen, das Ober- und das Unterteil
zusammendrücken und zum Verriegeln das Ober-
teil im Uhrzeigersinn bis zum Anschlag drehen.
Akku (300 mAh), aufladbar
über USB-Anschluss (5 V )
up, the battery is exhausted and has to be re-
charged.
audio unit, actuate the corresponding control.
the switch (3). For transporting, separate all con-
nections, press together the upper part and the
lower part and for locking, turn the upper part clock-
wise up to the stop.
(300 mAh) to be recharged
via USB connection (5 V )
Ž
A-1051.99.01.11.2009
1
2
3
Werbung

Verwandte Anleitungen für Monacor Accessories SP-1/SW


Inhaltszusammenfassung für Monacor Accessories SP-1/SW
- Seite 1 (3). The LED (2) lights up. If the LED does not light Subject to technical modification. ALIGN ALIGN Œ Ž ® Copyright © by MONACOR INTERNATIONAL GmbH & Co. KG, Bremen, Germany. All rights reserved. A-1051.99.01.11.2009...
- Seite 2 Con riserva di modifiche tecniche. ALIGN ALIGN Œ Ž ® Copyright © by MONACOR INTERNATIONAL GmbH & Co. KG, Bremen, Germany. All rights reserved. A-1051.99.01.11.2009...
- Seite 3 6) Po zakończeniu pracy, wyłączyć system przełącz- wane lub naprawiane. nikiem (3). Na czas transportowania, rozłączyć Z zastrzeżeniem możliwości zmian. ALIGN ALIGN Œ Ž ® Copyright © by MONACOR INTERNATIONAL GmbH & Co. KG, Bremen, Germany. All rights reserved. A-1051.99.01.11.2009...