Herunterladen Diese Seite drucken

Werbung

Verfügbare Sprachen
  • DE

Verfügbare Sprachen

Werbung

loading

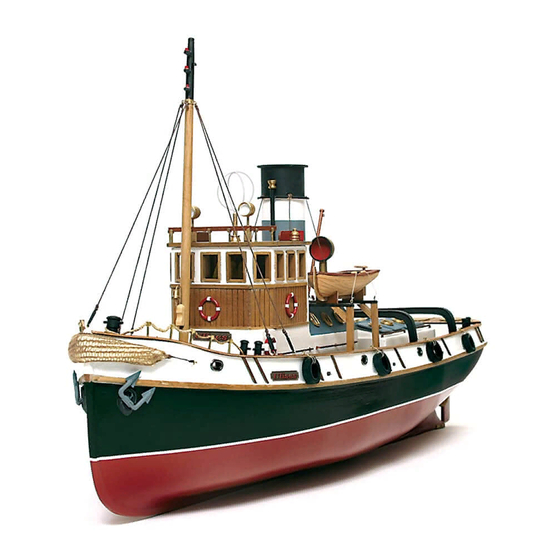
Inhaltszusammenfassung für OcCre ULISES R-C 61001

  • Seite 2: Instrucciones De Montaje

    INSTRUCCIONES DE MONTAJE ULISES R-C CASCO FOTO 1- Tome las tres porciones de quilla 1, 2 y 3. Únalas entre si y fije la unión con los refuerzos 4 en la mitad de proa y con los refuerzos 5 en la mitad de popa, uno por cada lado. Deben quedar enrasados con la parte superior de la quilla. Realice esta operación sobre una superficie plana.
  • Seite 3 FOTO 46-. Pinte las amuradas de color blanco mate por la parte interior. Pinte también el mamparo 48 y 41. Lime el perfil de la cubierta para que las amuradas tengan base al colocarlas. Ajústelas de longitud si es preciso. Encole seguidamente las brazolas de las escotillas 53, 54 y 55 en su lugar correspondiente.
  • Seite 4 FOTO 87- Monte la cabina con las piezas 125 a 134. En la parte posterior debe pegar las fogonaduras de los manguerotes 135. Estas deben quedar casi enrasadas con la parte posterior de la caseta y adentradas en la base unos 10 mm. Clave unas puntas en cada esquina de las fogonaduras.
  • Seite 5 ASSEMBLY INSTRUCTIONS ULISES R-C HULL PHOTO 1: Take the three parts that make up the keel 1, 2 & 3. Join them together and fix the joints with the reinforcements 4 for the forward half and reinforcements 5 for the back half, one on each side. These must be flush with the top of the keel. This work has to be done on a flat surface.
  • Seite 6 PHOTOS 43 - 45: Start to line the decks using the deck planking sheets 50. First fit a section in place in the middle of the deck. And then, on both sides, fit 70 mm lengths and then, next to these, fit another section covering the area up to the hatch. On both sides fit more lengths, each as long as the one in the centre.
  • Seite 7 boards and paint them gold. Make up the rope 115 braiding together three pieces of thread, all the same length, to achieve the right thickness. Glue the shanks 116 to the anchors 117 and paint them dark grey. The hawses 118 have been painted in black gloss before gluing them to the hull.
  • Seite 8 PHOTOS 117 - 119: Glue the rubbing strakes 241 onto both sides of the launch, five millimetres above the first lining strip. Using a saw separate the launch from the base flush with the lining. Glue the stem 242 into place along with the keel 243, taken from strips. PHOTOS 120 - 122: Glue the stern post 244 to the stern.
  • Seite 9: Instructions De Montage

    INSTRUCTIONS DE MONTAGE ULISES R-C COQUE PHOTO 1. Prendre les trois morceaux de quille 1, 2 et 3. Les unir et fixer l’union aux renforts 4 au milieu de la proue et aux renforts 5 au milieu de la poupe (un de chaque côté). Ils doivent être de niveau avec la partie supérieure de la quille. Cette opération doit être réalisée sur une surface plane.
  • Seite 10 de contact pour ce type de plaques. Prendre les murailles 51 et 52. Les unir de sorte à obtenir une seule muraille de chaque côté de la coque. PHOTO 46. Peindre la partie intérieure des murailles en blanc mat. Peindre également les cloisons 48 et 41. Limer le profil du pont afin que les murailles aient une base au moment de leur montage.
  • Seite 11 PHOTO 87. Monter la cabine avec les pièces 125 à 134. Coller à l’arrière les étambrais des manches 135. Ceux-ci doivent être pratiquement de niveau avec la partie arrière du poste et pénétrer environ 10 mm dans la base. Clouer des pointes à chaque coin des étambrais.
  • Seite 12 BASTELANLEITUNG ULISES-RC RUMPF Foto 1.- Drei Stücke von Kiel 1, 2 und 3 nehmen. Untereinander verbinden und die Verbindungen mit den Verstrebungen 4 auf die Bugmitte und mit den Verstrebungen 5 auf die Heckmitte setzen. Die Teile müssen mit der Oberseite des Kiels abschließen. Diesen Schritt auf einer ebenen Oberfläche ausführen.
  • Seite 13 angrenzenden Verbindung übereinstimmt. Die Beplankung mit auf ca. 140 mm zurechtgeschnittenen Leisten abschließen. Für diese Leisten Kontaktkleber verwenden. Die Schanzverkleidung 51 und 52 vorbereiten. Untereinander verbinden, so dass ein Stück für jede Seite des Rumpfs entsteht. Foto 46.- Die Schanzverkleidung an der Innenseite mattweiß lackieren. Ebenfalls die Schotts 48 und 41 lackieren. Das Profil des Decks glatt feilen, um eine Basis für die Anbringung der Schanzverkleidung herzustellen.
  • Seite 14 Foto 88.- Den Unterbau der Kabine mit den Leisten 136 verkleiden, dabei die Einkerbungen beachten. Den Schott mit den Leisten 137 verkleiden. Pütz und Kleiderhaken mit den Leisten 138 formen. Gebogene Stifte als Kleiderhaken verwenden. Die Ölhäute können mit Seidenpapier oder gelber Folie nachgeahmt werden. Foto 89.- Die Teile 139 bis 143 vorbereiten.
  • Seite 15: Istruzioni Di Montaggio

    ISTRUZIONI DI MONTAGGIO ULISES R-C SCAFO FOTO 1- Prendere le tre parti della chiglia 1, 2 e 3. Unirle tra di loro e fissare l'unione con i rinforzi 4 a metà della prua e con i rinforzi 5 a metà della poppa, uno su ogni lato. Devono andare a filo con la parte superiore della chiglia. Realizzare quest'operazione su di una superficie piana.
  • Seite 16 FOTO 46-. Pitturare le mura di color bianco mate dalla parte interiore. Pitturare anche la paratia 48 e 41. Limare il bordo della coperta affinché le mura abbiano la base per essere collocate. Se necessario rivedere la lunghezza. Incollare poi gli orli rialzati dei boccaporti 53, 54 e 55 al loro posto corrispondente.
  • Seite 17 FOTO 87- Montare la cabina con i pezzi 125 a 134. Sulla parte posteriore vanno incollate le mastre delle maniche 135. Maniche che devono essere quasi a filo con la parte posteriore della casetta a 10 mm dalla base. Mettere un chiodino su ogni angolo delle mastre.
  • Seite 18 Lista de piezas / Parts List / Liste des pièces / Teileliste / Elenco delle parti Nº/No./ Nº / Cantidad / Quantity / Quantité / Medidas / Measurements / Dimensions /Maße / Misure Material / Material / Matériau / Material / Materiale Nr.
  • Seite 19 Lista de piezas / Parts List / Liste des pièces / Teileliste / Elenco delle parti Nº/No./ Nº / Cantidad / Quantity / Quantité / Medidas / Measurements / Dimensions /Maße / Misure Material / Material / Matériau / Material / Materiale Nr.
  • Seite 20 Lista de piezas / Parts List / Liste des pièces / Teileliste / Elenco delle parti Nº/No./ Nº / Cantidad / Quantity / Quantité / Medidas / Measurements / Dimensions /Maße / Misure Material / Material / Matériau / Material / Materiale Nr.
  • Seite 21 Lista de piezas / Parts List / Liste des pièces / Teileliste / Elenco delle parti Nº/No./ Nº / Cantidad / Quantity / Quantité / Medidas / Measurements / Dimensions /Maße / Misure Material / Material / Matériau / Material / Materiale Nr.
  • Seite 22 Lista de piezas / Parts List / Liste des pièces / Teileliste / Elenco delle parti Nº/No./ Nº / Cantidad / Quantity / Quantité / Medidas / Measurements / Dimensions /Maße / Misure Material / Material / Matériau / Material / Materiale Nr.
  • Seite 23 Lista de piezas / Parts List / Liste des pièces / Teileliste / Elenco delle parti Nº/No./ Nº / Cantidad / Quantity / Quantité / Medidas / Measurements / Dimensions /Maße / Misure Material / Material / Matériau / Material / Materiale Nr.
  • Seite 33 Ulises 61001-3 61001-1 61001-4 61001-5 61001-6...
  • Seite 34 Ulises 61001-7 61001-8 61001-9 61001-10...
  • Seite 35 Ulises Scale 1/1...
  • Seite 36 Ulises Baterias Variador Scale 1/1...
  • Seite 37 Ulises Scale 1/1...
  • Seite 38 Ulises Receptor Servo Interruptor Motor Cardan Scale 1/1...