Philips HR7782 Benutzerhandbuch
Quicklinks
Register your product and get support at
www.philips.com/welcome
EN
User manual
NO
Brukerhåndbok
DE
Benutzerhandbuch
FI
Käyttöopas
FR
Mode d'emploi
SV
Användarhandbok
Brugervejledning
NL
Gebruiksaanwijzing
DA
IT
Manuale utente
PT
Manual do utilizador
EL
Εγχειρίδιο χρήσης
TR
Kullanım kılavuzu
Manual del usuario
ES
Specifications are subject to change without notice
© 2012 Koninklijke Philips Electronics N.V.
All rights reserved.
3140 035 29043
HR7782_WE_UM_V3.0
English
1 Important
Read this user manual carefully before you use the appliance, and save the user manual for
future reference.
Danger
•
Do not immerse the motor unit in water nor rinse it under the tap.
Warning
•
Never use your fingers or an object to push ingredients into the feeding tube while the
appliance is running. Only use the pusher.
•
Before you connect the appliance to the power, make sure that the voltage indicated
on the bottom of the appliance corresponds to the local power voltage.
•
Never connect this appliance to a timer switch, to avoid a hazardous situation.
•
If the power cord, the plug, or other parts are damaged, do not use the appliance.
•
If the power cord is damaged, you must have it replaced by Philips, a service center
authorized by Philips, or similarly qualified persons to avoid a hazard.
•
This appliance is not intended for use by persons (including children) with reduced
physical, sensory or mental capabilities, or lack of experience and knowledge, unless
they have been given supervision or instruction concerning use of the appliance by a
person responsible for their safety.
•
For their safety, do not allow children to play with the appliance.
•
Never let the appliance run unattended.
•
If food sticks to the wall of the bowl, switch off the appliance and unplug it. Then use a
spatula to remove the food from the wall.
•
Be careful when you handle or clean the discs, the blade units of the food processor.
The cutting edges are very sharp.
•
Do not touch the blades, especially when the appliance is plugged in. The blades are
very sharp.
•
If the blades get stuck, unplug the appliance before you remove the ingredients that
block the blades.
Caution
•
Never switch off the appliance by turning the bowl, or its lids. Always switch off the
appliance by turning the knob to 0.
•
Unplug the appliance immediately after use.
•
Wait until the moving parts stop running before you remove the lid of the bowl.
•
Do not exceed the maximum level indication on the bowl.
•
Thoroughly clean the parts that come into contact with food before you use the
appliance for the first time.
•
Before you remove or clean the kneading accessory or discs, unplug the appliance.
•
Never use any accessories or parts from other manufacturers or that Philips does not
specifically recommend. If you use such accessories or parts, your guarantee becomes
invalid.
•
This appliance is intended for household use only.
•
Do not exceed the quantities and processing time indicated in the user manual.
•
Let hot ingredients cool down (< 80ºC) before processing them.
•
Always let the appliance cool down to room temperature after each batch that you
process.
•
Certain ingredients may cause discolorations on the surface of the parts. This does not
have a negative effect on the parts. The discolorations usually disappear after some
time.
•
Noise level = 85 dB [A]
Electromagnetic fields (EMF)
This Philips appliance complies with all standards regarding electromagnetic fields (EMF). If
handled properly and according to the instructions in this user manual, the appliance is safe
to use based on scientific evidence available today.
Recycling
Your product is designed and manufactured with high quality materials and components,
which can be recycled and reused.
1/4
1
HR7782
(MAX)
(MAX)
5 x 1 sec
5 x 1 sec
30 sec
60 sec
45 sec
30 sec
60-180 sec
-4
C
o
2 min
60-300 sec
60-180 sec
30 sec
30 sec
30 sec
30 sec
30 sec
30 sec
30 sec
30 sec
30 sec
2 min
20 sec
9
When you see the crossed-out wheel bin symbol attached to a product, it means the
product is covered by the European Directive 2002/96/EC:
Never dispose of your product with other household waste. Please inform yourself about
the local rules on the separate collection of electrical and electronic products. The correct
disposal of your old product helps prevent potentially negative consequences on the
environment and human health.
2 Introduction
Congratulations on your purchase and welcome to Philips! To fully benefit from the support
that Philips offers, register your product at www.philips.com/welcome.
For recipes to use with your food processor, go to www.philips.com/kitchen
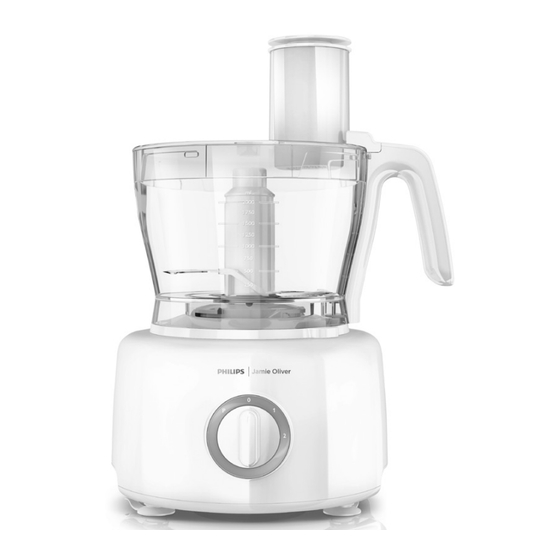
3 Food processor
Warning
•
Never use your fingers or an object (for example, a spatula) to push ingredients into the feeding
tube while the appliance is running. Only use the pusher.
Chopper knife
Before you start, make sure you assemble according to Fig. 2.
You can use the chopper knife to chop, mix, blend, or puree ingredients. You can also use it to
mix and blend cake batters.
Caution
•
Do not use the chopper knife to chop hard ingredients, like coffee beans, turmeric, nutmeg, and ice cubes, as this
may cause the blade to get blunt.
Note
•
Do not let the appliance run too long when you chop (hard) cheese or chocolate. Otherwise these
ingredients become too hot, start to melt, and turn lumpy.
•
Precut large pieces of food into pieces of approx. 3 x 3 x 3 cm.
1
Turn the the bowl clockwise to fix it on the motor unit, and then put the tool holder
in the bowl.
» When the bowl is fixed correctly, you hear a click.
2
Put the chopper knife on the tool holder.
3
Put the ingredients in the bowl.
4
Put the lid on the bowl, and then turn the lid clockwise to fix it.
» When the lid is assembled correctly, you hear a click and the lid is fixed to the
bowl handle.
5
Put the pusher into the feeding tube.
6
Connect the power plug to the power supply.
7
Check the preparation time, the maximum amount and the speed setting required for
the ingredients in Table 1. Turn the knob to the desired speed setting.
8
After use, turn the knob to 0, and then unplug the appliance.
Tip
•
When you chop onions, turn the knob to P a few times to prevent the onions from becoming too
finely chopped.
•
When the food sticks to the blade or inside the bowl, you can do the following steps: 1. Switch off
the appliance, and then unplug it. 2. Remove the lid from the bowl. 3. Remove the ingredients from
the blade or from the side of the bowl with a spatula.
Serrated blade
Before you start, make sure you assemble according to Fig. 3.
Use the serrated blade to crush frozen fruit.
Note
•
Always put the blade unit in the bowl before you start.
•
It is recommended to cut the fruit into 2x2x2cm cube size before having it frozen.
•
For making fruit desserts, it is recommended to use speed 2 for smooth result, and speed 1 for
chunky result.
2
P
1
(MAX)
(MAX)
750 g
P
1 kg
P/2
100 g
P
1 kg
2
500 g
2
400 g
2
750 g
1-2
1 kg
1
600 ml
750 ml
1
8 pcs
1
1 k g
1
1 k g
1
3 pcs
1
6
750 g
1
3 pcs
1
1 k g
1
200 g
1
1
3 pcs
1 k g
1
1 kg
1
500 g
1
10
1
Turn the the bowl clockwise to fix it on the motor unit, and then put the tool holder
in the bowl.
» When the bowl is fixed correctly, you hear a click.
2
Put the serrated ice blade on the tool holder.
3
Put the frozen fruit in the bowl.
4
Put the lid on the bowl, and then turn the lid clockwise to fix it.
» When the lid is assembled correctly, you hear a click and the lid is fixed to the
bowl handle.
5
Put the pusher into the feeding tube.
6
Connect the power plug to the power supply.
7
Turn the knob to 1 or 2 .
8
After use, turn the speed selector to 0, and then unplug the appliance.
Kneading accessory
Before you start, make sure you assemble according to Fig. 4.
You can use the kneading tool to knead yeast dough for bread and pizzas. You need to
adjust the amount of liquid to form the dough according to the humidity and temperature
condition.
Note
•
Do not use the kneading tool to blend cake batters. Use the chopper knife for this job.
•
Always put the kneading tool in the bowl before you add the ingredients.
Tip
•
If using High Gluten Flour, for best results, use 60g water for every 100g of flour, and knead at speed
1 for 2 minutes (max time).
1
Turn the the bowl clockwise to fix it on the motor unit, and then put the tool holder
in the bowl.
» When the bowl is fixed correctly, you hear a click.
2
Put the kneading tool on the tool holder.
3
Put the ingredients in the bowl.
4
Put the lid on the bowl, and then turn the lid clockwise to fix it.
» When the lid is assembled correctly, you hear a click and the lid is fixed to the
bowl handle.
5
Put the pusher into the feeding tube.
6
Connect the power plug to the power supply.
7
Turn the knob to the 1 position.
8
Check the preparation time, the maximum amount and the speed setting required for
the ingredients in Table 1.
9
After use, turn the knob to 0, and then unplug the appliance.
Balloon beater
Before you start, make sure you assemble according to Fig. 5:
1
Put the tool holder in the bowl.
2
Put the balloon beater on the tool holder in the bowl.
3
Put the ingredients in the bowl.
4
Put the lid on the bowl. Turn the lid clockwise to fix it. Put the pusher in the feeding
tube.
5
Select speed 1.
6
After use, turn the speed selector to 0, and then unplug the appliance.
Citrus press
Before you start, make sure you assemble according to Fig. 6.
You can use the citrus press to squeeze citrus fruits.
1
Turn the the bowl clockwise to fix it on the motor unit, and then put the tool holder
in the bowl.
» When the bowl is fixed correctly, you can hear a click .
2
Put the sieve for citrus press on the tool holder in the bowl. Make sure that the
projection on the sieve is locked in the slot of the bowl handle.
» When the sieve is fixed correctly, you can hear a click .
3
Put the cone on the sieve.
4
Connect the power plug to the power supply.
5
Check the maximum amount required for the ingredients in Table 1. Turn the knob to
speed 1.
» The cone starts rotating.
6
Press the citrus fruit onto the cone.
7
Stop pressing from time to time to remove the pulp from the sieve. When you finish
pressing or when you want to remove the pulp, turn the knob to 0 and remove the
bowl from the appliance with the sieve and cone on it.
3
4
-4
o
C
7
11
12
0
P
Slicing discs and shredding discs
Before you start, make sure you pick your desired disc and assemble according to Fig. 7:
•
Adjustable slicing disc to adjust different thickness
•
Reversible shredding disc (bigger or small size)
Caution
•
Be careful when you handle the disc. It has a very sharp cutting edge.
•
Never use the disc to process hard ingredients, like ice cubes.
•
Do not exert too much pressure on the pusher when you press ingredients into the feed tube.
4 Cleaning
Warning
•
Before you clean the appliance, unplug it.
Caution
•
Make sure that the cutting edges of the blades and discs do not come into contact with hard objects.
This may cause the blade to get blunt.
•
The cutting edges are sharp. Be careful when you clean the blade unit of the food processor and the
discs.
1
Clean the motor unit with a moist cloth.
2
Clean the other parts in hot water (< 60ºC) with some washing-up liquid or in a
dishwasher.
Quick cleaning
You can follow the following steps to clean the food processor bowl and blender jar easier.
Note
•
Make sure that the blade is assembled in the bowl if you clean the food processor bowl.
1
Pour lukewarm water (not more than 0.5 liters) and a few drops of washing-up liquid
into the food processor bowl.
2
Place the lid on the food processor bowl, and then turn it clockwise to fix it.
3
Turn the knob to P. Let the appliance run for 30 seconds or until the food processor
bowl is clean.
4
After use, turn the knob to 0, and then unplug the appliance.
5
Detach the food processor bowl and rinse it with clean water.
5 Storage
1
Push the power cord into the integrated cord storage (Fig. 10).
2
Store the product in a dry place.
3
Put the discs, kneading tool and shaft, and other small accessories in the food processor
bowl (Fig. 11).
6 Guarantee and service
If you have a problem, need service, or need information, see www.philips.com/support or
contact the Philips Consumer Care Center in your country. The phone number is in the
worldwide guarantee leaflet. If there is no Consumer Care Center in your country, go to
your local Philips dealer.
5
8
1
2

Verwandte Anleitungen für Philips HR7782


Inhaltszusammenfassung für Philips HR7782
- Seite 1 After use, turn the knob to 0, and then unplug the appliance. • Never use any accessories or parts from other manufacturers or that Philips does not Detach the food processor bowl and rinse it with clean water. specifically recommend. If you use such accessories or parts, your guarantee becomes Put the chopper knife on the tool holder.
-
Seite 2: Einführung
Innenwand der Schüssel zu entfernen. Avant de commencer, assurez-vous que vous avez effectué le montage selon la fig. 3. Si vous rencontrez un problème ou souhaitez obtenir des informations supplémentaires, Utilisez la lame dentelée pour hacher des fruits congelés. visitez le site Web Philips à l'adresse www.philips.com/support ou contactez le Besuchen Sie bei evtl. Problemen, für Service oder Informationen www.philips.com/support, Service Consommateurs Philips de votre pays. Vous trouverez le numéro de téléphone dans oder wenden Sie sich an das Philips Service-Center in Ihrem Land. Die Telefonnummer Gezacktes Messer le dépliant de garantie internationale. - Seite 3 • Non utilizzare mai il disco con ingredienti duri come i cubetti di ghiaccio. welcome. voor het milieu en de volksgezondheid. • Omkeerbare raspschijf (klein en groter) • Non esercitare una pressione eccessiva sul pestello quando si spingono gli ingredienti nell'apertura Per ricette da utilizzare con il robot da cucina, andare su www.philips.com/kitchen di inserimento cibo. Let op 2 Inleiding 3 Robot da cucina • Wees voorzichtig wanneer u de schijf aanraakt. Het heeft een zeer scherpe snijkant. • Gebruik de schijf nooit om harde ingrediënten zoals ijsblokjes te verwerken. 4 Pulizia Gefeliciteerd met uw aankoop en welkom bij Philips! Registreer uw product op www.
- Seite 4 Si el cable de alimentación, el enchufe u otra pieza ha sufrido daños, no utilice el aparato. Nota • Προς αποφυγή επικίνδυνων καταστάσεων, μην συνδέετε ποτέ αυτήν τη συσκευή Πριν ξεκινήσετε, βεβαιωθείτε ότι έχετε κάνει τη συναρμολόγηση σύμφωνα με την εικ. 4. • Si el cable de alimentación está dañado, debe ser sustituido por Philips o por un centro σε χρονοδιακόπτη. Μπορείτε να χρησιμοποιήσετε το εξάρτημα ζύμωσης για να ετοιμάσετε ζύμη για ψωμί • No utilice el amasador para mezclar masas ligeras. Para ello, utilice la cuchilla de la picadora. de servicio autorizado por Philips u otro personal cualificado, con el fin de evitar •...
- Seite 5 For å unngå farlige situasjoner skal dette apparatet aldri kobles til en timer. • Ennen kuin liität laitteen virtalähteeseen, varmista, että laitteen pohjan jännitemerkintä • Ikke bruk apparatet hvis strømledningen, støpselet eller andre deler er ødelagt. vastaa paikallista jännitettä. Vri bollen med klokken for å feste den på motorenheten, og plasser utstyrsholderen i Kiinnitä kulho runkoon kiertämällä sitä myötäpäivään ja aseta sitten tarviketeline • Hvis ledningen er ødelagt, må den alltid skiftes ut av Philips, et servicesenter som er bollen. kulhoon. • Älä koskaan liitä laitetta ajastinkytkimeen, jottei aiheudu vaaratilanteita. godkjent av Philips eller lignende kvalifisert personell for å unngå farlige situasjoner. » Når bollen sitter fast på riktig måte, hører du et klikk. » Kun kulho on kiinnitetty oikein, kuulet naksahduksen. • Jos virtajohto, pistoke tai muut osat vahingoittuivat, älä käytä laitetta.
- Seite 6 » När skålen är ordentligt på plats hörs ett klickljud. » Du kan høre et klik, når skålen er sat rigtigt fast. • Hvis strømledningen, stikket eller andre dele er beskadigede, skal du ikke bruge • Apparaten är inte avsedd för användning av personer (inklusive barn) med olika apparatet. Sätt knådningsverktyget på redskapshållaren. Sæt æltetilbehøret i tilbehørsholderen. funktionshinder, eller av personer som inte har kunskap om hur apparaten används, • Hvis ledningen er beskadiget, skal den udskiftes hos Philips, et autoriseret Philips- Lägg ingredienserna i skålen. Kom ingredienserne i skålen. om de inte övervakas eller får instruktioner angående användning av apparaten av en serviceværksted eller en tilsvarende kvalificeret fagmand for at undgå enhver risiko. Placera locket på skålen och fäst sedan locket genom att vrida det medurs. Læg låget på skålen, og drej derefter låget med uret for at sætte det fast. person som är ansvarig för deras säkerhet. • Dette apparat er ikke beregnet til at blive brugt af personer (herunder børn) med » När locket är ordentligt på plats hörs ett klickljud och locket är fäst vid skålens » Du kan høre et klik, når låget er sat rigtigt fast.
- Seite 7 • Se o cabo de alimentação, a ficha ou outras peças estiverem danificadas, não utilize o Parabéns pela compra do seu produto e bem-vindo à Philips! Para beneficiar na totalidade Acessório para amassar aparelho. do suporte que a Philips oferece, registe o seu produto em www.philips.com/welcome. Atenção Para obter mais receitas para preparar no seu robot, visite www.philips.com/kitchen • Se o cabo de alimentação estiver danificado, este deve ser sempre substituído pela Antes de começar a utilizar, assegure-se de que montou as peças de acordo com a Fig. 4. As pás de amassar podem ser utilizadas para amassar massas levedadas para pão e piza. Philips, por um centro de assistência autorizado pela Philips ou por pessoal com •...
- Seite 8 Bir sorun yaşarsanız ya da servise veya bilgiye ihtiyaç duyarsanız, www.philips.com/support Fişi güç kaynağına takın. • adresine bakın veya ülkenizdeki Philips Müşteri Merkezi ile iletişim kurun. Gerekli telefon Bıçak ünitesini, her zaman başlamadan önce hazneye yerleştirin. • Malzemeler için maksimum miktarı Tablo 1'den kontrol edin. Düğmeyi hız 1 ayarına Dondurmadan önce meyveleri 2x2x2 cm küp boyutunda kesmeniz önerilir. numarası için garanti broşürüne bakın. Ülkenizde Müşteri Merkezi yoksa, yerel Philips satıcınıza • Meyveli tatlılar hazırlarken, pütürsüz bir sonuç elde etmek için 2 hızını, parçacıklı bir sonuç elde etmek getirin. gidin. için de 1 hızını kullanmanız önerilir. » Huni dönmeye başlar. Narenciyeyi huniye doğru bastırın. Ürününüz, geri dönüşüme tabi tutulabilen ve yeniden kullanılabilen, yüksek kalitede malzeme Hazneyi saat yönünde çevirerek motor ünitesinin üzerinde sabitleyin ve ardından aparat...