Herunterladen Inhalt Inhalt Diese Seite drucken
D-Link DKVM-2K Kurzinstallationsanleitung
Vorschau ausblenden Andere Handbücher für DKVM-2K:

Werbung

Verfügbare Sprachen
  • DE

Verfügbare Sprachen

  • DEUTSCH, seite 7
This product works with
all Windows Operating
Systems
Before You Begin
You must have at least the following:
PS/2 Keyboard
PS/2 Mouse
VGA or Higher Monitor
Check Your Package Contents
These are the items included with your purchase:
If any of the above items are missing, please contact your reseller.
©2003 D-Link Systems, Inc. All rights reserved. Trademarks or registered trademarks are the property of their
respective holders. Software and specifi cations subject to change without notice.
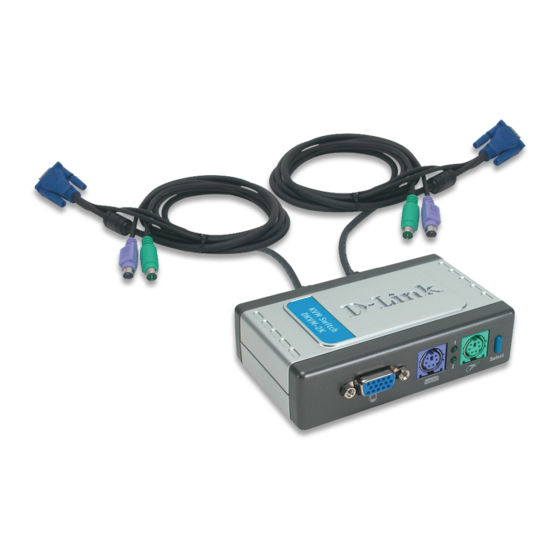
• DKVM-2K KVM Switch with Built-In Cables
• PS/2 / USB converter
1
DKVM-2K
2-Port KVM Switch
with Built-in Cables

Werbung

Inhaltsverzeichnis
loading

Inhaltszusammenfassung für D-Link DKVM-2K

  • Seite 1 • PS/2 / USB converter If any of the above items are missing, please contact your reseller. ©2003 D-Link Systems, Inc. All rights reserved. Trademarks or registered trademarks are the property of their respective holders. Software and specifi cations subject to change without notice.
  • Seite 2 Installing the DKVM-2K Make sure that all your computers are turned OFF before installing the DKVM-2K to avoid mouse and keyboard errors when booting up your computers. Attach your monitor’s HDDB 15 VGA connector to the console port of the DKVM-2K.
  • Seite 3 Installing the DKVM-2K The following steps below apply to both the computers that you are using with your DKVM-2K. Attach the DKVM-2K‘s built-in monitor cable to the VGA port located on the back of your computer case. Attach the DKVM-2K’s built-in...
  • Seite 4 Switching with the DKVM-2K The DKVM-2K features a Select Button located on the front panel and keyboard Hot Keys to switch quickly and easily between both your computers. Select Button To enter Hot Key switching mode, press the Scroll Lock key twice. A beep confi rms that the Hot Key mode is activated.
  • Seite 5: Troubleshooting Tips

    • Make sure that the keyboard is properly connected to the computer and to the DKVM-2K. Check that the keyboard is plugged into the correct PS/2 keyboard port and not the PS/2 mouse port. • Verify that the keyboard works when plugged into the computer directly. You will have to shut down your computer first to do this.
  • Seite 6 Technical Support You can find software updates and user documentation on the D-Link website. D-Link provides free technical support for customers within the United States and within Canada for the duration of the warranty period on this product. U.S. and Canadian customers can contact D-Link technical support through our website, or by phone.
  • Seite 7: Vor Dem Start

    •DKVM-2K KVM-Switch mit integrierten Kabeln •PS/2 / USB Konverter Sollte eines dieser Teile fehlen oder beschädigt sein, wenden Sie sich bitte an Ihren Fachhändler. © 2003 D-Link Systems Inc. Alle Rechte vorbehalten. Marken und eingetragene Marken sind Eigentum ihrer jeweiligen Inhaber. Änderungen vorbehalten.
  • Seite 8: Dkvm-2K Installieren

    2K installieren, um Funktionsstörungen der Tastatur oder der Maus beim Hochfahren des Computers zu vermeiden. Verbinden Sie den HDDB 15 VGA- Anschluss des Monitors mit dem Konsolenanschluss des DKVM-2K. Verbinden Sie den 6-poligen Stecker der PS/2-Tastatur mit dem Tastaturanschluss des DKVM-2K.
  • Seite 9 PS/2-Tastaturanschluss auf der Rückseite des Computergehäuses an. Schließen Sie das eingebaute Mauskabel des DKVM-2K an den PS/2-Mausanschluss auf der Rückseite des Computergehäuses an. Wenn Sie die Installation des DKVM-2K abgeschlossen Type A haben, schalten Sie die angeschlossenen Computer ein.
  • Seite 10: Umschalten Mit Dem Dkvm-2K

    Umschalten mit dem DKVM-2K Der DKVM-2K besitzt auf der Vorderseite eine Select-Taste und Hot Keys auf der Tastatur, um schnell und einfach zwischen beiden Computern zu wechseln. Select- Taste Sie können auch die Tastatur verwenden, um zwischen Computern zu wechseln.
  • Seite 11: Tipps Zur Fehlerbehebung

    Wenn die Tastatur nicht funktioniert, nicht erkannt wird, oder eine Funktionsstörung der Tastatur beim Hochfahren gemeldet wird, überprüfen Sie Folgendes: • Überprüfen Sie, ob die Tastatur ordnungsgemäß an den Computer und den DKVM-2K angeschlossen ist. Überprüfen Sie, ob die Tastatur mit dem PS/2-Tastaturanschluss verbunden ist und nicht mit dem PS/2-Mausanschluss.
  • Seite 12: Technische Unterstützung

    0,12€/Min aus dem Festnetz der Deutschen Telekom. Telefonische technische Unterstützung erhalten Sie Montags bis Freitags von 08.00 bis 19.00 Uhr. Wenn Sie Kunde von D-Link außerhalb Deutschlands, Österreichs, der Schweiz und Osteuropas sind, wenden Sie sich bitte an die zuständige Niederlassung aus der Liste im Benutzerhandbuch.
  • Seite 13: Avant De Commencer

    • Convertisseur USB / PS/2 Si l’un des éléments ci-dessus manque, contactez votre revendeur. ©2003 D-Link Systems, Inc. Tous droits réservés. Les marques sont la propriété de leurs propriétaires respectifs. Le logiciel et les spécifi cations sont susceptibles d’être modifi és sans préavis.
  • Seite 14 Installation du DKVM-2K Avant d’installer le DKVM-2K, vérifiez que tous vos ordinateurs sont éteints afin d’éviter les erreurs de souris et de clavier au démarrage de vos ordinateurs. Reliez le connecteur VGA HDDB 15 de votre écran au port console du DKVM-2K.
  • Seite 15 PS/2 situé à l’arrière de votre ordinateur. Connectez le câble de souris incorporé du DKVM-2K au port souris PS/2 situé à l’arrière de votre ordinateur. Une fois que vous avez terminé l’installation du DKVM-2K, Type A allumez tous les ordinateurs.
  • Seite 16 Basculement d’un ordinateur sur l’autre avec le DKVM-2K Pour basculer rapidement et facilement d’un ordinateur sur l’autre, vous pouvez vous servir du bouton de sélection situé à l’avant du DKVM-2K ou d’une combinaison de touches de votre clavier. Bouton de Sélection...
  • Seite 17: Dépannage

    Si votre clavier ne fonctionne pas, n’est pas détecté ou si une erreur clavier est signalée à la réinitialisation, effectuez les vérifications suivantes : • Assurez-vous que le clavier est bien branché sur l’ordinateur et sur le DKVM-2K. Vérifiez que le clavier est bien branché au port clavier PS/2 et non au port souris PS/2.
  • Seite 18: Assistance Technique

    Assistance technique Vous trouverez la documentation et les logiciels les plus récents sur le site web D-Link. Le service technique de D-Link est gratuit pour les clients aux Etats-Unis durant la période de garantie. Ceux-ci peuvent contacter le service technique de D-Link par notre site internet ou par téléphone.
  • Seite 19: Antes De Empezar

    Si falta alguno de estos componentes, por favor contacte con su proveedor. ©2003 D-Link Systems, Inc. Reservados todos los derechos. Las marcas o marcas registradas son propiedad de los respectivos titulares. El software y las especifi caciones pueden ser modifi cados sin previo aviso.
  • Seite 20 Instalar el DKVM-2K Antes de instalar el DKVM-2K, comprobar que todos los ordenadores están APAGADOS, así se evitan errores del ratón o del teclado cuando se reinicien los mismos. Introducir el conector HDDB 15 VGA del monitor en el puerto consola del DKVM-2K.
  • Seite 21 Conectar el cable del ratón, integrado en el DKVM-2K, en el puerto PS/2 para ratón que se encuentra en el panel trasero del ordenador. Tras haber finalizado la instalación del DKVM-2K, se han Type A de ENCENDER los ordenadores .
  • Seite 22 Conmutando con el DKVM-2K El DKVM-2K dispone de un botón selector en el panel frontal y de un teclado de teclas de acceso rápido que permiten que la conmutación entre los dos ordenadores sea más rápida y fácil. Botón se- lector También se puede usar el teclado para conmutar entre los ordenadores.
  • Seite 23: Consejos Para Solucionar Problemas

    • No debe moverse el ratón ni apretar ninguno de los botones del ratón mientras se está cambiando de un PC al otro. • Probar a reiniciar el ratón desconectándolo del DKVM-2K durante 3 segundos y volviéndolo a conectar. Vídeo Si la imagen del monitor no es nítida, hágase lo siguiente:...
  • Seite 24: Asistencia Técnica

    D-Link . D-Link ofrece asistencia técnica gratuita para clientes dentro de España durante el periodo de garantía del producto. Los clientes españoles pueden ponerse en contacto con la asistencia técnica de D-Link a través de nuestro sitio web o por teléfono. Asistencia Técnica de D-Link por teléfono:...
  • Seite 25: Prima Di Cominciare

    • Convertitore da PS/2 a USB Se uno dei componenti dovesse mancare, contattare il rivenditore. ©2003 D-Link Systems, Inc. Tutti i diritti riservati. I marchi ed i marchi registrati sono di proprietà del rispettivo proprietario. Il software e le specifi che potrebbero cambiare senza preavviso.
  • Seite 26 Installazione del DKVM-2K Prima di installare il DKVM-2K, assicurasi che tutti I computer sia spenti, in modo che mouse e tastiera non diano segnalazione di errore al boot del computer. Connettere il cavo del monitor HDDB 15 VGA alla porta console del DKVM-2K.
  • Seite 27 Connettere il cavo con connettore mouse del DKVM-2K, incluso nella confezione, nella porta mouse posta nella parte posteriore del vostro computer. Accendere tutti i computer connessi al dispositivo solo Type A dopo aver completato l’installazione del DKVM-2K.
  • Seite 28 Funzionalità di commutazione del DKVM-2K Il DKVM-2K è dotato di un Tasto di Selezione posizionato nella parte frontale e la funzione da tastiera denominata Hot Keys per facilitare la modalità di passaggio da un computer all’altro. Tasto Selezione E’ possibile utilizzare anche la tastiera per passare da un computer ad un altro.
  • Seite 29 Se il mouse non sta funzionando, non è rilevata o c’è un messaggio di errore al boot, verificare che: • Il mouse sia connesso correttamente al computer e al DKVM-2K. Controllare che il mouse sia connesso correttamente nella porta PS/2 mouse e non nella porta PS/2 tastiera •...
  • Seite 30: Supporto Tecnico

    Supporto tecnico Gli ultimi aggiornamenti e la documentazione sono disponibili sul sito D-Link. Supporto tecnico per i clienti residenti in Italia D-Link Mediterraneo S.r.L. Via N. Bonnet 6/B 20154 Milano Supporto Tecnico dal lunedì al venerdì dalle ore 9.00 alle ore 19.00 con orario continuato Telefono: 02-39607160 URL : http://www.dlink.it/supporto.html...
  • Seite 31: Voordat U Begint

    Muis met PS/2 aansluiting • Monitor met VGA of hogere resolutie Controleer de inhoud van de verpakking De verpakking van de DKVM-2K moet de volgende items bevatten: • DKVM-2K KVM-switch met 2 poorten en geïntegreerde kabels • PS/2 / USB converter Neem contact op met de leverancier, als een van deze items ontbreekt.
  • Seite 32 De DKVM-2K installeren Zorg ervoor dat alle computers zijn uitgeschakeld wanneer u de DKVM-2K gaat installeren. U voorkomt zo muis- en toetsenbord- fouten tijdens het opstarten van de computers. Sluit de 15-pins HDDB VGA connector van de monitor aan op de monitorpoort van de DKVM-2K.
  • Seite 33 DKVM-2K aan op de PS/2 toetsenbordpoort achter op de computer. Sluit de geïntegreerde muiskabel van de DKVM-2K aan op de PS/2 muispoort achter op de computer. Zet de computers aan als u klaar bent met de installatie Type A...
  • Seite 34 Overschakelen met de DKVM-2K Op het voorpaneel van de DKVM-2K zit een Select-knop voor het snel en een- voudig overschakelen tussen beide computers. U kunt hiervoor ook de speciale sneltoetsen op het toetsenbord gebruiken. Select- knop U kunt ook via het toetsenbord overschakelen tussen de computers. Druk tweemaal op de Scroll Lock-toets om de modus voor het overschakelen via sneltoetsen te activeren.
  • Seite 35: Problemen Oplossen

    Controleer de volgende punten als de muis niet werkt, niet wordt herkend of een fout geeft tijdens het opstarten van de computer: • Zorg ervoor dat de muis goed is aangesloten op de computer en op de DKVM-2K. Controleer of de muis is aangesloten op de PS/2 muispoort en niet op de PS/2 toetsenbordpoort.
  • Seite 36: Technical Support

    Technical Support You can find software updates and user documentation on the D-Link website. D-Link provides free technical support for customers within Benelux for the duration of the warranty period on this product. Benelux customers can contact D-Link technical support through our website, or by phone.
  • Seite 37: Przed Rozpoczęciem

    • Konwerter PS/2 / USB Jeżeli którejkolwiek z tych pozycji brakuje, należy skontaktować się ze sprzedawcą. © 2003 D-Link Systems Inc. Wszelkie prawa zastrzeżone. Znaki towarowe lub zastrzeżone znaki towarowe są własnością odpowiednich podmiotów. Oprogramowanie i dane techniczne mogą ulec zmianie bez powiadomienia.
  • Seite 38 Instalacja przełącznika DKVM-2K Aby uniknąć nieprawidłowego działania myszy i klawiatury, przed rozpoczęciem instalacji przełącznika DKVM-2K upewnij się, że wszystkie komputery są WYŁĄCZONE. Podłącz złącze monitora HDDB 15 VGA do portu konsoli przełącznika DKVM-2K. Podłącz 6-stykowy wtyk kabla klawiatury PS/2 do portu klawiatury przełącznika DKVM-2K.
  • Seite 39 Podłącz wbudowany kabel klawiatury przełącznika DKVM- 2K do portu klawiatury PS/2 z tyłu obudowy komputera. Podłącz wbudowany kabel myszy przełącznika DKVM- 2K do portu myszy PS/2 z tyłu obudowy komputera. Po zakończeniu instalacji przełącznika DKVM-2K WŁĄCZ Type A zasilanie wszystkich podłączonych komputerów.
  • Seite 40 Przełączanie z użyciem przełącznika DKVM-2K Przełącznikiem DKVM-2K można sterować używając przycisku wyboru (Select Button) na panelu przednim lub klawiszy skrótów (Hot Keys) na klawiaturze. Przycisk wyboru (Select) Do przełączania między komputerami można także używać klawiatury. Aby przejść do trybu przełączania za pomocą klawiszy skrótów (Hot Key), naciśnij dwukrotnie klawisz Scroll Lock.
  • Seite 41: Rozwiązywanie Problemów

    DKVM-2K. • Podczas przełączania pomiędzy komputerami nie poruszaj myszą, ani nie naciskaj żadnego przycisku myszy. • Spróbuj zresetować mysz przez odłączenie jej od przełącznika DKVM-2K na ok. 3 sekundy i ponowne podłączenie. Monitor Jeżeli obraz na monitorze jest niewyraźny, wykonaj następujące czynności.
  • Seite 42: Pomoc Techniczna

    Pomoc techniczna Najnowsze wersje oprogramowania i dokumentacji użytkownika można znaleźć w serwisie internetowym firmy D-Link. D-Link zapewnia bezpłatną pomoc techniczną klientom w Polsce w okresie gwarancyjnym produktu. Klienci z Polski mogą się kontaktować z działem pomocy technicznej firmy D-Link za pośrednictwem Internetu lub telefonicznie.
  • Seite 43: Než Začnete

    • Adaptér PS/2 / USB Pokud některá z výše uvedených položek chybí, kontaktujte prodejce. ©2004 D-Link Systems, Inc. Všechna práva vyhrazena. Ochranné známky nebo registrované ochranné známky jsou majetkem příslušných vlastníků. Software a parametry mohou být bez upozornění změněny.
  • Seite 44 Instalace DKVM-2K Před instalací DKVM-2K se ujistěte, že jsou oba připojované počítače vypnuté, abyste zabránili problémům s myší a klávesnicí při spouštění počítačů. Připojte konektor HDDB 15 VGA monitoru do portu pro monitor na DKVM-2K. Připojte konektor PS/2 s 6 kontakty klávesnice do portu pro klávesnici na...
  • Seite 45 Instalace DKVM-2K Následující kroky platí pro oba počítače, které budete používat spolu s DKVM-2K. Připojte zabudovaný kabel monitoru z DKVM-2K do VGA portu vzadu na počítači. Připojte zabudovaný kabel klávesnice z DKVM-2K do PS/2 portu pro klávesnici vzadu na počítači.
  • Seite 46 Přepínání pomocí DKVM-2K Pro rychlé a snadné přepínání mezi počítači slouží tlačítko Select na předním panelu DKVM-2K a klávesové zkratky (horké klávesy). Tlačítko Select Pro přepínání mezi počítači můžete používat také klávesnici. Stiskněte dvakrát klávesu Scroll Lock, abyste se dostali do režimu přepínání pomocí horkých kláves. Aktivace režimu horkých kláves je potvrzena zvukovým signálem.
  • Seite 47: Řešení Potíží

    Při přepínání z jednoho PC na druhý nehýbejte s myší a netiskněte žádné tlačítko myši. • Zkuste resetovat myš tak, že ji asi na 3 sekundy odpojíte od DKVM-2K a pak ji znovu připojíte. Monitor Není-li obraz na monitoru dobře viditelný, zkontrolujte následující: •...
  • Seite 48: Technická Podpora

    Technická podpora Aktualizované verze software a uživatelských příruček najdete na webové stránce firmy D-Link. D-Link poskytuje svým zákazníkům bezplatnou technickou podporu. Zákazníci mohou kontaktovat oddělení technické podpory přes webové stránky, mailem nebo telefonicky Web: http://www.dlink.de E-Mail: support@dlink.de Telefon: +49 (1805)-2787 Telefonická...
  • Seite 49: Kezdő Lépések

    • PS/2 / USB átalakító Amennyiben a fenti elemek bármelyike hiányzik, kérjük, keresse meg értékesítőjét. ©2004 D-Link Systems, Inc. Minden jog védve. A védjegyek vagy bejegyzett védjegyek a megfelelő birtokosok tulajdonait képezik. A szoftver és a tulajdonságok előzetes értesítés nélküli módosításának joga fenntartva.
  • Seite 50 A DKVM-2K csatlakoztatása Ellenőrizze, hogy minden számítógép ki van-e kapcsolva, mielőtt csatlakoztatja a DKVM-2K-t, hogy elkerüljön minden egér vagy billentyűzet hibát a számítógép indításakor. Csatlakoztassa a monitor HDDB 15 VGA csatlakozóját a DKVM-2K konzol portjához. Csatlakoztassa a számítógép 6 tűs PS/2 male billentyűzet csatlakozóját a...
  • Seite 51 A DKVM-2K csatlakoztatása Az alábbi lépések mindkét DKVM-2K által használt számítógépre vonatkoznak. Csatlakoztassa a DKVM-2K beépített monitor kábelét a számítógép hátulján található VGA portra. Csatlakoztassa a DKVM-2K beépített billentyűzet kábelét a számítógép hátulján található PS/2 billentyűzet portra. Csatlakoztassa a DKVM- 2K beépített egér kábelét a...
  • Seite 52 Kapcsolás a DKVM-2K-val A DKVM-2K első paneljén található egy Kiválasztó gomb illetve billentyűzet gyorsgombok a két számítógép közti gyors és egyszerű váltáshoz. Select (Kiválasztó) gomb Emellett a billentyűzetről is válthat a számítógépek között. Nyomja meg kétszer a Scroll Lock gombot a Hot Key (gyorsgomb) kapcsolási mód kiválasztásához. Sípszó jelzi a gyorsgomb mód aktiválását.
  • Seite 53 Ne mozgassa az egeret, és ne nyomja meg a gombokat, miközben az egyik számítógépről a másikra vált. • Próbálja meg reset-elni az egeret úgy, hogy kihúzza azt a DKVM-2K-ból, majd 3 másodperc elteltével újra csatlakoztatja azt. Video Ha a monitorkép nem tiszta, ellenőrizze az alábbiakat: •...
  • Seite 54 9.00 – 16.00 óráig és pénteken 9.00 – 14.00 óráig kérhet (1) 461-3000 support@dlink.hu telefonszámon vagy a emailcímen. Magyarországi technikai támogatás : D-Link Magyarország 1075 Budapest, Alsóerdősor u. 6. – R70 Irodaház 1 em. Tel. : 06 1 461-3000 Fax : 06 1 461-3004 email : support@dlink.hu URL : http://www.dlink.hu I-2-Eye : 36 1 20 9360768 Fórum : http://www.dlink.hu/forum/...
  • Seite 55: Før Du Begynner

    • DKVM-2K KVM Switch med innebygde kabler • PS/2/USB-omformer Vennligst kontakt forhandleren hvis noen av disse delene mangler. ©2004 D-Link Systems, Inc. Forbeholdt alle rettigheter. Varemerker eller registrerte varemerker eies av sine respektive innehavere. Programvaren og spesifi kasjonene kan endres uten forutgående varsel.
  • Seite 56 Installere DKVM-2K Pass på at alle datamaskiner er slått av før du installerer DKVM-2K. Da unngår du feil med mus og tastatur når du starter dem opp igjen. Kople skjermens HDDB 15 VGA- kontakt til konsollporten på DKVM-2K. Kople datamaskinens 6-pinners PS/2 hannkontakt for tastatur til tastaturporten på...
  • Seite 57 Installere DKVM-2K Trinnene nedenfor gjelder begge datamaskinene du bruker med DKVM-2K. Kople DKVM-2Ks innebygde skjermkabel til VGA-porten på baksiden av chassiset til datamaskinen. Kople DKVM-2Ks innebygde tastaturkabel til PS/2- tastaturporten på baksiden av chassiset til datamaskinen. Kople DKVM-2Ks innebygde musekabel til PS/2-museporten på...
  • Seite 58 Veksle med DKVM-2K DKVM-2K har en valgknapp, Select (Valg), på frontpanelet. Du kan også bruke Hot Keys (hurtigtaster) på tastauret til å veksle raskt og enkelt mellom begge datamaskiner. Select Button (Valgknapp) Du kan også bruke tastaturet til å veksle mellom datamaskiner. Trykk to ganger på...
  • Seite 59 Hvis tastaturet ikke fungerer, ikke registreres, eller hvis det er en tastaturfeil ved oppstart, kontrollerer du følgende: • Pass på at tastaturet er riktig koplet til datamaskinen og til DKVM-2K. Kon troller at tastaturet er koplet til riktig PS/2-tastaturport og ikke til PS/2-muse porten.
  • Seite 60: Teknisk Support

    Teknisk Support Du kan finne programvare oppdateringer og bruker dokumentasjon på D-Links web sider. D-Link tilbyr sine kunder gratis teknisk support under produktets garantitid. Kunder kan kontakte D-Links teknisk support via våre hjemmesider, eller på tlf. Teknisk Support: D-Link Teknisk telefon Support: 23 16 28 04 (Hverdager 0800-2200) Trådløst/Bredbånd...
  • Seite 61: Før Du Går I Gang

    • DKVM-2K KVM-switch med indbyggede kabler • PS/2 / USB-konverteringsenhed Hvis noget af ovennævnte indhold mangler, skal du kontakte forhandleren. ©2004 D-Link Systems, Inc. Alle rettigheder forbeholdes. Varemærker eller registrerede varemærker tilhører deres respektive ejere. Software og specifi kationer kan ændres uden forudgående varsel.
  • Seite 62 Installation af DKVM-2K Sørg for, at alle computere er slukket, før du installerer DKVM-2K. Så undgår du fejl med mus og tastatur, når computerne startes Sæt skærmens HDDB 15 VGA-stik i konsolporten på DKVM-2K. Sæt computerens PS/2- tastaturhanstik med 6 ben i tastaturporten på...
  • Seite 63 Installation af DKVM-2K Fremgangsmåden herunder gælder for begge computere, som du bruger sammen med DKVM-2K. Sæt det indbyggede skærmkabel i DKVM-2K ind i VGA-porten, som er placeret bag på computeren. Sæt det indbyggede tastaturkabel i DKVM-2K i tastaturporten på PS/2, som er placeret bag på...
  • Seite 64 Skift med DKVM-2K DKVM-2K har en Select (valgknapp), der er placeret på frontpanelet, og Hot Keys (hurtigtaster) på tastaturet, så du hurtigt og let kan skifte mellem computerne. Select Button (Valgknap) Du kan også bruge tastaturet til at skifte mellem computerne. Tryk to gange på tasten Scroll Lock for at aktivere skift med hurtigtaster.
  • Seite 65: Tip Til Fejlfinding

    Flyt ikke musen, og tryk ikke på nogen af museknapperne, når du er ved at skifte fra én computer til en anden. • Prøv at nulstille musen ved at tage den ud af DKVM-2K i ca. 3 sekunder og sætte den i igen. Video Hvis billedet på...
  • Seite 66 Teknisk Support Du finder software opdateringer og bruger-dokumentation på D-Link’s hjemmeside. D-Link tilbyder gratis teknisk support til kunder i Danmark i hele produktets garantiperiode. Danske kunder kan kontakte D-Link’s tekniske support via vores hjemmeside eller telefonisk. D-Link teknisk support over telefonen: Tlf.
  • Seite 67: Ennen Kuin Aloitat

    Pakkauksessa on mukana seuraavat komponentit: • DKVM-2K KVM-kytkin sisäänrakennetuin kaapelein • PS/2 / USB -muunnin Jos pakkauksesta puuttuu jokin yllämainituista, ota yhteys jälleenmyyjääsi. ©2004 D-Link Systems, Inc. Kaikki oikeudet pidätetään. Tuotemerkit tai rekisteröidyt tuotemerkit ovat asianomaisten yritysten omaisuutta. Oikeus ohjelmisto- ja teknisiin muutoksiin pidätetään.
  • Seite 68 DKVM-2K:n asentaminen Varmista ennen DKVM-2K:n asentamista, että kaikki tietokoneet on kytketty pois päältä. Näin vältät hiiri- ja näppäimistöongelmat käynnistyksen yhteydessä. Kytke näyttösi HDDB 15 VGA -liitin DKVM-2K:n konsoliporttiin. Kytke tietokoneesi näppäimistön 6-piikkinen PS/2-liitin DKVM-2K:n näppäimistöporttiin. Kytke tietokoneesi hiiren 6-piikkinen PS/2-liitin DKVM-2K:n hiiriporttiin.
  • Seite 69 DKVM-2K:n asentaminen Seuraavat ohjeet koskevat molempia tietokoneita, joita aiot DKVM-2K:n avulla käyttää. Kytke DKVM-2K: n sisäänrakennettu näyttökaapeli tietokoneesi takapaneelin VGA-porttiin. Kytke DKVM-2K: n sisäänrakennettu näppäimistökaapeli tietokoneesi takapaneelin PS/2-näppäimistöporttiin. Kytke DKVM-2K: n sisäänrakennettu hiirikaapeli tietokoneesi takapaneelin PS/2-hiiriporttiin. Kytke molempiin tietokoneisiin virta päälle, kun olet Type A asentanut DKVM-2K:n.
  • Seite 70 2 tietokoneen käyttö DKVM-2K:n avulla DKVM-2K:ssa on Select (Valinta) -painike etupaneelissa, ja myös näppäimistölla on mahdollisuus käyttää Hot Keys (pikavalintanäppäimiä), joiden avulla vaihtaminen tieto- koneesta toiseen sujuu nopeasti ja helposti. Select (Valitse) -painike Voit myös käyttää näppäimistöä tietokoneelta toiselle vaihtamiseen. Paina Scroll Lock (Vierityslukko) -näppäintä...
  • Seite 71 Hiiri Jos hiiri ei toimi, sitä ei löydy, tai tietokone ilmoittaa käynnistyksen yhteydessä hiirivirheestä, tarkista että: • hiiri on kunnolla kytketty tietokoneeseen ja DKVM-2K:hon. Hiiri on kytketty PS/2-hiiriporttiin eikä PS/2-näppäimistöporttiin. • hiiri toimii, kun se kytketään suoraan tietokoneeseen. Tarkistaaksesi tämän sinun tulee ensin sammuttaa tietokone.
  • Seite 72 Teknistä tukea asiakkaille Suomessa: D-Link tarjoaa teknistä tukea asiakkailleen. Tuotteen takuun voimassaoloajan. Tekninen tuki palvelee seuraavasti: Arkisin klo. 8 - 22 numerosta 096-937 9610 Internetin kautta Ajurit ja lisätietoja tuotteista. http://www.dlink.fi Sähköpostin kautta voit myös tehdä kyselyitä. support@dlink.fi...
  • Seite 73: Innan Du Börjar

    • DKVM-2K KVM-switch med inbyggda kablar • PS/2 / USB-omvandlare Kontakta din återförsäljare om någon av ovanstående komponenter saknas. ©2004 D-Link Systems, Inc. Alla rättigheter reserverade. Varumärken eller registrerade varumärken tillhör respe- ktive ägare. Programvara och specifi kationer kan ändras utan föregående varsel.
  • Seite 74 Installation av din DKVM-2K Försäkra dig om att alla datorer är avstängda innan du installerar din DKVM-2K för att undvika fel hos musen eller tangentbordet när du startar dina datorer. Fäst din bildskärms HDDB 15 VGA-kontakt vid konsolporten på din DKVM-2K.
  • Seite 75 Installation av din DKVM-2K Följande steg gäller båda de datorer som du använder med din DKVM-2K. Fäst den inbyggda monitorkabeln hos din DKVM-2K vid VGA- porten på baksidan av din dator. Fäst den inbyggda tangentbordskabeln hos din DKVM-2K vid PS/2- tangentbordsporten på...
  • Seite 76 Att växla med din DKVM-2K Din DKVM-2K har en valknapp, Select (Välj), placerad på frontpanelen och Hot Keys (snabbtangenter) för att växla snabbt och enkelt mellan dina datorer. Select button (Valknapp) Du kan också använda ditt tangentbord för att växla mellan dina datorer. Tryck på...
  • Seite 77 Rör inte musen och tryck inte på någon av dess knappar när du växlar mellan datorerna. • Prova att återställa musen genom att först koppla ur den från din DKVM-2K i ungefär 3 sekunder och sedan återansluta den. Bild Om bilden på din skärm inte är tydlig, kontrollera följande: •...
  • Seite 78 Teknisk Support På vår hemsida kan du hitta mer information om mjukvaru uppdateringar och annan användarinformation. D-Link tillhandahåller teknisk support till kunder i Sverige under hela garantitiden för denna produkt. Teknisk Support för kunder i Sverige: D-Link Teknisk Support via telefon: 08-585 36 841 Vardagar 08.00-22.00...

Inhaltsverzeichnis