Werbung
Verfügbare Sprachen
Verfügbare Sprachen
Quicklinks
Emerson Electric GmbH & Co. OHG
Heerstr.111 - D 71332 Waiblingen
Tel.: 07151 509-0 - Fax.: -200
For application in refrigeration systems and heat
pumps.
!
Safety instructions:
• Read
installation
instructions
Failure to comply can result in device failure,
system damage or personal injury.
• It is intended for use by persons having the
appropriate knowledge and skill.
• Before opening any system make sure pressure
in system is brought to and remains at
atmospheric pressure.
• Ensure supply voltage and current of electric
device match rating on PS1/PS2 name plate.
Disconnect supply voltage from system and
PS1/PS2 before installation or service.
• Do not exceed test pressure.
• Keep temperatures within nominal limits.
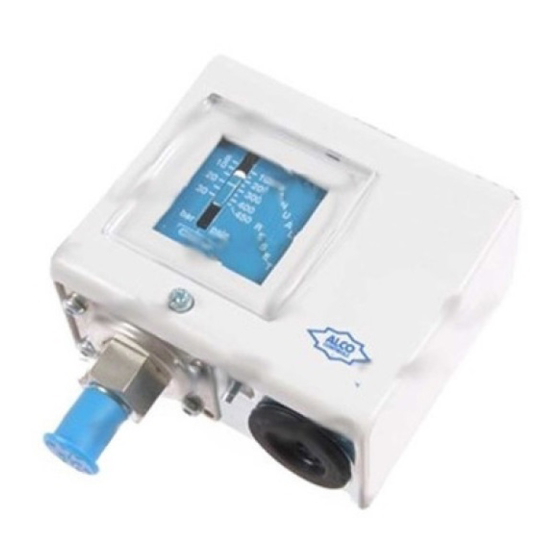
Function/Type of switch (Fig. 1):
Fig. 1a: automatic reset function
Fig. 1b: manual reset function for low pressure reset
Fig. 1c: manual reset function for high pressure reset
• PS1/PS2 Pressure switches are equipped with
SPDT snap action contacts switching from 1-2 to 1-
4 on rising and from 1-4 to 1-2 on falling pressure.
Reaching the preset switch point on rising pressure,
contact 1-2 breakes while contact 1-4 makes and
vice versa on falling pressure.
• PS1/PS2 with manual reset (high pressure/low
pressure reset): Reaching the preset switching point
contact 1-4 breakes (low pressure switch) or
contact 1-2 makes (high pressure switch) and locks
in this position. After the pressure rises or drops by
a fixed differential the switch can be reset by
pushing the reset button.
• PS1/PS2 with manual reset are "trip-free".
Mounting (Fig. 2):
• PS1/PS2 controls may be installed by using a
mounting plate or as a wall-mounted device against
a flat surface.
• Use universal thread M4 or UNC8-32 mounting
holes for installation via mounting plate.
• Use the standard mounting holes at the backside for
wall mounting.
• Use mounting screws supplied with control.
• Mounting screws must not penetrate control
backside by more than 8 mm to ensure proper
operation.
• Do not use PS1/PS2 in pulsating operating
conditions!
In order to achieve protection class IP44, the
following instructions must be observed:
• Cover must be closed and cover screw fastened
• Control must be mounted against a flat surface so
that all openings on the housing backside are fully
covered
Mounting direction:
Any direction except upside down
Pressure connection (Fig. 3):
• Connection of the pressure side depends on the
exact model / pressure connector.
• Connectors A, C, F and S: Do not apply torsional
load to pressure connnector; use second spanner to
counter-balance torque when tightening pressure
connection.
• Connector A: high pressure versions (pressure
range '5') are equipped with a snubber to dampen
pulsations.
• When connecting PS1/PS2 to the hot gas line of a
refrigeration system, a pipe, capillary or flexible
tube of at least 80 mm shall be used to allow
sufficient temperature drop between refrigeration
line and pressure switch bellows.
• K-type connectors: use copper gasket supplied with
control.
Document Nr.: A6.5.048 / 02Replacement for A6.5.048/01 and A6.5.049/01
ALCO CONTROLS
Leakage test:
After completion of installation, a test pressure must
be carried out as follows:
- According to EN378 for systems which must
comply with European pressure equipment directive
thoroughly.
97/23/EC
- To maximum working pressure of system for other
applications
Warning:
- Failure to do so could result in loss of refrigerant
and personal injury.
- The pressure test must be conducted by skilled
persons
related to pressure.
Maintenance/Service:
In case of repair work or replacing the control always
use new gasket
Electrical connection (Fig. 4):
Range spindle
Lockplate
Differential spindle
Note: Comply with local electrical regulations when
conducting electrical wiring. Wire size must match
the electrical load connected to the switch contacts.
• Feed cables through rubber grommet at switch
bottom.
• Optionally, the rubber grommet may be replaced by
a standard PG 13.5 cable gland.
• Connect wires to terminals 1, 2 and 4 by taking into
account switch functions as shown in Fig. 1a to 1c.
• Fasten terminal screws with torque 1.2 Nm max.
• For electronic applications with low electrical loads
(voltage <24 V and current <50 mA) gold plated
contacts are recommended.
Setpoint adjustment (Fig. 5):
Upper setpoint
Lower setpoint
Differential = constant
Turning range spindle
• PS1/PS2 pressure switches come with individually
adjustable range and differential depending on the
exact model.
• Manual reset switches always have a fixed
differential.
• Use a flat screw driver or a ¼" refrigeration
(square) wrench to adjust setpoints as described
below.
• Adjust upper setpoint using the range spindle.
• Adjust lower setpoint by turning the differential
spindle.
• A separate gauge must be used for exact adjustment
of the setpoints. The integrated display scale can
only be used for obtaining approximate settings.
• When changing the upper setpoint the lower
setpoint must be re-checked.
• Refer to the ALCO catalogue for standard factory
settings.
Manual reset / Universal reset (Fig.6):
• Manual reset (external): press the reset button
indicated by Fig. 6a.
• Manual reset (internal): remove the housing cover and
press the reset button
• Note that the reset is 'trip-free', i.e. reset is only
possible if the pressure has reached its reset
treshold.
• Universal reset: remove the cover and change the
universal toggle to the desired position (manual
or auto reset
Check-out lever
• Use the check-out lever to manually override the
electrical contact position for testing out the
system.
Operating Instructions
Pressure Controls Series PS1 / PS2
with due respect regarding the danger
Electrical terminals
Check-out lever
Cable entry grommet
Upper setpoint
Lower setpoint
Differential = variable
Turning differential spindle
Upper setpoint – Differential =
Lower setpoint
as indicated by Fig. 6b.
).
(Fig. 4)
Date: 02.02.2004
• Use the check-out lever on low pressure switches to
manually override the electrical contact position for
evacuating the refrigeration system.
Standards
• EN 12263 (DIN 32733): specific models
• Pressure Equipment Directive PED 97/23/EC,
Category IV for all devices with TÜV approval
under EN12263 (DIN 32733)
• Low
Voltage
Directive
93/68/EWG; EN 60947-1; EN 60947-5-1
• UL/CSA: all models
•
0035 marking for devices under PED
•
marking for devices under LVD
Technical data:
• Protection class:
• Ambient temperature (housing):
• Storage / transportation temperature:-50°C
+70°C
• Medium / allowable temperature TS: -50°C
+70°C
• Operating pressure:
• Test pressure PT:
see type code / pressure range
• Max. allowable pressure PS:see type code / pressure
range
• Vibration resistance:
• Electrical
Heating load (AC1):
Inductive load (AC15):
Inductive load (DC13):
• Start-up (AC3):
Motor rating (FLA):
Locked rotor (LRA):
• Medium compatibility:
not released for inflammable refrigerants
Type code:
PS1 - ! " #, PS2 - ! " #
!
Function
A = Pressure control, automatic
B = Pressure cut out, external manual reset,
TÜV/EN12263 approval,
C = (PS2) Left: pressure limiter, automatic,
TÜV/EN12263. Right: pressure cut out,
external manual reset, TÜV/EN12263
G = (PS2) Left: pressure cut out, external man reset,
TÜV/EN12263. Right: safety pressure cut out,
internal manual reset, TÜV/EN12263
L = (PS2) Left: automatic pressure control.
Right: pressure control, extern. manual reset
M =(PS2) Left: automatic pressure control.
Right: convertible reset from R to A
R = Pressure control, external manual reset
S = Safety pressure cut out, internal manual reset,
TÜV/DIN32733 approval
T = (PS2) Left: pressure limiter, automatic, TÜV/
DIN32733. Right: safety pressure cut out,
internal manual reset, TÜV/DIN32733.
U = Convertible from function 'R' to 'A'
W = Pressure limiter, automatic,
as
TÜV/DIN32733 approval
NOTE: Function types B, R or S in combination with
pressure range 1, 2 or 3 have a low pressure manual
reset function and latch with falling pressure. Function
types B, R, S in combination with Pressure Range 4 or 5
have a high pressure manual reset function and latch
with rising pressure
" Pressure range (Fig. 7)
(PS: max. allowable pressure / PT: test pressure)
#
Pressure connection (Fig. 3
7
A =
/
"-20 UNF, male
16
1
C = R
/
" male, stainless steel with steel bellows
4
7
K = cap. tube, nut
/
"-20 UNF, schrader valve opener
16
1
R = R
/
" male, brass
4
GB
LVD
73/23/EWG;
IP44 (IEC 529/EN 60529)
-50°C to +70°C
to
to
-0.9 to 31 bar
4g (10...1000 Hz)
rating
24 A / 230 V AC
10 A / 230 V AC
0.1 A / 230 V DC
3 A / 24 V DC
144 A / 230 V AC
24 A / 230 V AC
144 A / 230 V AC
HFC, HCFC
e.g. PS1-A 5 A
)
DWG Nr.: /PCN 0715180
Werbung

Verwandte Anleitungen für Emerson ALCO CONTROLS PS1 Serie


Inhaltszusammenfassung für Emerson ALCO CONTROLS PS1 Serie
- Seite 1 ALCO CONTROLS Operating Instructions Emerson Electric GmbH & Co. OHG Heerstr.111 - D 71332 Waiblingen Pressure Controls Series PS1 / PS2 Tel.: 07151 509-0 - Fax.: -200 For application in refrigeration systems and heat • Use the check-out lever on low pressure switches to Leakage test: pumps.
- Seite 2 ALCO CONTROLS Betriebsanleitung Emerson Electric GmbH & Co. OHG Heerstr.111 - D 71332 Waiblingen Druckschalter Serie PS1 / PS2 Tel.: 07151 509-0 - Fax.: -200 Zum Einsatz in Kälteanlagen und Wärmepumpen. • K-Anschluss: mitgelieferte Kupferdichtung ver- geändert werden, um die Funktion des Gerätes und wenden.
- Seite 3 ALCO CONTROLS Instrucciones de funcionamiento Emerson Electric GmbH & Co. OHG Heerstr.111 - D 71332 Waiblingen Presostatos PS1 / PS2 Tel.: 07151 509-221 - Fax.: -200 Para uso en sistemas de refrigeración y de bomba de Una vez realizada la instalación de la válvula, deberá...
- Seite 4 ALCO CONTROLS Instructions de service Emerson Electric GmbH & Co. OHG Heerstr.111 - D 71332 Waiblingen Pressostats Série PS1 / PS2 Tel.: 07151 509-221 - Fax.: -200 Application pour la réfrigération et pompes à chaleur • Avec le raccord de type K, utilisez le joint cuivre •...
- Seite 5 ALCO CONTROLS Istruzioni operative Emerson Electric GmbH & Co. OHG Heerstr.111 - D 71332 Waiblingen Pressostato PS1 / PS2 Tel.: 07151 509-221 - Fax.: -200 Per applicazioni in condizionamento e refrigerazione sufficiente diminuzione di temperatura tra la tubazione • Reset...
- Seite 6 ALCO CONTROLS Istruzioni operative Emerson Electric GmbH & Co. OHG Heerstr.111 - D 71332 Waiblingen Drukschakelaar PS1 / PS2 Tel.: 07151 509-221 - Fax.: -200 Voor toepassing koelinstallaties • Aansluiting K: gebruik de meegeleverde koperen • De testknop op lagedrukschakelaars kan tevens warmtepompen.
- Seite 7 ALCO CONTROLS PS1 / PS2 Emerson Electric GmbH & Co. OHG Heerstr.111 - D 71332 Waiblingen Tel.: 07151 509-221 - Fax.: -200 Fig. 5a Fig. 5b Fig. 2 Ø 4,5 25,4 Fig. 6a 25,2 59,5 Fig. 6b 23,5 Ø 4,5 137,5 Fig.