Herunterladen Inhalt Inhalt Diese Seite drucken
Monacor AKB-30DT/DSP Bedienungsanleitung

Monacor AKB-30DT/DSP Bedienungsanleitung

Verstärker mit signalprozessor für dante-netzwerke
Inhaltsverzeichnis

Werbung

Verfügbare Sprachen

Verfügbare Sprachen

Verstärker mit Signalprozessor
für Dante-Netzwerke
Amplifier with Signal Processor
for Dante Networks
AKB- 30 DT/DSP
Bestellnummer • Order Number 17.6770
BEDIENUNGSANLEITUNG
INSTRUCTION MANUAL
MODE D'EMPLOI
ISTRUZIONI PER L'USO
ELECTRONICS FOR SPECIALISTS ELECTRONICS FOR SPECIALISTS ELECTRONICS FOR SPECIALISTS ELECTRONICS FOR SPECIALISTS ELECTRONICS FOR SPECIALISTS ELECTRONICS FOR SPECIALISTS

Werbung

Inhaltsverzeichnis
loading

Inhaltszusammenfassung für Monacor AKB-30DT/DSP

  • Seite 1 Verstärker mit Signalprozessor für Dante-Netzwerke Amplifier with Signal Processor for Dante Networks AKB- 30 DT/DSP Bestellnummer • Order Number 17.6770 BEDIENUNGSANLEITUNG INSTRUCTION MANUAL MODE D’EMPLOI ISTRUZIONI PER L’USO ELECTRONICS FOR SPECIALISTS ELECTRONICS FOR SPECIALISTS ELECTRONICS FOR SPECIALISTS ELECTRONICS FOR SPECIALISTS ELECTRONICS FOR SPECIALISTS ELECTRONICS FOR SPECIALISTS...
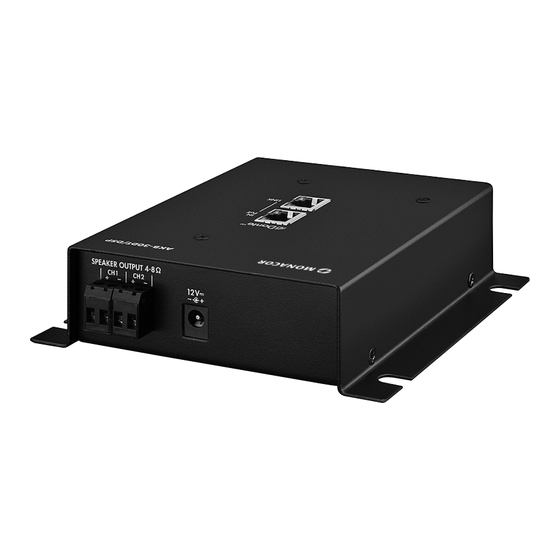
  • Seite 2 AKB-30DT/DSP LINK SPEAKER OUTPUT 4-8 Ω CH 2 12 V Abb. • Fig. 1...
  • Seite 3 Deutsch . . . . . . . . . . . Seite English . . . . . . . . . . . . Page Français .
  • Seite 4: Inhaltsverzeichnis

    Verstärker mit Signalprozessor für Dante-Netzwerke Diese Anleitung richtet sich an Benutzer mit Grundkenntnissen in der Audiotechnik und Netzwerktechnik . Bitte lesen Sie die Anleitung vor dem Betrieb gründlich durch und heben Sie sie für ein späteres Nachlesen auf . Inhalt Übersicht der Montageteile und Anschlüsse .
  • Seite 5: Übersicht Der Montageteile Und Anschlüsse

    Auf Seite 2 finden Sie alle beschriebenen Montageteile und Anschlüsse. 1 Übersicht der Montageteile und Anschlüsse 2 Wichtige Hinweise Das Gerät entspricht allen relevanten Richt linien der EU und ist deshalb 1 Montagewinkel gekennzeichnet . 2 RJ45-Buchse IN / PoE zur Verbindung des Verstärkers mit dem Netz- •...
  • Seite 6: Einsatzmöglichkeiten

    3 Einsatzmöglichkeiten Die Stromversorgung des Verstärkers kann über den Netzwerk- anschluss erfolgen (Power over Ethernet) oder über ein zusätzliches Der kompakte Verstärker AKB-30DT/ DSP ist für den Einsatz in Beschal- Netzgerät . lungsanlagen auf der Basis von Dante-Audionetz werken konzipiert . Der Verstärker besitzt eine Ethernet-Schnittstelle zum Empfang von 3.1 Dante Audiosignalen aus einem Dante-Audionetzwerk .
  • Seite 7: Verstärker Montieren Und Anschließen

    4 Verstärker montieren und anschließen es sich intern um zwei getrennte Ethernet-Schnittstellen mit unter- schiedlichen IP-Adressen . Der Verstärker kann bei Bedarf mit seinen Montagewinkeln (1) z . B . Hinweis: Bei einer manuellen Festlegung der IP-Adressen im lokalen Netzwerk an der Wand oder einer Lautsprecherbox befestigt werden .
  • Seite 8: Stromversorgung

    3 A über einen Hohlstecker mit den Maßen 5,5 / 2,1 mm (Außen-/ Innendurchmesser) an die Buchse 12 V ⎓ (5) anschließen . Dabei die Polarität beachten: Innenkontakt = + . Für die Stromversorgung eignet sich z . B . das Netzgerät PSS-1230DC von MONACOR .
  • Seite 9: Dante-Netzwerk Einrichten

    5 Dante-Netzwerk einrichten 5.1 Installation des Programms „Dante Controller“ Zur Installation des Programms von der Audinate-Website: Die Einrichtung des AKB-30DT/ DSP als Empfänger im Dante-Netz- werk geschieht über das Programm „Dante Controller“, das über 1) Die folgende Internet-Adresse aufrufen: die Website der Firma Audinate kostenlos erhältlich ist . Die über das https://www .audinate .com/products/software/dante-controller Programm vorgenommenen Einstellungen werden in den beteiligten 2) Dort das Betriebssystem auswählen .
  • Seite 10: Gerätekonfiguration Mit Dem Dante-Controller

    5.2 Gerätekonfiguration mit dem Dante-Controller 1) Den Dante-Controller starten . 2) Warten bis in der Matrix der gewünschte Dante-Transmitter und der AKB-30DT/ DSP (unter „Dante Receivers“) erscheinen . Hinweis: Ein Nichterscheinen eines Geräts kann als Grund haben, dass es – nicht eingeschaltet ist, –...
  • Seite 11: Routing Mit Dem Dante-Controller

    5.3 Routing mit dem Dante-Controller Für die Zuweisung der Eingangs- und Ausgangssignale der beteiligten Geräte: 1) Im „Network View“-Fenster unter „Routing“ die Kanäle des ge- wünschten Geräts unter „Dante Transmitters“ sowie die Kanäle des ⊞ AKB-30DT/ DSP unter „Dante Receivers“ durch Klicken auf das ☞...
  • Seite 12: Bedienung

    Passwörter . Zugriffsebene Passwort * Administrator mega_adm User monacor Locked State — Abb. 5 Passwortvorgaben * Diese Passwörter sind vom Werk vorgegeben und können vom Anwender in der jeweiligen Zugriffsebene geändert werden . Geänderte Passwörter gut merken!
  • Seite 13: Das Dsp-Steuerprogramm

    Die benötigte DSP-Controller-Software finden Sie im Internet auf der erscheint ein Fenster zur Eingabe des Passworts . Das Passwort Website von MONACOR unter: monacor .de  Service  Downloads . eingeben . Diese Anleitung bezieht sich auf die Version 3 .8 .22 der PC-Software .
  • Seite 14: Gerätegruppen

    Beschreibung der Funktionen: 6 . Anzeige der Hardware-Adresse (MAC-Adresse) der Schnittstelle des Geräts, über die sich ein Gerät immer eindeutig identifizieren lässt 1 . Schaltfläche zum Stummschalten des Geräts 7 . Anzeige der IP-Adresse eines Geräts Während der Stummschaltung ist die Schaltfläche rot . Zum Wie- Bei unterbrochener Verbindung steht an dieser Stelle „Offline“...
  • Seite 15: Neue Gruppe Bilden

    7.2.1.1 Neue Gruppe bilden 7.2.1.2 Gruppe löschen 1) Zum Anlegen einer neuen Gruppe den Menüpunkt „Tools New Zum Löschen einer Gruppe in der entsprechenden Zeile auf die Schalt- ☞ Group“ aufrufen . fläche klicken ( Abb . 7) . Es erscheint eine Sicherheitsabfrage zur Bestätigung des Löschvorgangs .
  • Seite 16: Programmpasswort Einrichten

    7.2.2 Programmpasswort einrichten hier über die Schaltfläche das Konfigurationsfenster aufgerufen Um einen Passwortschutz für den Start des Programms einzurichten: ☞ werden (  Abb . 9) . Um die virtuellen Geräte wieder aus der Liste zu entfernen, den 1) Den Menüpunkt „Tools Set Software Password“ aufrufen . Menüpunkt „Tools Leave Demo Mode“...
  • Seite 17: Update Über Das Menü Des Konfigurationsfensters

    2) Es erscheint ein Hinweis, dass das Gerät während der mehrschrit- Hinweis zum Laden einer Flash-Image-Datei (*.ffi): Das Laden eines Flash- Images bewirkt zuerst ein Firmware-Update und dann das Laden eines Factory- tigen Aktualisierung nicht ausgeschaltet oder die Verbindung ge- Files .
  • Seite 18: Signalverarbeitung Konfigurieren

    7.3 Signalverarbeitung konfigurieren 7.3.1 Signalweg In der Abbildung 8 ist der Signalweg durch den Verstärker als Block- ACHTUNG Der Signalprozessor ist in Verbindung mit dem Steuer- diagramm dargestellt . Es gibt zwei Grundkonfigurationen, die durch programm ein effektives Werkzeug, mit dem sehr feine, das Laden des entsprechenden Presets gewählt werden können aber auch gravierende Änderungen der Übertragungs- ☞...
  • Seite 19 Preset Basic 2 × Mix MUTE IN A CH 1 GAIN PEQ 1 – 10 LIMITER Dante LINK MUTE DELAY LOW CUT CH 2 IN B GAIN PEQ 1 – 10 LIMITER Preset Basic 1/ 2 MUTE IN A CH 1 GAIN PEQ 1 –...
  • Seite 20: Ansicht Main

    7.3.2 Ansicht MAIN (Abb . 9) [10] Listenfeld zum Wählen der Einheit für den DELAY-Wert [11]: Zeit oder Entfernung (zur automatischen Berechnung der Schall- [1] Schaltflächen zum Umschalten der An sicht (Wechsel der Ansicht laufzeit) nur in der Zugriffsebene „Administrator“ möglich) [11] Eingabe-/ Anzeigefeld DELAY für die Einstellung einer Signalver- [2] UNIT CONNECTION –...
  • Seite 21 [10] [12] [11] [13] Abb. 9 Konfigurationsfenster in der Ansicht MAIN...
  • Seite 22: Ansicht In-A /B

    7.3.3 Ansicht IN-A /B (Abb . 10) [17] MUTE-Schalter zum Stummschalten des entsprechenden Ein- gangs (gleiche Wirkung wie [9]) [14] Schaltflächen zum Umschalten der An sicht [18] Schalter ON jeweils zum Aktivieren / Deaktivieren eines Filters [15] GAIN-Regler zur Verstärkungseinstellung (Lautstärke) für den entsprechenden Eingang, daneben Pegelanzeige, darun- [19] Listenfeld TYPE zur Auswahl des Filtertyps: Bell, Notch, Allpass, High Shelf, Low Shelf, Band Pass, High Pass, Low Pass...
  • Seite 23 [14] [15] [16] [23] [24] [18] [19] [20] [21] [22] [17] [25] Abb. 10 Ansicht IN-A...
  • Seite 24: Gruppensteuerung

    7.3.4 Gruppensteuerung [26] Wie im Kapitel 7 .2 .1 beschrieben ist, können Gerätegruppen gebildet und gemeinsam gesteuert werden . Das Konfigurationsfenster wird über die Schaltfläche hinter der Gruppe in der Geräteübersicht [27] (Abb . 7) aufgerufen . Für die Steuerung der Gerätegruppen vom Typ „Carbon Copy“ und „Advanced“...
  • Seite 25 Die Anzeige- und Bedienelemente des Gruppensteuerungsfensters Wichtig: Damit ein Verstärker einer Gruppe vom Typ „Master Vo- „Master Volume“ haben die folgenden Funktionen: lume“ über die Gruppensteuerung bedient werden kann, muss für seine aktuelle Zugriffsebene die entsprechende Option freigegeben [26] Schaltfläche zum Schließen des Gruppensteuerungsfensters sein ( ☞...
  • Seite 26: Zugriffsrechte Verwalten

    7.4 Zugriffsrechte verwalten 7.6 Standby Um das Gerät in den Bereitschaftsmodus „Standby“ zu versetzen, den 7.4.1 Passwörter eingeben Menüpunkt „Hardware Go to Standby“ aufrufen . Für die Rückkehr Nach dem Einschalten der Stromversorgung ist generell die Zugriffs- zum normalen Betrieb dann den Menüpunkt „Hardware Exit Stand- ☞...
  • Seite 27: Werkseinstellungen Laden

    7.9 Werkseinstellungen laden 7.10 Flash-Image speichern Über den Menüpunkt „File Load Factory Settings“ können Werksein- Zur Datensicherung oder zum Übertragen auf ein anderes Gerät kön- stellungen geladen werden . Dabei werden zwei Arten von Dateien nen sämtliche Einstellungen, Presets und die Firmware eines Geräts in unterschieden: einer Flash-Image-Datei gespeichert werden .
  • Seite 28: Netzwerkeinstellungen

    7.11 Netzwerkeinstellungen Es ist möglich, dem Gerät automatisch eine IP-Adresse zuweisen zu lassen oder diese manuell einzurichten . Die automatische IP-Adressen- zuweisung ist voreingestellt . Um manuell eine IP-Adresse für das Gerät festzulegen: 1) Den Menüpunkt „Hardware Configure Network Settings“ auf- rufen .
  • Seite 29: Technische Daten

    8 Technische Daten Signalbearbeitungsmöglichkeiten je Eingangskanal Sinusleistung bei 12-V-Versorgung an 4 Ω: . . . . . . . . . . . . . . . . . . . . 2 × 15 W Gain: .
  • Seite 30: Steuerung Über Tabletcomputer/Smartphone

    9 Steuerung über Tabletcomputer/Smartphone [33] [34] Im „App Store“ des Computerherstellers Apple Inc . sind unter der Bezeichnung „DSP-CONTROL“ Varianten des DSP-Steuerprogramms er hältlich . [35] [36] [37] [38] Auf dem Tabletcomputer funktioniert die DSP-Steuerung ähnlich wie in den vorangegangenen Kapiteln beschrieben . Die Steuerung mit dem iPhone beschränkt sich dagegen auf das Anlegen und die Bedie- ☞...
  • Seite 31 [46] Gerät stummschalten [47] Konfigurationsfenster eines Geräts öffnen (Ansicht MAIN, Abb . 9) Änderungen vorbehalten . Diese Bedienungsanleitung ist urheberrechtlich für MONACOR ® INTERNATIONAL GmbH & Co. KG geschützt. Eine Reproduktion für eigene kommerzielle Zwecke – auch auszugsweise – ist untersagt.
  • Seite 32 Amplifier with Signal Processor for Dante Networks These instructions are intended for users with basic knowledge in audio technology and network technology . Please read the instructions carefully prior to operation and keep them for later reference . Contents Mounting Parts and Connections . . . . . . . . . . . . 33 7 .2 .5 Firmware update .
  • Seite 33: Mounting Parts And Connections

    All mounting parts and connections described can be found on page 2. 1 Mounting Parts and Connections 2 Important Notes The unit corresponds to all relevant directives of the EU and is therefore 1 Mounting brackets marked with 2 RJ45 jack IN / PoE to connect the amplifier to the network (Ethernet) •...
  • Seite 34: Applications

    3 Applications The amplifier is supplied with power via the network connection (Power over Ethernet) or via an additional power supply unit . The compact amplifier AKB-30DT/ DSP has been designed for PA sys- tems based on Dante audio networks . The amplifier features an Ether- 3.1 Dante net interface to receive audio signals from a Dante audio network .
  • Seite 35: Installing And Connecting The Amplifier

    4 Installing and Connecting the Amplifier The DSP interface of the AKB-30DT/ DSP is preset to automatic reception of an IP address . If a DHCP server is available in the network connect- If required, use the mounting brackets (1) to fasten the amplifier to a ed, the amplifier will receive its address from the server .
  • Seite 36: Power Supply

    12 V DC power supply unit with a permanent rating of 3 A to the jack 12 V ⎓ (5) . Observe the correct polarity: inside contact = + . A suitable power supply unit is, for example, PSS-1230DC from MONACOR .
  • Seite 37: Configuration Of The Dante Network

    5 Configuration of the Dante Network 5.1 Installing the “Dante Controller” To install the program from the Audinate website: The AKB-30DT/ DSP is configured as a receiver in the Dante network by means of the program “Dante Controller”, available as a free 1) Call up the following Internet address: download on the website of the company Audinate .
  • Seite 38: Configuration Of The Unit With The Dante Controller

    5.2 Configuration of the unit with the Dante Controller 1) Start the Dante Controller . 2) Wait for the desired Dante transmitter and the AKB-30DT/ DSP to appear in the matrix (under “Dante Receivers”) . Note: If a unit fails to appear, the reason may be that –...
  • Seite 39: Routing With The Dante Controller

    5.3 Routing with the Dante Controller To assign the input signals and output signals of the corresponding units: ⊞ 1) Under “Routing” in the window “Network View”, click to open the channels of the desired unit under “Dante Transmitters” and the channels of the AKB-30DT/ DSP under “Dante Receivers”...
  • Seite 40: Operation

    Access level Password * Administrator mega_adm User monacor Locked State — Fig. 5 Default passwords * The passwords are factory-set and can be changed by the user at the corre- sponding access level . Make sure to remember the password after changing it!
  • Seite 41: The Dsp Control Program

    7.2 Calling up the control program 7.1 Installing the PC software 1) Call up the control program “DSP Controller” on the computer . The DSP Controller Software required is available on the MONACOR ☞ website: monacor .com  Service  Downloads .
  • Seite 42: Groups Of Units

    Note: The program “DSP Controller” is not only used to control amplifiers of the The preset name can be changed here or in the configuration menu type AKB-30DT/ DSP but also other units from MONACOR with integrated signal ☞  chapter 7 .3 .2) in order to distinguish between identical units . It processor .
  • Seite 43: Creating A New Group

    “Master Volume”: Only essential settings such as total volume or group types “Carbon Copy” and “Advanced” are similar to those ☞  basic sound adjustment can be made for all group for individual units ( chapters 7 .3 .2 and 7 .3 .3), groups of the ☞...
  • Seite 44: Creating A New Program Password

    7.2.2 Creating a new program password 7.2.5 Firmware update To create a password protection for starting the program: The control program and the unit must be equipped with matching firmware versions to ensure smooth communication . If the control 1) Call up the menu item “Tools Set Software Password” . program is a later version, it is possible to update the firmware (oper- 2) Enter the desired password in the field “Enter New Password:”...
  • Seite 45: Update Via The Menu Of The Configuration Window

    Note: A reset to the factory settings will also affect the network settings and 7.2.6 Exiting the program the passwords of the unit, i . e . for the time being, it may be impossible To exit the program, call up the menu item “File Quit” or close the to access the unit from the computer (compare note in chapter 7 .2 .5 .1) .
  • Seite 46: Configuring The Signal Processing

    7.3 Configuring the signal processing 7.3.1 Signal path Figure 8 shows a block diagram of the path a signal takes through ATTENTION Combined with the control program, the signal pro- the amplifier . There are two basic configurations; to select a config- cessor is an effective tool for making slightest but also ☞...
  • Seite 47 Preset Basic 2 × Mix MUTE IN A CH 1 GAIN PEQ 1 – 10 LIMITER Dante LINK MUTE DELAY LOW CUT CH 2 IN B GAIN PEQ 1 – 10 LIMITER Preset Basic 1/ 2 MUTE IN A CH 1 GAIN PEQ 1 –...
  • Seite 48: View Main

    7.3.2 View MAIN (fig . 9) [9] MUTE switch for muting the corresponding input [1] Buttons to switch over the view (change of view only possible at [10] List field to select the unit of measurement for the DELAY value the access level “Administrator”) [11]: time or distance (for automatic calculation of the delay) [2] UNIT CONNECTION –...
  • Seite 49 [10] [12] [11] [13] Fig. 9 Configuration window in the view MAIN...
  • Seite 50: View In-A/B

    7.3.3 View IN-A/B (fig . 10) [17] MUTE switch to mute the corresponding input (same effect as [9] [18] Switch ON to activate /deactivate a filter [14] Buttons to switch over the view [19] List field TYPE to select the filter type: Bell, Notch, Allpass, High [15] GAIN control to set the gain (volume) for the corresponding Shelf, Low Shelf, Band Pass, High Pass, Low Pass input, level indicators next to the control, input /display field as...
  • Seite 51 [14] [15] [16] [23] [24] [18] [19] [20] [21] [22] [17] [25] Fig. 10 View IN-A...
  • Seite 52: Group Control

    7.3.4 Group control [26] As described in chapter 7 .2 .1, it is possible to create groups of units to be controlled together . Use the button behind the group in the overview (fig . 7) to call up the configuration window . [27] For controlling groups of units of the type “Carbon Copy”...
  • Seite 53 The indicator and control elements of the group control window Important: To be able to operate an amplifier from a group of the type “Master Volume” have the following functions: “Master Volume” via the group control, the corresponding option for ☞...
  • Seite 54: Managing Access Rights

    7.4 Managing access rights 7.5 Locked State To go to the lowest access level “Locked State”, call up the menu 7.4.1 Entering passwords item “Hardware Lock Unit” . A message will appear pointing out When the power supply is switched on, the access level “User” will that you have to enter the correct password of a higher level before ☞...
  • Seite 55: Loading Factory Settings

    7.9 Loading factory settings 7.10 Saving a flash image file Use the menu item “File Load Factory Settings” to load factory For backup or for transferring settings to another unit, all settings, settings . There are two different types of files: presets and the firmware of a unit can be saved to a flash image file: Call up the menu item “File Create Flash Image”...
  • Seite 56: Network Settings

    7.11 Network settings An IP address can either be automatically assigned to the unit or it can be configured manually . The automatic IP address assignment is preset . To manually set an IP address for the unit: 1) Call up the menu item “Hardware Configure Network Settings” . 2) Click “Configure Network Manually”...
  • Seite 57: Specifications

    8 Specifications RMS power with 12 V power supply Signal processing options for each input channel at 4 Ω: . . . . . . . . . . . . . . . . . . . . 2 × 15 W Gain: .
  • Seite 58: Control Via Tablet Computer/Smartphone

    9 Control via Tablet Computer/Smartphone [33] [34] In the “App Store” of Apple Inc ., variants of the DSP control program are available under the name “DSP-CONTROL” . The DSP control on a tablet computer is similar to that described [35] [36] [37]...
  • Seite 59 [47] Open the configuration window of a unit (view MAIN, fig . 9) Subject to technical modification . All rights reserved by MONACOR ® INTERNATIONAL GmbH & Co. KG. No part of this instruction manual may be reproduced in any form or by any means for any commercial use.
  • Seite 60 Amplificateur avec processeur de signal pour réseaux Dante Cette notice s’adresse aux utilisateurs avec des connaissances de base en technologie audio et technologie réseau . Veuillez lire la présente notice avec attention avant le fonctionnement et conservez-la pour pouvoir vous y reporter ultérieurement . Table des matières Composants de montage et branchements .
  • Seite 61: Composants De Montage Et Branchements

    Vous trouverez sur la page 2 les composants de montage et les branchements. 1 Composants de montage et branchements 2 Conseils importants L’appareil répond à toutes les directives nécessaires de l’Union euro- 1 Etriers de montage péenne et porte donc le symbole 2 Prise RJ45 IN / PoE pour relier l’amplificateur à...
  • Seite 62: Possibilités D'utilisation

    3 Possibilités d’utilisation L’alimentation de l’amplificateur peut se faire soit via la connexion réseau (Power over Ethernet) soit via un bloc secteur supplémentaire . L’amplificateur compact, AKB-30DT/ DSP, est spécialement conçu pour une utilisation dans des installations de sonorisation développées sur 3.1 Dante la base de réseaux audio Dante .
  • Seite 63: Montage Et Branchement De L'amplificateur

    4 Montage et branchement de l’amplificateur L’interface DSP de l’AKB-30DT/ DSP est préréglée sur l’obtention auto- matique d’une adresse IP . Si dans le réseau connecté, il y a un serveur L’amplificateur peut, si besoin, être fixé sur un mur ou une enceinte DHCP, l’amplificateur reçoit son adresse de lui .
  • Seite 64: Alimentation

    5,5 / 2,1 mm (diamètre extérieur/diamètre intérieur) à la prise 12 V ⎓ (5) . Veillez à respecter la polarité : contact interne = + . Pour l’alimentation, le bloc secteur PSS-1230DC de MONACOR, par exemple, est bien adapté .
  • Seite 65: Créer Un Réseau Dante

    5 Créer un réseau Dante 5.1 Installer le programme «Dante Controller» Pour installer le programme depuis le site internet de Audinate : L’installation de l’AKB-30DT/ DSP comme récepteur dans le réseau 1) Allez à l’adresse internet suivante : Dante se fait via le programme «Dante Controller» disponible gratuite- https://www .audinate .com/products/software/dante-controller ment via le site internet de la société...
  • Seite 66: Configurer Des Appareils Avec Le Dante Controller

    5.2 Configurer des appareils avec le Dante Controller 1) Démarrez le Dante Controller . 2) Attendez jusqu’à ce que l’émetteur Dante souhaité et l’AKB-30DT/ DSP (sous «Dante Receivers») s’affichent dans la ma- trice . Remarque : si un appareil n’apparaît pas, la raison peut être : –...
  • Seite 67: Routage Avec Le Dante Controller

    5.3 Routage avec le Dante Controller Pour attribuer les signaux d’entrée et de sortie des appareils utilisés : 1) Dans la fenêtre «Network View», sous «Routing», ouvrez les canaux de l’appareil souhaité sous «Dante Transmitters» et les canaux de l’AKB-30DT/ DSP sous «Dante Receivers», en cliquant ⊞...
  • Seite 68: Utilisation

    Niveau d’accès Mot de passe * Administrator mega_adm User monacor Locked State — Schéma 5 Mots de passe préréglés * Ces mots de passe sont préréglés en usine et peuvent être modifiés par l’utili- sateur dans le niveau d’accès correspondant . Pensez à bien noter les mots de...
  • Seite 69: Le Programme De Commande Dsp

    Le logiciel DSP Controller nécessaire est disponible via le site internet une fenêtre s’ouvre pour saisir le mot de passe . Tapez-le . de MONACOR : monacor .com  Service  Downloads . En cas d’erreur lors de la saisie du mot de passe, le message Cette notice fait référence à...
  • Seite 70: Groupes D'appareils

    Description des fonctions : 7 . Affichage de l’adresse IP d’un appareil 1 . Bouton pour couper le son de l’appareil En cas de connexion interrompue, «Offline» est visible à la place . Lorsque le son est coupé, le bouton est rouge . Pour réactiver le 8 .
  • Seite 71: Créer Un Nouveau Groupe

    7.2.1.1 Créer un nouveau groupe 7.2.1.2 Effacer un groupe 1) Pour créer un nouveau groupe, appelez le point de menu «Tools Pour effacer un groupe, cliquez dans la ligne correspondante sur le New Group» . bouton ☞ schéma 7) . Une demande de confirmation pour valider le processus d’effacement s’affiche .
  • Seite 72: Créer Un Mot De Passe Du Programme

    7.2.2 Créer un mot de passe du programme Pour retirer les appareils virtuels de la liste, appelez le point de menu «Tools Leave Demo Mode» . Pour créer un mot de passe pour démarrer le programme : 1) Appelez le point de menu «Tools Set Software Password» . 7.2.5 Mise à...
  • Seite 73: Mise À Jour Via Le Menu De La Fenêtre De Configuration

    3) Une fois l’actualisation réussie, un message s’affiche . Confirmez 7.2.6 Quitter le programme de la même manière . Pour quitter le programme, appelez le point de menu «File Quit» ou fermez la fenêtre du programme . Pour ne pas afficher les symboles de mise à jour dans la liste, appelez le point de menu «Tools Disable Update»...
  • Seite 74: Configuration Du Traitement Du Signal

    7.3 Configuration du traitement du signal 7.3.1 Voie de signal Le schéma 8 présente sous forme de schéma-bloc, la voie de signal ATTENTION Le processeur de signal est, en liaison avec le programme au travers de l’amplificateur . Il y a deux configurations de base qui on de gestion, un outil efficace avec lequel des modifica- ☞...
  • Seite 75 Preset Basic 2 × Mix MUTE IN A CH 1 GAIN PEQ 1 – 10 LIMITER Dante LINK MUTE DELAY LOW CUT CH 2 IN B GAIN PEQ 1 – 10 LIMITER Preset Basic 1/ 2 MUTE IN A CH 1 GAIN PEQ 1 –...
  • Seite 76: Visualisation Main

    7.3.2 Visualisation MAIN (schéma 9) [9] Interrupteur MUTE pour couper le son de l’entrée correspondante [1] Boutons pour commuter la visualisation (changement possible [10] Champ pour sélectionner l’unité pour la valeur de DELAY [11] : uniquement au niveau d’accès «Administrator») durée ou distance (pour un calcul automatique de la propagation du son) .
  • Seite 77 [10] [12] [11] [13] Schéma 9 Fenêtre de configuration dans la visualisation MAIN...
  • Seite 78: Visualisation In-A / B

    7.3.3 Visualisation IN-A / B (schéma 10) [17] Interrupteur MUTE pour couper le son de l’entrée correspondante (même action que [9]) [14] Boutons pour commuter la visualisation [18] Interrupteur ON respectivement pour activer/ désactiver un filtre [15] Réglage GAIN pour régler l’amplification (volume) pour l’entrée [19] Champ TYPE pour sélectionner le type de filtre : Bell, Notch, correspondante, à...
  • Seite 79 [14] [15] [16] [23] [24] [18] [19] [20] [21] [22] [17] [25] Schéma 10 Visualisation IN-A...
  • Seite 80: Gérer Des Groupes

    7.3.4 Gérer des groupes [26] Comme décrit dans le chapitre 7 .2 .1, il est possible de former des groupes d’appareils et de les gérer ensemble . Vous pouvez appeler la fenêtre de configuration via le bouton derrière le groupe dans la [27] visualisation des appareils (schéma 7) .
  • Seite 81 Les éléments d’affichage et de commande de la fenêtre de gestion les membres du groupe est diminué de manière proportionnelle . des groupes «Master Volume» ont les fonctions suivantes : Les réglages dans chaque amplificateur ne sont pas modifiés . Important : Pour pouvoir utiliser un amplificateur d’un groupe de [26] Bouton pour fermer la fenêtre de gestion des groupes type «Master Volume»...
  • Seite 82: Gérer Des Droits D'accès

    7.4 Gérer des droits d’accès 7.6 Standby Pour mettre l’appareil sur le mode veille «Standby», appelez le point 7.4.1 Saisir le mot de passe de menu «Hardware Go to Standby» . Pour revenir au mode normal, Une fois l’appareil sous tension, le niveau de droits «User» est généra- appelez le point de menu «Harware Exit Standby»...
  • Seite 83: Charger Les Réglages D'usine

    7.9 Charger les réglages d’usine 7.10 Mémoriser une image Flash Via le point de menu «File Load Factory Settings», vous pouvez char- Pour sauvegarder les données ou les transmettre à un autre appareil, ger les réglages usine . Deux types de fichiers sont distincts : on peut mémoriser tous les réglages, presets et le firmware d’un appareil sous forme de fichier image Flash .
  • Seite 84: Réglages Réseau

    7.11 Réglages réseau Il est possible d’attribuer automatiquement une adresse IP à l’appareil ou de la saisir manuellement . L’attribution automatique des adresses IP est préréglée . Pour définir manuellement une adresse IP pour l’appareil : 1) Appelez le point de menu «Hardware Configure Network Set- tings»...
  • Seite 85: Caractéristiques Techniques

    8 Caractéristiques techniques Possibilités de traitement du signal par canal d’entrée Puissance RMS pour alimentation 12 V sous 4 Ω : . . . . . . . . . . . . . . . . . . 2 × 15 W Gain : .
  • Seite 86: Gestion Via Une Tablette / Smartphone

    9 Gestion via une tablette / smartphone [33] [34] Dans «l’App Store» du fabricant d’ordinateur Apple Inc ., des variantes du programme de gestion DSP sont disponibles sous le nom «DSP- CONTROL» . [35] [36] [37] [38] Sur la tablette, la gestion DSP fonctionne comme décrit dans les chapitres précédents .
  • Seite 87 [47] Ouvrir la fenêtre de configuration d’un appareil (visualisation MAIN, schéma 9) Tout droit de modification réservé . Notice d’utilisation protégée par le copyright de MONACOR ® INTERNATIONAL GmbH & Co. KG. Toute reproduction même partielle à des fins commerciales est interdite.
  • Seite 88 Amplificatore con processore di segnali per reti Dante Queste istruzioni sono rivolte a utenti con conoscenze base nella tecnica audio e network . Vi preghiamo di leggerle attentamente prima della messa in funzione e di conservarle per un uso futuro . Contenuto Panoramica degli elementi di montaggio 7 .2 .5...
  • Seite 89: Panoramica Degli Elementi Di Montaggio

    A pagina 2 trovate tutti gli elementi di montaggio e i collegamenti. 1 Panoramica degli elementi di montaggio 2 Avvertimenti importanti e dei collegamenti L’apparecchio è conforme a tutte le direttive rilevanti dell’UE e pertanto porta la sigla 1 Angoli di montaggio •...
  • Seite 90: Possibilità D'impiego

    3 Possibilità d’impiego L’alimentazione dell’amplificatore può essere fatta tramite la con- nessione rete (Power over Ethernet) oppure tramite un alimentatore L’amplificatore compatto AKB-30DT/ DSP è stato realizzato per l’im- supplementare . piego in impianti di sonorizzazione sulla base di reti audio Dante . L’amplificatore possiede un’interfaccia Ethernet per la ricezione di 3.1 Dante segnali audio da una rete audio Dante .
  • Seite 91: Montare E Collegare L'amplificatore

    4 Montare e collegare l’amplificatore server DHCP, l’amplificatore riceve il suo indirizzo da questo . Se l’am- plificatore viene collegato con un computer tramite un semplice switch Se necessario, l’amplificatore può essere fissato per mezzo dei suoi Ethernet che pure è impostato per la ricezione automatica di un indiriz- angoli di montaggio (1) p .
  • Seite 92: Alimentazione

    3 A usando uno spinotto delle dimensioni 5,5 / 2,1 mm (diametro esterno / interno) . Occorre rispettare la polarità: contatto interno = + . Per l’alimentazione è adatto p . es . l’alimentatore PSS-1230DC di MONACOR .
  • Seite 93: Impostare La Rete Dante

    5 Impostare la rete Dante 5.1 Installazione del programma “Dante Controller” Per l’installazione del programma, dal sito web Audinate: L’impostazione dell’AKB-30DT/ DSP come ricevitore nella rete Dante avviene tramite il programma “Dante Controller”, disponibile gratuita- 1) Aprire il seguente indirizzo Internet: mente nel sito web della società...
  • Seite 94: Configurazione Degli Apparecchi Con Il Dante Controller

    5.2 Configurazione degli apparecchi con il Dante Controller 1) Avviare il Dante Controller . 2) Aspettare che si vedano nella matrice il trasmitter desiderato di Dante e l’AKB-30DT/ DSP (con “Dante Receivers”) . N. B.: Se non si vede un apparecchio, la causa ne può essere che il relativo apparecchio –...
  • Seite 95: Routing Con Il Dante Controller

    5.3 Routing con il Dante Controller Per l’assegnazione dei segnali d’ingresso e d’uscita degli apparecchi interessati: 1) Nella finestra “Network View”, alla voce “Routing” e con un clic ⊞ , aprire sotto la voce “Dante Transmitters“ i canali dell’appa- recchio desiderato nonché sotto la voce “Dante Receivers“ i canali dell’AKB-30DT/ DSP (vedi figura 4) .
  • Seite 96: Funzionamento

    . Livello d’access Password * Administrator mega_adm User monacor Locked State — Fig. 5 Password preimpostate * Queste password sono preimpostate dalla fabbrica e possono essere modificate dall’utente nel relativo livello d’accesso . Ricordarsi bene le password modificate!
  • Seite 97: Il Programma Di Comando Dsp

    Fig. 6 Finestra riassuntiva N. B.: Con il programma “DSP Controller” si possono comandare non solo gli amplificatori del tipo AKB-30DT/ DSP, ma anche altri apparecchi della MONACOR con processore di segnali integrato . Nella figura è elencato quindi anche un...
  • Seite 98: Gruppi Di Apparecchi

    Descrizione delle funzioni: 7 . Indicazione dell’indirizzo IP di un apparecchio 1 . Pulsante per la messa in muto dell’apparecchio Se la connessione è interrotta, qui si vede “Offline” . Durante la messa in muto, il pulsante è rosso . Per riattivare l’audio 8 .
  • Seite 99: Creare Un Nuovo Gruppo

    7.2.1.1 Creare un nuovo gruppo 7.2.1.2 Cancellare un gruppo 1) Per creare un nuovo gruppo aprire la voce del menu “Tools New Per cancellare un gruppo, cliccare sul pulsante nella relativa riga ☞ Group” .  Fig . 7) . Appare una domanda di sicurezza per confermare la cancellazione .
  • Seite 100: Istituire Una Password Per Il Programma

    7.2.2 Istituire una password per il programma 7.2.5 Update del firmware Per istituire la protezione con password per l’avvio del programma: Per una comunicazione senza problemi fra il programma di comando e un apparecchio, entrambi devono avere delle versioni del firmware 1) Aprire la voce del menu “Tools Set Software Password”...
  • Seite 101: Update Attraverso Il Menu Della Finestra Di Configurazione

    Per cancellare i simboli di update nell’elenco, aprire la voce del menu 7.2.6 Terminare il programma “Tools Disable Update” . Per terminare il programma aprire la voce del menu “File Quit” N. B.: Il reset delle impostazioni alle impostazioni della fabbrica riguarda anche le oppure chiudere la finestra del programma .
  • Seite 102: Configurare L'elaborazione Dei Segnali

    7.3 Configurare l’elaborazione dei segnali 7.3.1 Percorso dei segnali La figura 8 illustra come schema a blocchi il percorso dei segnali attra- ATTENZIONE Il processore dei segnali, in combinazione con il pro- verso l’amplificatore . Ci sono due configurazioni di base; per selezio- gramma di comando, è...
  • Seite 103 Preset Basic 2 × Mix MUTE IN A CH 1 GAIN PEQ 1 – 10 LIMITER Dante LINK MUTE DELAY LOW CUT CH 2 IN B GAIN PEQ 1 – 10 LIMITER Preset Basic 1/ 2 MUTE IN A CH 1 GAIN PEQ 1 –...
  • Seite 104: Vista Main

    7.3.2 Vista MAIN (Fig . 9) [10] List box per scegliere l’unità per il valore DELAY [11]: tempo o distanza (per il calcolo automatico della durata del suono) [1] Pulsanti per cambiare la vista (cambio possibile solo al livello [11] Campo di digitazione/ indicazione DELAY per l’impostazione di un d’accesso „Administrator”) ritardo dei segnali d’ingresso (p .
  • Seite 105 [10] [12] [11] [13] Fig. 9 Finestra di configurazione nella vista MAIN...
  • Seite 106: Vista In-A /B

    7.3.3 Vista IN-A /B (Fig . 10) [17] Interruttore MUTE per la messa in muto del relativo ingresso (stesso effetto come [9]) [14] Pulsanti per cambiare la vista [18] Interruttore ON per attivare / disattivare un filtro [15] Regolatore GAIN per impostare l’amplificazione (volume) per l’ingresso interessato, di fianco indicazione del livello, sotto campo [19] List box TYPE per la scelta del tipo di filtro: Bell, Notch, Allpass, di digitazione / indicazione come possibilità...
  • Seite 107 [14] [15] [16] [23] [24] [18] [19] [20] [21] [22] [17] [25] Fig. 10 Vista IN-A...
  • Seite 108: Comando Di Gruppi

    7.3.4 Comando di gruppi [26] Come descritto nel capitolo 7 .2 .1, si possono creare e comandare insieme dei gruppi di apparecchi . La finestra di configurazione si apre con il pulsante dietro il gruppo nella vista riassuntiva degli appa- [27] recchi (Fig .
  • Seite 109 Gli elementi di visualizzazione e di comando della finestra di comando Importante: Affinché un amplificatore di un gruppo del tipo “Master dei gruppi “Master Volume” hanno le seguenti funzioni: Volume” possa essere comandato tramite il comando gruppo, per il suo livello d’accesso attuale deve essere resa disponibile la relativa [26] Pulsante per chiudere la finestra di comando gruppi opzione ( ☞...
  • Seite 110: Gestire I Diritti D'accesso

    7.4 Gestire i diritti d’accesso 7.6 Standby Per mettere l’apparecchio nel modo standby, aprire la voce del menu 7.4.1 Digitare le password “Hardware Go to Standby” . Per il ritorno al funzionamento normale Dopo l’accensione, in genere è scelto il livello d’accesso “User” aprire la voce del menu “Hardware Exit Standby”...
  • Seite 111: Caricare Le Impostazioni Della Fabbrica

    7.9 Caricare le impostazioni della fabbrica 7.10 Memorizzare Flash image Tramite la voce del menu “File Load Factory Settings” si possono Per la salvezza dei dati o per trasmetterli a un altro apparecchio, tutte caricare le impostazioni della fabbrica . Si distinguono due tipi di file: le impostazioni, tutti i preset e il firmware di un apparecchio possono essere memorizzati in un file Flash image .
  • Seite 112: Impostazioni Della Rete

    7.11 Impostazioni della rete È possibile fare assegnare all’apparecchio un indirizzo IP automatico oppure assegnarlo manualmente . L’assegnazione automatica dell’in- dirizzo IP è il modo preimpostato . Per fissare un indirizzo IP manuale per l’apparecchio: 1) Aprire la voce del menu “Hardware Configure Network Settings” . 2) Cliccare su “Configure Network Manually”...
  • Seite 113: Dati Tecnici

    8 Dati tecnici Possibilità d’elaborazione dei segnali per ogni canale d’ingresso Potenza RMS con alimentazione 12 V con 4 Ω: . . . . . . . . . . . . . . . . . . . 2 × 15 W Gain: .
  • Seite 114: Comando Attraverso Tablet /Smartphone

    9 Comando attraverso Tablet /Smartphone [33] [34] Nell’ ”App Store” del produttore di computer Apple Inc ., con il nome “DSP-CONTROL” sono disponibili delle varianti del programma di comando DSP . [35] [36] [37] [38] Sui tablet, il comando DSP funziona in modo simile a quanto descritto nei capitoli precedenti .
  • Seite 115 [47] Aprire la finestra di configurazione di un apparecchio (Vista MAIN, fig . 9) Con riserva di modifiche tecniche . La MONACOR ® INTERNATIONAL GmbH & Co. KG si riserva ogni diritto di elaborazione in qualsiasi forma delle presenti istruzioni per l’uso.
  • Seite 116 MONACOR INTERNATIONAL GmbH & Co. KG • Zum Falsch 36 • 28307 Bremen • Germany A-1879.00.02.09.2018 Copyright by MONACOR INTERNATIONAL. All rights reserved. ©...

Inhaltsverzeichnis