Herunterladen Inhalt Inhalt Diese Seite drucken
Classic Phono TT-33 Benutzerhandbuch

Classic Phono TT-33 Benutzerhandbuch

Koffer-plattenspieler im retro-stil

Werbung

Verfügbare Sprachen
  • DE

Verfügbare Sprachen

Model TT-33
User manual Retro Suit Case Turntable
Gebruiksaanwijzing Platenspeler in Retro Behuizing
Benutzerhandbuch Koffer-Plattenspieler im Retro-Stil
Mode d'emploi Tourne-Disque Valise Rétro
Manual del usuario Maleta Retro Para Tocadisco

Werbung

Inhaltsverzeichnis
loading

Inhaltszusammenfassung für Classic Phono TT-33

  • Seite 1 Model TT-33 User manual Retro Suit Case Turntable Gebruiksaanwijzing Platenspeler in Retro Behuizing Benutzerhandbuch Koffer-Plattenspieler im Retro-Stil Mode d’emploi Tourne-Disque Valise Rétro Manual del usuario Maleta Retro Para Tocadisco...
  • Seite 2: Inhaltsverzeichnis

    Index English ..............................3 Nederlands ............................12 Deutsch ..............................21 Français ..............................31 Español ..............................41 Version: 1.0...
  • Seite 3: English

    English 1. Safety instructions • When using electrical equipment basic safety precautions should always be followed. • This equipment is not intended to be used by persons (including children) with reduced physical, sensory or mental capabilities or lack of experience or knowledge. They should be given appropriate supervision and instructions to use the equipment by a person responsible for their safety.
  • Seite 4 • The apparatus shall not be exposed to liquid, and objects filled with liquids, such as vases, shall not be placed on the apparatus. We strongly recommend retaining the packaging for future transport of the product. WARNING: • Never remove the casing of this apparatus. •...
  • Seite 5 Inside ADAPTOR FOR 45 RPM RECORDS TONE ARM, ARM LIFT AUTO STOP ON/OFF SWITCH 10. R.P.M 33⅓, 45, 78 SELECTION 11. ARM LOCK/REST 12. SPINDLE 13. TURNTABLE 14. CARTRIDGE 15. POWER INDICATOR 16. POWER/VOLUME Metal support Tap up the cover until the Metal spike touches the end of the metal arm.
  • Seite 6 Cartridge installation UNPACKING Remove all packing materials from the unit. (Save all packing materials.) Carefully remove the unit from its Styrofoam and take it out of the plastic bag. Although records can be played with the lid closed as well as opened, it is recommended that the lid is opened.
  • Seite 7 System connection Follow the operation steps on the next page to start using the unit. Music device Active Active Active Left speaker Right speaker Subwoofer 230V ~50Hz...
  • Seite 8: Volume Control

    Operation Use the POWER CABLE to connect the unit with the power outlet. POWER ON Turn the unit on by rotating the POWER/VOL located on the front panel to power on the unit. VOLUME CONTROL Rotate the POWER/VOL on the front panel of the unit to adjust the volume to a comfortable level. STEPS OF PLAYING RECORDS Release the TONE ARM from the ARM LOCK/REST.
  • Seite 9 Plug the supplied AUX IN cord into the AUX IN JACK on the rear of the unit. Insert the plug at the other end of the Auxiliary cable into the output jack or 3.5mm dia. headphone jack of the external audio player. Switch the other Audio Player on, play the music and adjust its volume if required.
  • Seite 10 THE TONE ARM SLIDES ACROSS THE RECORD AND DOES NOT PLAY IT The white protective cover is still covering the needle cartridge. Remove it. The stylus tip may be damaged. Replace the stylus. (See specifications for details) NO SOUND IS HEARD WHEN THE RECORD IS PLAYING Adjust the VOLUME CONTROL knob to turn the sound up.
  • Seite 11 Disclaimer Updates to Firmware and/or hardware components are made regularly. Therefore some of the instruction, specifications and pictures in this documentation may differ slightly from your particular situation. All items described in this guide for illustration purposes only and may not apply to particular situation.
  • Seite 12: Nederlands

    Nederlands 1. Veiligheidsinstructies • Bij het gebruik van elektrische apparatuur moeten de algemene voorzorgsmaatregelen voor de veiligheid altijd worden opgevolgd. • Deze apparatuur is niet bestemd voor gebruik door personen (waaronder kinderen) met gereduceerde fysieke, zintuiglijke of mentale capaciteiten of met een tekort aan kennis of ervaring.
  • Seite 13 de handleiding staat vermeld, tenzij u hiervoor gekwalificeerd bent. • De stekker wordt gebruikt als schakelaar en moet gemakkelijk bereikbaar blijven. • Dit apparaat is een klasse II of dubbel geïsoleerd elektrisch apparaat. Het apparaat is zodanig ontworpen dat deze geen veiligheidaansluiting vereist op elektrische aarding. •...
  • Seite 14 Binnenzijde 7. ADAPTER VOOR 45 TPM PLATEN 8. TOONARM, TOONARMLIFT 9. AUTO-STOP AAN/UITSCHAKELAAR 10. T.P.M 33⅓, 45, 78 SELECTIE 11. ARMVERGRENDELING/ STEUN 12. AS 13. DRAAITAFEL 14. PATROON 15. INDICATIELAMPJE AAN/UIT 16. AAN/UIT/VOLUME Metalen steun Til de cover op totdat de metalen pin het uiteinde van de metalen arm aanraakt.
  • Seite 15: Aanvullende Informatie

    Patroon installeren UITPAKKEN 1. Verwijder alle verpakkingsmaterialen van het apparaat. (Bewaar alle verpakkingsmaterialen.) 2. Haal het apparaat voorzichtig uit de Styrofoam en vervolgens uit de plastic zak. 3. Al kunnen platen worden afgespeeld met het deksel beide gesloten en geopend, wij raden u aan het deksel geopend te houden.
  • Seite 16 Systeemaansluiting Volg de stappen op de volgende pagina voordat u het apparaat in gebruik neemt. Muziekapparaat Actief Actief Actief Linker Rechter luidspreker Subwoofer luidspreker 230V ~ 50Hz...
  • Seite 17: Aux-In Aansluiting & Bediening

    Operatie Gebruik de VOEDINGSKABEL om het apparaat aan te sluiten op het stopcontact. INSCHAKELEN Schakel het apparaat in door POWER/VOL op het voorpaneel te draaien. VOLUMEREGELING Draai POWER/VOL op het voorpaneel van het apparaat om het volume in te stellen op een comfortabel luisterniveau.
  • Seite 18 Schakel het apparaat in en pas het volume aan. Steek de meegeleverde AUX-kabel in de AUX-INGANG op de achterzijde van het apparaat. Steek de stekker aan het andere uiteinde van de AUX-kabel in de uitgang of 3,5mm hoofdtelefoonuitgang van de externe audiobron. Schakel de andere audiospeler in, speel de muziek af en pas het volume naar wens aan.
  • Seite 19 MIJN 33⅓ PLATEN WIEBELEN WANNEER GEPLAATST OP HET DRAAIPLATEAU Zorg ervoor de ARMVERGRENDELING omlaag te klappen voordat u de plaat plaatst of dat de 45tpm ADAPTER niet op het draaiplateau achter is gelaten. DE TOONARM SCHUIFT OVER DE PLAAT EN SPEELT NIETS AF De witte beschermkap dekt nog steeds het naaldpatroon af.
  • Seite 20 Belangrijke opmerking: Het is niet mogelijk om producten die gerepareerd moeten worden direct naar Lenco te sturen. Belangrijke opmerking: De garantie verloopt als een onofficieel servicecenter het apparaat op wat voor manier dan ook heeft geopend, of er toegang toe heeft gekregen. Het apparaat is niet geschikt voor professioneel gebruik.
  • Seite 21: Deutsch

    Deutsch 1. Sicherheitsanweisungen • Befolgen Sie immer die grundlegenden Sicherheitsanweisungen für die Benutzung elektrischer Geräte. • Dieses Gerät ist nicht für die Benutzung durch Personen (Kinder inbegriffen) mit verminderter körperlicher, sensorischer oder geistiger Leistungsfähigkeit oder unzureichender Erfahrung und Kenntnis bestimmt. Diese sind ordnungsgemäß zu beaufsichtigen und über die sichere Benutzung des Gerätes durch eine für ihre Sicherheit verantwortliche Person zu unterweisen.
  • Seite 22: Übersicht Und Bedienelemente

    erreichbar sein. • Diese Anlage ist ein Klasse II/doppelt isoliertes Gerät. Es ist so konzipiert, dass keine sicherheitstechnische Erdung des Gerätes nötig ist. • Der Blitz in dem dreieckigen Symbol weist darauf hin, dass diese Einheit unter unisolierter lebensgefährlicher Spannung steht. •...
  • Seite 23: Metallhalterung

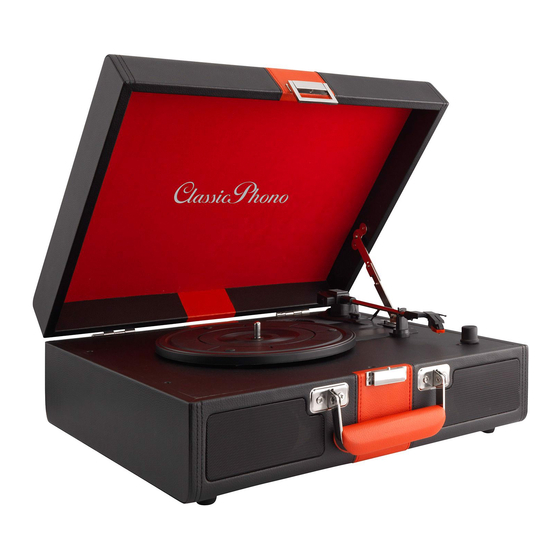
    Innen ADAPTER FÜR 45 U/MIN SCHALLPLATTEN TONARM; ARMHEBER AUTOM. ABSCHALTUNG EIN-/AUSSCHALTER U/MIN AUSWAHL 33⅓, 45, 78 TONARMVERRIEGELUNG/ABLAGE SPINDEL PLATTENSPIELER TONABNEHMER POWER-LED POWER/LAUTSTÄRKE Metallhalterung 1. Tippen Sie auf die Abdeckung, bis die Metallspitze das Ende des Metallarms berührt. 2. Bewegen Sie die Metallspitze zu der Spalte auf dem anderen Metallarm.
  • Seite 24: Auspacken

    Einbau des Tonabnehmers AUSPACKEN 1. Entfernen Sie sämtliches Verpackungsmaterial aus dem Gerät. (Bewahren Sie alle Verpackungsmaterialien auf.) 2. Entnehmen Sie das Gerät vorsichtig aus der Styroporverpackung und aus dem Kunststoffbeutel. 3. Obwohl Schallplatten bei geschlossenem als auch offenem Deckel wiedergegeben werden können, wird empfohlen, dass der Deckel geöffnet ist.
  • Seite 25 Systemanschluss Befolgen Sie die Bedienungsschritte auf der nächsten Seite, um mit dem Betrieb des Gerätes zu beginnen. Musikgerät Aktiv Aktiv Aktiv Linker Rechter Subwoofer Lautsprecher Lautsprecher 230 V ~ 50 Hz...
  • Seite 26: Einschalten

    Betrieb Verwenden Sie das STROMKABEL zum Anschließen des Geräts an einer Steckdose. EINSCHALTEN: Schalten Sie das Gerät ein, indem Sie den Regler POWER/VOL drehen, der sich an der Vorderseite befindet, um das Gerät einzuschalten. LAUTSTÄRKEREGLER Drehen Sie den Regler POWER/VOL ab der Vorderseite des Gerätes, um die Lautstärke anzupassen. SCHRITTE FÜR DIE WIEDERGABE EINER SCHALLPLATTE Nehmen Sie den TONARM von der TONARMVERRIEGLUNG/ABLAGE.
  • Seite 27: Kein Strom

    Schalten Sie das Gerät ein und passen Sie die Lautstärke an. Stecken Sie das mitgelieferte AUX IN-Kabel in die AUX-EINGANGSBUCHSE auf der Rückseite des Gerätes. Stecken Sie das andere Ende des Aux-Kabels in die Ausgangsbuchse oder 3,5 mm Kopfhörerbuchse eines externen Audio-Spielers. Schalten Sie das andere Audiogerät ein, geben Sie die Musik wieder und passen Sie die Lautstärke ggf.
  • Seite 28: Kein Ton Bei Der Wiedergabe Einer Schallplatte

    MEINE 33⅓ SCHALLPLATTE WACKELT, WENN SIE AUF DEM PLATTENTELLER LIEGT Stellen Sie sicher, dass Sie die ARMVERRIEGELUNG heruntergeklappt haben, bevor Sie die Schallplatte darauf auflegen, oder dass der 45 U/Min.-SPINDELADAPTER vom Plattenteller entfernt wurde. DER TONARM RUTSCHT ÜBER DIE SCHALLPLATTE UND GIBT SIE NICHT WIEDER Die Nadel des Tonabnehmers ist immer noch mit der Abdeckung versehen.
  • Seite 29 Garantie Lenco bietet Leistungen und Garantien im Einklang mit Europäischem Recht. Im Falle von Reparaturen (sowohl während als auch nach Ablauf der Garantiezeit) sollten Sie deshalb Ihren Einzelhändler kontaktieren. Wichtiger Hinweis: Es ist nicht möglich, Geräte für Reparaturen direkt an Lenco zu schicken. Wichtiger Hinweis: Falls dieses Gerät von einem nicht autorisierten Kundendienst geöffnet oder darauf zugegriffen wird, erlischt die Garantie.
  • Seite 30 11. Service Weitere Informationen und Unterstützung erhalten Sie unter www.lenco.com Lenco Benelux BV, Thermiekstraat 1a, 6361 HB, Die Niederlande.
  • Seite 31: Français

    Français 1. Précautions d'emploi • Lors de l’utilisation de cet appareil électrique, observez toujours les mesures de sécurité ci- dessous. • Les personnes (y compris les enfants) aux capacités physiques, sensorielles ou mentales réduites, ou manquant d'expérience ou de connaissances, ne doivent pas utiliser cet appareil. Ils doivent être surveillés et conseillés par une personne responsable de leur sécurité.
  • Seite 32 conception n'exige pas de prise terre/masse. • Le symbole d'éclair dans un triangle indique que l'appareil contient une tension dangereuse non isolée. • Les piles de la télécommande ne doivent pas être exposées à une chaleur excessive telle que la lumière du soleil ou un feu.
  • Seite 33 Intérieur ADAPTATEUR POUR 45 TOURS BRAS DE LECTURE, LEVAGE DU BRAS ARRÊT AUTOMATIQUE INTERRUPTEUR MARCHE/ARRÊT SÉLECTION DE 33⅓, 45, 78 TOURS BLOCAGE/SUPPORT DU BRAS BROCHE TOURNE-DISQUE CARTOUCHE TÉMOIN D’ALIMENTATION POWER/VOLUME Support métallique 1. Tirez le couvercle vers le haut jusqu'à ce que la pointe métallique touche l'extrémité...
  • Seite 34: Informations Supplémentaires

    Installation de la cartouche DÉBALLAGE Enlevez tous les emballages de l'appareil. (Conservez tous les emballages.) Enlevez délicatement l'appareil de sa mousse de polystyrène et sortez-le du sachet en plastique. Bien que des disques puissent être lus avec le couvercle fermé aussi bien qu'ouvert, il est recommandé...
  • Seite 35 Branchement du système Suivez la procédure à la page suivante pour commencer à utiliser l'appareil. Lecteur audio Actif Actif Actif Haut-parleur Haut-parleur droit Caisson de gauche basses 230 V ~ 50 Hz...
  • Seite 36: Arrêt Automatique

    Utilisation Utilisez le CÂBLE D'ALIMENTATION pour brancher l'appareil à une prise secteur. MISE SOUS TENSION Mettez l'appareil en marche en tournant la molette POWER/VOL située en façade pour allumer l'appareil. RÉGLAGE DU VOLUME Tournez la molette POWER/VOL en façade de l'appareil pour régler le volume à votre convenance. PROCÉDURE DE LECTURE D'UN DISQUE Libérez le BRAS DE LECTURE de son VERROUILLAGE/SUPPORT.
  • Seite 37 CONNEXION ET UTILISATION DE L'ENTRÉE AUXILIAIRE Vous pouvez brancher n'importe quel appareil ayant une sortie audio, tel qu'un module radio DAB ou un lecteur CD/cassette/MP3 grâce à un câble muni d'une fiche de 3,5 mm de dia. (un cordon de 3,5 mm est fourni).
  • Seite 38 MON DISQUE NE LIT PAS À LA BONNE VITESSE Réglez correctement le sélecteur de vitesse pour un disque de 33⅓, 45 ou 78 tours. MON DISQUE DE 33⅓ TOURS TREMBLE QUAND IL EST PLACÉ SUR LE PLATEAU DU TOURNE-DISQUE Vérifiez que vous avez abaissé le VERROUILLAGE DU BRAS avant d'y mettre le disque, ou que l'ADAPTATEUR DE BROCHE de 45 tours n'est pas encore sur le plateau du tourne-disque.
  • Seite 39 Garantie Lenco propose un entretien et une garantie conformément à la législation européenne, ce qui signifie qu’en cas de besoin de réparation (aussi bien pendant et après la période de garantie), vous pouvez contacter votre revendeur le plus proche. Remarque importante : Il n’est pas possible de renvoyer l’appareil pour réparation directement à Lenco.
  • Seite 40 Service Pour en savoir plus et obtenir de l'assistance, visitez www.lenco.com Lenco Benelux BV, Thermiekstraat 1a, 6361 HB, The Netherlands.
  • Seite 41: Español

    Español 1. Instrucciones de seguridad • Cuando use aparatos eléctricos debe seguir siempre unas precauciones de seguridad básicas. • Este equipo no está diseñado para que los usen personas (incluyendo niños) con capacidades físicas, sensoriales o mentales reducidas o con falta de conocimientos o experiencia. Para poder usar el equipo deberán ser supervisados e instruidos por una persona responsable de su seguridad.
  • Seite 42 que no requiere una conexión de seguridad a la toma eléctrica a tierra. • El rayo con los símbolos de un triángulo muestra que la unidad contiene tensión peligrosa sin aislamiento. • Las pilas del mando no deben exponerse a un calor excesivo, como la luz solar o el fuego. •...
  • Seite 43: Interruptor On/Off

    Interior 7. ADAPTADOR PARA DISCOS DE 45 RPM 8. BRAZO, PALANCA LEVANTADORA DEL BRAZO 9. PARADA AUTOMÁTICA INTERRUPTOR ON/OFF 10. SELECCIÓN DE R.P.M 33⅓, 45, 78 11. REPOSABRAZOS/BLOQUEO DEL BRAZO 12. EJE 13. TOCADISCOS 14. CARTUCHO 15. INDICADOR DE ENCENDIDO 16.
  • Seite 44: Información Adicional

    Instalación del cartucho DESEMBALAJE Retire todos los materiales del envase de la unidad. (Guarde todos los materiales del envase.) Retire con cuidado la unidad de la espuma styro y extráigala de la bolsa de plástico. Aunque se puede reproducir los discos con la tapa cerrada así como abierta, se recomienda que la tapa esté...
  • Seite 45 Conexiones del sistema Siga los pasos de funcionamiento en la página siguiente para empezar a usar la unidad. Dispositivo de música Activo Activo Activo Altavoz izquierdo Altavoz derecho Subwoofer 230V ~ 50Hz...
  • Seite 46: Parada Automática

    Funcionamiento Use el CABLE DE ALIMENTACIÓN para conectar la unidad con la toma de alimentación. ENCENDIDO Encienda la unidad girando el botón POWER/VOL situado en el panel frontal para encender la unidad. CONTROL DE VOLUMEN Gire el botón POWER/VOL situado en el panel frontal de la unidad para ajustar el volumen a un nivel cómodo.
  • Seite 47: Aux In Connection & Operation

    AUX IN CONNECTION & OPERATION Cualquier componente de la salida de audio, como, por ejemplo, el módulo de Radio DAB, reproductor de CD/Casete, reproductor MP3 puede conectarse mediante el uso de una toma de 3,5mm de diámetro (se suministra un cable de ENTRADA AUXILIAR de 3,5mm). Encienda la unidad y ajuste el volumen.
  • Seite 48 EL DISCO NO SE REPRODUCE A LA VELOCIDAD CORRECTA Gire el interruptor de control de velocidad a la velocidad correcta para discos de 33⅓, 45 o 78 rpm. EL DISCO DE 33⅓ SE BAMBOLEA CUANDO SE COLOCA EN EL PLATO DEL TOCADISCOS Asegúrese de que ha plegado el BLOQUEO DEL BRAZO antes de colocar el disco en el plato, o que no se ha dejado del adaptador del eje de 45 rpm en el plato del tocadiscos.
  • Seite 49 Garantía Lenco ofrece servicio y garantía en cumplimiento con las leyes de la Unión Europea, lo cual implica que, en caso de que su producto precise ser reparado (tanto durante como después del periodo de garantía), deberá contactar directamente con su distribuidor. Nota importante: No es posible enviar sus reparaciones directamente a Lenco.
  • Seite 50 Servicio Para obtener más información y soporte del departamento técnico, por favor, visite la página web www.lenco.com Lenco Benelux BV, Thermiekstraat 1a, 6361 HB, Países Bajos.

Inhaltsverzeichnis