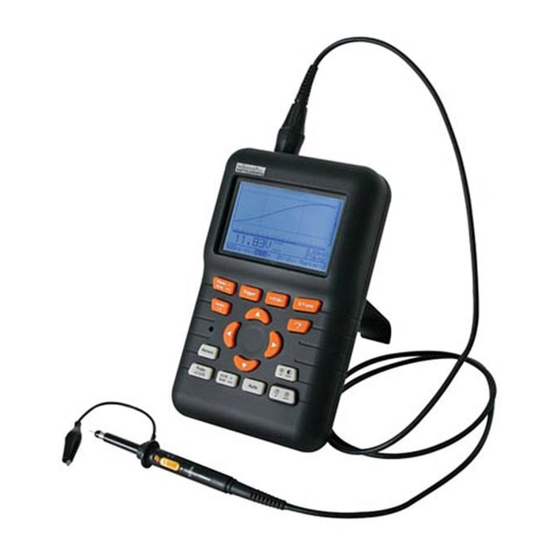
Velleman HPS50 Anleitung
Oscilloscope
Inhaltsverzeichnis
Quicklinks
Inhaltsverzeichnis

Verwandte Anleitungen für Velleman HPS50


Inhaltszusammenfassung für Velleman HPS50
-
Seite 2: Unit Information
HPS50 PersonalScope UNIT INFORMATION: OWNER NAME: DATE OF PURCHASE: UNIT PART NUMBER: DESCRIPTION: UNIT SERIAL NUMBER: UNIT SOFTWARE BUILD VERSION:... - Seite 3 HPS50 PersonalScope ERSONAL COPE English Nederlands Français Deutch...
- Seite 4 HPS50 PersonalScope Contents CONTENTS General ............... 6 Features..............6 Options ..............6 Safety and warnings........... 8 Power supply ............ 12 Use..............12 Survey of the connections and controls ..... 12 Survey of the indications on the screen....14 Operation............16 Turning on/off the Personal Scope.....
-
Seite 5: Inhaltsverzeichnis
HPS50 PersonalScope Inhoud / Sommaire / Inhaltsverzeihnis INHOUD SOMMAIRE INHALTSVERZEICHNIS Algemeen .............7 Generalites ............7 Allgemein ............7 Kenmerken ............7 Caractéristiques ............ 7 Eigenschaften ............7 Opties ..............7 Options ..............7 Optional..............7 Veiligheid en waarschuwingen ......9 Sécurité et mises en garde ......... 9 Sicherheit und Warnungen ....... - Seite 6 HPS50 PersonalScope General GENERAL Features • ultra fast full auto set up option • adjustable trigger level • X and Y position signal shift • DVM readout • audio, power calculation (rms and peak) • dBm, dBV, DC, rms ... measurements Fig 1.0...
-
Seite 7: Optional
HPS50 PersonalScope Algemeen / Generalites / Allgemein ALGEMEEN GENERALITES ALLGEMEIN Kenmerken Eigenschaften Caractéristique • zeer snelle en volledig geautomatiseerde instelling • sehr schnelle und völlig automatisierte Einstellung • possibilité de programmation automatique ultra- mogelijk möglich rapide • regelbare trigger niveau •... -
Seite 8: Safety Warnings
HPS50 PersonalScope Safety & Warnings SAFETY & WARNINGS Symbolen op het toestel - Symbols displayed on the unit - ⇒ Symboles sur l'appareil - Symbole auf dem Gerät The PersonalScope is ideally suited for measure- ments of category II installations with pollution degree II and using a maximum of 600V, in ac- cordance with the IEC1010-1 norm. -
Seite 9: Veiligheid En Waarschuwingen
HPS50 PersonalScope Veiligheid en waarschuwingen / Securite et mises en garde / Sicherheit und warnungen VEILIGHEID & WAARSCHUWINGEN SECURITE & MISES EN GARDE SICHERHEIT & WARNUNGEN ⇒ ⇒ ⇒ De PersonalScope is geschikt voor het uitvoeren Der PersonalScope eignet sich für die Dur- Le PersonalScope convient pour l'exécution de... - Seite 10 HPS50 PersonalScope Safety & Warnings ⇒ When first using the unit or if the batteries are completely discharged, the user should charge Fig. 3.0 them for at least 10 hours before using the unit. ⇒ The “Charge” indication LED on the top panel will light up when the batteries are being charged (see fig.3.0).
- Seite 11 HPS50 PersonalScope Veiligheid en waarschuwingen / Securite et mises en garde / Sicherheit und warnungen Wanneer men het toestel voor het eerst Lorsque vous utilisez l'oscilloscope pour la Wenn das Gerät zum ersten Mal gebraucht gebruikt, of wanneer de batterijen totaal ontladen première fois, ou lorsque les batteries sont...
-
Seite 12: Power Supply
HPS50 PersonalScope Power supply POWER SUPPLY The HPS50 Personal Scope can be powered by means of the supplied adapter or with the internal lithium Ion battery (7,4V/1050mAh) Fig 8.0 Survey of the connections and controls 1. BNC input connector (max. input 100Vp AC+DC). -
Seite 13: Voeding
Voeding / Alimentation / Speisung VOEDING ALIMENTATION SPEISUNG De HPS50 PersonalScope kan men voeden via de Le PersonalScope HPS50 peut être alimenté par Das HPS50 PersonalScope funktioniert mit dem meegeleverde adapter of via de interne Li-ionbatterij l’adaptateur secteur inclus ou par la pile Li-ion mitgelieferten Netzteil oder der internen Li-ion- (7,4V/1050mAh). - Seite 14 HPS50 PersonalScope Screen Survey of the indications on the screen 1. Relative position indication of the signal in the window. 2. Trigger position and slope indication 3. Signal window with (possibly) the markers or grid to indicate the various divisions.
-
Seite 15: Overzicht Van Aanduidingen Op Het Scherm
HPS50 PersonalScope Scherm / l’écran / Bildschirm Overzicht van de aanduidingen op het Übersicht der Anzeigen auf dem Bild- Aperçu des indications à l'écran scherm schirm 1. Indicatie van de relatieve positie van het signaal 1. Indication sur l'écran de la position relative du 1. -
Seite 16: Power On/Off
HPS50 PersonalScope Operation OPERATION NOTE: - If functions are used together with cursor keys a short indication will pop up at the right bottom of the screen. - Some keys have double function selected with a long --- or short press. -
Seite 17: Bediening
HPS50 PersonalScope Bediening / Commande / Bedienung BEDIENING COMMANDE BEDIENUNG OPMERKING: REMARQUE: ANMERKUNG: - Lorsque des fonctions sont accessibles au moyen - Indien de functies samen met de cursor toetsen Wenn Funktionen zusammen mit den Pfeiltasten − des touches curseur, un petit message d’aide... -
Seite 18: Adjusting The Contrast
HPS50 PersonalScope Operation After power on, the unit will send the current data through the USB port (1), see fig. 11 : 1) settings and samples stored in memory. 2) settings and samples of the screen. Download software from our web site www.velleman.eu... -
Seite 19: Instellen Van Het Contrast
HPS50 PersonalScope Bediening / Commande / Bedienung Na inschakeling van de scoop zal de huidige data via Après mise sous tension, l'unité envoie les données Nach dem Einschalten des Gerätes, wird es den de USB poort verstuurd worden (1), zie fig. 11 : en cours via le port USB (1), voir fig. -
Seite 20: Display Set-Up
HPS50 PersonalScope Display D isplay DISPLAY SET-UP Setup Short press: Use the left/right cursorkeys to select one of the 5 screen layouts (see fig. 12 to 16). Use the up/down cursorkeys to view/hide the markers or grid on the screen. -
Seite 21: Scherm Instellingen
HPS50 PersonalScope Weergave / Commande / Bedienung D isplay D isplay D isplay SCHERM INSTELLING MODES D’AFFICHAGE BILDSCHIRM EINSTELLUNG Setup Setup Setup Kort drukken: Gebruik de linker/rechter cursortoets Pression brève: Utilisez les touches curseur "droite/ Kurzer Druck: Die Pfeiltasten links und rechts voor het selecteren van één van de 5 schermweerga-... -
Seite 22: Setup Menu
HPS50 PersonalScope Setup Display SETUP MENU Setup Long press: Shows a setup menu for changing the operation mode, the default power-off timer, the display mode. 1. Select the highlighted item with a short keypress of the setup-key and by using the up/ down cursor keys 2. -
Seite 23: Menu De Paramétrage
HPS50 PersonalScope Setup D isplay D isplay D isplay SETUP MENU MENU DE PARAMETRAGE SETUP MENÜ Setup Setup Setup Lang drukken: weergave van het setup menu Pression prolongée: Affiche un menu de configu- Langes Drücken: zeigt das Setup-Menü, mit dem... - Seite 24 HPS50 PersonalScope Setup 1. Operating mode : Scope: normal operation mode. Demo: Scope goes into demo mode; several ani- mated screens are displayed one after the other. Y-cal. calibrate the centre of the signal; only if the Y position is incorrect during Auto set-up mode.
-
Seite 25: Gebruikersinstelling
HPS50 PersonalScope Setup 1. Gebruikersinstelling : 1. Mode de fonctionnement : 1. Betriebs Modus : Scope: Oszilloskopmodus Scope: mode de fonctionnement normal. Scope: Normaal gebruik. Demo: L'oscilloscope se met en mode de démonstra- Demo: Das Gerät schaltet in den Demonstrations- Demo: Demo-instelling mode waar verschillende tion;... - Seite 26 HPS50 PersonalScope Setup 3. Display mode Dynamic: The screen layout changes automatical- ly to show the best signal resolution, depending on X position shift and the position of the markers. See also “using the markers” Manual: The screen layout remains fixed accor- ding to your selection.
-
Seite 27: Schermweergave
HPS50 PersonalScope Setup 3. Schermweergave 3. Mode d' affichage 3. Anzeige Dynamisch: de schermweergave wijzigt automatisch Dynamique: l’agencement de l’affichage change Dynamic: Der Bildschirm wird immer automa- om de beste signaalresolutie te kunnen weergeven automatiquement pour obtenir la meilleure résolution tisch auf die beste Anzeigeauflösung eingestellt. -
Seite 28: Readout Set-Up
HPS50 PersonalScope Meter readout READOUT SET-UP Press to call the meter 1 to 4 selection menu. Make use of the cursorkeys to set a readout for up to 4 meters Setting up the measurement readouts: 1. Pressing the ‘meter’-key selects the first readout location. -
Seite 29: Der Messanzeige
HPS50 PersonalScope Meetuitlezing / L’affichage de la mesure / MessAnzeige MEETUITLEZING AFFICHAGE DES MESURES MESSWERT MODUS Druk voor het oproepen van de meter 1 tot 4 selec- Enfoncez la touche "Mesure" pour afficher le Drücken Sie die „Meter“ Taste um in den Anzeige- tie. - Seite 30 HPS50 PersonalScope Meter readout 1. DC voltage measurement (V=). This function enables the user to measure DC voltages (only for DC input coupling) 2. Maximum voltage (Vmax.). The signal's positive peak voltage (difference between zero and highest value) is displayed.
- Seite 31 HPS50 PersonalScope Meetuitlezing / L’affichage de la mesure / MessAnzeige 1. Gleichspannung messen (V=). 1. Gelijkspanning meten (V=). 1. Mesures de tensions continues (V=). Über diese funktion kann der Gleichspannung ge- Via deze functie kan men gelijkspanning meten Cette fonction permet de mesurer des tensions messen werden.
- Seite 32 HPS50 PersonalScope Meter readout 6. dBV measurement (dBV ac). The measured signal (ac only) is converted to dBv (0dB= 1V). 7. dBm measurement (dBm ac). The measured signal (ac only) is converted to dBm (0dB= 0.775V). 8. dB measurement (dB ac).
- Seite 33 HPS50 PersonalScope Meetuitlezing / L’affichage de la mesure / MessAnzeige 6. dBV metingen (dBV ac). 6. Mesures dB (dBV ca). 6. dB-Messungen (dBV ac). Het gemeten signaal (enkel ac) wordt om-gerekend Le signal est converti en dBv (0dB=1V). Das Signal wird in dBv (0dB= 1V) umgerechnet.
- Seite 34 HPS50 PersonalScope Meter readout Audio power calculation. The measured voltage is converted into power, suposing that the voltage is measured across an impedance. The calculated power can be displayed for loads of 2, 4, 8, 16 or 32 Ohm. To choose the different loads, first highlight the power readout and then press the right cursor key.
- Seite 35 HPS50 PersonalScope Meetuitlezing / Affichage des mesures / MessAnzeige Audio vermogen calculatie. Calcul de la puissance Audio. Audio Leistung berechnen De gemeten spanning wordt omgerekend naar een La tension mesurée est convertie en puissance, avec, Die gemessene Spannung wird über die Impedanz vermogen, rekening houdend dat de spanning comme hypothèse, que cette tension est mesurée aux...
- Seite 36 HPS50 PersonalScope Meter readout Notes: • If the signal goes off-screen or when the signal is too small for measurement, the readout will show ??? (see fig 28) • For all AC measurements: Make sure that at least one or two periods are displayed or Fig 28 select the auto-setup function.
- Seite 37 HPS50 PersonalScope Meetuitlezing / Affichage des mesures / MessAnzeige Opmerking : Remarque: Anmerkung : • Als het signaal buiten het scherm verdwijnt of • Si le signal sort de l'écran, ou lorsque le signal est • Wenn das Signal aus dem Bildschirm te klein is voor metingen, zal de uitlezing ??? trop petit pour être mesuré, trois points d'interro-...
-
Seite 38: Probe Setup
HPS50 PersonalScope Probe setup Probe PROBE SETUP x1 / x10 Press the ‘Probe x1/x10’-key to set the measurements accordingly the x1/x10-probe setting. (Fig. 30) Notes: • Automatically calculate the correct readouts depending the x1 or x10 probe setting. • An ‘x10’ symbol is displayed if this mode has Fig 30 been selected. -
Seite 39: Messprobeanpassung
HPS50 PersonalScope Meetprobe / Sonde de mesure / Messprobe Probe Probe Probe TASTKOPF EINSTELLUNG MEETPROBE INSTELLING REGLAGE DE LA SONDE x1 / x10 x1 / x10 x1 / x10 Enfoncez la touche “x1/x10” pour adapter l'affi- Drücken Sie die “x1/x10”-Taste, um die Anzeige Druk de ‘x1/x10’... - Seite 40 HPS50 PersonalScope Markers Marker THE SIGNAL MARKERS 1 - 2 The user can perform measurements on a certain signal by using the four moveable markers. This can be useful when measuring the interval between two points or the amplitude of any given peak.
-
Seite 41: De Signaalmarkers
HPS50 PersonalScope Markers / repères / Markierungen Marker Marker Marker DE SIGNAALMARKERS LES REPÈRES DIE MARKIERUNGEN 1 - 2 1 - 2 1 - 2 Via vier verplaatsbare markers heeft men de moge- Les quatre repères mobiles permettent d'effectuer Mittels vier verschiebbaren Markierungen haben lijkheid om metingen op een signaal te verrichten. - Seite 42 HPS50 PersonalScope Markers Determining the frequency of a signal requires the measurement of a period. The easiest way to do this would be by placing the vertical markers either on two consecutive peaks or two identical slopes of a signal.
- Seite 43 HPS50 PersonalScope Markers / repères / Markierungen Um die Frequenz eines Signals zu bestimmen, Om de frequentie van een signaal te bepalen Pour déterminer la fréquence d'un signal, mesu- muss die Zeit einer Periode gemessen werden. moet men de tijd van een periode meten, dit kan rez le temps d'une période.
-
Seite 44: Het Signaalvenster
HPS50 PersonalScope Signal position SIGNAL SCREEN X/Y - pos Press first the ‚X/Y-pos‘ key before pressing the arrow keys in order to move the signal in the direc- tion of the arrows. Prolonged pressing will make the X or Y- position change faster. A black bar (1) indicates the relative position of the signal in the sample window, see fig. - Seite 45 HPS50 PersonalScope Signaalpositie / Signal position / Signal position SIGNAALVENSTER AFFICHAGE DU SIGNAL SIGNAL BILDSCHIRM X/Y - pos X/Y - pos X/Y - pos Druk eerst op de ‚X/Y-pos‘-toets vóór men de Enfoncez d'abord la touche "X/Y-pos" avant d'uti- Drücken Sie zuerst die „X/Y-pos“ Taste, bevor Sie pijltoetsen indrukt voor het verschuiven van v/h liser les curseurs fléchés pour déplacer le signal...
- Seite 46 HPS50 PersonalScope Signal position AC/DC CHOICE OF INPUT COUPLING Short press: Choice of input coupling AC (3) or DC (2). Depending on (part of) the signal to be measured, the input can be connected to the signal through a direct link or by using a decoupling capa- citor.
-
Seite 47: Ingangskoppelingkeuze
HPS50 PersonalScope Signaalpositie / Signal position / Signal position AC/DC AC/DC AC/DC KEUZE VAN INGANSKOPPELING CHOIX DU COUPLAGE D'ENTREE WAHL DES INGANGSSIGNALS Kort drukken: Keuze van ingangskoppeling AC Pression brève : Choix du couplage d'entrée AC (3) Kurzer Druck: Wahl des Eingangssignals AC (3) (3) of DC (2). -
Seite 48: Auto-Setup Function
HPS50 PersonalScope Auto-setup Auto AUTO-SETUP FUNCTION The auto-setup function is ideally suited for quick measurements as no manual setup has to be made and everything is automatic. Note: Use the auto-setup function when the screen no longer displays a signal after the manual setup. -
Seite 49: Auto Setup Instelling
HPS50 PersonalScope Auto setup / Paramétrage automatique /’Auto setup’ Funktion Auto AUTO SETUP INSTELLING Auto PARAMÉTRAGE AUTOMATIQUE Auto 'AUTO SETUP'-FUNKTION De auto setup functie is ideaal om snel een meting La fonction de paramétrage automatique est idéale Die 'Auto-setup'-Funktion ist ideal für die schnelle... - Seite 50 HPS50 PersonalScope Input sensitivity CHANGING THE INPUT t-V/div SENSITIVITY AND TIMEBASE First press the „t-V/div“ key (1), use up/down cursorkeys (2) for changing the input sensitivity (V/div) (Fig 40). Press the left/right (3) cursorkeys for changing the timebase (time/div). (Fig 41) 1.
-
Seite 51: Ingangsgevoeligheid & Tijdsbasis
HPS50 PersonalScope Ingangsgevoeligheid / Sensibilite d‘entrée / Eingangsempfindlichkeit WIJZIGEN VAN INGANGSGEVOE- REGLAG DE LA SENSIBILITE ÄNDERUNG DER EINGANGSEMP- t-V/div t-V/div t-V/div LIGHEID EN TIJDSBASIS D'ENTREE ET LA BASE DE TEMPS FINDLICHKEIT UND ZEIT-BASIS Druk eerst “t-V/div“ (1) en daarna de omhoog of Enfoncez d'abord la touche "t-V/div"... - Seite 52 HPS50 PersonalScope Trigger function Note: Changing the timebase or sensitivity switches • the autorange mode immediately off. (Fig 42) The timebase or sensitivity cannot be changed • into hold mode. Pressing the ‘t-V/div’ key into hold mode • toggles the screen between the two stored waveforms.
-
Seite 53: De Trigger Functies
HPS50 PersonalScope Trigger Functie / Fonction de démarrage / TriggerFunktion Remarque : Anmerkung : Opmerking : Tout changement de la vitesse de balayage ou de Das Ändern der Zeitbasis oder der Eingang- • • Het wijzigen van de tijdsbasis of gevoelig- •... - Seite 54 HPS50 PersonalScope Trigger modes Trigger modes : ”norm” = Normal trigger A triggering (or manual trigger) must occur before the sample memory is filled. Use this mode when you want to start displaying the signal when it reaches a preset threshold value. (Fig 43) “run”...
-
Seite 55: Fonctions De Démarrage
HPS50 PersonalScope Trigger funkties / Fonctions de démarage / TriggerFunktionen Triggerfuncties : Fonctions de démarrage : TriggerFunktionen : ”norm”= Synchronisation Normale. „norm“ = Normaler Triggermodus ”norm” = Normale triggering L' acquisition des échantillons démarre dès le déclen- Eine Triggerung muss stattfinden, bevor der Speicher De triggering (of manuele trigger) moet gebeuren chement automatique ou manuel de la base de temps. - Seite 56 HPS50 PersonalScope Trigger Trigger slope : Press the left cursor key to set triggering at the rising or falling edge of the input signal. 1. Triggering on the rising slope of the signal : The screen will only display the signal when a positive slope is "detected", viz.
- Seite 57 HPS50 PersonalScope Triggerflank / Flan de déclenchement / Flanken Einstellung Flan de déclenchement : Trigger flank : Flanken Einstellung : Enfoncer la touche curseur "gauche", pour choisir Drücken Sie die Linken Pfeiltaste um mit der Druk op de linker pijltoets voor het kiezen van...
- Seite 58 HPS50 PersonalScope Trigger Changing the trigger level : Press the ‘Trigger’-key to set the cursorkeys • action into ‘trigger’ mode. Press the up/down arrow keys to move the • trigger level (1). Notes: When no markers are displayed, the cursorkeys are set for changing the timebase or input sensiti- vity when no keys are pressed during 10 seconds.
- Seite 59 HPS50 PersonalScope Triggerflank / Flan de déclenchement / Flanken Einstellung Wijzigen van trigger niveau : Réglage du niveau de déclenchement : Änderung des Triggerlevels Druk de ‘trigger’ toets om de pijltoetsen in te Enfoncez la touche "TRIGGER" pour régler le Drücken Sie die „Trigger“...
- Seite 60 HPS50 PersonalScope Screen memory Memory HOLDING THE SCREEN Press the ‘Memory’-key to freeze the waveform on-screen. It may be useful to "freeze" certain signals on your screen. This will allow the user to study the signal using the markers. (Fig 50) Remarks: •...
-
Seite 61: Het Schermgeheugen
HPS50 PersonalScope Schermgeheugen / Figer l’affichage / Bildschirm einfrieren Memory Memory Memory HET SCHERMGEHEUGEN FIGER L'AFFICHAGE BILDSCHIRM EINFRIEREN Druk op de “Memory” toets om het signaal op het Enfoncez la touche "Memory" pour figer l'image à Drücken Sie die „Memory“ Taste um das Signal auf scherm te houden. - Seite 62 HPS50 PersonalScope Screen memory t-V/div RECALL MEMORIES Pressing the ‘t-V/div’-key when in hold mode toggles the screen between the frozen waveform and the stored waveform. ‘Mem’ is displayed if stored waveform is visible. (1) Notes: • The store and recall function is only available in ‘HOLD’-mode...
-
Seite 63: Het Geheugen Oproepen
HPS50 PersonalScope Schermgeheugen / Figer l’affichage / Bildschirm einfrieren GESPEICHERTE BILD SCHIRME t-V/div GEHEUGEN OPROEPEN t-V/div RAPPEL DE MISE EN MÉMOIRE t-V/div ANSEHEN Het indrukken van de ‘t-V/div’ toets tijdens de En mode "HOLD", presser la touché "t-V/div", Drücken Sie die „t-V/div“ Taste im Hold Modus ‘Hold’... - Seite 64 Resetting HPS50 PersonalScope RESETTING THE PERSONAL SCOPE Press the sunk (1) ‘Reset’ push button for at least 10 seconds to return to the manufacture- programmed setup. Note: • Use the reset function in case of unusual behaviour of the unit, like distorted screen or not functional keyboard (see also troubleshoo- ting).
-
Seite 65: Herstarten Van De Personal Scope
HPS50 PersonalScope Herstarten / Redémarrage / Reset RESETTEN VAN DE REDÉMARRAGE DU RESET VON PERSONAL SCOPE PERSONAL SCOPE PERSONAL SCOPE Druk op het verzonken ‘Reset’ drukknop (1) Enfoncez le petit bouton (1) enfoui de"Reset" Drücken Sie die „Reset“ Taste (1) mit einem gedurende 10 seconden voor het terugkeren naar de pendant au moins 10 secondes pour accéder... - Seite 66 HPS50 PersonalScope Troubleshooting TROUBLESHOOTING The screen remains blank or there is no signal : • No power supply • Batteries are discharged • Contrast adjustment is incorrect • Press RESET for at least 10 seconds REMARK: Temporarily remove the battery and adapter in case RESET is not helping.
-
Seite 67: Foutzoeken
HPS50 PersonalScope Foutzoeken / Localisation des erreurs / Fehlersuche FOUTZOEKEN LOCALISATION DES ERREURS FEHLERSUCHE L'écran reste vide ou aucun signal n'apparaît: Auf dem Bildschirm erscheint nichts oder ist kein Het scherm blijft blank of er komt geen signaal op: Signal zu sehen: •... - Seite 68 The warranty does not apply to software, fuses, measuring probes and batteries. VELLEMAN COMPONENTS will not be held responsible for any flaw or defect which the company feels is due to negligence on behalf of the user, to modification or opening of the unit, or to accidents or abnormal use or treatment of the product.
-
Seite 69: Waarborg
Originalankaufbescheinigung VELLEMAN document bij VELLEMAN COMPONENTS of een originale auprès de VELLEMAN COMPONENTS COMPONENTS. oder einem offiziellen Vertreiber officiële verdeler aankomt. De verplichtingen van ou d'un revendeur officiel. - Seite 70 TECHNICAL TECHNICAL SPECIFICATIONS SPECIFICATIONS...
-
Seite 71: Technische Specificaties
HPS50 PersonalScope Specifications Maximum sample rate 40MS/s for repetitive signals (5MS/s for single shot events) Input amplifier bandwidth (-3dB) From 5MHz at 5mV/div to 12MHz at 50mV, 1V & 20V /div Input impedance 1Mohm // 20pF (standard oscilloscope probe) Maximum input voltage... - Seite 72 France Belgium VELLEMAN ELECTRONIQUE VELLEMAN COMPONENTS +33 (0) 320158615 +32 (0)9 3843611 Netherlands VELLEMAN COMPONENTS VELLEMAN INC. +31 (0) 765147563 +1 (817) 284 7785...