Lika ASB62 Montagehinweise
Quicklinks
ROTACOD
Absolute encoders
Series
Complete documentation
at www.lika.biz
Warning: encoders having order code ending with "/Sxxx" may have mechanical and electrical characteristics different from standard and be supplied with additional documentation for special connections (Technical Info).
Attenzione: gli encoder con codice di ordinazione finale "/Sxxx" possono avere caratteristiche meccaniche ed elettriche diverse dallo standard ed essere provvisti di documentazione aggiuntiva per cablaggi speciali (Technical info).
Achtung: Geräte, deren Bestellschlüssel mit der Kennung /Sxxx enden, können in ihren mech. und elektr. Eigenschaften vom Standard abweichen. Diese werden daher mit einer ergänzenden Dokumentation ausgeliefert (Technical info).
Atención: los encoders con código de pedido acabado en "/Sxxx" pueden tener características mecánicas y eléctricas diferentes a las básicas y documentación adicional relativa a conexiones especiales (Technical Info).
Attention: les codeurs avec code de commande terminant en "/Sxxx" peuvent avoir des caractéristiques mécaniques et électriques différentes du standard et documentation additionnelle pour les câblages spéciaux (Technical info).
EN
Mounting instructions
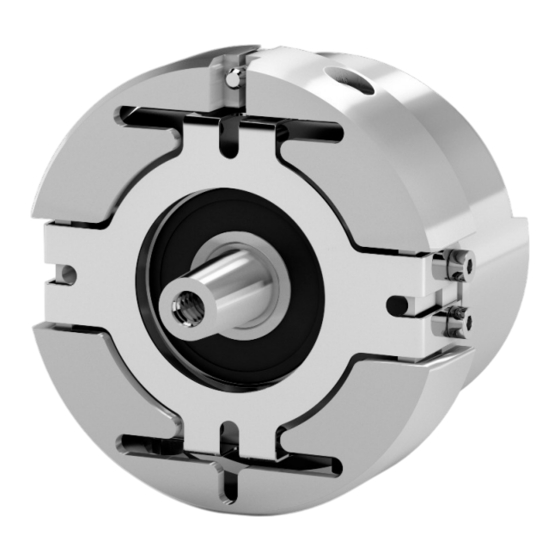
Mounting the encoder
Remove the PG cap 1 from the back of the encoder;
fit the encoder into the rotor shaft 2 and fix it by means of the supplied M5 x
50 UNI 5931 screw 3; recommended tightening torque: 5 Nm;
replace the PG cap 1 properly and fix it;
tighten the M3 screw 4 to cause the flange 5 to expand so clamping the
encoder onto the stator 6; recommended tightening torque: 1.2 Nm.
Removing the encoder
Unscrew the M3 screw 4 to release the expansion flange 5;
remove the PG cap 1 from the back of the encoder;
hold the rotor shaft 2 and screw off the M5 screw 3 which fixes the encoder
to the rotor shaft 2;
WARNING: do not force the encoder manually to remove it from
the motor!
carefully pull the encoder out of the rotor shaft 2 by screwing an
M6 screw in the encoder shaft. To prevent damage of the M5 thread we
recommend an M5 grub screw to be screwed in before using the M6 screw.
ES
Instrucciones de montaje
Montaje de l'encoder
Aflojar la tapa PG 1 en la parte posterior del encoder;
montar el encoder en el eje del rotor 2 y asegurarlo mediante el tornillo 3 tipo
M5 x 50 UNI 5931; par de apriete recomendado: 5 Nm;
apretar de nuevo la tapa PG 1;
atornillar el tornillo tipo M3 4 para dilatar la brida 5 que asegura l'encoder al
estátor 6; par de apriete recomendado: 1,2 Nm.
Desmontaje de l'encoder
destornillar el tornillo tipo M3 4 y aflojar la brida de expansión 5;
quitar la tapa PG 1 en la parte posterior del encoder;
asegurarse de que el eje del rotor 2 esté parado y destornillar el tornillo 3 tipo
M5 que fija el encoder en el eje del rotor 2;
ATTENCIÓN: no forzar manualmente el encoder para sacarlo del
motor!
atornillar con cuidado un tornillo tipo M6 en el eje del encoder
hasta la extracción completa del dispositivo de su alojamiento. Para evitar
daños en la rosca del eje rotor 2 aconsejamos apretar un tornillo sin cabeza
tipo M5 en el eje rotor 2 antes de que se utiliza el tornillo tipo M6.
Electrical connections
Function
14-pin connector
Zero setting / Preset
1
Counting direction
2
Data OUT + / SLO +
3
+Vdc
1
4
/A (COS -)
5
White_Green
Clock IN - / MA -
6
0Vdc
7
B (SIN +)
8
/B (SIN -)
9
0Vdc
2
10
Clock IN + / MA +
11
A (COS +)
12
+Vdc
3 / 4
13
Brown_Green Marrone_Verde Braun_Grün
Data OUT - / SLO -
14
Shield
Case
ASB62
IT
Montaggio encoder
Svitare il tappo PG 1 posto sul retro dell'encoder;
montare l'encoder sull'albero del rotore 2 e fissarlo con la vite M5 x 50 UNI
5931 3 in dotazione; coppia di serraggio raccomandata: 5 Nm;
riposizionare e avvitare il tappo PG 1 precedentemente rimosso;
stringere la vite M3 4 procurando l'espansione della flangia 5 e il fissaggio
dell'encoder allo statore 6; coppia di serraggio raccomandata: 1,2 Nm.
Smontaggio encoder
Svitare la vite 4 allentando così la flangia a espansione 5;
togliere il tappo PG 1 sul retro del dispositivo;
impedire che l'albero rotore 2 ruoti e rimuovere la vite M5 3 che fissa l'encoder
all'albero rotore 2;
ATTENZIONE: non forzare manualmente l'encoder per estrarlo dal
motore!
estrarre l'encoder dall'albero rotore 2 avvitando con prudenza una
vite M6 nell'albero encoder. Per non rovinare la filettatura dell'albero rotore 2
avvitare un grano M5 nell'albero rotore 2 prima di usare la vite M6.
FR
Montage du codeur
Dévisser le couvercle PG 1 dans la partie postérieure du codeur ;
monter le codeur sur l'arbre du rotor 2 et le fixer au moyen de la vis 3 type M5
x 50 UNI 5931 ; couple de serrage recommandé : 5 Nm ;
visser de nouveau le couvercle PG 1 ;
visser la vis type M3 4 au fin d'étendre la bride d'expansion 5 qui fixe le codeur
au stator 6 ; couple de serrage recommandé : 1.2 Nm.
Démontage du codeur
Dévisser la vis type M3 4 et relâcher la bride d'expansion 5 ;
ôter le couvercle PG 1 dans la partie postérieure du codeur ;
s'assurer que l'arbre du rotor 2 ne tourne pas et enlever la vis 3 type M5 qui
fixe le codeur à l'arbre du rotor 2 ;
ATTENTION: ne pas forcer le codeur manuellement pour l'extraire
du moteur !
extraire le codeur de l'arbre du rotor 2 en vissant une vis type M6
dans l'arbre du codeur ; dans le but de ne pas endommager le filetage de
l'arbre du rotor 2, on conseille de visser un boulon sans tête type M5 dans
l'arbre du rotor 2 avant d'utiliser la vis type M6.
EC-ASB/CB62-xx cable / cavo / Kabel / cable / câble
Violet
Viola
Violett
Morado
-
-
-
Red
Rosso
Rot
Pink
Rosa
Rosa
Rosado
Bianco_Verde
Weiß_Grün
Blanco_Verde
Brown
Marrone
Braun
Marrón
White
Bianco
Weiß
Blue
Blu
Blau
Green
Verde
Grün
-
-
-
Grey
Grigio
Grau
Black
Nero
Schwarz
Marrón_Verde
Yellow
Giallo
Gelb
Amarillo
Shield
Schermo
Schirm
Istruzioni di montaggio
Instructions de montage
1 Internally connected to pin 13
2 Internally connected to pin 7
Violet
3 +Vdc according to the order code.
-
-
E.g.: ASB6221SC1-...
Rojo
Rouge
+Vdc = +5Vdc ±5%
Rose
4 WARNING At power-on, above
Blanc_Vert
3V supply voltage +Vdc must be
Marron
applied with a slew rate larger than
Blanco
Blanc
50V/s
Azul
Bleu
Verde
Vert
-
-
Gris
Gris
Negro
Noir
Marron_Vert
Jaune
Malla
Blindage
DE
Montagehinweise
Montage des Gebers
PG Deckel 1 von der Geberrückseite entfernen;
Geber auf die Rotorwelle 2 setzen und mit einer M5 x 50 UNI 5931 Schraube 3
(im Lieferumfang) festschrauben. Empfohlener Drehmoment max. 5 Nm;
PG Deckel 1 wieder sorgfältig aufsetzen und festziehen;
Spreizflansch 5 mit Hilfe der M3 Spannschraube 4 am Motor festklemmen.
Empfohlener Drehmoment max. 1,2 Nm.
Demontage des Gebers
Spannschraube 4 aufdrehen bis sich die Klemmung löst;
PG Deckel 1 von der Geberrückseite entfernen;
Rotorwelle 2 halten und dabei die M5 Schraube 3 zur Befestigung des Gebers
herausschrauben;
ACHTUNG: den Geber bei der Demontage nicht mechanisch
belasten!
Geber durch einschrauben der M6 Schraube mit Vorsicht von der
Rotorwelle 2 abziehen. Um gegen Schaden am M5 Gewinde vorzubeugen kann
ein M5 Gewindestift vor der M6 Schraube eingeschraubt werden.
Cable shield connection. We suggest gathering the shielding wires together
and fixing them by means of a hexagonal metal gland crimped 25 mm from the
connector. Be sure that the gland is in tight contact with the encoder's
enclosure. Prevent the shielding wires from coming in contact with the internal
EC-ASB/CB62-xx connection cable available on request. To be ordered
separately. Available length xx = 1 m, 4 m or 7 m.
Installation has to be carried out with power supply disconnected.
L'installazione deve essere eseguita in assenza di tensione.
Der Anschluss darf nur bei ausgeschalteter Versorgungsspannung erfolgen.
La instalación sólo debe ser efectuada en ausencia total de tensión.
Le montage du dispositif doit être effectué en absence totale de tension.
electronics.
98414-G06-14-LF
male frontal side
maschio lato contatti
Aufsicht Stiftseite
macho lado contactos
mâle côté contacts

Verwandte Anleitungen für Lika ASB62


Inhaltszusammenfassung für Lika ASB62
- Seite 1 ROTACOD Absolute encoders ASB62 Series Complete documentation at www.lika.biz Warning: encoders having order code ending with "/Sxxx" may have mechanical and electrical characteristics different from standard and be supplied with additional documentation for special connections (Technical Info). Attenzione: gli encoder con codice di ordinazione finale “/Sxxx” possono avere caratteristiche meccaniche ed elettriche diverse dallo standard ed essere provvisti di documentazione aggiuntiva per cablaggi speciali (Technical info).
- Seite 2 la Société Lika Electronic nie toute responsabilité pour tout dommage ou blessure que l'utilisateur peut encourir à la suite de la BiSS C-mode + 2048 PPR sine-cosine signals SC Shaft diameter (mm) non-observance des normes de sécurité.