Herunterladen Inhalt Inhalt Diese Seite drucken

Werbung

Verfügbare Sprachen
  • DE

Verfügbare Sprachen

  • DEUTSCH, seite 15
4340z
4 0
Downloaded from
www.Manualslib.com
manuals search engine

Werbung

Inhaltsverzeichnis
loading

Inhaltszusammenfassung für Concord 4340z

  • Seite 1 4340z Downloaded from www.Manualslib.com manuals search engine...
  • Seite 2 ENGLISH FRANÇAIS CONCORD 4340z DEUTSCH Quick Start Guide ESPAÑOL ITALIANO NEDERLANDS PORTUGUÊS Downloaded from www.Manualslib.com manuals search engine...
  • Seite 3 CAMERA COMPONENTS Front Viewfinder Flash Self-portrait mirror Battery/Memory Card Door Self-Timer/Red-Eye Reduction LED Lens Rear Flash Ready LED Auto Focus (AF) LED Viewfinder button W (zoom out) button T (zoom in) button Up button/ Flash/ Erase Right button/ Quick View SET button Left button/ Macro...
  • Seite 4: Installing The Batteries

    Side DC IN terminal USB port INSTALLING THE BATTERIES Insert two (2) AA-size alkaline batteries (included with the camera). 1. Be sure that the camera power is off. 2. Slide the battery/memory card door in the direction of the arrow, and lift it open. 3.
  • Seite 5: Turning The Power On / Off

    INSTALLING AN SD CARD 1. Turn off the camera. 2. Slide the Battery/Memory Card door in the direction of the arrow to open the door. 3. Insert the memory card as shown in the diagram. TURNING THE POWER ON / OFF Press and hold the POWER button for more than 1 second to turn the camera on.
  • Seite 6 Down Button ( • To set Continuous Shot in Shooting Mode. • To set Self-Timer in Shooting Mode and Video Mode. • To move the cursor down when MENU screen is shown. Left Arrow ( • To set Macro shooting in Shooting Mode and Video Mode. •...
  • Seite 7 REVIEWING THE IMAGE AFTER SHOOTING The quick playback function is available in both Shooting Mode and Video Mode. 1. Press to view the just captured photo or video clip. • To delete the file, press . Then press select YES or NO, and then press SET to confirm. 2.
  • Seite 8: Using The Flash

    USING THE FLASH Use the flash according to the guidelines below. The camera judges if a flash is required. If the Auto environment is too dark, the flash will fire. Force On The flash always fires. Force Off The flash does not fire. The camera will automatically detect when the Red-eye reduction, Auto flash is needed and the flash will fire after a short...
  • Seite 9: Composants De L'appareil

    COMPOSANTS DE L’APPAREIL Avant Viseur Arriére Viseur Dessus Déclencheur Bouton On/Off Downloaded from www.Manualslib.com manuals search engine...
  • Seite 10: Installation Des Piles

    Côté Branchement courant continu Port USB INSTALLATION DES PILES Placez deux (2) piles alcalines AA (livrées avec l’appareil photo). 1. Vérifiez que l’appareil ne soit pas en marche. 2. Faites glisser le volet du compartiment de la carte-mémoire/des piles dans le sens indiqué par la flèche et soulevez-le pour ouvrir le compartiment.
  • Seite 11: Installation D'une Carte Sd

    INSTALLATION D’UNE CARTE SD 1. Eteignez l’appareil. 2. Faites glisser le volet du compartiment de la carte-mémoire/des piles dans le sens indiqué par la flèche pour ouvrir le volet. 3. Insérez la carte SD comme indiqué dans le diagramme. MISE EN MARCHE/ARRÊT Appuyez sur le bouton Mise en marche et maintenez-le enfoncé...
  • Seite 12: Utilisation Du Zoom

    Bouton bas ( • Pour entrer dans le mode Prise de vue continue dans Mode prise de vue. • Pour régler le retardateur en mode Prise de vue et en mode Vidéo. • Pour déplacer le curseur vers le bas lorsque l’écran de MENU s’affiche. Flèche vers la gauche ( •...
  • Seite 13 AFFICHAGE D’UNE IMAGE APRÈS UNE PRISE DE VUE RAPIDE La lecture rapide est disponible dans chaque mode de prise de vues 1. Appuyez sur pour afficher la photo ou la vidéo enregistrée. • pour effacer le fichier, appuyez sur . Appuyez sur pour sélectionner OUI ou NON, puis sur SET pour confirmer.
  • Seite 14: Utilisation Du Flash

    UTILISATION DU FLASH L’appareil photo dispose de plusieurs modes de flash. L’appareil détermine si le flash est nécessaire. Si Auto l’environnement est trop sombre, le flash se déclenche. Le flash se déclenche toujours. Forcé Le flash ne se déclenche pas. Coupé...
  • Seite 15: Kamerakomponenten

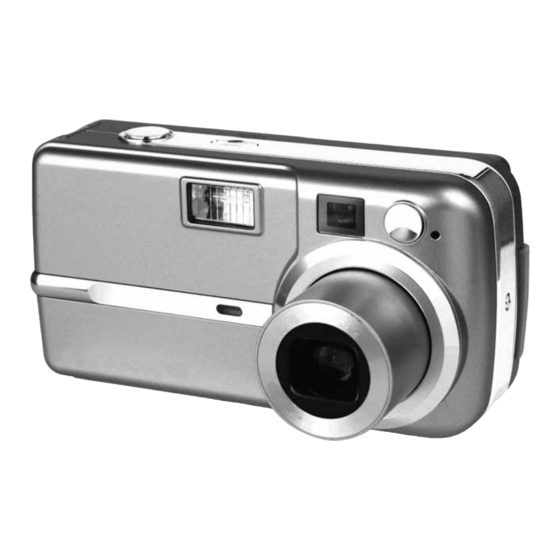
    KAMERAKOMPONENTEN Vorderseite Bildsucher Blitz Batterie/Speicherkarten- Selbstportrait-Spiegel Deckel Selbstauslöser/Rote- Augen-Reduzierungs-LED Objektiv Rückseite Blitzbereitschafts-LED Auto-Fokus-LED (AF) ANZEIGE-Taste W Zoom-Taste (Verkleinern) Bildsuche T Zoom-Taste (Vergrößern) Pfeiltaste nach oben/ Blitz/ Löschen Rechte Taste/ Quick View EINST.-Taste Linke Taste/ Macro Antriebsmodus Pfeiltaste nach unten/ MENÜ-Taste LCD-Anzeige Kameramodus-Taste Stativaufnahme...
  • Seite 16: Batterien Einlegen

    Seite DC-IN-Anschluss USB-Anschluss BATTERIEN EINLEGEN Legen sie zwei (2) AA Alkaline Batterien ein (im Lieferumfang enthalten). 1. Sie müssen stets sicherstellen, dass die Kamera ausgeschaltet ist. 2. Den Batterie/Speicherkarten-Deckel in Pfeilrichtung schieben und zum Öffnen anheben. 3. Zwei AA Batterien so einlegen, dass Plus-(+) und Minuspole (-) mit der Polaritätsangabe auf der Innenseite des Batteriedeckels übereinstimmen.
  • Seite 17: Sd-Karte Einlegen

    SD-KARTE EINLEGEN 1. Die Kamera ausschalten. 2. Den Batterie/Speicherkarten-Deckel in Pfeilrichtung schieben und zum Öffnen anheben. 3. Die Speicherkarte wie in der Abbildung gezeigt einlegen. STROMZUFUHR EIN-/AUSSCHALTEN Taste Netztaste drücken und 1 Sekunde lang gedrückt halten, um die Kamera einzuschalten. Die Kamera ausschalten Die Taste Power drücken, um Kamera auszuschalten.
  • Seite 18: Zoomfunktion Verwenden

    Pfeiltaste nach unten ( • Einstellen der Serienbildaufnahme im Aufnahmemodus. • Einstellen des Selbstauslösers im Aufnahme- und Videomodus. • Bewegen des Cursors im MENU-Bildschirm nach oben. Pfeiltaste nach links ( • Einstellen der Makroaufnahme im Aufnahme- und Videomodus. • Bewegen des Cursors im MENU-Bildschirm nach oben. Taste SET •...
  • Seite 19: Wiedergabe Eines Bilds Nach Der Aufnahme

    WIEDERGABE EINES BILDS NACH DER AUFNAHME Die schnelle Wiedergabefunktion ist sowohl im Aufnahme- als auch im Videomodus möglich. 1. Tasten drücken, um das gerade aufgenommene Foto oder den Videoclip anzuzeigen. • Zum Löschen der Datei . drücken. Drücken Sie dann , um Ja oder Nein zu wählen und danach SET zur Bestätigung.
  • Seite 20: Mit Blitz Fotografieren

    MIT BLITZ FOTOGRAFIEREN Den Blitz gemäß den folgenden Richtlinien verwenden. Die Kamera entscheidet, ob der Blitz erforderlich ist. Bei Automatisch unzureichenden Lichtverhältnissen wird der Blitz ausgelöst. Der Blitz wird bei jedem Bild ausgelöst. Von Hand eingeschaltet Der Blitz wird nicht ausgelöst. Von Hand ausgeschaltet Die Kamera ermittelt automatisch ob der Blitz erforderlich Rote-Augen-Reduzierung,...
  • Seite 21: Componentes De La Cámara

    COMPONENTES DE LA CÁMARA Vista de frente Visor Flash Espejo para autorretrato Tapa batería/tarjeta de memoria Disparador automático/ LED para reducción de ojos rojos Lente Vista posterior LED enfoque LED de flash listo automático (AF) Botón W Botón zoom (alejar) Visor T Botón zoom (acercar) Botón subir/...
  • Seite 22: Colocación De Las Baterías

    Vista lateral Terminal entrada CC Puerto USB COLOCACIÓN DE LAS BATERÍAS Inserte dos (2) baterías alcalinas tipo AA (incluidas con la cámara). 1. Verifique que la alimentación de la cámara esté apagada. 2. Deslice la tapa de la batería/tarjeta de memoria en la dirección de la flecha y déjela abierta. 3.
  • Seite 23 INSTALACIÓN DE TARJETA SD 1. Apague la cámara. 2. Deslice la tapa de la batería/tarjeta de memoria en la dirección de la flecha para abrirla. 3. Inserte la tarjeta de memoria tal como se muestra en el diagrama. ENCENDIDO / APAGADO Presione el botón de encendido durante más de 1 segundo para encender la cámara.
  • Seite 24 Botón bajar ( • Para establecer la toma continua en modo toma. • Para establecer el Disparador automático en modo Toma y modo Vídeo. • Para mover el cursor hacia abajo cuando se muestra la pantalla MENU. Flecha izquierda ( •...
  • Seite 25 REVISIÓN DE UNA IMAGEN DESPUÉS DE TOMARLA La función de repetición rápida está disponible en el modo Toma y en el modo Vídeo. 1. Presione para ver la fotografía o el corto de vídeo que acaba de capturar. • Para borrar el archivo, presione .
  • Seite 26 UTILIZACIÓN DEL FLASH Utilice el flash de acuerdo con la siguiente guía. La cámara decide si es necesario el uso del flash. Auto Si el entorno es demasiado oscuro, se dispara. Activación forzada El flash se dispara siempre. Desactivado El flash no dispara. La cámara detecta automáticamente si es necesario Automático, reducción de el uso del flash y éste se dispara tras una breve...
  • Seite 27: Componenti Della Fotocamera

    COMPONENTI DELLA FOTOCAMERA Parte anteriore Mirino Portello Flash batterie/scheda SD Specchio autoritratto Spia del sistema riduzione effetto occhi rossi/Autoscatto Obiettivo Parte posteriore Spia di flash pronto Spia della messa a fuoco automatica Mirino W Pulsante di riduzione Pulsante DISP T Pulsante di ingrandimento Pulsante spostamento verso líalto/ Flash/...
  • Seite 28: Installazione Delle Batterie

    Parte laterale Morsetto DC IN Porta USB INSTALLAZIONE DELLE BATTERIE Inserire due (2) batterie alcaline tipo AA (incluse con la fotocamera). 1. Accertarsi che la fotocamera sia spenta. 2. Fate scorrere il portello batterie/scheda memoria come indicato dalla freccia e poi sollevatelo. 3.
  • Seite 29 INSTALLAZIONE SCHEDA SD 1. Spegnere la fotocamera. 2. Aprire il portello del vano batterie/scheda memoria facendolo scorrere nella direzione della freccia e poi sollevandolo. 3. Inserire la scheda memoria come indicato nell’immagine. ACCENSIONE / SPEGNIMENTO FOTOCAMERA Per accendere la fotocamera, tenere premuto il pulsante di accensione per circa 1 secondo.
  • Seite 30: Uso Della Funzione Zoom

    Pulsante verso il basso ( • Per impostare scatto continuo in modalità di scatto. • Per impostare l’autoscatto in modalità di scatto e modalità video. • Per muovere il cursore verso il basso quando è visualizzato il MENU. Freccia a sinistra ( •...
  • Seite 31 RIPRODUZIONE DI UN’IMMAGINE DOPO LO SCATTO La funzione di riproduzione rapida è disponibile sia in modalità di scatto che in modalità video. 1. Premere per visualizzare l’immagine o il video clip appena acquisito. • Per eliminare il file, premere . Quindi premere per selezionare SÌ...
  • Seite 32: Uso Del Flash

    USO DEL FLASH Utilizzare il flash in conformità alle linee guida di seguito riportate La fotocamera determina se l’utilizzo del flash è Auto necessario. Se l’ambiente è troppo scuro, il flash scatta. Force On Il flash si accende sempre. Force Off Il flash non si accende La fotocamera determina automaticamente se il flash è...
  • Seite 33 CAMERA ONDERDELEN Voorkant Beeldzoeker Flits Zelfportretspiegel Batterij/ Geheugenkaartklepjer Zelfontspanner/ Lampje Rode-ogen Lens Achterkant Lampje Flitser gereed Auto-focus (AF) lampje Beeldzoeker knop W-knop(uitzoomen) T-knop(inzoomen) Omhoog/ Flits/ Verwijder Rechts / Quick View SET knop Links / Macro Omlaag / Drivestand knop LCD scherm Camerastand-knop Statiefaansluit Bovenkant...
  • Seite 34: De Batterijen Plaatsen

    Zijkant DC IN ingang USB-poort DE BATTERIJEN PLAATSEN Plaats twee(2) AA-formaat alkaline batterijen (inclusief met de camera). 1. Zorg dat de camera uitstaat. 2. Schuif het klepje van de batterij/geheugenkaart in de richting van de pijl en licht hem op om het batterijvak te openen.
  • Seite 35: Een Sd Kaart Plaatsen

    EEN SD KAART PLAATSEN 1. Zorg dat de camera uit is geschakeld. 2. Schuif het klepje van de batterij/geheugenkaart in de richting van de pijl om het batterijvak te openen. 3. Plaats de geheugenkaart in overeenstemming met de afbeelding. DE CAMERA AAN- EN UITZETTEN De Aanzet-knop indrukken en langer dan 1 seconde vasthouden om de camera aan te zetten.
  • Seite 36 Omlaag-knop ( • Om binnen de Fotografeerstand Continu-opname in te stellen. • Om binnen de Fotografeerstand en Filmstand Zelfontspanner in te stellen. • Om de cursor omlaag te verplaatsen als MENU-scherm weergegeven wordt. Pijl naar links ( • Om binnen de Fotografeerstand en Filmstand Macro-opname in te stellen. •...
  • Seite 37 DE BEELDEN NA OPNAME WEERGEVEN De beelden na opname weergeven De functie Snel weergeven is zowel in Fotografeerstand als in de Filmstand beschikbaar. 1. Druk op om de net vastgelegde foto of kort filmpje te bekijken. • Druk op om het desbetreffende bestand te wissen. Druk vervolgens op en op om YES (Ja) of...
  • Seite 38 DE FLITS GEBRUIKEN Gebruik voor de flits de volgende richtlijnen: De camera beoordeelt of de flitser vereist is.Als de Auto omgeving te donker is zal de flitser afgaan. Flits aan De flits flitst altijd. Flits uit De flits flitst niet. De camera zal automatisch vaststellen wanneer de Rode-ogen beperking, flitser vereist is en de flitser zal naar een korte vertraging...
  • Seite 39 COMPONENTES DA CÂMERA Frente Mira ótica Flash Espelho de auto-retrato Bateria/ Porta do cartão de Timer automático/LED de Redução de Olho Vermelho Lentes Fundo LED de Prontidão do Flash LED de Foco Automático Botão W (diminuir zoom) Botão Mira ótica Botão T (aumentar zoom) Botão para cima/ Flash/ Apagar...
  • Seite 40 Lado Terminal DC IN porta USB INSTALANDO AS BATERIAS Insira duas (2) pilhas alcalinas, tamanho AA (incluídas com a câmera). 1. Certifique-se de que a câmera está desligada. 2. Deslize a porta da pilha/cartão de memória na direção da seta e abra. 3.
  • Seite 41 INSTALANDO UM CARTÃO SD 1. Desligue a câmera. 2. Deslize a porta da pilha/cartão de memória na direção da seta e abra. 3. Insira o cartão de memória como mostrado no diagrama. LIGANDO E DESLIGANDO Pressione e segure o botão LIGAR durante mais do que 1 segundo para ligar a câmera.
  • Seite 42 Botão para baixo ( • Para configurar foto contínua no modo de fotografar. • Para configurar o Timer automático no modo de fotografar e no modo de vídeo. • Para mover o cursor para baixo quando a tela do menu é mostrada. Seta para esquerda ( •...
  • Seite 43 REVENDO A IMAGEM APÓS FOTOGRAFAR A função de reprodução rápida está disponível tanto no modo de fotografar como no modo de vídeo. 1. Pressione to visualizar a foto ou vídeo que acabou de ser capturado. • Para excluir o arquivo, pressione .
  • Seite 44 USANDO O FLASH Use o flash de acordo com as informações abaixo. A câmera decide se o flash é necessário. Se o Automático ambiente for muito escuro, o flash disparará. O flash sempre dispara. Forçado ligado Forçado desligado O flash não dispara. A câmera detecta automaticamente quando é...
  • Seite 45 Visit Concord on the Internet www.concord-camera.com Version 1.1 516059-01 Concord 4340z Quick Start Guide Copyright 2006 Concord Camera Corp. Downloaded from www.Manualslib.com manuals search engine...

Inhaltsverzeichnis