Herunterladen Inhalt Inhalt Diese Seite drucken

Werbung

Verfügbare Sprachen
  • DE

Verfügbare Sprachen

  • DEUTSCH, seite 31

Werbung

Inhaltsverzeichnis
loading

Inhaltszusammenfassung für Yukon Photon RT

  • Seite 3 Riflescope Photon RT........................1-22 Viseur Photon RT.........................23-46 Zielfernrohr Photon RT.........................47-70 Visor Photon RT...........................71-94 ITALIANO Cannocchiale Photon RT......................95-118 Прицел Photon RT........................119-142...
  • Seite 4: Package Contents

    (visible range) (invisible range) used for operation in total darkness. Operational characteristics Tube diameter, mm Photon RT digital riflescopes are designed for hunting, sports shooting, security, general observation. Operating voltage, V / Battery 3.8-6.3V (4xAA) 3.8-6.3V (4xAA) 3.8-6.3V (4xAA) 3.8-6.3V (4xAA) External power supply, V Max.
  • Seite 5: Description Of Controls

    Quick-release battery container DESCRIPTION OF CONTROLS Lightweight and compact Easy operation Button Operating mode Rotation Long press 1 short press 2 short press Suitable for day use Water resistant microUSB port Riflescope is off Turns riflescope on Turns Wi-Fi on Switches display off —...
  • Seite 6: Battery Installation

    Install the mounting rings (bought separately) on the riflescope's tube and tighten the screws with the help of a hex-nut wrench. If the eye relief is not sufficient, you can use mount Yukon SW-30 (#29048). Slide in four АА batteries so that the “+” and “-” match the polarity on the container.
  • Seite 7 To focus on the object being observed rotate the lens focusing ring (6). To change power level (from 1 to 10), rotate the controller. After this adjustment no further dioptre adjustment should be required, regardless of distance or other To turn the IR Illuminator off, rotate the controller to postion “off”. Upon turning the IR off, a crossed out factors.
  • Seite 8: Usb Connection

    USB Mass storage device DISPLAY OFF FUNCTION If this option is selected, the unit is detected by the PC as a flash card. The unit switches to USB power. This function deactivates the display, which allows you to eliminate light exposure caused by the glowing This option is designed for use when working with files saved in the unit's memory.
  • Seite 9: Operating Modes

    VIDEO mode ZOOM SOUND USB disconnection. Full magnification is shown with by special icon (i.e. 4.5x/9x or 6x/12x) In USB Mass storage device connection mode. on the display. 01:42 On disconnection the unit remains "off". The unit must be switched on to continue operation. To start or stop video recording, briefly press the REC (11) button.
  • Seite 10: Photo Mode

    IR Illuminator and brightness. In VIDEO mode the display shows the following information: REVIEW MODE is designed to review photo and video files (saved in the internal Flash memory) on the display. IR Illuminator power level – shown by the corresponding icon - Available Brightness File display order.
  • Seite 11 Video countdown timer File navigation: Unavailable functions. During file review some control functions are not available: Enter menu Leftwards - press the controller counterclockwise Video 00:05 review ZOOM control Rightwards - press the controller clockwise mode 5/123 File IR Illuminator control counter Briefly press the REC (11) button to start If the IR Illuminator was on, it turns off when entering the REVIEW mode.
  • Seite 12 Date format is displayed as: yyyy/mm/dd (2017/06/12) Photon RT unit via Wi-Fi to a smartphone or PC tablet. You can find further guidelines on Stream Vision Rotate the controller to select desired value (clockwise to increase the value; counterclockwise to on our web site www.yukonopticsglobal.com...
  • Seite 13 Time setup Selection of reticle shapes Enter the main menu with a long press of the controller. Enter the submenu with a brief press of the controller. Enter the submenu “Reticle type” rotating the controller. Time format is displayed as: “format mm/hh” (24 06:51) Rotate the controller to select the required time format - 24/AM/PM.
  • Seite 14: Maintenance And Storage

    Always store the unit in its carrying case in a dry, well-ventilated space. For prolonged storage, remove the About device batteries. This menu option shows the following service information about your riflescope: Name: Photon RT (name of the unit) TROUBLESHOOTING SKU: 263 1 9 (model number) The table below lists some potential problems that may occur when using the riflescope.
  • Seite 15 Problem Check Corrective action Problem Check Corrective action Check that the batteries are correctly fitted in Replace the batteries or fit the batteries The unit will not turn on. The aiming point shifts after riflescope is not mounted Check that the riflescope has been securely mounted, the battery compartment.
  • Seite 16 Problem Check Corrective action NOTES 4) Release the REC button and the controller. The original firmware is being installed which may take up to 1 min. After successful firmware installation display will steadily glow. 5) Disconnect the riflescope from the power supply (remove the batteries or disconnect an external power supply).
  • Seite 17: Contenu De L'emballage

    26393 26394 Modèle Photon RT 4.5х42 S RT 4.5х42 RT 6х50 S RT 6х50 Viseur Photon RT Conteneur de batterie supplémentaire Caractéristiques optiques: Étui de transport Pochette pour conteneur de batterie Grossissement optique, fois 4,5 / 9 4,5 / 9...
  • Seite 18 Conteneur de batterie de l'attache rapide FONCTIONNALITE DES ORGANES DE COMMANDE Léger et compact Utilisation facile Bouton Mode opératoire actuel Premier appui Autres appuis Rotation Appui long Adapté pour l’usage diurne court courts MicroUSB port imperméable L'appareil est éteint Allumez l'appareil Activez Wi-Fi Éteignez...
  • Seite 19: Installation Des Piles

    à l'aide d'une clé à six pans. Si le dégagement oculaire n'est pas suffisant, vous pouvez utiliser le indiquée à l'intérieur du couvercle; les piles LR06/AA rechargeables sont tolérées. montage Yukon SW-30 (#29048). Montez le viseur sur la barette de visée de votre fusil et rassurez-vous que sa fixation soit fiable. Mettez le Fermer le couvercle du compartiment à...
  • Seite 20 Un message “Switch off”, le comptage de temps, de 3 secondes à 0, apparaîtera sur l'afficheur et le Changement de niveau de puissance de l'illuminateur IR: dispositif s'arrêtera. Appuyez brièvement sur le régulateur pour le débloquer - les icônes de luminosité, d'IR et de Parvenez à...
  • Seite 21 Afin de pouvoir activer le zoom, faîtes un appui instantané sur le bouton ZOOM. L'arrêt de fonction DISPLAY OFF a lieu: Le changement de la valeur d'amplification totale se poursuit de façon cyclique lors de l'appui instantané L'afficheur s'enclenchera à nouveau lors de l'appui instantané sur le bouton ON. sur le bouton ZOOM briefly pressing the controller: Lors de la connexion de dispositif à...
  • Seite 22: Modes De Fonctionnement

    Le fonctionnement de dispositif se poursuit, toutes les fonctions En mode de connexion Power. sont accessibles. Une fois déconnecté du PC, l'appareil éteint. Une fois que l'appareil est déconnecté d'une power bank ou Pour effectuer le passage cyclique entre les options de adaptateur secteur, l'appareil passe automatiquement en batteries internes, si c'est le cas et la charge est connexion (USB->...
  • Seite 23 Mode VIDEO ZOOM Démarrez l'enregistrement vidéo en appuyant rapidement sur le bouton L'illuminateur IR et la luminosité REC (11). Au cours du fonctionnement de dispositif en mode VIDEO des informations suivantes apparaîssent sur 01:42 l'afficheur: Les fichiers vidéo sont sauvegardés dans la carte mémoire après l'arrêt de Disponible temps Réglage de Le niveau de puissance de l'illuminateur IR sous forme de l'icône...
  • Seite 24 PHOTO: Mode REVIEW – fichier vidéo Illuminateur IR Luminosité Durée de la vidéo Mode Grossissement total REVIEW-VIDEO 00:05 Compteur de Wi-Fi 2/123 fichiers Attention: en mode PHOTO l'enregistrement sonore La flèche de saut La flèche de saut vers la gauche n'est pas possible.
  • Seite 25 Confirmer la Annuler la La minuterie de comptage à rebours de la durée de vidéo s'arrête. MENU suppression suppression L'indicateur PLAY s'affiche à la place de l'indicateur PAUSE. du fichier du fichier Eléments de menu: Reprise de visionnage vidéo après la pause. Un deuxième appui Setting Wi-Fi instantané...
  • Seite 26 La valeur fixée est sauvegardée dans la mémoire de dispositif. Lors du démarrage de dispositif ultérieur la dernière valeur mémorisée s'affiche. La technologie Stream Vision permet de transférer l'image à partir de l'afficheur de dispositif Photon RT moyennant Wi-Fi vers le smartphone, soit vers la tablette.
  • Seite 27 Setting date Enregistrement sonore Cet élément est destiné à être utilisé pour l'enclenchement et le déclenchement d'enregistrement Accédez au sous-menu, en faisant un appui instantané sur le régulateur. sonore uniquement au cours de l'enregistrement vidéo. La date s'affiche en format: aaaa / mm / jj (2017/02/12) Choisissez la valeur voulue moyennant la rotation du régulateur - dans le sens horaire pour augmenter la Accédez au sous-menu, en faisant un appui instantané...
  • Seite 28 Appuyez sur votre appareil: longuement sur le régulateur pour accéder au menu Name: Photon RT (dénomination de l’appareil) Au centre de l’écran s’affiche croix auxiliaire (C) A d oite de l’icône apparaîtront: les flèches...
  • Seite 29: Entretien Et Stockage

    ACCESSORIES PROBLÈME CAUSE PROBABLE SOLUTION L'installation incorrecte des piles. Les piles sont complètement déchargées. Le viseur ne se met en Le viseur est équipé d'un rail Weaver (7) pour le montage des accessoires supplémentaires tels que illuminateurs marche. IR LED Pulsar-805/Pulsar-940/Pulsar- X850 (#79071/79076/79074) Les contacts dans le compartiment à...
  • Seite 30 PROBLÈME SOLUTION CAUSE PROBABLE SOLUTION CAUSE PROBABLE PROBLÈME Ajustez l’image en faisant La lentille objective n’est pas Veuillez-vous restaurer la version L'unité ne fonctionne pas une rotation de la molette 1) Branchez une alimentation externe ou insérez mise au point. originale du logiciel.
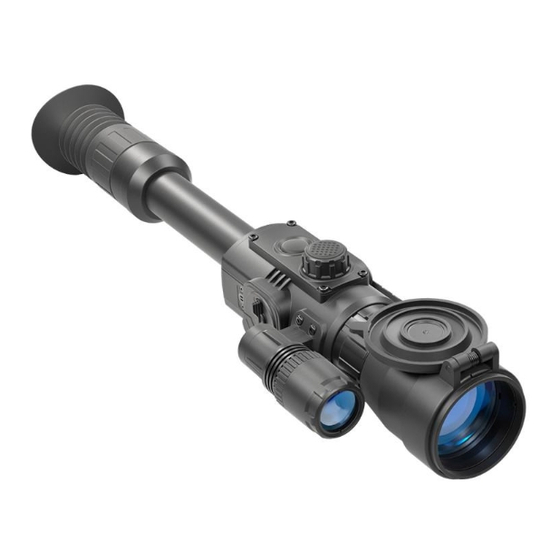
  • Seite 31 LCD / 640х480 LCD / 640х480 LCD / 640х480 Photon RT ist ein digitales Zielfernrohr, das für die Anwendung bei Nacht und Dämmerung bestimmt ist. Das EINGEBAUTER IR-STRAHLER Zielfernrohr ist mit einem elektronischen Absehen mit der Form- und Farbe-Umschaltoption versehen. Das Typ / Wellenlänge, nm...
  • Seite 32: Funktionen Der Bedienelemente

    Schnellspann-Batteriebehälter FUNKTIONEN DER BEDIENELEMENTE Leichtgewichtig und kompakt Einfache Bedienung Taste Betriebsmodus 1. kurze Betätigung 2. kurze Drehung Lange Betätigung Widerstandsfähig gegen helles Licht Betätigung Wassergeschützter microUSB-Anschluss Gerät ausgeschaltet Gerät einschalten Wi-Fi einschalten Bildschirm ausschalten — Aktualisierung der Software verfügbar (Display OFF)/ Kompatibel mit Stream Vision Modus Display Off Bildschirm einschalten...
  • Seite 33: Einlegen Der Batterien

    Drehen Sie die Schrauben mithilfe des Sechskantschlüssels zu. Falls der Austrittspupillenabstand nicht Legen Sie vier AA-Batterien der Markierung auf der inneren Seite des Batteriefachdeckels entsprechend ausreicht, können Sie die Schiene Yukon SW-30 (#29048) anwenden. ein. Das Zielfernrohr soll auf die Zielschiene ihres Gewehrs angebracht werden. Vergewissern Sie sich, dass das Gerät fest montiert ist.
  • Seite 34: Eingebauter Ir-Strahler

    Zum Ausschalten des Gerätes drücken Sie die Taste ON und halten Sie sie länger als 3 Sekunden Leistungsstärke des IR-Strahlers einstellen: gedrückt. Auf dem Display erscheint eine Meldung “Switch off”, die Zeitzählung von 3 bis 1 Sekunden Drücken Sie kurz den Kontroller, um es zu entsperren - die Symbole von Helligkeit, IR und und das Gerät schaltet aus.
  • Seite 35: Funktion Digitaler Zoom

    Die Videoaufnahme wird fortgesetzt (falls die Aufnahme vor der Einschaltung der Funktion DISPLAY OFF erfolgte). FUNKTION DIGITALER ZOOM Die Funktion Wi-Fi bleibt aktiv. Die Ausschaltung der Funktion DISPLAY OFF erfolgt: Diese Funktion ermöglicht den Vergrößerungsmodus Zoom zu nutzen. Im Display wird der Wert der Bei der kurzen Betätigung der Taste ON schaltet das Display wieder ein.
  • Seite 36 Power Abschaltung von USB. Beim Anschluss von einem USB Mass storage device Bei der Wahl dieser Variante wird der Computer vom Gerät als Bei der Abschaltung bleibt das Gerät um «ausgeschalteten» Zustand. Für den weiteren Betrieb ist das externe Stromspeisung genutzt. Im Display erscheint anstelle des Gerät einzuschalten.
  • Seite 37 VIDEO Modus ZOOM Die volle Vergrößerung wird auf dem Display als Piktogramm (z.B. 4,5x/9x IR-Strahler und Helligkeit. Im Modus VIDEO werden im Display folgende Informationen angezeigt: oder 6x/12x) angezeigt. 01:42 Leistungsstärke des IR-Strahlers als jeweiliges Verfügbare Helligkeits- Aufnahmezeit einstellung Zum Einschalten bzw. Ausschalten der Videoaufzeichnung betätigen Sie Piktogramm kurz die Taste REC (11).
  • Seite 38 REVIEW MODUS: Wiedergabe der aufgenommenen (auf dem internen Speicher des Gerätes REVIEW Modus – Videodate Dauer des Videos gespeicherten) Foto- und Videodateien auf dem Display. 00:05 Modus REVIEW-VIDEO Anzeigereihenfolge der Dateien. Beim Einschalten des REVIEW Modus wird im Display immer die 2/123 Dateizähler letzte gespeicherte Datei angezeigt.
  • Seite 39 Anzeige der Pause der Videowiedergabe: MENÜ 00:05 Dateilöschen 5/123 Dateilöschen bestätigen abbrechen Inhalt des Menüs Der Abwärtszähler der Videodauer stoppt. Die nächste kurze Betätigung der Taste REC ermöglicht die Wi-Fi-Einstellung Wiedergabe der Datei von der Stelle, an der die Auswahl der Aufnahmeauflösung Videowiedergabe unterbrochen wurde.
  • Seite 40 Stream Vision Mit dem Kontroller geben Sie den gewünschten Wert ein Mit der Stream Vision Technologie können Sie das Bild vom Display des Photon RT über Wi-Fi auf (Kontroller in den Uhrzeigersinn drehen - Wert erhöhen; Kontroller gegen den Uhrzeigersinn drehen- ein Smartphone bzw.
  • Seite 41 Zeit-Einstellung Auswahl des Absehens Gehen Sie ins Hauptmenü mit langer Betätigung des Kontrollers. Gehen Sie ins Untermenü mit kurzer Betätigung des Kontrollers. Gehen Sie ins Unter menü “Auswahl des Absehens” den Kontroller drehend. Das Datum wird im Format: Format MM / DD angezeigt (z.B. 24 06:51) Drehen Sie den Kontroller, um Sie das gewünschte Uhrzeitformat 24/AM/PM zu wählen.
  • Seite 42: Wartung Und Lagerung

    Dieser Menüpunkt zeigt die folgende Service-Information über Ihr Gerät: bei niedrigen Temperaturen gebraucht und in den warmen Raum gebracht wurde, lassen Sie es in der Name: Photon RT (Name des Geräts) Aufbewahrungstasche nicht weniger als 2-3 Stunden liegen, das ermöglicht, Kondensatbildung auf äußeren optischen Flächen zu vermeiden.
  • Seite 43: Fehlerbeseitigung

    Prüfung Fehlerbeseitigung FEHLERBESEITIGUNG Beim deutlichen Bild des Staub oder Kondensat auf Wischen Sie die optischen Außenflächen mit dem In der Tabelle ist die Liste der möglichen Probleme, die bei dem Betrieb des Zielfernrohrs entstehen können, Absehens bleibt das Bild des optischen Außenflächen des weichen Baumwolltuch ab.
  • Seite 44 BEMERKUNGEN Prüfung Fehlerbeseitigung Es gibt zu viele WLAN-Netzwerke Um stabile WLAN-Leistung zu gewährleisten, tragen in der Umgebung, wo das Gerät Sie das Gerät zu einem Gebiet mit wenigen oder sich befindet, was kann die keinen Wi-Fi-Netzwerke. Signalstörungen verursachen. Das Gerät funktioniert Bitte stellen Sie die 1) Schließen Sie eine externe Stromspeisung oder legen Sie nicht ordnungsgemäß...
  • Seite 45: Contenido Del Embalaje

    Resolución del sensor, pixel 768х576 768х576 768х576 768х576 Photon RT es un visor digital diseñado para el uso en el crepúsculo y por la noche. Los visores tienen un LCD / 640х480 LCD / 640х480 LCD / 640х480 LCD / 640х480 Tipo / Resolución...
  • Seite 46: Descripción De Los Controles

    Contenedor de baterias de desenganche rápido DESCRIPCIÓN DE LOS CONTROLES Ligero y compacto Fácil operación Botón Modo de funcionamiento Primera Segundo Pulsación Rotación Resistente a la luz brillante (se puede usar por el día) pulsación breve pulsación breve prolongada actual Puerto microUSB impermeable Encender dispositivo Activar Wi-Fi...
  • Seite 47: Alimentación Externa

    Introduzca dos pilas R-06 (AA) de acuerdo con la polaridad "+" "-" indicada dentro de la tapa. con ayuda de la llave hexagonal. Si el alivio pupilar es insuficiente, se puede utilizar el montaje Yukon Cierre la tapa y gire la manivela 90 grados a la derecha.
  • Seite 48 Logre una imagen nitida de los pictogramas en la pantalla girando el ruedo de ajuste dióptrico del Gire el regulador para ajustar el nivel de potencia (de 1 hasta 10). ocular (5). Para apagar el Iluminador IR, gire el regulador en la posición “off”. Al apagar el IR, el icono aparece Girando el objetivo (6) logre una imagen nítida del objeto de observación.
  • Seite 49 USB Mass storage device Al elegir la presente opción, el dispositivo es reconocido por el ordenador como tarjeta flash. El dispositivo FUNCIÓN DISPLAY OFF pasa a la alimentación desde el enchufe de USB. Esta función está destinada para apagar la pantalla, lo que permite eliminar el desmascaramiento de la La presente opción está...
  • Seite 50 Desconexión del enchufe USB. En el modo de conexión de USB Mass storage device Modo VIDEO ZOOM SONIDO Para conectar o desconectar la grabación de video presione Al desconectar, el dispositivo queda en estado «apagado». Para el funcionamiento consiguiente es brevemente el botón REC (11).
  • Seite 51 Disponible tiempo El iluminador de IR y la luminosidad. Durante el funcionamiento Ajuste de MODO REVIEW – es el modo de muestra de los archivos de foto y video (que se conservan en la memoria de grabación la luminosidad del dispositivo en el modo VIDEO en la pantalla se representa la interna del dispositivo) en la pantalla.
  • Seite 52 Temporizador de cuenta inversa Navegación entre los archivos: Borrado de los archivos con una confirmación. Con una presión breve del botón ON en la pantalla de la duración del video. apareceuna petición de confirmación del borrado. A la izquierda – girar el regulador en sentido Modo Para elegir la orden “Yes”...
  • Seite 53 Por medio de la tecnología Stream Vision Ud. puede transmitir la imagen desde la pantalla del visor Ajuste de Wi-Fi Photon RT a través de Wi-Fi a un smartfono / Tablet PC. Instrucciones más detalladas sobre el funcionamiento de Stream Vision, Ud. puede encontrarlas en La presente posición permite ajustar la contraseña al punto de acceso.
  • Seite 54 Para entrar al submenú presione brevemente el regulador (3). Ajuste de la hora Girando el regulador elija la resolución. Entre al submenú por medio de una presión breve del regulador (3). Confirme con una presión breve del el regulador. La fecha se muestra como: formato hora / minuto (ej. 24 06:51) Girando el regulador, elija el formato necesario de la hora 24/AM/PM.
  • Seite 55 Confirme la elección una presión breve del regulador. Reglaje de tiro de «un disparo» Al conectar la grabación del sonido, en la pantalla aparece el pictograma . Al desconectarlo el El visor dispone de un método de reglaje de tiro de «un disparo» El reglaje de tiro puede realizarse a pictograma aparece.
  • Seite 56: Solución De Problemas

    El visor se puede utilizar dentro de un amplio rango de temperaturas desde -15 °C hasta +50 °C. Sin embargo, si el visor ha sido introducido desde el frío a un local abrigado - no lo encienda en el Name: Photon RT (el nombre del dispositivo) curso de 2 a 3 horas.
  • Seite 57 Comprobar Comprobar Problema Medida correctora Problema Medida correctora Baja calidad de la Revise, están o no ajustados Ajuste el instrumento en conformidad con las instrucciones. El dispositivo se encuentra fuera de Desplaza el dispositivo a una zona de visión directa No hay o se imagen.
  • Seite 58 LCD / 640х480 LCD / 640х480 Photon RT è un cannocchiale digitale progettato per l'utilizzo nel crepuscolo e di notte. Il cannocchiale è dotato di ILLUMINATORE INFRAROSSO INCORPORATO un reticolo elettronico con numerose varianti di forma e colore. I cannocchiali possono essere montati con gli...
  • Seite 59 Porta batterie a rilascio veloce FUNZIONALE DEGLI ELEMENTI DI COMMANDO Compatti dimensioni e basso peso Facile funzionamento Lunga pressione Rotazione Adatto all'impiego in pieno giorno Pulsante Regime di lavoro 1-ma breve pressione 2-da breve pressione Micro porta USB resistente all'acqua Dispositivo spento Accensione Wi-Fi...
  • Seite 60: Inserimento Delle Batterie

    Mettete attacchi (si acquistano a parte) sul cannocchiale e bloccateli con le viti a chiave esagonale. Se la Inserire il porta batterie nell'apposita sede, ruotare il tappo di 90° in senso orario. distanza pupillare non è sufficiente, si può usare l’attacco Yukon SW-30 (#29048). Il livello di carica della batteria è visualizzato nella barra di stato.
  • Seite 61 Per cambiare il livello di potenza (da 1 a 10), ruotare il regolatore. Ruotando la ghiera di messa a fuoco della lente (6) ottenete l'immagine nitida. Per spegnere l'illuminatore IR ad infrarossi, ruotare il regolatore in posizione “off”. Quando si spegne, In futuro in un modo independente dalla distanza ed altre condizioni non c'e bisogno piu' di girare l'anello appare l'icona con il simbolo di cancellazione della regolazione diottrica dell'oculare del cannocchiale.
  • Seite 62: Connessione Usb

    USB Mass storage device FUNZIONE DISPLAY OFF Se viene scelto questa variante l'apparecchio si riconosce dal computer come flash-card. L'apparecchio La presente funzione permette di disattivare il display, ciò che permette di eliminare il demascheramento passa all'alimentazione USB. con il display luminoso. La presente variante è...
  • Seite 63 Per attivare o disattivare il regime di videoregistrazione premete Regime VIDEO ZOOM SUONO Disattivazione di USB. brevemente il pulsante REC (11). Nel regime di connessione USB Mass storage device 01:42 Le videoregistrazioni vengono salvate nella memoria Flash incorporata L'apparecchio rimane “bloccato”. Per continuare il lavoro bisogna abilitarlo. dopo la disattivazione della registrazione o spegnimento dell'apparecchio.
  • Seite 64 Microfono incorporato REGIME REVIEW – il regime serve per sfogliare sul display le foto ed i video registrati. Modalità di visualizzazione di file. Quando viene attivato il regime Review sul display si visualizza Quando il microfono incorporato è attivo, vi è una segnalazione nell'angolo in alto a destra sul display. sempre l'ultimo file registrato.
  • Seite 65 Regime REVIEW – file video La pausa del video corrente – la breve Confermare 00:05 cancellazione pressione del pulsante REC. 5/123 Annullare di file cancellazione di file Durata video L'indicazione della pausa del review del video: Regime REVIEW - VIDEO 00:05 Contatore di file 2/123...
  • Seite 66 Tecnologia Stream Vision L'uscita dal menu - tenere premuto il controller per due secondi; l'uscita automatica – dopo 10 secondi di Con la tecnologia Stream Vision potere trasmettere l'immagine dal display dell'apparecchio Photon RT inattività nel menu. via Wi-Fi sul smartphone o sul tablet.
  • Seite 67 Scelta della risoluzione della registrazione Per salvare la data e passare all'impostazione di ora premete e tenete premuto il controller più di un La presente voce permette di scegliere la risoluzione della registrazione video o foto a seconda del regime secondo .
  • Seite 68 Confermate la scelta con la breve pressione del controller. La taratura con un colpo Quando la registrazione dell'audio è attiva sul display appare il pittogramma . Quando la funzione è Il cannocchiale permette la taratura con il modo di “uno sparo” La taratura dovrebbe essere eseguita in disattivata il pittogramma si visualizza.
  • Seite 69: Manutenzione E Conservazione

    Questa opzione di menu mostra il seguente servizio informazioni sul dispositivo: Conservare lo strumento nella sua custodia in ambiente secco e ben ventilato. In caso di lunga inattività Name: Photon RT (nome dell'unità) togliere la batteria d'alimentazione. SKU:...
  • Seite 70 Problema Controllo Azione correttiva Problema Controllo Azione correttiva L'unità non funziona Assicurarsi che l'alimentatore Ricaricare la batteria (se indicato). E' assente o sparisce La presenza di troppe reti Wi-Fi Per garantire una corretta e stabile prestazione del Wi-Fi, con una fonte di fornisca energia.
  • Seite 71: Комплект Поставки

    +/-4 +/-4 +/-4 +/-4 Макс. дистанция наблюдения животного ростом 1,7 м (ИК-осветитель вкл.), м ОПИСАНИЕ Электронный блок Прицелы ночного видения Photon RT предназначены для наблюдения и ведения прицельной стрельбы в Тип матрицы CMOS CMOS CMOS CMOS Разрешение камеры, пикселей 768х576 768х576...
  • Seite 72 Быстросменный контейнер батарей ФУНКЦИОНАЛ ОРГАНОВ УПРАВЛЕНИЯ Легкий и компактный Простое управление Кнопка Режим работы 1 короткое нажатие 2 короткое нажатие Вращение Длительное Возможность использования днем нажатие Влагозащищенный порт MicroUSB Прибор выключен Включение прибора Включение Wi-Fi Выключение дисплея — Обновляемое ПО (Display OFF)/ Совместим...
  • Seite 73: Установка Батарей

    закрутите винты с помощью шестигранного ключа. В том случае, если удаление выходного зрачка Внимание! Извлеките контейнер батарей с установленными батареями из прибора ночного будет недостаточным, Вы можете использовать кронштейн Yukon SW-30 (#29048). видения при хранении или транспортировке. Установите прицел на прицельную планку Вашего оружия и убедитесь, что он надежно...
  • Seite 74 В условиях недостаточной ночной освещенности для повышения качества наблюдения включите ВКЛЮЧЕНИЕ И НАСТРОЙКА ИЗОБРАЖЕНИЯ встроенный ИК-осветитель. Подробное описание работы ИК-осветителя в разделе 10. Откройте крышку (2) объектива. Для фокусировки ИК-осветителя вращайте бленду (13) осветителя. Включите прицел кратким нажатием кнопки ON (4). Через несколько секунд на дисплее появится Для...
  • Seite 75 В случае необходимости юстировки светового пятна ИК-осветителя по вертикали или горизонтали поверните стопорное кольцо (12) на 5-10 град. против часовой стрелки; путем поперечного ФУНКЦИЯ ОТКЛЮЧЕНИЯ ДИСПЛЕЯ (DISPLAY OFF) смещения бленды (13) совместите пятно с изображением, наблюдаемым через прицел. Зафиксируйте стопорное кольцо (12). Данная...
  • Seite 76 ПОДКЛЮЧЕНИЕ USB Вариант Вариант подключения подключения Предусмотрена возможность подключения прицела к компьютеру через порт micro USB (8). При (активный) (не активный) этом прицел определяется компьютером автоматически, установка драйверов не требуется. Варианты подключения. 960p 04:23pm При подключении к компьютеру включенного прицела с помощью USB-порта предлагается один из...
  • Seite 77: Режимы Работы

    Режим VIDEO ZOOM ЗВУК Отключение USB. РЕЖИМ VIDEO В режиме подключения USB Mass storage device Video – режим записи видео (режим по умолчанию). 01:42 При отключении прицел остается в «выключенном» состоянии. Для дальнейшей работы Режим Video обозначается на дисплее пиктограммой необходимо...
  • Seite 78 ИК-осветитель и яркость. Индикация функци на дисплее в режиме PHOTO: й Во время работы прицела в режиме VIDEO на дисплее отображается следующая информация: ИК-осветитель Яркость Уровень мощности ИК-осветителя в виде соответствующей пиктограммы. Полное увеличение Wi-Fi Если ИК-осветитель выключен, пиктограмма отсутствует. Доступное...
  • Seite 79 Режим Режим REVIEW – фотоснимок Навигация между файлами: REVIEW-PHOTO Счетчик 2/123 Влево – вращение контроллера против часовой стрелки. файлов Вправо – вращение контроллера по часовой стрелке. Стрелка Стрелка перелистывания перелистывания Для просмотра видеофайла кратко нажмите кнопку REC (11). файлов файлов Индикация...
  • Seite 80 Подтвердить Отклонить Удаление файлов с подтверждением. Работа контроллера в меню: удаление удаление При коротком нажатии кнопки ON на дисплее появляется запрос о длительное нажатие – вход в основное меню, короткое нажатие – вход в подменю, подтверждении удаления файла. 00:05 5/123 короткое...
  • Seite 81 Посредством технологии Stream Vision Wi-Fi Вы можете транслировать изображение с прицела Данный пункт позволяет настроить текущую дату и время, а также формат отображения времени. Photon RT через Wi-Fi на смартфон либо планшет. Подробные инструкции по работе Stream Vision Вы можете найти на нашем сайте...
  • Seite 82 Вращением контроллера выберите нужное значение часа (по часовой стрелке - увеличение Выбор метки из памяти прицела значения; против часовой стрелки – уменьшение значения). Войдите в подменю кратким нажатием контроллера Для перехода к настройке значения минуты кратко нажмите контроллер. Вращением контроллера выберите пункт “Выбор...
  • Seite 83 Если точка попадания не совпала с точкой прицеливания, длительным нажатием кнопки В данном пункте отображается следующая служебная информация о Вашем прицеле: контроллера войдите в меню прицела и вращением контроллера выберите пункт «Пристрелка» Name: Photon RT 4.5х42 S (наименование модели) (обозначается пиктограммой...
  • Seite 84: Уход И Хранение

    неисправность возможная причина исправление Лазерные ИК-осветители Pulsar L-808S/L-915 (#79072/79075). Батареи установлены неправильно. Установите батареи в Прицел не Окислены контакты в контейнере батарей - включается. соответствии с маркировкой. Для увеличения времени автономной работы прицела Вы можете использовать аккумуляторную "потекли" батареи или на контакты попала Очистите...
  • Seite 85 неисправность возможная причина исправление неисправность возможная причина исправление Нет жесткости установки прицела Проверьте жесткость установки прицела на Необходимо вернуться к 1) Подключите источник питания (внешний либо батареи). При стрельбе сбивается Некорректная работа 2) Нажмите и удерживайте одновременно кнопку REC и метка.
  • Seite 86 FR BE DE AU...

Inhaltsverzeichnis