Herunterladen Inhalt Inhalt Diese Seite drucken
Inhaltsverzeichnis

Werbung

Verfügbare Sprachen
  • DE

Verfügbare Sprachen

  • DEUTSCH, seite 84

Werbung

Inhaltsverzeichnis
loading

Inhaltszusammenfassung für Parkside PKIK 4.3 A1

  • Seite 3 Español ................2 Italiano ................22 Português ................42 English ................62 Deutsch ................82 V 2.6...
  • Seite 4: Inhaltsverzeichnis

    PARKSIDE PKIK 4.3 A1 Índice 1. Explicación de los símbolos empleados en este manual ..4 2. Uso destinado............... 5 3. Contenido del embalaje ............6 4. Datos técnicos ............... 7 5. Instrucciones de seguridad ........... 8 6. Primeros pasos y manejo ........... 11 6.1 Resumen de las funciones de los mandos y botones ......
  • Seite 5 12. Información sobre la garantía y el servicio posventa ..20 ¡Enhorabuena! Con la adquisición de este boroscopio PARKSIDE PKIK 4.3 A1 ha obtenido un producto de calidad. La cámara con cuello flexible e iluminación LED ajustable se puede utilizar en aquellas zonas en las que desee realizar una inspección o un análisis de errores y sean de difícil acceso.
  • Seite 6: Explicación De Los Símbolos Empleados En Este Manual

    PARKSIDE PKIK 4.3 A1 1. Explicación de los símbolos empleados en este manual ¡PELIGRO! Esta palabra indica un peligro de alto riesgo que puede causar la muerte o heridas graves si no se evita. ¡ADVERTENCIA! Esta palabra indica un peligro de riesgo mediano que puede causar la muerte o heridas graves si no se evita.
  • Seite 7: Uso Destinado

    PARKSIDE PKIK 4.3 A1 2. Uso destinado El boroscopio PKIK 4.3 A1 es un dispositivo de exploración óptico. La cámara con cuello flexible e iluminación LED ajustable se puede utilizar en aquellas zonas en las que desee realizar una inspección o un análisis de errores y sean de difícil acceso.
  • Seite 8: Contenido Del Embalaje

    En caso de que alguna pieza faltase o estuviera dañada, póngase en contacto con el fabricante. Boroscopio PARKSIDE PKIK 4.3 A1 Bolsa de tela Herramienta "Imán"...
  • Seite 9: Datos Técnicos

    PARKSIDE PKIK 4.3 A1 4. Datos técnicos Pantalla Tamaño diagonal 10,9 cm / 4,3 pulgadas Resolución de pantalla 480 x 272 Resolución de la cámara 640 x 480 Memoria interna para hasta 100 imágenes Conexión Conexión Micro USB Luz de la cámara...
  • Seite 10: Instrucciones De Seguridad

    PARKSIDE PKIK 4.3 A1 5. Instrucciones de seguridad Generales ¡PELIGRO! El boroscopio no debe emplearse para fines médicos. No debe ser introducido en orificios corporales. Existe el riesgo de provocar lesiones que pongan en peligro la vida. • En caso de humo, ruido u olor anormal, apague enseguida el dispositivo.
  • Seite 11 PARKSIDE PKIK 4.3 A1 accidentalmente, acuda inmediatamente a un médico. Mantenga el embalaje fuera del alcance de los niños. El material de embalaje no es un juguete. Existe el riesgo de asfixia. ! Pantalla ¡ATENCIÓN No aplique presión en la pantalla y mantenga los objetos afilados alejados de la misma.
  • Seite 12 PARKSIDE PKIK 4.3 A1 ¡PELIGRO! Pilas Inserte las pilas respetando la polaridad. La polaridad viene indicada con un diagrama en las pilas y en el interior del compartimento. No intente recargar las pilas convencionales (no recargables) y no las arroje al fuego. No instale diferentes tipos de pilas (cargadas y descargadas, de carbono y alcalinas, etc.) a la vez.
  • Seite 13: Primeros Pasos Y Manejo

    PARKSIDE PKIK 4.3 A1 6. Primeros pasos y manejo 6.1 Resumen de las funciones de los mandos y botones Este manual del usuario posee una portada desplegable. Despliegue la portada para tener la referencia al elemento en cuestión a la vista.
  • Seite 14: Insertar O Cambiar Las Pilas

    PARKSIDE PKIK 4.3 A1 6.3 Insertar o cambiar las pilas Apague la cámara. El compartimento de las pilas [2] se encuentra en la parte posterior del dispositivo. Abra la tapa del compartimento de pilas. Para ello, presione el botón de desbloqueo lateral y levante la tapa del compartimento de pilas.
  • Seite 15: Desenrollar / Enrollar El Cuello Flexible

    PARKSIDE PKIK 4.3 A1 6.4 Desenrollar / enrollar el cuello flexible Desenrolle o enrolle el cuello flexible hasta la longitud deseada. 6.5 Usar el dispositivo 6.5.1 Encender/apagar el boroscopio Para encender boroscopio, mantenga pulsado botón encendido/apagado [5] durante unos 3 segundos hasta que la pantalla [1] se ilumine.
  • Seite 16: Brillo De La Pantalla

    PARKSIDE PKIK 4.3 A1 6.5.3 Brillo de la pantalla Pulse el botón Brillo de pantalla [6] para ajustar el brillo de la pantalla [1]. Pulse este botón varias veces para incrementar el brillo de la pantalla [1] por pasos. Hay 9 niveles ajustables. Si pulsa el botón Brillo de pantalla [6] una vez que haya llegado al máximo nivel luminoso, el brillo se establece en el...
  • Seite 17: Capturar Una Imagen

    PARKSIDE PKIK 4.3 A1 6.5.7 Capturar una imagen Pulse el botón de grabación [3] para tomar una imagen. La imagen capturada se muestra durante unos 2 segundos en pantalla [1]. Después, la pantalla [1] vuelve a mostrar la imagen en vivo. Las imágenes capturadas se almacenan en la memoria interna de la cámara.
  • Seite 18: Instalar Las Herramientas

    PARKSIDE PKIK 4.3 A1 6.5.10 Instalar las herramientas Las siguientes herramientas y fijaciones están incluidas con el dispositivo: Imán [C] Gancho [D] Espejo [E] Fijación para herramientas [G] Inserte el pequeño gancho de las herramientas en la apertura que se encuentra al final del cuello flexible, justo debajo del cabezal la cámara [10].
  • Seite 19: Transferir Imágenes Al Ordenador

    PARKSIDE PKIK 4.3 A1 6.5.11 Transferir imágenes al ordenador Puede emplear el cable USB [F] suministrado para conectar el boroscopio a un ordenador y transferir las imágenes al mismo. Siga estos pasos: ¡CUIDADO! Pérdida de datos Tenga especial cuidado al renombrar los archivos y las carpetas.
  • Seite 20: Almacenamiento Cuando No Se Utilice

    PARKSIDE PKIK 4.3 A1 6.6 Almacenamiento cuando no se utilice Si prevé que no va a utilizar el boroscopio durante mucho tiempo, retire las pilas para evitar una pérdida de electrolito. Guarde el boroscopio limpio y seco junto con todos sus accesorios en el bolso de tela [B] incluido y colóquelo todo en un lugar seco y...
  • Seite 21: Normativa Medioambiental E Información Sobre El Desecho

    PARKSIDE PKIK 4.3 A1 9. Normativa medioambiental e información sobre el desecho Los dispositivos señalizados con este símbolo están sujetos a la Directiva Europea 2012/19/EU. Todo dispositivo eléctrico o electrónico debe ser desechado por separado de la basura doméstica y en los puntos limpios municipales. Saque las pilas antes de desechar el dispositivo.
  • Seite 22: Notas Sobre La Conformidad

    PARKSIDE PKIK 4.3 A1 10. Notas sobre la conformidad Este producto cumple los requisitos de las Directivas Europeas y nacionales aplicables. Para demostrar la conformidad, se han realizado las pruebas pertinentes. El fabricante posee las declaraciones y la documentación al respecto.
  • Seite 23 PARKSIDE PKIK 4.3 A1 Si no fuera posible solucionar el problema por teléfono, y dependiendo de la causa del mismo, nuestro servicio de atención al cliente le pasará con otro servicio técnico. Al utilizar la garantía por defectos de material o de fabricación en el producto, nosotros nos haremos cargo de la reparación o...
  • Seite 24 PARKSIDE PKIK 4.3 A1 Indice 1. Spiegazione dei simboli ............24 2. Utilizzo previsto ..............25 3. Contenuto della confezione ..........26 4. Specifiche tecniche .............. 27 5. Istruzioni di sicurezza ............28 6. Introduzione e funzionamento ........... 31 6.1 Panoramica dei comandi e dei pulsanti ........... 31 6.2 Panoramica dei simboli sul display ............
  • Seite 25 12. Informazioni sull'assistenza e sulla garanzia ....40 Congratulazioni! Acquistando il boroscopio PARKSIDE PKIK 4.3 A1 (telecamera per ispezioni) avete scelto un prodotto di qualità. Grazie al suo stelo e alla luce LED, il boroscopio può essere utilizzato in aree difficilmente raggiungibili, offrendo un valido aiuto per la ricerca e l'analisi di malfunzionamenti.
  • Seite 26: Spiegazione Dei Simboli

    PARKSIDE PKIK 4.3 A1 1. Spiegazione dei simboli PERICOLO! Questo segnale indica un pericolo ad alto rischio di morte o ferite gravi. ATTENZIONE! Questo segnale indica un pericolo a medio rischio di morte o ferite gravi. ATTENZIONE! Questo segnale indica un pericolo a basso rischio di ferite leggere o di moderata gravità.
  • Seite 27: Utilizzo Previsto

    PARKSIDE PKIK 4.3 A1 2. Utilizzo previsto Il boroscopio PKIK 4.3 A1 è un dispositivo ottico per ispezioni. Grazie al suo stelo e alla luce LED, il boroscopio può essere utilizzato in aree difficilmente raggiungibili, offrendo un valido aiuto per la ricerca e l'analisi di malfunzionamenti.
  • Seite 28: Contenuto Della Confezione

    Estrarre il dispositivo e gli accessori dall'imballaggio. Rimuovere i materiali d'imballaggio e controllare che tutti i componenti siano completi e integri. In presenza di componenti danneggiati o mancanti, contattare il produttore. Boroscopio PARKSIDE PKIK 4.3 A1 Borsa in tessuto Strumento con il magnete...
  • Seite 29: Specifiche Tecniche

    PARKSIDE PKIK 4.3 A1 4. Specifiche tecniche Display Dimensioni in diagonale dell'immagine: 10,9 cm / 4,3 pollici Risoluzione del display 480 x 272 Risoluzione della telecamera 640 x 480 Memoria interna Fino a 100 immagini Connessione Connessione Micro USB Luce della telecamera...
  • Seite 30: Istruzioni Di Sicurezza

    PARKSIDE PKIK 4.3 A1 5. Istruzioni di sicurezza Generale PERICOLO! Il boroscopio non è approvato per l'utilizzo in campo medico! Non inserirlo mai negli orifizi del corpo! Rischio di ferite mortali! • In presenza di fumo, rumori od odori insoliti, smettere di utilizzare il dispositivo e farlo controllare da personale qualificato.
  • Seite 31 PARKSIDE PKIK 4.3 A1 ! Display ATTENZIONE Non esercitare pressioni e non utilizzare oggetti appuntiti sullo schermo. In caso di rottura dello schermo sussiste il pericolo di ferirsi. Quando si raccolgono le parti rotte indossare i guanti e contattare il produttore, se necessario.
  • Seite 32 PARKSIDE PKIK 4.3 A1 PERICOLO! Batterie Inserire le batterie prestando attenzione alla polarità. Fare riferimento alle figure nell'alloggiamento delle batterie e sulle batterie stesse. Non tentare di ricaricare le batterie e non gettarle nel fuoco. Non mescolare le batterie (nuove e vecchie, carbonio e alcaline, ecc.). Quando il dispositivo rimane inutilizzato per lunghi periodi di tempo, rimuovere le batterie.
  • Seite 33: Introduzione E Funzionamento

    PARKSIDE PKIK 4.3 A1 6. Introduzione e funzionamento 6.1 Panoramica dei comandi e dei pulsanti Queste istruzioni sono dotate di una parte pieghevole della copertina. Aprirla, in modo da poter fare riferimento ai relativi comandi in qualsiasi momento. Display Vano batterie (sul retro)
  • Seite 34: Inserimento/Sostituzione Delle Batterie

    PARKSIDE PKIK 4.3 A1 6.3 Inserimento/sostituzione delle batterie Accertarsi che la telecamera sia spenta. L'alloggiamento della batteria [2] è situato sul lato posteriore del dispositivo. Rimuovere coperchio dell'alloggiamento della batteria premendo il pulsante laterale di sblocco e sollevando il coperchio.
  • Seite 35: Svolgimento/Avvolgimento Dello Stelo

    PARKSIDE PKIK 4.3 A1 6.4 Svolgimento/avvolgimento dello stelo Srotolare o arrotolare lo stelo fino a raggiungere lunghezza desiderata. 6.5 Utilizzo del dispositivo 6.5.1 Accensione/spegnimento del dispositivo accendere boroscopio, tenere premuto pulsante accensione/spegnimento [5] per circa 3 sec, fino a quando il display [1] non si illumina.
  • Seite 36: Luminosità Del Display

    PARKSIDE PKIK 4.3 A1 6.5.3 Luminosità del display Per regolare la luminosità del display [1] utilizzare il pulsante per la luminosità del display [6]. Premendo più volte questo pulsante si aumenterà gradualmente la luminosità del display [1]. Sono presenti 9 livelli di regolazione.
  • Seite 37: Cattura Di Un'immagine

    PARKSIDE PKIK 4.3 A1 6.5.7 Cattura di un'immagine Premere il pulsante registrazione [3] per scattare la foto. La foto scattata sarà visibile sul display [1] per circa 2 sec. Quindi il display [1] riprenderà a mostrare le immagini in diretta. Le fotografie scattate vengono memorizzate nella memoria interna del dispositivo.
  • Seite 38: Montaggio Degli Strumenti

    PARKSIDE PKIK 4.3 A1 6.5.10 Montaggio degli strumenti Il dispositivo è dotato dei seguenti strumenti/manici: Magnete [C] Uncino [D] Specchio [E] Manico dello strumento [G] Posizionare il piccolo uncino con i barbigli dello strumento nell'apertura sull'estremità dello stelo, subito sotto la testa della telecamera [10].
  • Seite 39: Trasferimento Di Immagini A Un Computer

    PARKSIDE PKIK 4.3 A1 6.5.11 Trasferimento di immagini a un computer Il cavo USB [F] in dotazione può essere utilizzato per collegare il boroscopio a un computer e trasferirvi le immagini. Procedere nel seguente modo: AVVERTENZA! Perdita dei dati Quando si rinominano cartelle e file occorre prestare molta attenzione.
  • Seite 40: Conservazione Del Dispositivo Inutilizzato

    PARKSIDE PKIK 4.3 A1 6.6 Conservazione del dispositivo inutilizzato Quando si lascia inutilizzato il dispositivo per lunghi periodi di tempo, rimuovere le batterie per prevenire fuoriuscite di liquido. Custodire il boroscopio pulito e asciutto, insieme ai suoi accessori, nella borsa di tela [B] in dotazione in un luogo asciutto e fresco.
  • Seite 41: Normativa In Materia Ambientale E Informazioni Sullo Smaltimento

    PARKSIDE PKIK 4.3 A1 Normativa materia ambientale informazioni sullo smaltimento I dispositivi contrassegnati da questo simbolo sono soggetti alla Direttiva Europea 2012/19/EU. Tutti i dispositivi elettrici ed elettronici devono essere smaltiti separatamente dai rifiuti domestici, presso i centri di smaltimento ufficiali. Rimuovere le batterie prima di smaltire il dispositivo.
  • Seite 42: Note Di Conformità

    PARKSIDE PKIK 4.3 A1 10. Note di conformità Il dispositivo è conforme ai requisiti delle direttive europee e nazionali in materia. L’attestato di conformità è stato fornito. Il produttore è in possesso delle relative dichiarazioni e della documentazione in materia.
  • Seite 43 PARKSIDE PKIK 4.3 A1 nostra discrezione, riparato o sostituito gratuitamente. La riparazione o sostituzione del prodotto non comporta l’inizio di un nuovo periodo di garanzia. Materiali soggetti a usura come batterie, accumulatori ed elementi illuminanti sono esclusi dalla garanzia. I suoi diritti legali nei confronti del venditore non sono in alcun modo limitati da questa garanzia.
  • Seite 44 PARKSIDE PKIK 4.3 A1 Índice 1. Descrição dos símbolos utilizados ........44 2. Fim a que se destina ............45 3. Conteúdo da embalagem ........... 46 4. Especificações técnicas ............47 5. Instruções de segurança ............. 48 6. Os primeiros passos, e utilizar o dispositivo ....... 51 6.1 Vista geral das funções dos controlos e dos botões .......
  • Seite 45 12. Informação relativa à garantia e assistência ....60 Parabéns! Ao adquirir o boroscópio (câmara de inspeção) PARKSIDE PKIK 4.3 A1, optou por um produto de qualidade. A câmara com pescoço de ganso e iluminação LED ajustável pode ser utilizada em áreas de difícil acesso, como auxiliar de inspeção e análise de problemas.
  • Seite 46: Descrição Dos Símbolos Utilizados

    PARKSIDE PKIK 4.3 A1 1. Descrição dos símbolos utilizados PERIGO! Esta palavra-sinal identifica uma situação perigosa de elevado risco, que pode levar a morte ou sérios ferimentos, se não for evitada. AVISO! Esta palavra-sinal identifica uma situação perigosa de moderado risco, que pode levar a morte ou sérios ferimentos, se não for evitada.
  • Seite 47: Fim A Que Se Destina

    PARKSIDE PKIK 4.3 A1 2. Fim a que se destina O boroscópio PKIK 4.3 A1 é um dispositivo para exame visual de objetos. A câmara com pescoço de ganso e iluminação LED ajustável pode ser utilizada em áreas de difícil acesso, como auxiliar de inspeção e análise de problemas.
  • Seite 48: Conteúdo Da Embalagem

    Se estiver algo em falta ou danificado, contacte o fabricante. Boroscópio PARKSIDE PKIK 4.3 A1 Saco de tecido Ferramenta da câmara “Íman”...
  • Seite 49: Especificações Técnicas

    PARKSIDE PKIK 4.3 A1 4. Especificações técnicas Visor tamanho da imagem na diagonal 10,9 cm / 4,3" Resolução do visor 480 x 272 Resolução da câmara 640 x 480 Memória interna para até 100 imagens Ligação ligação Micro USB Iluminação da câmara 6 LEDs brancos (ajustáveis a 8 níveis)
  • Seite 50: Instruções De Segurança

    PARKSIDE PKIK 4.3 A1 5. Instruções de segurança Geral PERIGO! O boroscópio não é aprovado para aplicações médicas! Ele nunca deve ser inserido em orifícios corporais! Há risco de ferimentos potencialmente fatais! • Se observar fumo, ruído incomum, ou cheiros estranhos, o dispositivo não deve ser utilizado mais e deve ser inspecionado por pessoal de...
  • Seite 51 PARKSIDE PKIK 4.3 A1 Se for engolida uma peça pequena, procure imediatamente ajuda médica. Mantenha o material de embalamento fora do alcance destas pessoas. O material de embalamento não é um brinquedo. Existe o risco de asfixia! Visor AVISO! Não exerça pressão no ecrã e mantenha objetos afiados afastados do ecrã.
  • Seite 52 PARKSIDE PKIK 4.3 A1 PERIGO! Pilhas Insira as pilhas respeitando as marcas de polaridade. Refira-se ao diagrama nas pilhas e no interior do compartimento das pilhas. Não tente recarregar as pilhas e não se descarte delas no fogo. Não misture pilhas de tipos diferentes (usadas e novas, ou de carbono e alcalinas, etc.).
  • Seite 53: Os Primeiros Passos, E Utilizar O Dispositivo

    PARKSIDE PKIK 4.3 A1 6. Os primeiros passos, e utilizar o dispositivo 6.1 Vista geral das funções dos controlos e dos botões Estas instruções de utilização têm uma capa desdobrável. Desdobre a capa para poder consultar, a qualquer momento, os controlos relevantes.
  • Seite 54: Inserir Ou Substituir As Pilhas

    PARKSIDE PKIK 4.3 A1 6.3 Inserir ou substituir as pilhas Assegure-se que a sua câmara está desligada. O compartimento das pilhas [2] está localizado na parte de trás do dispositivo. Remova a tampa do compartimento das pilhas premindo o botão para...
  • Seite 55: Desenrolar/Enrolar O Pescoço De Ganso

    PARKSIDE PKIK 4.3 A1 6.4 Desenrolar/enrolar o pescoço de ganso Desenrole ou enrole o pescoço de ganso para obter o comprimento desejado. 6.5 Utilizar o Dispositivo 6.5.1 Ligar/desligar o boroscópio Para ligar o boroscópio, prima e mantenha premido o botão para ligar/desligar [5] durante cerca de 3 segundos, até...
  • Seite 56: Brilho Do Visor

    PARKSIDE PKIK 4.3 A1 6.5.3 Brilho do visor Pode utilizar o botão do brilho do visor [6] para ajustar o brilho do visor [1]. Premir este botão múltiplas vezes faz aumentar, passo a passo, o brilho do visor [1]. Há 9 níveis ajustáveis. Assim que se atingir o nível mais elevado, premir novamente o botão do brilho do visor [6] coloca o brilho no valor mais...
  • Seite 57: Tirar Uma Fotografia

    PARKSIDE PKIK 4.3 A1 6.5.7 Tirar uma fotografia Prima o botão de gravação [3] para tirar uma fotografia. A imagem capturada aparece no visor [1] durante cerca de 2 segundos. De seguida, o visor [1] mostra novamente a imagem em direto. As fotografias tiradas são armazenadas na memória interna da câmara.
  • Seite 58: Instalar As Ferramentas

    PARKSIDE PKIK 4.3 A1 6.5.10 Instalar as ferramentas São fornecidas as seguintes ferramentas/suportes com o dispositivo: Íman [C] Gancho [D] Espelho [E] Suporte da ferramenta [G] Coloque o pequeno gancho farpado das ferramentas na abertura no fim do pescoço de ganso, imediatamente abaixo da cabeça da...
  • Seite 59: Transferir As Fotografias Para Um Computador

    PARKSIDE PKIK 4.3 A1 6.5.11 Transferir as fotografias para um computador Pode utilizar o cabo USB [F] fornecido para ligar o boroscópio a um computador, e transferir as suas fotografias para ele. Proceda da seguinte forma: CUIDADO! Perda de dados Tenha cuidado ao mudar o nome de quaisquer pastas e ficheiros.
  • Seite 60: Armazenamento Em Períodos De Não Utilização

    PARKSIDE PKIK 4.3 A1 6.6 Armazenamento em períodos de não utilização Se achar que não vai utilizar o boroscópio durante um longo período de tempo, remova as pilhas para evitar quaisquer fugas. Armazene o boroscópio, limpo e seco, e os seus acessórios, no saco de tecido [B] fornecido, e num local seco e frio.
  • Seite 61: Regulamentos Ambientais E Informação De Descarte

    PARKSIDE PKIK 4.3 A1 9. Regulamentos ambientais e informação de descarte Os dispositivos marcados com este símbolo estão sujeitos à Diretiva Europeia 2012/19/EU. O descarte de todos os dispositivos elétricos eletrónicos deve efetuado separadamente do lixo doméstico, em centros de descarte oficiais.
  • Seite 62: Notas Relativas À Conformidade

    PARKSIDE PKIK 4.3 A1 10. Notas relativas à conformidade O produto está em conformidade com os requisitos das diretivas europeias e nacionais aplicáveis. Foi fornecida prova de conformidade. O fabricante possui as declarações e documentação relevantes. O texto completo da Declaração de Conformidade da EU está...
  • Seite 63 PARKSIDE PKIK 4.3 A1 consoante a causa do erro. Dentro do prazo da garantia, tratando-se de falhas de material ou de fabrico, o produto será reparado ou substituído à nossa discrição, sem custos para o comprador. Os consumíveis, como pilhas, baterias e lâmpadas, estão excluídos da garantia.
  • Seite 64 PARKSIDE PKIK 4.3 A1 Table of Contents 1. Explanation of used symbols ..........64 2. Intended use ............... 65 3. Package contents ............... 66 4. Technical specifications ............67 5. Safety instructions .............. 68 6. Getting started and operation ..........71 6.1 Overview of controls and button functions ..........
  • Seite 65 12. Warranty and service information ........80 Congratulations! By purchasing the PARKSIDE PKIK 4.3 A1 borescope (inspection camera), you have opted for a quality product. The camera with gooseneck and adjustable LED lighting can be used in areas with poor accessibility as an aid for inspection and fault analysis.
  • Seite 66: Explanation Of Used Symbols

    PARKSIDE PKIK 4.3 A1 1. Explanation of used symbols DANGER! This signal word indicates a danger with a high risk, which could lead to death or major injuries if not avoided. WARNING! This signal word indicates a danger with a moderate risk, which can lead to death or major injuries if not avoided.
  • Seite 67: Intended Use

    PARKSIDE PKIK 4.3 A1 2. Intended use The PKIK 4.3 A1 borescope is an optical examination device. The camera with gooseneck and adjustable LED lighting can be used in areas with poor accessibility as an aid for inspection and fault analysis.
  • Seite 68: Package Contents

    Remove the device and all the accessories from the packaging. Remove all packaging material and check that all parts are complete and undamaged. If you find anything missing or damaged, please contact the manufacturer. PARKSIDE PKIK 4.3 A1 borescope Fabric bag "Magnet" camera tool "Hook"...
  • Seite 69: Technical Specifications

    PARKSIDE PKIK 4.3 A1 4. Technical specifications Display 10.9 cm / 4.3" diagonal image size Display resolution 480 x 272 Camera resolution 640 x 480 Internal memory for up to 100 pictures Connection Micro USB connection Camera lighting 6 white LEDs...
  • Seite 70: Safety Instructions

    PARKSIDE PKIK 4.3 A1 5. Safety instructions General DANGER! The borescope is not approved for medical applications! It must never be inserted into bodily orifices! There is the risk of life-threatening injuries! • If you notice any smoke, unusual noise or strange smells, the device should no longer be used and should be inspected by authorized service personnel.
  • Seite 71 PARKSIDE PKIK 4.3 A1 ! Display WARNING Do not apply any pressure to the screen and keep sharp objects away from the screen. A broken screen represents a risk of injury. Wear gloves when collecting the broken parts and contact the manufacturer if necessary.
  • Seite 72 PARKSIDE PKIK 4.3 A1 device is not to be used for an extended period. Improper use could cause explosions or leaks. Batteries must never be opened or deformed, as this could result in chemicals leaking out which could cause injuries. If the batteries have leaked, remove them to prevent damage to the device.
  • Seite 73: Getting Started And Operation

    PARKSIDE PKIK 4.3 A1 6. Getting started and operation 6.1 Overview of controls and button functions These operating instructions have a fold-out cover. Fold-out the cover so you can refer to the relevant controls at any time. Display Battery compartment (on the...
  • Seite 74: Inserting Or Replacing The Batteries

    PARKSIDE PKIK 4.3 A1 6.3 Inserting or replacing the batteries Please make sure that your camera is switched off. The battery compartment [2] is located on the rear of the device. Remove the battery compartment cover by pressing the unlock button on the side and lifting the battery compartment cover.
  • Seite 75: Unwinding / Winding The Gooseneck

    PARKSIDE PKIK 4.3 A1 6.4 Unwinding / winding the gooseneck Unwind or wind the gooseneck to the desired length. 6.5 Using the Device 6.5.1 Switching the borescope on/off To switch the borescope on, press and hold the On/Off button [5] for about 3 seconds until the display [1] illuminates.
  • Seite 76: Display Brightness

    PARKSIDE PKIK 4.3 A1 6.5.3 Display brightness You can use the Display brightness button [6] to adjust the brightness of the display [1]. Pressing this button multiple times will stepwise increase the display [1] brightness. There are 9 adjustable levels. Once the highest level has been reached, pressing the Display brightness button [6] again will reset the brightness to the lowest value.
  • Seite 77: Playback Function

    PARKSIDE PKIK 4.3 A1 again. Any captured pictures are stored in the internal memory of the camera. You can save up to approx. 100 pictures. If the internal memory is full, "100%" reads on the display [1]. Before you can capture more pictures, you need to erase some pictures first.
  • Seite 78: Installing The Tools

    PARKSIDE PKIK 4.3 A1 6.5.10 Installing the tools The following tools/holders are supplied with the device: Magnet [C] Hook [D] Mirror [E] Tool holder [G] Place the small barbed hook of the tools in the opening at the end of the goose neck, just below the camera head [10].
  • Seite 79: Transferring Pictures To A Computer

    PARKSIDE PKIK 4.3 A1 6.5.11 Transferring pictures to a computer You can use the USB cable [F] supplied to connect the borescope to a computer and transfer your pictures to it. Proceed as follows: CAUTION! Loss of data Be careful when renaming any folders and files. Do NOT try to...
  • Seite 80: Storage When Not In Use

    PARKSIDE PKIK 4.3 A1 6.6 Storage when not in use If you will not be using the borescope for a long period of time, remove the batteries to prevent any leaking. Store the clean and dry borescope and its accessories in the supplied fabric bag [B] and in a dry, cool place.
  • Seite 81: Environmental Regulations And Disposal Information

    PARKSIDE PKIK 4.3 A1 9. Environmental regulations and disposal information Devices marked with this symbol are subject to the European Directive 2012/19/EU. All electrical and electronic devices must be disposed of separately from household waste at official disposal centres. Remove the batteries before disposal of the device.
  • Seite 82: Conformity Notes

    PARKSIDE PKIK 4.3 A1 10. Conformity notes The product complies with the requirements of the applicable European and national directives. Evidence of conformity has been provided. The manufacturer has the relevant declarations and documentation. The complete text of the EU Declaration of Conformity is available at the following address: https://www.targa.gmbh/...
  • Seite 83 PARKSIDE PKIK 4.3 A1 Your statutory rights towards the seller are not affected or restricted by this warranty. Service Phone: 0800 404 7657 E-Mail: targa@lidl.co.uk Phone: 1890 930 034 E-Mail: targa@lidl.ie Phone: 800 62230 E-Mail: targa@lidl.com.mt Phone: 8009 4409 E-Mail: targa@lidl.com.cy...
  • Seite 84 PARKSIDE PKIK 4.3 A1 Inhaltsverzeichnis 1. Verwendete Symbole und ihre Bedeutung ......84 2. Bestimmungsgemäße Verwendung ........85 3. Lieferumfang ..............86 4. Technische Daten ..............87 5. Sicherheitshinweise ............87 6. Inbetriebnahme und Bedienung ......... 91 6.1 Übersicht der Bedienelemente und Tastenfunktionen ......91 6.2 Übersicht der Displaysymbole ..............
  • Seite 85 12. Hinweise zu Garantie und Service-abwicklung ....100 Herzlichen Glückwunsch! Mit dem Kauf der Inspektionskamera PARKSIDE PKIK 4.3 A1 haben Sie sich für ein hochwertiges Produkt entschieden. Die Kamera mit dem beweglichen Schwanenhals und der einstellbaren LED-Beleuchtung kann an schwer zugänglichen Stellen als Hilfsmittel zur Inspektion und Fehleranalyse eingesetzt...
  • Seite 86: Verwendete Symbole Und Ihre Bedeutung

    PARKSIDE PKIK 4.3 A1 1. Verwendete Symbole und ihre Bedeutung GEFAHR! Dieses Signalwort bezeichnet eine Gefährdung mit einem hohen Risikograd, die, wenn sie nicht vermieden wird, den Tod oder schwere Verletzung zur Folge hat. WARNUNG! Dieses Signalwort bezeichnet eine Gefährdung mit einem mittleren Risikograd, die, wenn sie nicht vermieden wird, den Tod oder schwere Verletzung zur Folge haben kann.
  • Seite 87: Bestimmungsgemäße Verwendung

    PARKSIDE PKIK 4.3 A1 2. Bestimmungsgemäße Verwendung Bei der Inspektionskamera PKIK 4.3 A1 handelt es sich um ein optisches Inspektionsgerät. Die Kamera mit dem beweglichen Schwanenhals und der einstellbaren LED-Beleuchtung kann an schwer zugänglichen Stellen als Hilfsmittel zur Inspektion und Fehleranalyse eingesetzt werden.
  • Seite 88: Lieferumfang

    Nehmen Sie das Gerät und alle Zubehörteile aus der Verpackung. Entfernen Sie alle Verpackungsmaterialien und überprüfen Sie, ob alle Teile vollständig und unbeschädigt sind. Im Falle einer unvollständigen oder beschädigten Lieferung wenden Sie sich bitte an den Hersteller. Inspektionskamera PARKSIDE PKIK 4.3 A1 Stofftasche Kameraaufsatz “Magnet” Kameraaufsatz “Haken”...
  • Seite 89: Technische Daten

    PARKSIDE PKIK 4.3 A1 4. Technische Daten Display 10,9 cm / 4,3" Bilddiagonale Display-Auflösung 480 x 272 Kamera-Auflösung 640 x 480 Interner Speicher für bis zu 100 Bilder Anschluss Micro USB Anschluss Kamerabeleuchtung 6 weiße LEDs (einstellbar in 8 Stufen)
  • Seite 90 PARKSIDE PKIK 4.3 A1 • Falls Sie Rauchentwicklung, ungewöhnliche Geräusche oder Gerüche feststellen, darf das Gerät nicht weiterverwendet werden, bevor eine Überprüfung durch einen Fachmann durchgeführt wurde. Schalten Sie in diesem Fall das Gerät sofort aus und entnehmen Sie die Batterien.
  • Seite 91 PARKSIDE PKIK 4.3 A1 ! Display WARNUNG Üben Sie keinen Druck auf das Display aus und halten Sie spitze Gegenstände vom Display fern. Bei einem gebrochenen Display besteht Verletzungsgefahr. Tragen Sie Handschuhe, wenn Sie die gebrochenen Teile einsammeln und setzen Sie sich gegebenenfalls mit dem Hersteller in Verbindung.
  • Seite 92 PARKSIDE PKIK 4.3 A1 GEFAHR! Batterien Legen Sie die Batterien stets polrichtig ein. Beachten Sie dazu die Kennzeichnung auf den Batterien und im Batteriefach. Versuchen Sie nicht, Batterien wieder aufzuladen und werfen Sie diese unter keinen Umständen ins Feuer. Verwenden Sie keine unterschiedlichen Batterien (alte und neue, Alkali und Kohle, usw.) gleichzeitig.
  • Seite 93: Inbetriebnahme Und Bedienung

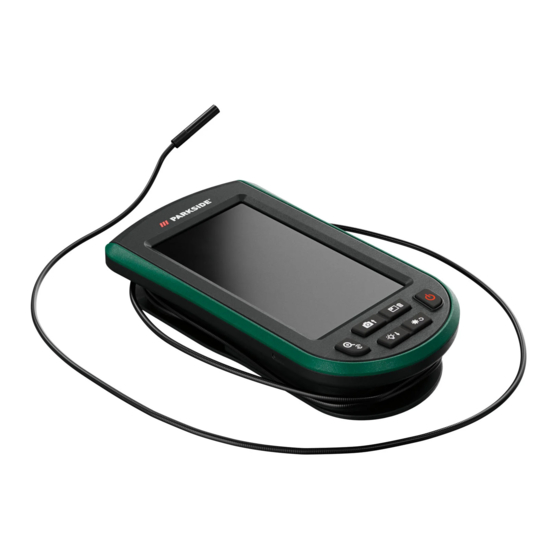
    PARKSIDE PKIK 4.3 A1 6. Inbetriebnahme und Bedienung 6.1 Übersicht der Bedienelemente und Tastenfunktionen Diese Bedienungsanleitung ist mit einem ausklappbaren Umschlag versehen. Klappen Sie die Umschlagseite aus, damit Sie die Bedienelemente immer vor Augen haben. Display Batteriefach (auf der Rückseite)
  • Seite 94: Batterien Einsetzen/ Austauschen

    PARKSIDE PKIK 4.3 A1 6.3 Batterien einsetzen/ austauschen Achten Sie darauf, dass die Kamera ausgeschaltet ist. Das Batteriefach [2] befindet sich auf der Rückseite des Gerätes. Entfernen Batteriefach- abdeckung, indem Entriegelung an der Seite drücken Batteriefachabdeckung nach oben abheben. Legen Sie 4 Stück 1,5V AA (Mignon) / LR6 Batterien polungs- richtig in das Batteriefach [2] ein.
  • Seite 95: Schwanenhals Ab- Bzw. Aufwickeln

    PARKSIDE PKIK 4.3 A1 6.4 Schwanenhals ab- bzw. aufwickeln Wickeln Sie den Schwanenhals auf die gewünschte Länge ab- bzw. auf. 6.5 Gerät verwenden 6.5.1 Ein-/Ausschalten der Inspektionskamera Um die Inspektionskamera einzuschalten, halten Sie die Ein-/Aus-Taste [5] ca. 3 Sekunden gedrückt, bis sich das Display [1] einschaltet. Halten Sie die Ein- /Aus-Taste [2] ca.
  • Seite 96: Displayhelligkeit

    PARKSIDE PKIK 4.3 A1 6.5.3 Displayhelligkeit Über die Displayhelligkeits-Taste [6] kann die Helligkeit des Displays [1] verändert werden. Durch mehrmaliges Drücken dieser Taste wird die Helligkeit des Displays [1] stufenweise erhöht. 9 verschiedene Stufen sind einstellbar. Wurde die höchste Stufe erreicht und die Displayhelligkeits-Taste [6] wird erneut gedrückt, wird die Helligkeit auf den niedrigsten Wert eingestellt.
  • Seite 97: Bild Aufnehmen

    PARKSIDE PKIK 4.3 A1 6.5.7 Bild aufnehmen Drücken Sie die Aufnahme-Taste [3], um ein Bild aufzunehmen. Das aufgenommene Bild wird ca. 2 Sekunden auf dem Display [1] angezeigt. Danach wechselt die Anzeige des Displays [1] wieder in das Live-Bild. Aufgenommene Bilder werden auf dem internen Speicher der Kamera gespeichert.
  • Seite 98: Aufsätze Montieren

    PARKSIDE PKIK 4.3 A1 6.5.10 Aufsätze montieren Dem Gerät liegen folgende Aufsätze/ Befestigungen bei: Magnet [C] Haken [D] Spiegel [E] Aufsatzbefestigung [G] Legen Sie den kleinen Wiederhaken des Aufsatzes in die dafür vorgesehene Öffnung am Ende des Schwanenhalses kurz unterhalb des Kamerakopfes [10].
  • Seite 99: Bilder Auf Einen Computer Übertragen

    PARKSIDE PKIK 4.3 A1 6.5.11 Bilder auf einen Computer übertragen Sie können Ihre Bilder auf einen Computer übertragen, indem Sie die Inspektionskamera mit Ihrem Computer über das beiliegende USB-Kabel [F] verbinden. Gehen Sie dazu wie folgt vor: ACHTUNG! Datenverlust Vorsicht beim Umbenennen der Verzeichnisse und Dateien.
  • Seite 100: Lagerung Bei Nichtbenutzung

    PARKSIDE PKIK 4.3 A1 6.6 Lagerung bei Nichtbenutzung Wenn Sie die Inspektionskamera für längere Zeit nicht benutzen, entnehmen Sie die Batterien, um einem Auslaufen vorzubeugen. Bewahren Sie die gereinigte, trockene Inspektionskamera und die Zubehörteile in der mitgelieferten Stofftasche [B] an einem trockenen und kühlen Ort auf.
  • Seite 101: Umwelthinweise Und Entsorgungshinweise

    PARKSIDE PKIK 4.3 A1 9. Umwelthinweise und Entsorgungshinweise Die mit diesem Symbol gekennzeichneten Geräte unterliegen der europäischen Richtlinie 2012/19/EU. Alle Elektro- und Elektronik-Altgeräte müssen getrennt vom Hausmüll über dafür staatlich vorgesehene Stellen entsorgt werden. Entfernen Sie vor der Entsorgung des Gerätes die Batterien aus dem Gerät.
  • Seite 102: Konformitätsvermerke

    PARKSIDE PKIK 4.3 A1 10. Konformitätsvermerke Dieses Produkt erfüllt die Anforderungen der geltenden europäischen und nationalen Richtlinien. Die Konformität wurde nachgewiesen. Entsprechende Erklärungen und Unterlagen sind beim Hersteller hinterlegt. Der vollständige Text der EU-Konformitätserklärung ist unter folgender Internetadresse verfügbar: https://www.targa.gmbh/ downloads/conformity/315439_1904.pdf...
  • Seite 103 PARKSIDE PKIK 4.3 A1 veranlasst. In der Garantie wird das Produkt bei Material- oder Fabrikationsfehler – nach unserer Wahl – kostenlos repariert oder ersetzt. Mit Reparatur oder Austausch des Produkts beginnt kein neuer Garantiezeitraum. Verbrauchsmaterial wie Batterien, Akkus und Leuchtmittel sind von der Garantie ausgeschlossen.

Inhaltsverzeichnis