Herunterladen Inhalt Inhalt Diese Seite drucken
Inhaltsverzeichnis

Werbung

Verfügbare Sprachen
  • DE

Verfügbare Sprachen

  • DEUTSCH, seite 55
AXIS P13-E Series
AXIS P1364-E Network Camera
AXIS P1365-E Network Camera
Installation Guide

Werbung

Inhaltsverzeichnis
loading

Inhaltszusammenfassung für Axis P13-E Serie

  • Seite 1 AXIS P13-E Series AXIS P1364-E Network Camera AXIS P1365-E Network Camera Installation Guide...
  • Seite 2 Every care has been taken in the preparation of this • Restrictions of Hazardous Substances (RoHS) Directive document. Please inform your local Axis office of any 2011/65/EU. See Disposal and Recycling 3. inaccuracies or omissions. Axis Communications AB cannot A copy of the original declaration of conformity may be be held responsible for any technical or typographical errors obtained from Axis Communications AB.
  • Seite 3 Canada AXIS P1364-E: 이 기기는 업무용(A급) 전자파적합기 기로서 판매자 또는 사용자는 이 점을 주의하시기 AXIS P1364-E: This digital apparatus complies with 바라며, 가정외의 지역에서 사용하는 것을 목적으 CAN ICES-3 (Class A). The product shall be connected 로 합니다. 적절히 접지된 STP (shielded twisted using a shielded network cable (STP) that is properly pair) 케이블을...
  • Seite 4 • find answers to resolved problems in the FAQ database. Search by product, category, or phrase • report problems to Axis support staff by logging in to your private support area • chat with Axis support staff •...
  • Seite 5: Hazard Levels

    AXIS P13-E Series Safety Information Read through this Installation Guide carefully before installing the product. Keep the Installation Guide for future reference. Hazard Levels DANGER Indicates a hazardous situation which, if not avoided, will result in death or serious injury.
  • Seite 6 Battery The Axis product uses a 3.0 V CR2032 lithium battery as the power supply for its internal real-time clock (RTC). Under normal conditions this battery will last for a minimum of five years. Low battery power affects the operation of the RTC, causing it to reset at every power-up. When the battery needs replacing, a log message will appear in the product’s server report.
  • Seite 7 WARNING • Risk of explosion if the battery is incorrectly replaced. • Replace only with an identical battery or a battery which is recommended by Axis. • Dispose of used batteries according to local regulations or the battery manufacturer's instructions.
  • Seite 9: Installation Steps

    AXIS P13-E Series Installation Guide This Installation Guide provides instructions for installing AXIS P1364–E/P1365–E Network Camera on your network. For other aspects of using the product, see the User Manual available at www.axis.com Installation Steps 1. Make sure the package contents, tools and other materials necessary for the installation are in order.
  • Seite 10: Hardware Overview

    AXIS P13-E Series Hardware Overview Status LED Built-in microphone microSD card slot Audio in Audio out Network connector (PoE) Power LED Network LED Control button 10 I/O connector 11 Iris connector 12 Not used 13 RS485/422 connector...
  • Seite 11 AXIS P13-E Series AXIS P1364-E AXIS P1365-E Focus ring Lock screw for focus ring Zoom puller Safety wire Heater connector Network connector (PoE OUT) Status LED indicator Network connector (PoE IN) Heater cable Cable gasket M20 (2x)
  • Seite 12: Wall Mount

    AXIS P13-E Series Drill-out (2x) Intrusion alarm switch 10 Holder screw T20 (2x) 11 Camera screw T20 12 Pin 13 Holder 14 Window 15 Top cover 16 Weather shield Wall Mount Network cable (route through wall bracket) Power cable (route through wall bracket) (for products equipped with power...
  • Seite 13: Led Indicators

    AXIS P13-E Series LED Indicators Note • The Status LED can be configured to be unlit during normal operation. To configure, go to Setup > System Options > Ports & Devices > LED. See the online help for more information.
  • Seite 14: Connectors And Buttons

    When a signal is received the state changes and the input becomes active (shown under System Options > Ports & Devices). Audio Connector The Axis product has the following audio connectors: • Audio in (pink) – 3.5 mm input for a mono microphone, or a line-in mono signal.
  • Seite 15: Specifications

    Enabling the Focus Assistant. Press and very quickly release the Control button. • Resetting the product to factory default settings. See page 26. • Connecting to an AXIS Video Hosting System service or AXIS Internet Dynamic DNS Service. For more information about these services, see the User Manual. Specifications Operating Conditions...
  • Seite 16: Power Consumption

    AXIS P13-E Series Product Temperature Humidity AXIS P1364-E -40 °C to 50 °C 10–100% RH (condensing) (-40 °F to 122 °F) AXIS P1365-E -40 °C to 50 °C 10–100% RH (condensing) (-40 °F to 122 °F) Important When the ambient temperature is below 0 ºC (32 ºF), start-up could take up to 60 minutes.
  • Seite 17 AXIS P13-E Series 3– Configurable Digital input – Connect to pin 1 to activate, 0 to max 30 V DC (Input or or leave floating (unconnected) to deactivate. Output) Digital output – Connected to pin 1 when 0 to max 30 V DC, open...
  • Seite 18 To create extra cable holes, open the drill-outs located in the bottom of the housing. See Hardware Overview on page 10. For information about accessories, such as cable gaskets and cable glands that allow for other cable areas, see www.axis.com...
  • Seite 19: Connection Diagrams

    For information about regulatory requirements, see Regulatory Information 2 • Be careful not to scratch, damage or leave fingerprints on the window because this could decrease image quality. The Axis product can be installed with the cables routed through or along the wall.
  • Seite 20 4. Fasten the wall bracket to the wall by tightening the screws. Note • For detailed instructions, see the wall mount’s Installation Guide supplied in the package and available on www.axis.com Attach the Housing to the Wall Mount NO TICE...
  • Seite 21 AXIS P13-E Series Bottom cover Bottom cover screw T20 (4x) Cable gasket M20 (2x) 3. Push the network cable through the cable gasket. NO TICE TICE TICE If the network cable has a premounted network connector, remove the cable gasket and use the connector guard to prevent tearing of the cable gasket.
  • Seite 22 AXIS P13-E Series 5. Make sure that the cable gasket is fitted properly. 6. If connecting an auxiliary device, for example an I/O, audio, or external power device, to the camera, repeat the steps above as applicable to the specific device.
  • Seite 23 AXIS P13-E Series Screw T20 (4x) Wall bracket Bracket adjustment screw T30 Connect the Camera 1. If applicable, connect external/input devices or audio devices to the camera. 2. Connect the heater cable to the heater connector in the bottom cover.
  • Seite 24: Access The Product

    9. If required, loosen the screws on the weather shield, adjust its position and tighten the screws. Access the Product AXIS IP Utility and AXIS Camera Management are recommended methods for finding Axis products on the network and assigning them IP addresses in Windows®. Both applications are free and can be downloaded from www.axis.com/techsup The product can be used with most operating systems and browsers.
  • Seite 25 • If movements in front of the camera cannot be avoided, the Focus Assistant should not be used. • If the control button is not released within two seconds, AXIS Dynamic DNS Service is enabled instead of the Focus Assistant.
  • Seite 26: Reset To Factory Default Settings

    For the latest version of this document, see www.axis.com The User Manual is available at www.axis.com Visit www.axis.com/techsup to check if there is updated firmware available for your network product. To see the currently installed firmware version, go to Setup > About.
  • Seite 27: Warranty Information

    AXIS P13-E Series Visit Axis learning center www.axis.com/academy for useful trainings, webinars, tutorials and guides. Warranty Information For information about Axis’ product warranty and thereto related information, see www.axis.com/warranty/...
  • Seite 29: Niveaux De Risques

    AXIS P13-E Series Informations sur la sécurité Lisez attentivement ce guide d'installation avant d'installer l'appareil. Conservez le guide d'installation pour toute référence ultérieure. Niveaux de risques DANGER Indique une situation dangereuse qui, si elle n'est pas évitée, entraînera le décès ou des blessures graves.
  • Seite 30 éviter d'endommager le produit. Batterie Le produit Axis utilise une batterie au lithium CR2032 3,0 V comme alimentation de son horloge en temps réel interne (RTC). Dans des conditions normales, cette batterie a une durée de vie minimale de cinq ans.
  • Seite 31 AXIS P13-E Series Les piles boutons 3,0 V au lithium contiennent du 1,2-diméthoxyéthane, éthylène glycol diméthyl éther (EGDME), CAS N° 110-71-4. AVERTISSEMENT • Risque d'explosion si la batterie est remplacée de façon incorrecte. • Remplacez-la uniquement par une batterie identique ou une batterie recommandée par Axis.
  • Seite 33: Procédures D'installation

    AXIS P13-E Series Guide d’installation Ce guide d’installation explique comment installer la caméra réseau AXIS P1364–E/P1365–E sur votre réseau. Pour toute autre information relative à l’utilisation du produit, consultez le manuel de l’utilisateur disponible sur le site www.axis.com Procédures d’installation 1.
  • Seite 34: Aperçu Du Matériel

    AXIS P13-E Series Aperçu du matériel Voyant d'état Microphone intégré Logement de carte microSD Entrée audio Sortie audio Connecteur réseau (PoE) Voyant d’alimentation Voyant DEL réseau Bouton de commande 10 Connecteur E/S 11 Connecteur de l’iris 12 Non utilisé 13 Connecteur RS485/422...
  • Seite 35 AXIS P13-E Series AXIS P1364–E AXIS P1365–E Bague de mise au point Vis de verrouillage de la bague de mise au point Commande de zoom Câble de sécurité Connecteur de régulateur de chauffage Connecteur réseau (PoE OUT) Voyant d’état Connecteur réseau (PoE IN) Câble de régulateur de chauffage...
  • Seite 36: Fixation Murale

    AXIS P13-E Series Perforation (x2) Interrupteur d'alarme d'intrusion 10 Vis du support T20 (x2) 11 Vis de la caméra T20 12 Broche 13 Support 14 Fenêtre 15 Couvercle supérieur 16 Protection étanche Fixation murale Câble réseau (acheminé à travers le support mural) Câble d'alimentation (acheminé...
  • Seite 37 AXIS P13-E Series Voyants Note • Le voyant d'état peut être éteint pendant le fonctionnement normal. Pour ce faire, rendez-vous dans Setup > System Options > Ports & Devices > LED (Configuration > Options système > Ports et dispositifs > DEL). Consultez l'aide en ligne pour plus d'informations.
  • Seite 38 AXIS P13-E Series Voyants DEL du boîtier Voyant DEL Couleur Indication Vert Fonctionnement normal État Clignote une seule Erreur au niveau du régulateur de chauffage fois en vert Clignote deux fois Auto-test en vert Clignote trois fois Erreur générale en vert Comportement du voyant d’état pour l'assistant de mise au point...
  • Seite 39 (sous System Options > Ports & Devices (Options du système > Ports et dispositifs)). Connecteur audio Le produit Axis dispose des connecteurs audio suivants : • Entrée audio (rose) – entrée de 3,5 mm pour microphone mono ou signal d'entrée mono.
  • Seite 40: Caractéristiques Techniques

    • Réinitialisation du produit aux paramètres d’usine par défaut. Cf. page 52. • Connexion au service du Système d'hébergement vidéo AXIS ou au service AXIS Internet Dynamic DNS. Pour plus d'informations sur ces services, reportez-vous au Manuel de l'utilisateur. Caractéristiques techniques Conditions d'utilisation L'appareil Axis est uniquement destiné...
  • Seite 41 AXIS P13-E Series Produit AXIS P1364–E Alimentation par Ethernet (PoE) IEEE 802.3af/802.3at Type 1 Classe, max. 12,95 W, type 5,0 W AXIS P1365–E Alimentation par Ethernet (PoE) IEEE 802.3af/802.3at Type 1 Classe, max. 12,95 W, type 5,3 W Connecteurs Connecteur d'E/S Bloc terminal à...
  • Seite 42 AXIS P13-E Series Connecteur audio Connecteurs audio 3,5 mm (stéréo) 1 Pointe 2 Anneau 3 Manchon Masse Entrée audio Entrée micro/ligne Sortie audio Masse Sortie ligne (mono) Connecteur RS485/422 Blocs terminaux à 2 broches pour interface série RS485/RS422. Le port série peut être configuré pour la prise en charge de : •...
  • Seite 43 Pour créer d'autres trous de câbles, ouvrez les perforations situées dans la partie inférieure du boîtier. Cf. Aperçu du matériel page 34. Pour plus d'informations sur les accessoires, tels que les joints de câble et les presse-étoupes adaptés à d'autres zones de câble, consultez www.axis.com...
  • Seite 44: Schémas De Connexion

    Pour plus d'informations sur les exigences réglementaires, consultez Regulatory Information 2 • Veillez à ne pas rayer, endommager ou laisser d'empreintes sur la fenêtre, car cela pourrait altérer la qualité d'image. Le produit Axis peut être installé avec des câbles acheminés à travers ou le long du mur.
  • Seite 45: Installation De La Fixation Murale

    4. Serrez les vis du support mural pour le fixer. Note • Pour obtenir des instructions détaillées, reportez-vous au guide d'installation de la fixation murale disponible dans la boîte et sur le site www.axis.com. Placement du boîtier sur la fixation murale A A A VIS •...
  • Seite 46 AXIS P13-E Series 2. Sélectionnez le joint de câble à utiliser et tirez sur la patte pour ouvrir un trou au niveau du câble réseau. Couvercle inférieur Vis du couvercle inférieur T20 (x4) Joint de câble M20 (x2) Patte 3. Faites passer le câble réseau à travers le joint de câble.
  • Seite 47 AXIS P13-E Series A A A VIS Si vous ne tirez pas sur le câble, il existe un risque d'infiltration d’eau et d’endommagement du produit. 5. Assurez-vous que le joint de câble est correctement installé. 6. Si vous connectez un périphérique auxiliaire (par exemple, un périphérique d'entrée/sortie, audio ou d'alimentation externe) à...
  • Seite 48 AXIS P13-E Series Couvercle inférieur Vis T20 (x4) Support mural Vis de réglage du support T30 Branchez la caméra 1. Le cas échéant, connectez les dispositifs externe/entrée ou les appareils audio à la caméra. 2. Connectez le câble de régulateur de chauffage au connecteur de régulateur de chauffage sur le couvercle inférieur.
  • Seite 49 AXIS P13-E Series Connecteur réseau (PoE OUT) Connecteur réseau (PoE IN) 5. Vérifiez que les voyants sur la caméra et le boîtier indiquent une condition correcte. Cf. Voyants page 37. 6. Desserrez la vis de réglage du support afin d’orienter la caméra dans la direction voulue.
  • Seite 50: Utilisez Le Produit

    Utilisez le produit Si vous souhaitez rechercher des produits Axis sur le réseau ou leur affecter des adresses IP sous Windows®, nous recommandons l’utilisation des applications AXIS IP Utility et AXIS Camera Management. Ces deux applications sont gratuites et peuvent être téléchargées depuis www.axis.com/techsup...
  • Seite 51: Réglage De La Mise Au Point Avec L'assistant De Mise Au Point

    • Si les mouvements devant la caméra ne peuvent pas être évités, l’assistant de mise au point ne doit pas être utilisé. • Si vous ne relâchez pas le bouton de commande dans les deux secondes, le service AXIS Dynamic DNS sera activé au lieu de l’assistant de mise au point.
  • Seite 52 Setup > System Options > Maintenance (Configuration > Options du système > Maintenance) et cliquez sur Default (Défaut). Pour obtenir plus de renseignements Pour la dernière version de ce document, consultez le site www.axis.com Le Manuel de l’utilisateur est disponible à l’adresse suivante : www.axis.com...
  • Seite 53: Informations Sur La Garantie

    Visitez le centre d’apprentissage en ligne Axis sur le site www.axis.com/academy pour en savoir plus sur les formations, les webinaires, les tutoriels et les guides. Informations sur la garantie Pour obtenir de plus amples informations sur la garantie du produit AXIS et des renseignements connexes, allez sur le site www.axis.com/warranty/...
  • Seite 55: Gefährdungsstufen

    AXIS P13-E Series Sicherheitsinformation Lesen Sie das Installationshandbuch sorgfältig durch bevor sie das Produkt installieren. Bewahren Sie das Installationshandbuch für zukünftige Zwecke auf. Gefährdungsstufen GEFAHR Weist auf eine gefährliche Situation hin, welche, falls nicht verhindert, zu Tod oder schweren Verletzungen führt.
  • Seite 56 Produkts, wenn ein Batteriewechsel erforderlich ist. Weitere Informationen über den Serverbericht finden Sie auf den Setup-Seiten des Produkts, oder wenden Sie sich an den Axis Support. Die Batterie sollte nur bei Bedarf ersetzt werden. Wenden Sie sich in diesem Fall an den Axis Support unter www.axis.com/techsup.
  • Seite 57 AXIS P13-E Series WARNUNG • Explosionsgefahr bei fehlerhaftem Batteriewechsel. • Die Batterie darf nur durch eine identische Batterie oder eine von Axis empfohlene Batterie ersetzt werden. • Verbrauchte Batterien sind gemäß den örtlichen Vorschriften oder den Anweisungen des Herstellers zu entsorgen.
  • Seite 59: Installationsschritte

    AXIS P13-E Series Installationsanleitung In dieser Anleitung wird die Installation der AXIS P1364–E/P1365–E Netzwerk-Kamera in Ihrem Netzwerk beschrieben. Weitere Informationen zur Nutzung dieses Produkts finden Sie im Benutzerhandbuch unter www.axis.com. Installationsschritte 1. Stellen Sie sicher, dass die Packungsinhalte, Werkzeuge und andere notwendige Materialien für die Installation in Ordnung sind.
  • Seite 60: Übersicht Über Die Hardware

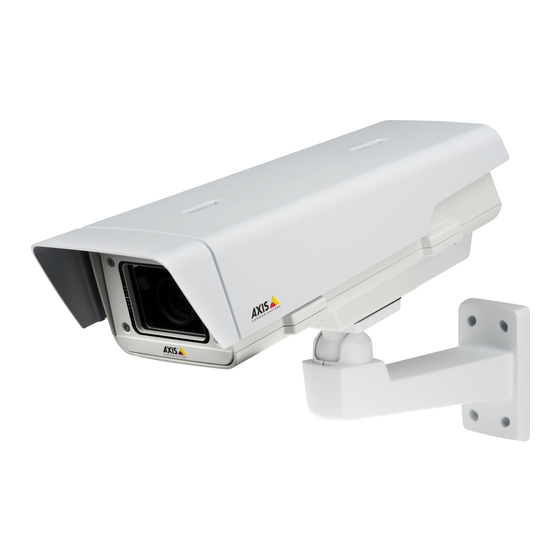
    AXIS P13-E Series Übersicht über die Hardware Status-LED Integriertes Mikrofon microSD-Karteneinschub Audioeingang Audioausgang Netzwerkanschluss (PoE) Netz-LED Netzwerk-LED Steuertaste 10 E/A-Anschluss 11 Blendenanschluss 12 Nicht verwendet 13 RS485/422-Anschluss...
  • Seite 61 AXIS P13-E Series AXIS P1364–E AXIS P1365–E Fokusring Feststellschraube für den Fokusring Zoomregler Sicherheitsdraht Anschluss für Heizelement Netzwerkanschluss (PoE-Ausgang) LED-Statusanzeige Netzwerkanschluss (PoE IN) Kabel für Heizelement Kabeldichtung M20 (2x)
  • Seite 62 AXIS P13-E Series Aufbohrung (2x) Einbruchalarmschalter 10 Schraube T20 für Halter (2x) 11 Schraube T20 für Kamera 12 Stift 13 Halter 14 Fenster 15 Obere Abdeckung 16 Wetterschutz Wandmontage Netzwerkkabel (durch Wandhalterung führen) Stromkabel (durch Wandhalterung führen) (für Produkte mit Stromanschluss) Schraube T20 (4x) Einstellschraube T30 für Halterung...
  • Seite 63 AXIS P13-E Series LEDs Beachten • Die Status-LED kann so eingestellt werden, dass sie während des Normalbetriebs nicht leuchtet. Diese Konfiguration können Sie unter Setup > System Options > Ports & Devices > LED (Setup > Systemoptionen > Ports & Geräte > LED) einstellen. Weitere Informationen finden Sie in der Online-Hilfe.
  • Seite 64: Led-Leuchten Am Gehäuse

    AXIS P13-E Series LED-Leuchten am Gehäuse Farbe Bedeutung Status Grün Normaler Betrieb Grünes, einmaliges Probleme mit dem Heizelement Blinken Grünes, doppeltes Selbsttest Blinken Grünes, dreifaches Allgemeiner Fehler Blinken Verhalten der LED-Statusanzeige für den Fokus-Assistenten Die Status-LED blinkt, wenn der Fokus-Assistent aktiviert ist.
  • Seite 65 Status und der Eingang wird aktiviert (siehe System Options > Ports & Devices (Systemoptionen > Anschlüsse & Geräte)). Audioanschlüsse Das Axis-Produkt ist mit den folgenden Audioanschlüssen ausgestattet: • Audioeingang (rosa) – 3,5-mm-Anschluss für ein Monomikrofon oder ein Monosignal. •...
  • Seite 66: Technische Daten

    Aktivierung des Fokus-Assistenten. Drücken Sie kurz die Steuertaste. • Zurücksetzen des Produkts auf die Werkseinstellungen. Siehe Seite 78. • Verbinden mit einem AXIS Video Hosting System-Service oder einem AXIS Internet Dynamic DNS-Service. Weitere Informationen zu diesen Diensten finden Sie in der Bedienungsanleitung. Technische Daten Betriebsbedingungen Das Axis Produkt ist für die Verwendung im Außenbereich konzipiert.
  • Seite 67 AXIS P13-E Series Produkt AXIS P1364–E Power over Ethernet (PoE) IEEE 802.3af/802.3at Typ 1 Klasse 3, max. 12,95 W, normalerweise 5,0 W AXIS P1365–E Power over Ethernet (PoE) IEEE 802.3af/802.3at Typ 1 Klasse 3, max. 12,95 W, normalerweise 5,3 W Anschlüsse...
  • Seite 68 AXIS P13-E Series Audioanschlüsse 3,5-mm- Audioanschlüsse (stereo) 2 Ring 1 Spitze 3 Schaft Audioeingang Masse Mikrofon-/Leitungseingang Audioausgang Masse Leitungsausgang (mono) RS485/422-Anschluss Zwei 2-polige Anschlussblöcke für serielle Schnittstellen vom Typ RS485/RS422. Der serielle Anschluss kann in den folgenden Anschlussmodi konfiguriert werden: •...
  • Seite 69 5 bis 15 mm Ca. 4 bis 6/0 Öffnen Sie für zusätzliche Kabellöcher die Aufbohrungen in der Gehäuseunterseite. Siehe Übersicht über die Hardware auf Seite 60. Unter www.axis.com finden Sie Informationen über Zubehör wie Kabeldichtungen und Kabelverschraubungen für andere Kabelbereiche.
  • Seite 70: Anschlussschaltbilder

    AXIS P13-E Series Anschlussschaltbilder E/A-Anschluss 0 V (-) DC DC-Ausgang 12 V, max. 50 mA E/A als Eingang konfiguriert E/A als Ausgang konfiguriert Installieren der Hardware HINWEIS HINWEIS HINWEIS • Aufgrund örtlicher Vorschriften oder der Umgebungsbedingungen und elektrischen Bedingungen, unter denen das Produkt verwendet wird, kann ein abgeschirmtes Netzwerkkabel (STP) empfehlenswert oder notwendig sein.
  • Seite 71: Montage Der Wandhalterung

    AXIS P13-E Series Bei der Installation des Axis Produkts können die Kabel durch die Wand oder an der Wand entlang geführt werden. Lesen Sie die Anweisungen, bevor Sie das Produkt installieren: 1. Montieren Sie die Wandhalterung. Siehe Montage der Wandhalterung auf Seite 71.
  • Seite 72: Befestigen Des Gehäuses An Der Wandhalterung

    • Verwenden Sie Kabel aus dem angegebenen Kabelbereich, siehe Seite 69. Wenn eine andere Kabeldichtung als die mitgelieferte verwendet wird, kann Wasser eindringen und das Produkt beschädigen. Unter www.axis.com finden Sie Informationen zu Kabeldichtungen und Kabelverschraubungen für andere Kabelbereiche. • Wird mehr als ein Kabel verwendet, muss jedes Kabel durch eine separate Kabeldichtung geführt werden.
  • Seite 73 AXIS P13-E Series HINWEIS HINWEIS HINWEIS Wenn das Netzwerkkabel über einen vormontierten Netzwerkstecker verfügt, entfernen Sie die Kabeldichtung, und verwenden Sie das Anschlussstück, um ein Reißen der Kabeldichtung zu verhindern. Verwenden Sie keine Netzwerkkabel, die Netzwerkstecker mit Deckeln aufweisen, da diese auch bei Verwendung des Anschlussstücks zum Reißen der Kabeldichtung führen können.
  • Seite 74: Anbringen Der Kamera

    AXIS P13-E Series Untere Abdeckung Schraube T20 (4x) Wandhalterung Einstellschraube T30 für Halterung Anbringen der Kamera 1. Schließen Sie ggf. externe bzw. Eingabegeräte oder Audiogeräte an die Kamera an. 2. Schließen Sie das Kabel des Heizelements an den entsprechenden Anschluss in der unteren Abdeckung an.
  • Seite 75 AXIS P13-E Series Netzwerkanschluss (PoE-Ausgang) Netzwerkanschluss (PoE IN) 5. Vergewissern Sie sich, dass die Kamera- und Gehäuse-LEDs den Betriebszustand ordnungsgemäß anzeigen. Siehe LEDs auf Seite 63. 6. Lösen Sie die Einstellschraube der Halterung und richten Sie die Kamera auf das gewünschte Ziel aus.
  • Seite 76: Zugriff Auf Das Produkt

    Sie die Schrauben wieder fest. Zugriff auf das Produkt Für die Suche nach Axis Produkten im Netzwerk und zur Zuweisung einer IP-Adresse unter Windows® werden AXIS IP Utility und AXIS Camera Management empfohlen. Beide Anwendungen sind kostenlos und können von unserer Website unter www.axis.com/techsup heruntergeladen werden.
  • Seite 77: Einstellen Der Bildschärfe Mit Dem Fokus-Assistenten

    Fokus-Assistenten nicht verwenden. • Wenn Sie die Steuertaste nicht innerhalb von zwei Sekunden loslassen, wird anstelle des Fokus-Assistenten der AXIS Dynamic DNS Service aktiviert. • Wenn die Kamera so montiert ist, dass die Betätigung der Steuertaste nicht möglich ist, können Sie den Fokus-Assistenten trotzdem verwenden. Befolgen Sie die Anweisungen.
  • Seite 78: Zurücksetzen Auf Werkseinstellungen

    Die Parameter können auch über die Weboberfläche auf die Werkseinstellungen zurückgesetzt werden. Rufen Sie Setup > System Options > Maintenance (Setup > Systemoptionen > Wartung) auf und klicken Sie auf Default (Standard). Weitere Informationen Unter www.axis.com finden Sie die neuste Version dieses Dokuments. Das Benutzerhandbuch steht unter www.axis.com zur Verfügung.
  • Seite 79: Gewährleistungsinformationen

    Firmware-Version zu sehen, gehen Sie auf Setup > About (Setup > Über). Besuchen Sie das Axis-Schulungszentrum www.axis.com/academy für anregende Schulungen, Webinare, Lernprogramme und Anleitungen. Gewährleistungsinformationen Informationen zur Gewährleistung der Axis Produkte und andere, hierzu relevante Informationen, finden Sie unter www.axis.com/warranty/...
  • Seite 81: Livelli Di Pericolo

    AXIS P13-E Series Informazioni di sicurezza Leggere con attenzione la guida all'installazione prima di installare il dispositivo. Conservare questo documento per usi futuri. Livelli di pericolo PERICOLO Indica una situazione pericolosa che, se non evitata, provoca morte o lesioni gravi.
  • Seite 82 • Durante il trasporto del dispositivo Axis, utilizzare l'imballaggio originale o equivalente per evitare danni al dispositivo. Batteria Il dispositivo Axis utilizza una batteria al litio da 3,0 V CR2032 come alimentazione per il suo real-time clock (RTC) interno. In condizioni normali questa batteria avrà una durata minima di cinque anni.
  • Seite 83 • Rischio di esplosione se la batteria viene sostituita in modo errato. • Sostituire solo con una batteria identica o una batteria consigliata da Axis. • Smaltire le batterie usate in base alle normative locali o alle istruzioni del produttore...
  • Seite 85: Procedura Di Installazione

    AXIS P13-E Series Guida all'installazione La presente guida all'installazione fornisce le istruzioni necessarie per installare la telecamera di rete AXIS P1364–E/P1365–E nella rete in uso. Per ulteriori informazioni sull'utilizzo del prodotto, consultare la Guida per l'utente disponibile all'indirizzo www.axis.com. Procedura di installazione 1.
  • Seite 86: Panoramica Dell'hardware

    AXIS P13-E Series Panoramica dell'hardware LED di stato Microfono incorporato Slot per scheda microSD Ingresso audio Uscita audio Connettore di rete (PoE) LED di alimentazione LED di rete Pulsante di comando 10 Connettore I/O 11 Connettore del diaframma 12 Non utilizzato...
  • Seite 87 AXIS P13-E Series AXIS P1364–E AXIS P1365–E Ghiera di messa a fuoco Vite di arresto della ghiera di messa fuoco Levetta zoom Cavo di sicurezza Morsettiera del riscaldatore Connettore di rete (PoE OUT) Indicatore LED di stato Connettore di rete (PoE IN)
  • Seite 88: Montaggio A Parete

    AXIS P13-E Series Preforo (2x) Interruttore allarme anti intrusione 10 Vite del supporto T20 (2x) 11 Vite della telecamera T20 12 Perno 13 Supporto 14 Finestra 15 Coperchio superiore 16 Schermo di protezione dagli agenti atmosferici Montaggio a parete Cavo di rete (da instradare attraverso la staffa a parete)
  • Seite 89: Indicatori Led

    AXIS P13-E Series Indicatori LED Nota • Lo stato del LED può essere configurato per essere spento durante il normale funzionamento. Per configurarlo, selezionare Setup > System Options > Ports & Devices > LED (Configurazione > Opzioni di sistema > Porte & Dispositivi > LED). Per ulteriori informazioni, consultare l'aiuto in linea.
  • Seite 90 AXIS P13-E Series Indicatori LED dell'alloggiamento Colore Indicazione LED di stato Verde Utilizzo normale Verde, lampeggio Errore riscaldatore singolo Verde, lampeggio Verifica automatica doppio Verde, lampeggio Errore generale triplo Comportamento del LED di stato per Focus Assistant Il LED di stato lampeggia quando Focus Assistant è attivo.
  • Seite 91 (visualizzato in System Options > Ports & Devices (Opzioni di Sistema > Porte e Dispositivi)). Connettore audio Il prodotto Axis dispone dei seguenti connettori audio: • Ingresso audio (rosa) - Ingresso audio da 3,5 mm per microfono in mono o segnale mono line-in.
  • Seite 92: Dati Tecnici

    • Ripristino del dispositivo alle impostazioni predefinite di fabbrica. Consultare pagina 104. • Collegamento a un servizio AXIS Video Hosting System o AXIS Internet Dynamic DNS Service. Per ulteriori informazioni su questi servizi, consultare il Manuale Utente. Dati tecnici Condizioni di funzionamento Il dispositivo Axis è...
  • Seite 93 AXIS P13-E Series Dispositivo AXIS P1364–E Power over Ethernet (PoE) IEEE 802.3af/802.3at Tipo 1 Classe 3, max 12,95 W, tipico 5,0 W AXIS P1365–E Power over Ethernet (PoE) IEEE 802.3af/802.3at Tipo 1 Classe 3, max 12,95 W, tipico 5,3 W...
  • Seite 94 AXIS P13-E Series Connettore audio Connettori audio da 3,5 mm (stereo) 1 Punta 2 Anello 3 Guaina Ingresso audio Terra Ingresso microfono/linea Uscita audio Terra Uscita linea (mono) Connettore RS485/422 Due morsettiere a 2 pin per interfaccia seriale RS485/RS422. La porta seriale può essere configurata per supportare: •...
  • Seite 95 Per creare ulteriori fori per i cavi, aprire i prefori collocati nella parte inferiore della custodia. Consultare Panoramica dell'hardware alla pagina 86. Per informazioni sugli accessori disponibili, come ad esempio guarnizioni per cavi e pressacavi adatti per altre aree dei cavi, visitare il sito Web www.axis.com.
  • Seite 96: Schema Delle Connessioni

    Per maggiori informazioni sui requisiti normativi, consultare Regulatory Information 2 • Non graffiare, danneggiare o lasciare impronte digitali sulla finestra per preservare la qualità dell'immagine. È possibile installare il dispositivo Axis instradando i cavi attraverso o lungo la parete. Leggere tutte le istruzioni prima di installare il prodotto:...
  • Seite 97 Per informazioni sulle guarnizioni per cavi e i pressacavi adatti per altre aree dei cavi, visitare il sito Web www.axis.com. • Utilizzando più di un cavo, instradare ciascun cavo attraverso una guarnizione separata.
  • Seite 98 AXIS P13-E Series Coperchio inferiore Vite del coperchio inferiore T20 (4x) Guarnizione cavo M20 (2x) Linguetta 3. Inserire il cavo di rete attraverso la guarnizione per cavi. A A A VVISO VVISO VVISO Se il cavo di rete dispone di un connettore preinstallato, rimuovere la guarnizione per cavi e usare la protezione del connettore per evitare danni alla guarnizione.
  • Seite 99 AXIS P13-E Series 5. Verificare il corretto montaggio della guarnizione del cavo. 6. In caso di connessione di un dispositivo (es. di I/O, audio o alimentazione esterna) alla telecamera, ripetere i passaggi precedenti (se consentito per il dispositivo in questione).
  • Seite 100 AXIS P13-E Series Coperchio inferiore Vite T20 (4x) Staffa a parete Vite di regolazione della staffa T30 Collegare la telecamera 1. Se necessario, collegare alla telecamera dispositivi esterni/di input o dispositivi audio. 2. Collegare il cavo del riscaldatore al connettore del coperchio inferiore.
  • Seite 101 AXIS P13-E Series Connettore di rete (PoE OUT) Connettore di rete (PoE IN) 5. Verificare che i LED della telecamera e dell'alloggiamento indichino la corretta condizione. Consultare Indicatori LED alla pagina 89. 6. Allentare la vite di regolazione della staffa per orientare la telecamera verso il punto desiderato.
  • Seite 102: Regolazione Della Messa A Fuoco

    Accedere al dispositivo AXIS IP Utility e AXIS Camera Management sono i metodi consigliati per trovare i dispositivi Axis in rete e assegnare loro un indirizzo IP in Windows®. Queste applicazioni sono entrambe gratuite e possono essere scaricate da www.axis.com/techsup...
  • Seite 103 • Se non si rilascia il pulsante di comando entro due secondi, viene abilitata la funzione AXIS Dynamic DNS Service (Servizio DNS dinamico) anziché Focus Assistant.
 • È possibile utilizzare Focus Assistant anche se la posizione di installazione della telecamera non consente l'accesso al tasto di comando.
  • Seite 104: Ripristino Dei Valori Predefiniti Di Fabbrica

    Web. Andare a Setup > System Options > Maintenance (Configurazione > Opzioni di sistema > Manutenzione) e fare clic su Default (Predefinito). Ulteriori Informazioni Per la versione più recente di questo documento, visitare il sito all'indirizzo www.axis.com Il Manuale per l'utente è disponibile all'indirizzo www.axis.com...
  • Seite 105: Informazioni Sulla Garanzia

    Setup > About (Impostazioni > Informazioni su). Visitare il centro di apprendimento Axis alla pagina www.axis.com/academy per servizi di formazione utili, webinar, tutorial e guide. Informazioni sulla garanzia Per informazioni sulla garanzia del dispositivo Axis e informazioni ad esso relative, consultare la pagina www.axis.com/warranty/...
  • Seite 107: Niveles De Peligro

    AXIS P13-E Series Información de seguridad Lea esta Guía de instalación con atención antes de instalar el producto. Guarde la Guía de instalación para poder consultarla en otro momento. Niveles de peligro PELIGRO Indica una situación peligrosa que, si no se evita, provocará lesiones graves o la muerte.
  • Seite 108 Batería Este producto de Axis utiliza una batería de litio CR2032 de 3,0 V como fuente de alimentación del reloj interno en tiempo real. En condiciones normales, esta batería durará un mínimo de cinco años.
  • Seite 109 ADVERTENCIA • La sustitución incorrecta de la batería implica riesgo de explosión. • Sustituya la batería por una batería idéntica u otra batería recomendada por Axis. • Deseche las baterías usadas de conformidad con la normativa local o las instrucciones...
  • Seite 111: Contenido Del Paquete

    AXIS P13-E Series Guía de instalación Esta guía de instalación incluye las instrucciones necesarias para instalar las cámaras de red AXIS P1364–E/P1365–E en su red. Para conocer otros aspectos de uso del producto, vea el manual del usuario disponible en www.axis.com.
  • Seite 112: Información General Del Hardware

    AXIS P13-E Series Información general del hardware LED de estado Micrófono integrado Ranura para tarjetas microSD Entrada de audio Salida de audio Conector de red (PoE) LED de alimentación LED de red Botón de control 10 Conector de E/S 11 Conector de iris...
  • Seite 113 AXIS P13-E Series AXIS P1364–E AXIS P1365–E Anillo de enfoque Tornillo de bloqueo del anillo de enfoque Palanca de zoom Cable de seguridad Conector del calefactor Conector de red (PoE OUT) Indicador LED de estado Conector de red (PoE IN)
  • Seite 114: Montaje En Pared

    AXIS P13-E Series Orificio preperforado (2) Interruptor de alarma contra intrusiones 10 Tornillos del soporte T20 (2) 11 Tornillo de la cámara T20 12 Pin 13 Soporte 14 Ventana 15 Cubierta superior 16 Parasol Montaje en pared Cable de red (guiado a través de la escuadra de pared) Cable de alimentación (guiado a través de la escuadra de pared) (para todos los...
  • Seite 115: Indicadores Led

    AXIS P13-E Series Indicadores LED Nota • Se puede configurar el LED de estado para que se apague durante el funcionamiento normal. Para ello, vaya a Setup > System Options > Ports & Devices > LED (Configuración > Opciones del sistema > Puertos y dispositivos > LED). Vea la ayuda en línea para obtener más información.
  • Seite 116 AXIS P13-E Series Indicadores LED de la carcasa Color Indicación Estado Verde Funcionamiento normal Verde, un parpadeo Error del calefactor Verde, doble autocomprobación parpadeo Verde, triple error general parpadeo Comportamiento del indicador LED de estado del Asistente de Enfoque Cuando el LED de estado parpadea, el Asistente de Enfoque está activado.
  • Seite 117 (se indica en System Options > Ports & Devices (Opciones del sistema > Puertos y dispositivos)). Conector de audio El producto de Axis integra los siguientes conectores de audio: • Entrada de audio (rosa): entrada de 3,5 mm para micrófono mono, o entrada de línea de señal mono.
  • Seite 118: Especificaciones

    Restablecer el producto a la configuración predeterminada de fábrica. Consulte página 130. • Conectarse a un servicio AXIS Video Hosting System o al Servicio de DNS dinámico de Internet de AXIS. Para obtener más información sobre estos servicios, consulte el Manual del usuario.
  • Seite 119 AXIS P13-E Series Producto AXIS P1364–E Alimentación a través de Ethernet (PoE) IEEE 802.3af/802.3at Tipo 1 Clase 3, 12,95 W máx., 5,0 W típicos AXIS P1365–E Alimentación a través de Ethernet (PoE) IEEE 802.3af/802.3at Tipo 1 Clase 3, 12,95 W máx., 5,3 W típicos...
  • Seite 120 AXIS P13-E Series Conector de audio Conectores de audio de 3,5 mm (estéreo) 1 Punta 2 Anillo Manguito Entrada de Tierra Entrada de línea/micrófono audio Salida de Tierra Salida de línea (mono) audio Conector RS485/422 Dos bloques de terminales de 2 pines para la interfaz serie RS485/RS422.
  • Seite 121 En caso de necesitar orificios para cables adicionales, abra los orificios preperforados situados en la parte inferior de la carcasa. Vea Información general del hardware en la página 112. Para obtener información acerca de los accesorios, como juntas de cable y prensaestopas permitidos para otras áreas de cableado, visite www.axis.com.
  • Seite 122: Diagramas De Conexión

    • Preste atención para no arañar, dañar ni dejar las huellas en la ventana de la carcasa, puesto que esto puede provocar una disminución de la calidad de imagen. El producto de Axis puede instalarse guiando los cables a través de la pared o sobre esta.
  • Seite 123 Para obtener más información acerca de las juntas de cable y de los prensaestopas permitidos para otras áreas de cableado, visite www.axis.com. • Si se utiliza más de un cable, deberá pasarse cada cable a través de una junta distinta.
  • Seite 124 AXIS P13-E Series 2. Seleccione la junta de cable que vaya a utilizar y tire de la lengüeta para abrir un orificio para el cable de red. Cubierta inferior Tornillo T20 de cubierta inferior (4x) Junta de cable M20 (2x) Lengüeta...
  • Seite 125 AXIS P13-E Series A A A VISO VISO VISO Si no se tira del cable hacia atrás, podría filtrarse agua y dañar el producto. 5. Asegúrese de que la junta de cable encaje correctamente. 6. Si se conecta un dispositivo auxiliar a la cámara, por ejemplo un dispositivo de alimentación externo, un dispositivo de E/S o uno de audio, repita los pasos anteriores...
  • Seite 126: Conexión De La Cámara

    AXIS P13-E Series Cubierta inferior Tornillo T20 (4x) Escuadra de pared Tornillo de ajuste de escuadra T30 Conexión de la cámara 1. Si procede, conecte dispositivos externos, de entrada o de audio a la cámara. 2. Conecte el cable del calefactor al conector de este situado en la cubierta inferior.
  • Seite 127 AXIS P13-E Series Conector de red (PoE OUT) Conector de red (PoE IN) 5. Asegúrese de que los LED de la cámara y la carcasa indican un estado correcto. Vea Indicadores LED en la página 115. 6. Afloje el tornillo de ajuste de la escuadra para orientar la cámara hacia el punto de interés.
  • Seite 128: Acceso Al Producto

    Acceso al producto Se recomiendan AXIS IP Utility y AXIS Camera Management como métodos para buscar los productos de Axis en la red y asignarles direcciones IP en Windows®. Ambas aplicaciones son gratuitas y pueden descargase de www.axis.com/techsup El producto se puede utilizar con la mayoría de los sistemas operativos y navegadores. Los navegadores recomendados son ®...
  • Seite 129 • Si el botón de control no se suelta en dos segundos, se activará el Servicio DNS dinámico de AXIS en lugar del Asistente de Enfoque. • Si la cámara está montada de manera que no es posible acceder al botón de control, todavía se puede utilizar el Asistente de Enfoque.
  • Seite 130: Restablecimiento A La Configuración Predeterminada De Fábrica

    Vaya a Setup > System Options > Maintenance (Configuración > Opciones del sistema > Mantenimiento) y haga clic en Default (Predeterminado). Más información Para consultar la versión más reciente de este documento, vaya a www.axis.com El Manual de usuario se encuentra disponible en www.axis.com.
  • Seite 131: Información De Garantía

    Visite el centro de aprendizaje de www.axis.com/academy para consultar guías, tutoriales, seminarios web y cursos que pueden resultarle útiles. Información de garantía Para obtener más detalles sobre la garantía del producto Axis y la información relacionada con ella, consulte www.axis.com/warranty/...
  • Seite 133 AXIS P13-E Series 安 安 安 全 全 全 情 情 情 報 報 報 本製品を設置する前に、このインストールガイドをよくお読みください。 インス トールガイドは、後で参照できるように保管しておいてください。 危 危 危 険 険 険 レ レ レ ベ ベ ベ ル ル ル 危 危 危 険 険 険 回避しない場合、死亡または重傷につながる危険な状態を⽰します。...
  • Seite 134 AXIS P13-E Series 安 安 安 全 全 全 ⼿ ⼿ ⼿ 順 順 順 注 注 注 記 記 記 • 本製品は、お使いになる地域の法律や規制に準拠して使⽤してください。 • 本製品は乾燥した換気のよい環境に保管してください。 • 本製品に衝撃または強い圧⼒を加えないでください。 • 本製品を不安定なブラケット、表⾯、または壁に設置しないでください。 • 本製品を設置する際には、適切な⼯具のみを使⽤してください。 電動⼯具を 使⽤して過剰な⼒をかけると、製品が損傷することがあります。 • 化学薬品、腐⾷剤、噴霧式クリーナーは使⽤しないでください。 • 清掃には、きれいな⽔に浸した清潔な布を使⽤してください。 • 製品の技術仕様に準拠したアクセサリーのみを使⽤してください。 これらの...
  • Seite 135 AXIS P13-E Series 警 警 警 告 告 告 • バッテリーは、正しく交換しないと爆発する危険があります。 • 交換⽤バッテリーとしては、同⼀品またはAxisが推奨するバッテリーのみを 使⽤してください。 • 使⽤済みバッテリーは、地域の規制またはバッテリーメーカーの指⽰に 従って廃棄してください。...
  • Seite 137 AXIS P13-E Series イ イ イ ン ン ン ス ス ス ト ト ト ー ー ー ル ル ル ガ ガ ガ イ イ イ ド ド ド このインストールガイドでは、AXIS P1364‒E/P1365‒Eネットワークカメラをお使い のネットワークにインストールする⼿順について説明します。 製品の使⽤の詳細に www.axis.com ついては、 で⼊⼿できるユーザーズマニュアルを参照してください 設 設 設 置 置 置 ⼿ ⼿ ⼿ 順 順 順...
  • Seite 138 AXIS P13-E Series ハ ハ ハ ー ー ー ド ド ド ウ ウ ウ ェ ェ ェ ア ア ア の の の 概 概 概 要 要 要 ステータスLED 内蔵マイクロフォン microSDカードスロット ⾳声⼊⼒ ⾳声出⼒ ネットワークコネクター (PoE) 電源LED ネットワークLED コントロールボタン...
  • Seite 139 AXIS P13-E Series AXIS P1364‒E AXIS P1365‒E フォーカスリング フォーカスリング固定ネジ ズーム調節レバー 安全ワイヤー ヒーターコネクタ ネットワークコネクタ (PoE出⼒) ステータスLEDインジケーター ネットワークコネクター (PoE⼊⼒) ヒーターケーブル...
  • Seite 140 AXIS P13-E Series ケーブルガスケットM20 (×2) ドリルアウト (×2) 侵⼊アラームスイッチ 10 ホルダーネジT20 (×2) 11 カメラネジT20 12 ピン 13 ホルダー 14 ウィンドウ 15 上蓋 16 ウェザーシールド 壁 壁 壁 ⾯ ⾯ ⾯ 取 取 取 付 付 付 ブ ブ ブ ラ ラ ラ ケ ケ ケ ッ ッ ッ ト ト ト...
  • Seite 141 AXIS P13-E Series 壁⾯取付ブラケット LED イ イ イ ン ン ン ジ ジ ジ ケ ケ ケ ー ー ー タ タ タ ー ー ー 注意 • ステータスLEDは、正常動作時に消灯させることができます。 設定は、 [Setup [Setup - - - System [Setup System System Options...
  • Seite 142 AXIS P13-E Series ハ ハ ハ ウ ウ ウ ジ ジ ジ ン ン ン グ グ グ LED LED イ イ イ ン ン ン ジ ジ ジ ケ ケ ケ ー ー ー タ タ タ ー ー ー...
  • Seite 143 AXIS P13-E Series I/O コ コ コ ネ ネ ネ ク ク ク タ タ タ ー ー ー 外部装置を接続し、カメラに対するいたずらの警報、動体検知、イベントトリ ガー、低速度撮影、アラーム通知などを使⽤することができます。 I/Oコネクター は、0 V DC基準点と電⼒ (DC出⼒) に加えて、以下のインターフェースを提供します。 デ デ デ ジ ジ ジ タ タ タ ル ル ル 出 出 出 ⼒ ⼒ ⼒ ̶ リレーやLEDなどの外部デバイスを接続します。 接続され...
  • Seite 144 フォーカスアシスタントを有効にする。 コントロールボタンを押して、す • ぐに離します。 156ページ 製品を⼯場出荷時の設定にリセットする。 を参照してください。 • AXIS Video Hosting SystemサービスまたはAXIS Internet Dynamic DNSサービ • スに接続する。 これらのサービスの詳細については、ユーザーズマニュ アルを参照してください。 仕 仕 仕 様 様 様 動 動 動 作 作 作 条 条 条 件 件 件 本製品は屋外対応モデルです。 製 製 製 品 品 品...
  • Seite 145 AXIS P13-E Series 製 製 製 品 品 品 AXIS P1364‒E Power over Ethernet (PoE) IEEE 802.3af/802.3at Type 1 Class 3、最⼤12.95 W、標準5.0 W AXIS P1365‒E Power over Ethernet (PoE) IEEE 802.3af/802.3at Type 1 Class 3、最⼤12.95 W、標準5.3 W コ コ コ ネ ネ ネ ク ク ク タ タ タ ー ー ー...
  • Seite 146 AXIS P13-E Series ⾳ ⾳ ⾳ 声 声 声 コ コ コ ネ ネ ネ ク ク ク タ タ タ 3.5 mm⾳声コネク タ (ステレオ) 3 スリー 1 チップ 2 リング ブ ⾳ ⾳ ⾳ 声 声 声 ⼊ ⼊ ⼊ ⼒ ⼒ ⼒...
  • Seite 147 AXIS P13-E Series ケ ケ ケ ー ー ー ブ ブ ブ ル ル ル エ エ エ リ リ リ ア ア ア 注 注 注 記 記 記 • 指定のケーブルエリアに収まるケーブルを使⽤してください。 • 地域の規制に適合したケーブルを選択してください。 • すべてのケーブル孔が適切に密封されていることを確認してください。 • ケーブル孔とケーブルエリアの両⽅に適合するケーブルガスケットまたは ケーブルグランドを使⽤してください。 A A A WG 直...
  • Seite 148 AXIS P13-E Series 接 接 接 続 続 続 図 図 図 I/O コ コ コ ネ ネ ネ ク ク ク タ タ タ 0 V DC (-) DC出⼒12 V、最⼤50 mA I/O (⼊⼒として設定) I/O (出⼒として設定) ハ ハ ハ ー ー ー ド ド ド ウ ウ ウ ェ ェ ェ ア ア ア の の の 設 設 設 置 置 置...
  • Seite 149 AXIS P13-E Series 製品を取り付ける前に、すべての説明に⽬を通してください。 149ページの、壁⾯取付ブラケットの取 1. 壁⾯取付ブラケットの取り付け。 り付け を参照してください。 詳しい取り付け⼿順については、壁⾯取付 ブラケットに同梱のインストールガイド、またはwww.axis.comを参照 してください。 149ページの、ハウジング 2. ハウジングの壁⾯取付ブラケットへの取り付け。 の壁⾯取付ブラケットへの取り付け を参照してください。 152ページの、カメラの接続 3. カメラを接続します。 を参照してください。 壁 壁 壁 ⾯ ⾯ ⾯ 取 取 取 付 付 付 ブ ブ ブ ラ ラ ラ ケ ケ ケ ッ ッ ッ ト ト ト の の の 取 取 取 り り り 付 付 付 け け け...
  • Seite 150 AXIS P13-E Series 1. 裏蓋ネジを緩め、上蓋を持ち上げます。 2. 使⽤するケーブルガスケットを選び、タブを引いてネットワークケーブル ⽤の⽳を開けます。 裏蓋 裏蓋ネジT20 (x4) ケーブルガスケットM20 (x2) タブ 3. ネットワークケーブルをケーブルガスケットに通します。 注 注 注 記 記 記 ネットワークケーブルにネットワークコネクタが付いている場合、ケーブ ルガスケットを取り外し、コネクタガードを使⽤して、ケーブルガスケッ トの破損を防⽌します。 キャップ付きネットワークコネクタの付いたネッ トワークケーブルは使⽤しないでください。コネクタガードを使⽤しても ケーブルガスケットが破損するおそれがあります。...
  • Seite 151 AXIS P13-E Series 4. ネットワークケーブルを少し⼿前に引き、ケーブルガスケットをケーブル にぴったりと合わせます。 注 注 注 記 記 記 ケーブルを引いて⼿前に戻さないと、浸⽔して製品が損傷するおそれが あります。 5. ケーブルガスケットが正しく取り付けられていることを確認します。 6. I/O、⾳声、外部電源デバイスなどの補助デバイスをカメラに接続する場 合、それぞれのデバイスについて同じ⼿順を繰り返します。 注 注 注 記 記 記 ケーブルをケーブルガスケットに通した後にコネクタを取り付けます。 7. 裏蓋を壁⾯取付ブラケットに取り付け、ネジを締めます (トルク2 Nm)。...
  • Seite 152 AXIS P13-E Series 裏蓋 ネジT20 (x4) 壁⾯ブラケット ブラケット調節ネジT30 カ カ カ メ メ メ ラ ラ ラ の の の 接 接 接 続 続 続 1. 必要に応じて、外部/⼊⼒デバイスまたは⾳声デバイスをカメラに接続 します。 2. 裏蓋のヒーターコネクタにヒーターケーブルを接続します。 3. SDカードをローカルストレージとして使⽤する場合は、カメラのSDカード スロットにSDカードを挿⼊します。 4. ハウジングをネットワーク (PoE⼊⼒) に接続し、カメラをハウジング (PoE出 ⼒) に接続します。...
  • Seite 153 AXIS P13-E Series ネットワークコネクタ (PoE出⼒) ネットワークコネクター (PoE⼊⼒) 5. カメラおよびハウジングのLEDが正しい状態を⽰しているかを確認します。 141ページの、LEDインジケーター を参照してください。 6. ブラケット調整ネジを緩め、カメラを撮影⽅向に向けます。 ビデオスト 154ページの、製品へのアクセス リームを表⽰する⽅法については、 を参 照してください 7. 乾燥剤のビニール包装を取り外し、レンズの下に乾燥剤を置きます。 乾燥剤 8. ハウジングを閉じます。 裏蓋ネジを数回ずつ回し、すべてのネジが締ま るまでこれを繰り返します (トルク1.5 Nm)。 これにより、裏蓋のガス ケットに均等に⼒が掛かります。 注 注 注 記 記 記 ハウジングを閉じるときに、ケーブルを挟まないよう注意してください。...
  • Seite 154 AXIS P13-E Series 9. 必要に応じて、ウェザーシールドのネジを緩め、位置を調節してネジを 締めます。 製 製 製 品 品 品 へ へ へ の の の ア ア ア ク ク ク セ セ セ ス ス ス ネットワーク上でAxis製品を検索したり、Windows®でそれにIPアドレスを割り当て るには、AXIS IP UtilityまたはAXIS Camera Managementの使⽤をお勧めします。 いず www.axis.com/techsup れのアプリケーションも無料で、 からダウンロードできます 本製品は、ほとんどのオペレーティングシステムとブラウザーでご利⽤いただけま...
  • Seite 155 フ フ フ ォ ォ ォ ー ー ー カ カ カ ス ス ス ア ア ア シ シ シ ス ス ス タ タ タ ン ン ン ト ト ト に に に よ よ よ る る る フ フ フ ォ ォ ォ ー ー ー カ カ カ ス ス ス の の の 調 調 調 節 節 節 注意 • フォーカス調節中はカメラの前の被写体が変化しないようにしてください。 カメラが動いたり、レンズの前に指やその他の物体が⼊り込んだ場合は、 ⼿順を再開します。 • カメラの前で被写体が動いてしまう場合は、フォーカスアシスタントを使⽤ しないでください。 • コントロールボタンを2秒以上押し続けると、フォーカスアシスタントの代 わりにAXIS Dynamic DNS Serviceが使⽤できるようになります。 • コントロールボタンに⼿が届かない場所にカメラを設置する場合でも、 フォーカスアシスタントを使⽤できます。 指⽰に従いますが、カメラの設置 前にフォーカスアシスタントを有効にします。 1. 製品のホームページを開き、[Setup Setup Setup - Basic Basic...
  • Seite 156 AXIS P13-E Series 14. [Enable [Enable [Enable iris] iris] iris] ( ( ( 絞 絞 絞 り り り 有 有 有 効 効 効 ) ) ) をクリックします。 絞りがすでに有効な場合、こ のボタンは使⽤できない状態になっています。 15. 必要に応じて、[Advanced] [Advanced] ( ( ( ⾼ ⾼ ⾼ 度 度 度 な な な 設 設 設 定 定 定 ) ) ) タブでさらに調整を⾏います。 詳...
  • Seite 157 AXIS P13-E Series いるファームウェアのバージョンを確認するには、[Setup [Setup - - - About] [Setup About] About] ( ( ( 設 設 設 定 定 定 - - - バ バ バ ー ー ー ジ ジ ジ ョ ョ ョ ン ン ン 情 情 情 報 報 報 ) ) ) を参照してください。...
  • Seite 159 AXIS P13-E Series 安 安 安 全 全 全 信 信 信 息 息 息 安装该产品前请仔细通读该安装指南。请保管好安装指南以供以后查阅。 危 危 危 险 险 险 等 等 等 级 级 级 危 危 危 险 险 险 表示有危险的情形,如果不能避免,将导致死亡或严重的个人伤害。 警 警 警 告 告 告...
  • Seite 160 AXIS P13-E Series 安 安 安 全 全 全 说 说 说 明 明 明 注 注 注 意 意 意 • 使用该安讯士产品必须符合当地法律法规要求。 • 安讯士产品应存放在干燥通风的环境中。 • 应避免对安讯士产品造成冲撞或重压。 • 不得将本产品安装于不稳固的支架、表面或墙面上。 • 安装安讯士产品时,请使用适用工具。使用电动工具时过度用力可能对产品 造成损坏。 • 请勿使用化学制剂、腐蚀性制剂或气雾性清洁剂。 • 使用浸有净水的干净抹布进行清洁。 • 所用附件必须符合该产品的技术规格要求。可由安讯士或第三方供应商提供。 • 必须使用安讯士提供或推荐的零件。...
  • Seite 161 AXIS P13-E Series 安 安 安 装 装 装 指 指 指 南 南 南 本安装指南说明了如何在网络上安装 AXIS P1364–E/P1365–E 网络摄像机。有关使用该 www.axis.com 产品的其他信息,请参见用户手册,网址: 安 安 安 装 装 装 步 步 步 骤 骤 骤 页 161 1. 确保安装必需的包装内容、工具和其它材料井然有序。参见 。 页 162 2.
  • Seite 162 AXIS P13-E Series 硬 硬 硬 件 件 件 概 概 概 览 览 览 LED 状态指示灯 内置麦克风 microSD 卡插槽 音频输入 音频输出 网络接口(PoE) LED 电源指示灯 LED 网络指示灯 控制按钮 10 I/O 接口 11 光圈接口 12 未使用 13 RS485/422 接口...
  • Seite 163 AXIS P13-E Series AXIS P1364–E AXIS P1365–E 对焦环 对焦环的锁定螺丝 变焦拉杆 保险丝 加热器接口 网络接口(PoE 输出) LED 状态指示灯 网络接口(PoE 输入) 加热器线缆...
  • Seite 164 AXIS P13-E Series 线缆垫圈 M20 (2x) 钻孔 (2x) 入侵报警开关 10 夹具螺丝 T20 (2x) 11 摄像机螺丝 T20 12 针脚 13 夹具 14 窗口 15 顶盖 16 风雨罩 壁 壁 壁 式 式 式 支 支 支 架 架 架 网线(穿过壁式支架) 电源线(穿过壁式支架)(用于配备电源接口的产品)...
  • Seite 165 AXIS P13-E Series LED 指 指 指 示 示 示 灯 灯 灯 备注 • LED 状态指示灯可被配置为在工作正常时不亮。进行配置请访问设 设 设 置 置 置 > > > 系 系 系 统 统 统 选 选 选 项 项 项 > > > 端 端 端 口 口 口 和 和 和 设 设 设 备 备 备 > > > LED LED 。如欲了解更多信息,请参见在线帮助。...
  • Seite 166 AXIS P13-E Series 色 色 色 彩 彩 彩 指 指 指 示 示 示 红色 图像脱焦。 调整镜头。 淡黄色 图像接近焦点。 镜头需要微调。 绿色 图像对准焦点。 接 接 接 口 口 口 和 和 和 按 按 按 钮 钮 钮 页 167 规范和工作条件方面的信息请参见...
  • Seite 167 AXIS P13-E Series 对于音频输入,可将左声道用于立体声信号。 RS485/RS422 RS485/RS422 接 接 接 口 口 口 RS485/RS422 面向 RS485/RS422 串行接口的 2 个接线端子用于控制辅助设备,如 PT 设备。 SD 卡 卡 卡 插 插 插 槽 槽 槽 注 注 注 意 意 意 • SD 卡损坏的风险。插入或移除 SD 卡时,切勿使用尖锐工具或用力过度。...
  • Seite 168 AXIS P13-E Series 重要 当环境温度低于 0 ºC (32 ºF),启动时间会长达 60 分钟。温度越低,启动 时间越长。 功 功 功 耗 耗 耗 注 注 注 意 意 意 使用额定输出电源 ≤100 瓦或额定输出电流 ≤5 安的有限电源 (LPS)。 产 产 产 品 品 品 AXIS P1364–E 以太网供电 (PoE),符合 IEEE 802.3af/802.3at 1 型...
  • Seite 169 AXIS P13-E Series 音 音 音 频 频 频 接 接 接 口 口 口 3.5 毫米音频接口 (立体声) 2 环 1 顶端 3 套 音 音 音 频 频 频 输 输 输 入 入 入 麦克风/线路输入 接地 音 音 音 频 频 频 输 输 输 出 出 出...
  • Seite 170 AXIS P13-E Series 线 线 线 缆 缆 缆 区 区 区 域 域 域 注 注 注 意 意 意 • 使用保持在指定线缆区域的线缆。 • 选择符合您当地法规要求的线缆。 • 确保所有线缆孔妥当密封。 • 使用与线缆孔和线缆区域匹配的线缆垫圈或线缆密封套。 直 直 直 径 径 径 从 5 到 15 毫米 (0.197 到 0.591 英寸)...
  • Seite 171 AXIS P13-E Series I/O 配置为输入 I/O 配置为输出 安 安 安 装 装 装 硬 硬 硬 件 件 件 注 注 注 意 意 意 • 根据当地法规或使用产品所在的环境与电力条件,可能需要使用屏蔽网线 (STP)。任何连接产品与网络的线缆以及伸展到户外或苛刻电力环境中的线缆必 须使用专用线缆。确保网络设备按照制造商的说明进行安装。 Regulatory Information 2 有关监管要求的信息,请参见 • 切勿刮伤或损坏窗口或在窗口上留下指纹,因为这样会降低图像质量。 可将线缆穿过或沿墙壁布置,以此安装该安讯士产品。 请在安装产品前阅读所有说明: 安装壁式支架 页 171 1.
  • Seite 172 AXIS P13-E Series 将 将 将 护 护 护 罩 罩 罩 安 安 安 装 装 装 至 至 至 壁 壁 壁 式 式 式 支 支 支 架 架 架 注 注 注 意 意 意 页 170 •...
  • Seite 173 AXIS P13-E Series 4. 轻轻向后拉动网线,使线缆垫圈在线缆上调整到位。 注 注 注 意 意 意 未向后拉动线缆,可导致水渗入并损坏产品。 5. 确保线缆垫圈安装妥当 6. 如果将辅助设备(如 I/O、音频或外部电源设备)连接至摄像机,请重复上 述适用于特定设备的步骤。 注 注 注 意 意 意 在线缆穿过线缆垫圈后,安装接口。 7. 将底盖置于壁式支架上,并拧紧螺丝(扭矩 2 纳米)。...
  • Seite 174 AXIS P13-E Series 底盖 螺丝 T20 (4x) 壁式支架 支架调节螺丝 T30 连 连 连 接 接 接 摄 摄 摄 像 像 像 机 机 机 1. 若可以,将外部/输入设备或音频设备连接至摄像机。 2. 将加热器线缆连接到底盖的加热器接口。 3. 如果将 SD 卡用于本地存储,请将该卡插入摄像机的 SD 卡插槽。 4. 将护罩连接至网络 (PoE 输入),并将摄像机连接至护罩 (PoE 输出)。...
  • Seite 175 AXIS P13-E Series 网络接口(PoE 输出) 网络接口(PoE 输入) LED 指示灯 页 165 5. 确保摄像机和护罩 LED 指示灯显示正确的状态。参见 。 6. 松开支架调节螺丝,将摄像机对准相关点。有关如何查看视频流的信息,请 访问产品 页 176 参见 7. 拆除干燥剂包的塑料包装,将干燥剂包置于镜头下。 干燥剂包 8. 合上护罩。每次请务必将底盖螺丝逐个拧动几圈,直至完全拧紧(扭矩 1.5 纳米)。这可确保底盖垫圈均匀受力。 注 注 注 意 意 意 合上护罩时,请确保不要夹住任何线缆。 9. 若需要,松开风雨罩上的螺丝,调整其位置,然后拧紧螺丝。...
  • Seite 176 AXIS P13-E Series 访 访 访 问 问 问 产 产 产 品 品 品 AXIS IP Utility 和AXIS Camera Management 推荐用于查找网络上的安讯士产品, 并在 Windows 中为它们分配 IP 地址®。两款应用都免费提供,并可在下列网址中 www.axis.com/techsup 下载: 该产品可配合多数操作系统和浏览器使用。推荐下列浏览器 Internet Explorer (搭配 Windows) ® ® • Safari (搭配 OS X)...
  • Seite 177 备注 • 在调节对焦的过程中,摄像机前面的视图不应改变。如果移动了摄像机,或是 镜头前出现手指或其他物体,则重新开始该程序。 • 如果无法避免摄像机前的物体移动,则不应使用对焦助手。 • 如果未在 2 秒钟内松开控制按钮,则将启用 AXIS Dynamic DNS Service 而非 对焦助手。 • 如果摄像机已安装,因此无法使用控制按钮,则您仍可使用对焦助手。遵照下 列说明,但在安装摄像机前启用对焦助手。 1. 打开产品主页并进入设 设 设 置 置 置 > 基 基 基 本 本 本 设 设 设 置 置 置 > 对 对 对 焦 焦 焦 。...
  • Seite 178 AXIS P13-E Series 备注 www.axis.com/techsup 安装和管理软件工具可通过以下网站中的支持页面获取: 要将产品重置为出厂默认设置,请执行以下操作: 1. 断开产品电源。 硬件概览 页 162 2. 按住控制按钮不放,重新连接电源。请参见 。 3. 按住控制按钮 15–30 秒的时间,直至 LED 状态指示灯闪烁淡黄色。 4. 松开控制按钮。当 LED 状态指示灯变为绿色时,结束此过程。该产品已重置 为出厂时的默认设置。如果网络上没有可用的DHCP服务器,则默认的 IP 地 址为 192.168.0.90。 5. 借助安装和管理软件工具,分配 IP 地址,设置密码及访问视频流。 6. 重调产品焦距。 也可通过 Web 界面将参数重置为出厂默认设置。访问设 设 设 置 置 置 > > > 系 系 系 统 统 统 选 选 选 项 项 项 > > > 维 维 维 护 护 护 ,...
  • Seite 180 Installation Guide Ver. M3.2 AXIS P13-E Series Date: December 2015 © Axis Communications AB, 2015 Part No. 1535723...

Diese Anleitung auch für:

P1364-eP1365-e

Inhaltsverzeichnis