Herunterladen Inhalt Inhalt Diese Seite drucken
Axis P1311 Installationsanleitung
Vorschau ausblenden Andere Handbücher für P1311:
Inhaltsverzeichnis

Werbung

Verfügbare Sprachen
  • DE

Verfügbare Sprachen

  • DEUTSCH, seite 37
INSTALLATION GUIDE
AXIS P1311 Network Camera

Werbung

Inhaltsverzeichnis
loading

Inhaltszusammenfassung für Axis P1311

  • Seite 1 INSTALLATION GUIDE AXIS P1311 Network Camera...
  • Seite 2 • find answers to resolved problems in the FAQ database. Australia - This electronic device meets the Search by product, category, or phrases requirements of the Radio communications • report problems to Axis support by logging in to your (Electromagnetic Compatibility) Standard AS/NZS private support area. CISPR22:2002. Korea - The AXIS P1311 uses a 3.0V CR2032 Lithium battery, for...
  • Seite 3: Installation Steps

    AXIS P1311 Installation Guide This installation guide provides instructions for installing an AXIS P1311 on your network. For all other aspects of using the product, please see the User’s Manual, available on the CD included in this package, or from www.axis.com...
  • Seite 4: Hardware Overview

    Page 4 AXIS P1311 Installation Guide Hardware overview Status indicator Focus puller Internal microphone Network Connector (PoE) SD memory card slot Rear panel Underside Audio in Audio out Power LED Back focus screw Network LED Power connector Control button I/O terminal connector...
  • Seite 5: Install The Hardware

    AXIS P1311 Installation Guide Page 5 Install the hardware IMPORTANT! - The casing of the AXIS P1311 is not approved for outdoor use - the product may only be installed in indoor environments. Connect the cables 1. Connect the camera to the network using a shielded network cable.
  • Seite 6: Assign An Ip Address

    Notes: • If assigning the IP address fails, check that there is no firewall blocking the operation. • For other methods of assigning or discovering the IP address of the AXIS P1311 (e.g. in other operating systems) see page 13.
  • Seite 7 AXIS P1311. Automatic discovery 1. Check that the AXIS P1311 is connected to the network and that power has been applied. 2. Start AXIS IP Utility. 3. When the AXIS P1311 appears in the window, double-click to open its home page.
  • Seite 8 Automatic discovery 1. Check that the camera is connected to the network and that power has been applied. 2. Start AXIS Camera Management. When AXIS P1311 appears in the window, right-click the link and select Live View Home Page. 3. See page 9 for instructions on how to set the password.
  • Seite 9 4. To log in, enter the user name “root” in the dialog as requested. Note: The default administrator user name root cannot be deleted. 5. Enter the password as set above, and click OK. If the password is lost, the AXIS P1311 must be reset to the factory default settings. See page 17.
  • Seite 10 The HTTPS certificate controls the encrypted exchange of information. • The default administrator user root cannot be deleted. • If the password for root is lost or forgotten, the AXIS P1311 must be reset to the factory default settings. See page 17...
  • Seite 11 • If the view in front of the camera changes during adjustment (e.g., a finger or other object is placed in front of the lens, or if the camera is moved), steps 3 -7 will have to be repeated. • If the control button is not released within two seconds, AXIS Dynamic DNS Service is enabled instead of the Focus Assistant.
  • Seite 12: Adjusting The Back Focus

    Page 12 AXIS P1311 Installation Guide Adjusting the back focus The back focus of the AXIS P1311 is set at the factory and does not need adjustment. However, the back focus might need to be adjusted when attaching a new lens that has specifications that are different from the original lens.
  • Seite 13 -s 408 192.168.0.125 4. Check that the network cable is connected to the AXIS P1311 and then start/restart the AXIS P1311, by disconnecting and reconnecting power. If PoE is used, start/restart the AXIS P1311 by disconnecting and then reconnecting the network cable.
  • Seite 14 SD memory card slot To insert an SD card, lift the SD card cover on the rear of the AXIS P1311, and carefully insert the SD card into its slot. To remove an SD card lift the cover and gently push the card in and release it. The SD card will back...
  • Seite 15 AXIS P1311 Installation Guide Page 15 I/O terminal connector - Used in applications for e.g. motion detection, event triggering, time lapse recording and alarm notifications. In addition to an auxiliary power and a GND pin, It provides the interface to: •...
  • Seite 16: Led Indicators

    Page 16 AXIS P1311 Installation Guide LED indicators Color Indication Network Green Steady for connection to a 100 Mbit/s network. Flashes for network activity. Amber Steady for connection to 10 Mbit/s network. Flashes for network activity. Unlit No network connection.
  • Seite 17: Resetting To The Factory Default Settings

    This will reset all parameters, including the IP address, to the Factory Default settings: 1. Disconnect the power from the AXIS P1311, or if PoE is used disconnect the network cable. 2. Press and hold the Control button and reconnect power or the network cable if PoE is used.
  • Seite 19: Guide D'installation

    AXIS P1311 Guide d'installation Ce guide d'installation explique comment installer l'AXIS P1311 sur votre réseau. Pour toute autre question concernant l’utilisation du produit, reportez-vous au Manuel de l’utilisateur du produit, que vous trouverez sur le CD joint ou sur le site www.axis.com Procédure d’installation...
  • Seite 20: Vue D'ensemble Du Matériel

    Page 20 AXIS P1311 Guide d'installation Vue d’ensemble du matériel Indicateur d’état Dispositif de mise au point Microphone interne Connecteur réseau (PoE) Logement de carte mémoire SD Panneau arrière Dessous Entrée audio Sortie audio Voyant d’alimentation Vis de foyer arrière Voyant de réseau...
  • Seite 21: Installation Du Matériel

    AXIS P1311 Guide d'installation Page 21 Installation du matériel IMPORTANT ! - Le boîtier de l'AXIS P1311 n'est pas approuvé pour une utilisation à l'extérieur. Le produit doit être uniquement installé en intérieur. Branchement des câbles 1. Connectez la caméra à votre réseau à l'aide d'un câble réseau blindé.
  • Seite 22: Attribution D'une Adresse Ip

    • En cas d'échec de l'attribution d'adresse IP, vérifiez qu'aucun pare-feu ne bloque l'opération. • Pour connaître les autres méthodes d’attribution ou de détection de l'adresse IP de votre AXIS P1311, par exemple sous d'autres systèmes d'exploitation, reportez-vous à la page 29.
  • Seite 23 1. Vérifiez que l’AXIS P1311 est connectée au réseau et sous tension. 2. Démarrez AXIS IP Utility. 3. Lorsque l'icône de l’AXIS P1311 apparaît dans la fenêtre, double-cliquez dessus pour ouvrir la page d'accueil correspondante. 4. Reportez-vous à la page 25 pour savoir comment configurer le mot de passe.
  • Seite 24 Recherche automatique 1. Vérifiez que la caméra est connectée au réseau et sous tension. 2. Démarrer Axis Camera Management. Lorsque l´AXIS P1311 apparait dans la fenêtre, effectuer un clique-droit sur le lien et sélectionner Live View Home Page 3. Reportez-vous à la page 25 pour savoir comment configurer le mot de passe.
  • Seite 25 5. Saisissez le mot de passe de la manière indiquée ci-dessus et cliquez sur OK. Si vous avez oublié votre mot de passe, vous devrez rétablir les paramètres d'usine par défaut de votre AXIS P1311. Reportez-vous à la page 35.
  • Seite 26 Page 26 AXIS P1311 Guide d'installation 7. La page Live View (Vidéo en direct) de l'AXIS P1311 s'affiche, avec des liens vers les outils de configuration qui vous permettront d'adapter la caméra à vos besoins. Setup (Configuration) : contient tous les outils nécessaires pour configurer la caméra en fonction de vos besoins.
  • Seite 27 étapes 3 à 7. • Si vous ne relâchez pas le bouton de commande dans les deux secondes, AXIS Dynamic DNS Service sera activé au lieu de Focus Assistant.
  • Seite 28: Réglage Du Foyer Arrière

    Page 28 AXIS P1311 Guide d'installation Réglage du foyer arrière Le foyer arrière de l'AXIS P1311 est réglé en usine et ne nécessite aucun réglage. Il peut toutefois arriver qu'il faille le régler si vous utilisez un nouvel objectif dont les spécifications sont différentes de celles de l'objectif d'origine.
  • Seite 29 -s 408 <Adresse IP> ping -s 408 192.168.0.125 4. Vérifiez que le câble réseau est connecté à l’AXIS P1311 puis démarrez/redémarrez l'AXIS P1311 en la mettant hors tension puis de nouveau sous tension. Si vous utilisez la PoE, démarrez/ redémarrez l’AXIS P1311 en débranchant puis en rebranchant le câble réseau.
  • Seite 30 Page 30 AXIS P1311 Guide d'installation 6. Dans votre navigateur, tapez http://<Adresse IP> dans le champ Emplacement/Adresse, puis appuyez sur la touche Entrée de votre clavier. Remarques: • Pour ouvrir une invite de commande sous Windows : dans le menu Démarrer, sélectionnez Exécuter… et tapez cmd.
  • Seite 31 Logement de carte mémoire SD Pour insérer une carte SD, soulevez le couvercle du logement de carte SD au dos de l'AXIS P1311 et insérez délicatement la carte SD dans son logement. Pour retirer une carte SD, soulevez le couvercle et poussez doucement la carte, puis relâchez-la. La...
  • Seite 32 Broche 1 Broche 3 connectés peuvent être activés par l’AXIS VAPIX API, à l'aide des boutons de sortie sur la page Live View (Vidéo en direct) ou par un type d'événement. La sortie est considérée comme étant active (ce qui est visible dans Events >...
  • Seite 33 AXIS P1311 Guide d'installation Page 33 Le schéma de câblage qui suit fournit un exemple de connexion d’un périphérique auxiliaire à l’AXIS P1311. E.g. push button 3.3V max. 50mA...
  • Seite 34: Voyants Lumineux

    Page 34 AXIS P1311 Guide d'installation Voyants lumineux Voyant Couleur Indication Réseau Vert Continu en cas de connexion à un réseau de 100 Mbits/s. Clignote en cas d'activité réseau. Orange Continu en cas de connexion à un réseau de 10 Mbits/s. Clignote en cas d'activité...
  • Seite 35: Plus D'informations

    Accès à la caméra depuis Internet Une fois installée, votre AXIS P1311 est accessible sur votre réseau local (LAN). Pour accéder à la caméra depuis Internet, les routeurs réseau doivent être configurés pour autoriser le trafic entrant, ce qui est généralement réalisé sur un port spécifique : •...
  • Seite 37: Installationsschritte

    CD oder auf unserer Website unter www.axis.com zur Verfügung steht. Installationsschritte Befolgen Sie diese Schritte, um die AXIS P1311 in Ihrem lokalen Netzwerk (LAN) zu installieren: 1. Prüfen Sie, ob alle in der nachfolgenden Liste aufgeführten Komponenten vorhanden sind.
  • Seite 38: Hardwareübersicht

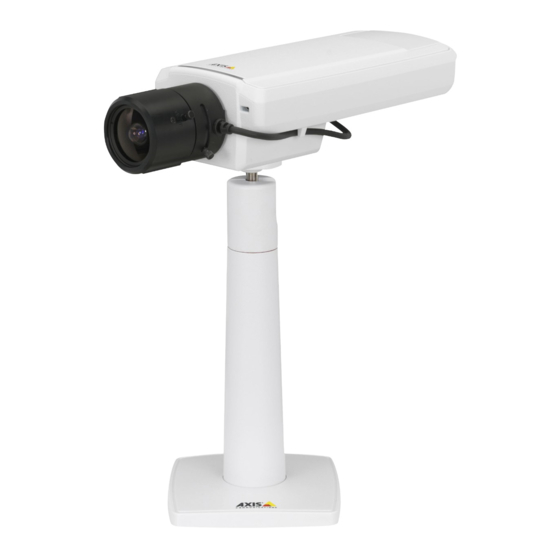
    Seite 38 AXIS P1311 Installationsanleitung Hardwareübersicht Statusanzeige Schärfenregler Internes Mikrofon Netzwerkanschluss (PoE) SD-Speicherkarteneinschub Geräterückseite Unterseite Audio-Eingang Audio-Ausgang Netz-LED Auflagemaß-Einstellschraube Netzwerk-LED Stromversorgungsanschluss Steuertaste E/A-Anschluss Seriennummer Abmessungen H × B × T = 45,7 x 77,6 x 199,2 mm Gewicht = 584g (ohne Netzteil)
  • Seite 39: Installieren Der Hardware

    AXIS P1311 Installationsanleitung Seite 39 Installieren der Hardware WICHTIG! – Das Gehäuse der AXIS P1311 ist nicht für den Einsatz im Außenbereich geeignet; das Gerät darf nur in Innenräumen installiert werden. Anschließen der Kabel 1. Verbinden Sie die Kamera über ein abgeschirmtes Netzwerkkabel mit dem Netzwerk.
  • Seite 40: Zuweisen Einer Ip-Adresse

    • Falls Sie die IP-Adresse nicht zuweisen können, müssen ggf. die Einstellungen der Firewall überprüft werden. • Weitere Informationen zu alternativen Methoden zum Festlegen oder Ermitteln der IP-Adresse der AXIS P1311 (z. B. in anderen Betriebssystemen) finden Sie auf Seite 47.
  • Seite 41: Axis Ip Utility - Einzelne Kamera/Kleine Installation

    AXIS IP Utility erkennt automatisch im Netzwerk vorhandene Axis-Geräte und zeigt diese an. Die Anwendung kann außerdem zur manuellen Zuweisung einer statischen IP-Adresse verwendet werden. Beachten Sie, dass sich die AXIS P1311 und der Computer, auf dem AXIS IP Utility ausgeführt wird, im gleichen Netzwerksegment (d. h. physischen Subnetz) befinden müssen. Automatische Erkennung 1.
  • Seite 42: Axis Camera Management - Mehrere Kameras/Große Installationen

    1. Stellen Sie sicher, dass die Kamera an das Netzwerk und die Stromversorgung angeschlossen ist. 2. Starten Sie Axis Kamera-Management. Wenn die Axis P1311 im Fenster erscheint, klicken Sie Bitte auf den Link mit der rechten Maustaste, und wählen Sie Live View Home Page.
  • Seite 43: Kennwort Festlegen

    Kennwort festlegen Für den Zugriff auf das Produkt muss das Kennwort für den standardmäßigen Administrator- Benutzer root festgelegt werden. Beim erstmaligen Zugriff auf AXIS P1311 wird das Dialogfeld „Configure Root Password“ (Root-Kennwort konfigurieren) angezeigt . Dort kann das Kennwort festgelegt werden.
  • Seite 44 Webbrowsern und Servern zu verschlüsseln. Das HTTPS-Zertifikat steuert den verschlüsselten Informationsaustausch. • Der standardmäßige Administrator-Benutzer „root“ kann nicht gelöscht werden. • Wenn Sie das Kennwort für die AXIS P1311 vergessen haben, muss sie auf die Werkseinstellungen zurückgesetzt werden. Siehe Seite 53...
  • Seite 45: Einstellen Der Bildschärfe Mit Dem Fokus-Assistenten

    AXIS P1311 Installationsanleitung Seite 45 Einstellen der Bildschärfe mit dem Fokus-Assistenten Gehen Sie wie folgt vor, um die Schärfe der AXIS P1311 mit dem Fokus-Assistenten einzustellen. 1. Schalten Sie die AXIS P1311 ein und warten Sie etwa eine Minute. 2. Fixieren oder platzieren Sie die Kamera so, dass sie nicht bewegt werden kann.
  • Seite 46: Einstellen Des Auflagemaßes

    Seite 46 AXIS P1311 Installationsanleitung Einstellen des Auflagemaßes Das Auflagemaß der AXIS P1311 wird werkseitig eingestellt und braucht nicht nachjustiert zu werden. Möglicherweise muss jedoch das Auflagemaß angepasst werden, wenn ein neues Objektiv angebracht wird, das andere Spezifikationen als das ursprüngliche Objektiv aufweist.
  • Seite 47: Andere Methoden Zum Festlegen Der Ip-Adresse

    -s 408 192.168.0.125 4. Stellen Sie sicher, dass das Netzwerkkabel an die AXIS P1311 angeschlossen ist, und starten Sie die AXIS P1311 bzw. starten Sie sie neu, indem Sie die Stromversorgung unterbrechen und wiederherstellen. Falls Sie PoE verwenden, starten Sie die AXIS P1311 bzw. starten Sie sie neu,...
  • Seite 48 Seite 48 AXIS P1311 Installationsanleitung 5. Schließen Sie die Befehlszeile, sobald „Reply from 192.168.0.125:...“ (Antwort von 192.168.0.125:...) oder eine ähnliche Meldung angezeigt wird. 6. Starten Sie einen Browser, geben Sie im Adressfeld „http://<IP-Adresse>“ ein, und drücken Sie die Eingabetaste auf der Tastatur.
  • Seite 49 Aufzeichnung mit Wechselmedien verwendet werden. SD-Speicherkarteneinschub Zum Einsetzen der SD-Karte heben Sie die SD-Karteneinschubabdeckung auf der Rückseite der AXIS P1311 an und schieben die SD-Karte vorsichtig in den Einschub ein. Zum Entnehmen der SD-Karte haben Sie die Abdeckung an und drücken die Karte vorsichtig ein und lassen sie wieder los.
  • Seite 50 • 1 Transistorausgang: Zum Anschluss externer Relais und Kontakt 4 Kontakt 2 LEDs. Angeschlossene Geräte können über die AXIS Kontakt 1 Kontakt 3 VAPIX API, über die Schaltflächen für den Ausgang auf der Seite Live View oder durch einen Ereignistyp aktiviert werden.
  • Seite 51 AXIS P1311 Installationsanleitung Seite 51 Das folgende Anschlussschaltbild zeigt ein Beispiel für den Anschluss eines Zusatzgeräts an die AXIS P1311. E.g. push button 3.3V max. 50mA...
  • Seite 52: Led-Anzeigen

    Seite 52 AXIS P1311 Installationsanleitung LED-Anzeigen Farbe Bedeutung Netzwerk Grün Leuchtet konstant bei Verbindung mit einem 100-MBit/s-Netzwerk. Blinkt bei Netzwerkaktivität. Gelb Leuchtet konstant bei Verbindung mit einem 10-MBit/s-Netzwerk. Blinkt bei Netzwerkaktivität. Leuchtet Keine Netzwerkverbindung vorhanden. nicht Status Grün Leuchtet bei Normalbetrieb konstant grün.
  • Seite 53: Wiederherstellen Der Werkseitigen Standardeinstellungen

    Gehen Sie wie folgt vor, um sämtliche Parameter, einschließlich der IP-Adresse, auf die werkseitigen Standardeinstellungen zurückzusetzen: 1. Trennen Sie die AXIS P1311 von der Stromversorgung oder ziehen Sie, falls PoE verwendet wird, das Netzwerkkabel ab. 2. Halten Sie die Steuertaste gedrückt und schließen Sie das Stromkabel oder bei Verwendung von PoE das Netzwerkkabel wieder an.
  • Seite 55: Guida All'installazione

    CD incluso nella confezione oppure visitare il sito Web all’indirizzo www.axis.com. Procedura di installazione Attenersi alla seguente procedura per installare la videocamera AXIS P1311 nella rete locale (LAN): 1. Controllare il contenuto della confezione utilizzando l'elenco fornito di seguito.
  • Seite 56: Panoramica Dell'hardware

    Pagina 56 Guida all'installazione della videocamera AXIS P1311 Panoramica dell’hardware Indicatore di stato Levetta messa a fuoco Microfono interno Connettore di rete (PoE) Slot per scheda di memoria SD Pannello posteriore Lato inferiore Ingresso audio Uscita audio LED di alimentazione...
  • Seite 57: Installazione Dell'hardware

    Assegnazione di un indirizzo IP La maggior parte delle reti dispone di un server DHCP che automaticamente assegna gli indirizzi IP alle periferiche connesse. Se la rete non dispone di un server DHCP, per la videocamera AXIS P1311 viene utilizzato l'indirizzo IP predefinito 192.168.0.90.
  • Seite 58 L’applicazione inoltre può essere utilizzata per assegnare manualmente un indirizzo IP statico. Si tenga presente che la periferica AXIS P1311 deve essere installata sullo stesso segmento di rete (subnet fisica) del computer sul quale è in esecuzione AXIS IP Utility.
  • Seite 59 Rilevamento automatico 1. Verificare che la videocamera sia collegata alla rete e alimentata correttamente. 2. Avviare AXIS Camera Management. Quando la AXIS P1311 compare nella lista, cliccare con il tasto destro del mouse sul link e selezionare Live View Home Page.
  • Seite 60: Impostazione Della Password

    Per ottenere l'accesso al prodotto, è necessario impostare la password dell'utente amministratore predefinito root. Questa operazione può essere effettuata nella finestra di dialogo ‘Configure Root Password’ (Configura password root), che viene visualizzata quando si accede a AXIS P1311 per la prima volta.
  • Seite 61 Web. Il certificato HTTPS controlla lo scambio crittografato di informazioni. • Non è possibile eliminare il nome utente amministratore predefinito “root”. • Se si smarrisce o si dimentica la password “root”, la videocamera AXIS P1311 deve essere reimpostata sulle impostazioni predefinite. Vedere la pagina 67.
  • Seite 62 3 a 7. • Se non si rilascia il pulsante di comando entro due secondi, viene abilitata la funzione AXIS Dynamic DNS Service (DNS dinamico) anziché Focus Assistant.
  • Seite 63 Bonjour nel browser (ad esempio Safari) e fare clic sul successive) collegamento per accedere alle pagine Web della videocamera. Tutti i paesi Servizio gratuito fornito da Axis che consente di installare la AXIS Dynamic DNS videocamera in modo facile e veloce. È necessaria una Service connessione a Internet senza proxy http.
  • Seite 64 -s 408 <Indirizzo IP> ping -s 408 192.168.0.125 4. Verificare che il cavo di rete sia collegato alla videocamera AXIS P1311, quindi avviare/riavviare la videocamera AXIS P1311 scollegandola/ricollegandola dalla/all'alimentazione. Se si utilizza l’opzione PoE, è necessario avviare/riavviare la videocamera AXIS P1311 scollegando e ricollegando il cavo di rete.
  • Seite 65 Slot per scheda di memoria SD Per inserire la scheda SD, sollevare la copertura della scheda SD sul lato posteriore della videocamera AXIS P1311 e inserire delicatamente la scheda nello slot. Per rimuovere la scheda SD, sollevare la copertura e spingere delicatamente la scheda per...
  • Seite 66 LED. Le periferiche collegate possono essere Pin 1 Pin 3 attivate tramite AXIS VAPIX API, i pulsanti di comando della pagina Live View (Immagini dal vivo) oppure tramite l'opzione Event Type (Tipo di evento). L'uscita verrà visualizzata come attiva (visualizzata in Events >...
  • Seite 67: Indicatori Led

    Questa procedura consente di ripristinare le impostazioni predefinite per tutti i parametri, incluso l'indirizzo IP. 1. Scollegare la videocamera AXIS P1311 dall'alimentazione oppure scollegare il cavo di rete se si utilizza PoE. 2. Premere e tenere premuto il pulsante di comando e ricollegare l’alimentazione o il cavo di rete se si utilizza PoE.
  • Seite 68: Ulteriori Informazioni

    Web per il supporto Axis all'indirizzo www.axis.com/ techsup. Ulteriori informazioni La Guida per l’utente è disponibile sul sito Web di Axis all’indirizzo www.axis.com oppure sul CD fornito con il prodotto. Suggerimento Visitare il sito di Axis all’indirizzo www.axis.com/techsup per verificare se sono stati pubblicati aggiornamenti del firmware per la videocamera AXIS P1311.
  • Seite 69: Guía De Instalación

    AXIS P1311 Guía de instalación Esta guía de instalación incluye las instrucciones necesarias para instalar la AXIS P1311 en su red. Para obtener información sobre cualquier cuestión relacionada con el uso del producto, consulte el Manual del usuario, disponible en el CD que se incluye en este paquete, o la página www.axis.com.
  • Seite 70: Presentación Del Hardware

    Página 70 AXIS P1311 Guía de instalación Presentación del hardware Indicador de estado Botón de enfoque Micrófono interno Conector de red (PoE) Ranura para tarjeta de memoria SD Panel posterior Entrada de audio Salida de audio LED de alimentación Tornillo de enfoque posterior LED de red Conector de alimentación...
  • Seite 71: Instalación Del Hardware

    AXIS P1311 Guía de instalación Página 71 Instalación del hardware IMPORTANTE: - La carcasa de la AXIS P1311 no está aprobada para usarse en el exterior; el producto sólo se puede instalar en interiores. Conexión de los cables 1. Conecte la cámara a la red con un cable de red blindado (UTP).
  • Seite 72 • Si no puede asignar la dirección IP, compruebe que no haya ningún cortafuegos (firewall) que bloquee la operación. • Para conocer otros métodos para asignar o detectar la dirección IP de la AXIS P1311, por ejemplo, en otros sistemas operativos, consulte la página 78.
  • Seite 73 1. Compruebe que la AXIS P1311 está conectada a la red y que recibe alimentación. 2. Inicie AXIS IP Utility. 3. Cuando la AXIS P1311 aparezca en la ventana, haga doble clic en ella para abrir su página de inicio.
  • Seite 74 1. Compruebe que la cámara está conectada a la red y que recibe alimentación. 2. Inicie el Axis camera Management. Cuando la Axis P1311 aparezca en la ventana, clic sobre el botón derecho y seleccione la página de live-View (vivo).
  • Seite 75 Configuración de la contraseña Para poder acceder al producto, hay que configurar la contraseña del usuario predeterminado para el administrador root. Al acceder por primera vez a AXIS P1311, aparecerá el cuadro de diálogo ‘Configure Root Password’ (Configurar contraseña de root).
  • Seite 76 Página 76 AXIS P1311 Guía de instalación 6. En caso necesario, haga clic en Yes (Sí) para instalar el AMC (AXIS Media Control) y así permitir la visualización de vídeo continuo en Internet Explorer. Para ello, debe tener derechos de administrador en su equipo.
  • Seite 77 3 a 7. • Si no se suelta el botón de control al cabo de dos segundos, se habilita AXIS Dynamic DNS Service (DNS dinámico) en lugar del Asistente de enfoque.
  • Seite 78 Página 78 AXIS P1311 Guía de instalación Ajuste del enfoque posterior El enfoque posterior de la AXIS P1311 viene configurado de fábrica y no requiere un ajuste. No obstante, es posible que deba ajustarse al conectar un nuevo objetivo cuyas especificaciones sean distintas al objetivo original.
  • Seite 79 -s 408 <Dirección IP> ping -s 408 192.168.0.125 4. Compruebe que el cable de red está conectado al codificador AXIS P1311 y desconecte y vuelva a conectar la corriente para iniciar o reiniciar la AXIS P1311. Si se usa PoE, inicie/reinicie la AXIS P1311 desconectando y volviendo a conectar el cable de red.
  • Seite 80 Ranura para tarjeta de memoria SD Para insertar una tarjeta SD, levante la tapa de la tarjeta SD situada en la parte posterior de la AXIS P1311, e inserte con cuidado la tarjeta SD en su ranura.
  • Seite 81 1 salida de transistor: Para conectar relés e indicadores LED. Los dispositivos conectados se pueden activar mediante la interfaz Pin 4 Pin 2 de programación de aplicaciones VAPIX de AXIS, los botones de Pin 3 Pin 1 salida de la página Live View (En vivo) o mediante un tipo de evento.
  • Seite 82: Indicadores Led

    Página 82 AXIS P1311 Guía de instalación Indicadores LED Color Indicación Verde Fijo para indicar la conexión a una red de 100 Mbits/s. Parpadea para indicar actividad en la red. Ámbar Fijo para indicar la conexión a una red de 10 Mbits/s. Parpadea para indicar actividad en la red.
  • Seite 83: Más Información

    Acceso a la cámara desde Internet Una vez instalada, la AXIS P1311 será accesible en su red local (LAN). Para acceder a la cámara desde Internet, los enrutadores de red deben configurarse para permitir tráfico entrante, que normalmente se realiza en un puerto específico.
  • Seite 85 Aviso de seguridad - Sustitución de la pila La AXIS P1311 utiliza una pila de litio CR2032 de 3,0 V como fuente de alimentación para el reloj en tiempo real interno (RTC). En condiciones normales, esta pila dura 5 años como mínimo. Si la alimentación de la pila es baja, el funcionamiento del RTC se ve afectado y se restablece después de cada arranque.
  • Seite 86 Installation Guide Ver. 1.00 AXIS P1311 Network Camera Printed: November 2008 ©2008 Axis Communications AB Part No. 31264...

Inhaltsverzeichnis