
Verwandte Anleitungen für Zanussi zba 3154


Inhaltszusammenfassung für Zanussi zba 3154
- Seite 1 KÜHLSCHRANK REFRIGERATEUR KOELKAST REFRIGERATOR ZBA 3154 ZBA 3224 BEDIENUNGSANLEITUNG MODE D’EMPLOI GEBRUIKSAANWIJZING INSTRUCTION BOOKLET 2222750-27...
-
Seite 2: Sicherheitshinweise
Hinweise zur Benutzung der Gebrauchsanweisung Die folgenden Symbole erleichtern das Lesen der Gebrauchanweisung: Sicherheitshinweise bezŸglich der Benutzung des GerŠtes RatschlŠge fŸr den korrekten Gebrauch und die optimale Ausnutzung des GerŠtes. Informationen zum Umweltschutz Sicherheitshinweise Bevor Sie Ihr neues KŠltegerŠt in Betrieb ¥... -
Seite 3: Inhaltsverzeichnis
Inhalt Sicherheitshinweise ..............2 Entsorgung . -
Seite 4: Temperaturregelung
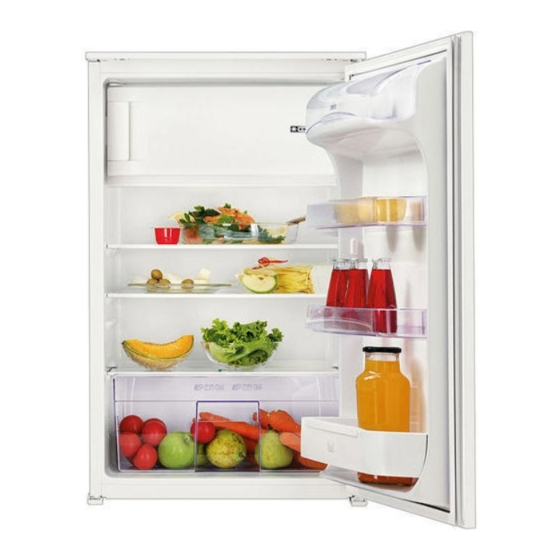
KŸhlabteil ¥ Das Einsetzen in eine andere Hšhe bitte in umgekehrter Reihenfolge vornehmen. Inbetriebnahme Die Glasablage Ÿber der GemŸseschale und die Flascheablage mŸssen immer in der ¥ Der Drehknopf fŸr die Temperaturwahl ist im Stellung verbleiben, um eine korrekte KŸhlraum rechts. Luftzirkulation zu gewŠhrleisten. -
Seite 5: Gefrierabteil - Temperaturregelung / Gefrierabteilausstattung / Tipps
Richtiges KŸhlen Gefrierabteilausstattung ¥ keine warmen Speisen oder dampfenden EiswŸrfelbereitung FlŸssigkeiten in den KŸhlschrank einstellen. Das GerŠt hat eine oder mehrere EiswŸrfelschalen, ¥ Geruchverbreitende Lebensmittel mŸssen welche mit Wasser aufgefŸllt in das Gefrierfach abgedeckt oder eingewickelt werden. gestellt werden. ¥ Die Lebensmittel mŸssen so eingelagert werden, Bitte zur Entnahme der EiswŸrfelschalen dass die KŠlte um sie frei zirkulieren kann. -
Seite 6: Wartung Abtauen / Reinigung
Wartung ¥ TŸr offen lassen. Ein GefŠ§ auf den ersten Rost Vor jeder Reinigungsarbeit immer den direkt unter das Ablaufloch stellen. Den Stšpsel wie Netzstecker aus der Steckdose ziehen. in der Abbildung gezeigt entfernen. Dieses GerŠt erhŠlt im Kaltekreislauf Kohlenwasserstoff. Aus diesem Grund darf Wartung NachfŸllen ausschlie§lich... -
Seite 7: Innenbeleuchtung
Innenbeleuchtung ¥ Vor dem Lampenwechsel GerŠt abschalten und den Netzstecker ziehen. 1. Lšsen Sie die Befestigungsschraube der Lampenabdeckung. 2. Heben Sie den beweglichen Teil ab, indem Sie wie in der Abbildung gezeigt darauf drŸcken. 3. Defekte Lampe durch eine neue Lampe gleicher Leistung auswechseln. -
Seite 8: Technische Angabe
Technische Angabe Die technischen Angaben sind auf dem Typschild genannt, das auf der linken inneren Seite der Anlage liegt. Im Falle einer Stromunterbrechung wŠhrend der Lagerung von TiefkŸhlkost bzw. von eingefrorenen Lebensmitteln soll die TŸr des Gefrierfaches nicht gešffnet werden. Die TiefkŸhlkost verdirbt nicht, wenn es sich um eine kurze Unterbrechung handelt (12 Std.) und das GerŠt voll ist. -
Seite 9: Aufstellung
Installation Nachstehende Tabelle zeigt, welche Vor der Installation sicherstellen, dass das Umgebungstemperatur welcher Klimaklasse GerŠt nicht beschŠdigt ist. Mšgliche zugeordnet ist: TransportschŠden sind HŠndler unverzŸglich mitzuteilen. Klimaklasse fŸr Umgebungstemperatur von ¥ WŠhrend das GerŠt in Betrieb ist, werden der VerflŸssiger und der Kompressor, die sich auf der +10 bis +32¡C RŸckseite des GerŠtes befinden, hei§. -
Seite 10: Einbau
Es muss mšglich sein, das GerŠt vom Netz zu trennen; nach der Installation muss die Steckdose daher zugŠnglich bleiben. Einbau D132 Ma§zeichnungen 2. Fugenabdeckprofil am GerŠt, wie in Abbildung ZBA 3154 ZBA 3224 gezeigt ankleben. Hšhe (1) 1225 Tiefe (2) Breite (3) 3. - Seite 11 ca. 50 mm 90° 90° ca. 50 mm PR167 9. Die Winkeleisen entfernen und 8 mm vom 6. Die Schiene auf der Innenseite der MšbeltŸr oben Šusseren Rand der TŸr mit dem Nagel (K) und unten auflegen (siehe Abb.) und die Position kennzeichnen.
-
Seite 12: Garantiebedingungen (B)
GARANTIEBEDINGUNGEN Unsere GerŠte werden mit grš§ter Sorgfalt hergestellt. Trotzdem kann es einmal zu einem Defekt kommen. Unser Kundendienst Ÿbernimmt auf Anfrage gerne die Reparatur, und zwar sowohl wŠhrend des Garantiezeitraums als auch danach. So ist gewŠhrleistet, dass ein Defekt nicht zu einer VerkŸrzung der Lebensdauer des GerŠts fŸhrt. Die vorliegenden Garantiebedingungen beruhen auf der Richtlinie der EuropŠischen Union 99/44/EG sowie den Bestimmungen des BŸrgerlichen Gesetzbuches. -
Seite 13: Avertissements Importants
Comment lire votre notice dÕemploi Les symboles ci-dessous vous guideront au long de la lecture de votre notice: Instructions liées à la sécurité lors de l’utilisation de l’appareil. Conseils pour une utilisation correcte de l’appareil afin d’obtenir les meilleures performances. Informations liées à... -
Seite 14: Avant La Mise En Service
Sommaire Avertissements importants ............. . .13 Elimination / Utilisation Avant la mise en service . -
Seite 15: Compartiment Ržfrigžrateur - Mise En Service / Ržglage De La Tempžrature / Equipement Intžrieur / Conseils
Compartiment rŽfrigŽrateur ¥ Pour le placement ˆ une autre hauteur, procŽder dans lÕordre inverse. Mise en service Pour permettre une bonne circulation de lÕair pas enlevez la clayette infŽrieure en verre au- ¥ Branchez la prise de courant et ouvrez la porte. dessus du/des bac/s ˆ... -
Seite 16: Compartiment Congžlateur - Ržglage De La Tempžrature / Equipement Intžrieur / Conseils
ainsi utilisŽ pour le refroidissement du Equipement intŽrieur rŽfrigŽrateur. Fabrication de gla•ons ¥ De temps en temps, dŽpoussiŽrez le condenseur La fabrication des gla•ons s'effectue dans le situŽ ˆ lÕarri•re de lÕappareil, ˆ lÕaide dÕun aspirateur ou dÕune brosse souple. compartiment congŽlateur. -
Seite 17: Entretien Džgivrage / Nettoyage
Entretien correspond ˆ lÕouverture de vidange, et retirez le DŽbranchez lÕappareil avant toute bouchon, comme lÕillustre la figure; opŽration. Attention Cet appareil contient des hydrocarbures dans son circuit rŽfrigŽrant; lÕentretien et la recharge ne doivent donc •tre effectuŽs que par du personnel qualifiŽ. DŽgivrage Compartiment rŽfrigŽrateur ¥... -
Seite 18: Changement De Lõampoule
Changement de l'ampoule ¥ Avant de remplacer lÕampoule, mettez ˆ lÕarr•t lÕappareil et dŽbranchez-le. L'ampoule d'Žclairage dans le compartiment rŽfrigŽrateur est accessible en effectuant les opŽrations ci-dessous: 1. DŽvissez la vis de fixation du plafonnier. 2. DŽcrochez la partie mobile en exer•ant une pression sur celle-ci comme indiquŽ... -
Seite 19: Caractžristiques Techniques
CaractŽristiques Techniques Les donnŽes techniques figurent sur la plaque signalŽtique situŽe sur le c™te gauche ˆ lÕintŽrieur de lÕappareil. En cas de coupure de courant abstenez-vous dÕouvrir la porte. Si lÕinterruption est de courte durŽe (jusquÕˆ 12 heures) et si le congŽlateur est rempli, il nÕy a aucun risque dÕaltŽration pour les aliments. -
Seite 20: Emplacement
Installation Le tableau ci-dessous vous permet de repŽrer les diffŽrentes classes climatiques existantes et les tempŽratures ambiantes correspondantes: Lors du transport et de lÕinstallation de pour une tempŽrature Classe lÕappareil, veiller ˆ nÕendommager aucune ambiante de climatique partie du circuit frigorifique. +10 ˆ... -
Seite 21: Instructions Pour Lõencastrement
Instructions pour I'encastrement Dimensions de la niche ZBA 3154 ZBA 3224 Hauteur (1) 1225 Profondeur (2) Largeur (3) 3. Ouvrez la porte et appuyez l'appareil contre le meuble de cuisine, du c™tŽ opposŽ aux charni•res. Fixez l'appareil ˆ l'aide des 4 vis (I) fournies. - Seite 22 ca. 50 mm 90° 90° ca. 50 mm PR167 6. Posez la glissi•re (Ha) sur la partie interne de la 9. Enlevez les Žquerres et marquez avec le clou (K) porte du meuble en respectant les c™tes indiquŽes ˆ 8 mm du bord externe de la porte. sur la figure et marquez la position des trous externes.
-
Seite 23: Džclaration De Conditions De Garantie (B)
DƒCLARATION DE CONDITIONS DE GARANTIE Nos appareils sont produits avec le plus grand soin. MalgrŽ cela, un dŽfaut peut toujours se prŽsenter. Notre service client•le se chargera de rŽparer ceci sur demande, pendant ou apr•s la pŽriode de garantie. La durŽe de vie de lÕappareil nÕen sera pas pour autant amputŽe. -
Seite 24: Algemene Veiligheid
Aanwijzing voor het gebruik van het instructieboekje Met de waarschuwingsdriehoek en/of door signaalwoorden wordt de aandacht gevestigd op aanwijzingen die belangrijk zijn voor uw veiligheid of voor het juist functioneren van het apparaat. Na dit symbool wordt uitleg gegeven over de bediening en het praktisch gebruik van het apparaat. -
Seite 25: Veiligheid Van Kinderen
schraap evenmin met metalen voorwerpen rijp of Veiligheid van kinderen ijs af. Lekkage kan het gevolg zijn, hetgeen een ¥ Dit apparaat is bedoeld en gemaakt voor het onherstelbare schade aan het apparaat en bederf gebruik door volwassenen. Het is gevaarlijk om van de levensmiddelen veroorzaakt. -
Seite 26: Weggooien
Weggooien Informatie over de verpakking van het apparaat ¥ De materialen in dit apparaat die voorzien zijn van het symbool zijn geschikt voor recycling. >PE<=polyethyleen >PS<=schuimpolystyrol >PP<=polypropyleen Alle gebruikte materialen zijn niet schadelijk voor het milieu! Weggooien van oude apparaten Het symbool op het product of op de verpakking wijst erop dat dit product niet als huishoudafval mag worden behandeld. -
Seite 27: Koelruimte - Interieur / Tips
Interieur Tips Legvlakken ¥ De legvlakken zijn in hoogte verstelbaar. Energie besparen ¥ Daartoe het legvlak zover naar voren trekken tot ¥ Het apparaat niet in de buurt van kachels, het naar boven of onderen bewogen kan worden verwarmingselementen of andere warmtebronnen en eruit gehaald kan worden. -
Seite 28: Vrieslruimte - Instellen Van De Temperatuur / Interieur / Tips
Vriesruimte Tips Instellen van de temperatuur Invriezen en bewaren ¥ Voor het invriezen kunt u de thermostaatknop op ¥ Verdeel de levensmiddelen in handzame porties . de gebruikelijke stand laten staan. Deze vriezen sneller in en bij later gebruik hoeft u ¥... -
Seite 29: Schoonmaken / Vervangen Van De Lamp
¥ Draai de thermostaatknop op ÇOÈ of trek de Vervangen van de lamp stekker uit het stopcontact. Voor het vervangen van de lamp het apparaat ¥ Laat de deur openstaan en plaats een bakje direct uitzetten en de stekker uit het stopcontact trekken. onder het afvoergaatje, haal de dop van de afvoer Het lampje van de koelkast is op de volgende wijze (zie afbeelding);... -
Seite 30: Storingen / Klantenservice / Technische Gegevens
Storingen Indien de koelkast niet functioneert, controleer dan onderstaande punten, voordat u contact opneemt met onze service-afdeling: Storing Oplossing Temperatuur in het apparaat is te hoog Temperatuur is niet juist ingesteld. Zie hoofdstuk ÒInstellen van de temperatuurÓ. Plaats de levensmiddelen zo, dat de lucht vrij eromheen kan circuleren. Omgevingstemperatuur te hoog. -
Seite 31: Wijzigen Van De Deurdraairichting
Wijzigen van de deurdraairichting transportbeveiliging zijn beide Attentie! scharnierkanten scharnierpennen aangebracht. Bij een lage omgevingstemperatuur (bijv. in de Afhankelijk van de gewenste deurdraairichting moet winter) voorkomen aan een kant, zowel onder als boven, een deurafdichting niet perfect aan de kast hecht. scharnierpen verwijderd worden. -
Seite 32: Plaats Van Opstelling
Installatie volgende tabel geeft welke omgevingstemperatuur bij welke klimaatklasse behoort: Bij het transport en het opstellen van het voor een Klimaatklasse apparaat erop letten dat geen onderdelen van omgevingstemperatuur van het koelvloeistofcircuit beschadigd worden. +10 tot +32¡C ¥ Tijdens normaal gebruik worden de condensor en de compressor die zich op de achterkant van het +16 tot +32¡C apparaat bevinden, warm. -
Seite 33: Inbouw
Inbouw Nismaten ZBA 3154 ZBA 3224 Nishoogte (1) 1225 Nisdiepte (2) Nisbreedte (3) 3. Open de deur en druk het apparaat tegen de zijwand van de nis, aan de kant waar niet de scharnieren zitten. Bevestig het apparaat aan de nis met de vier meegeleverde schroeven (I). - Seite 34 ca. 50 mm 90° 90° ca. 50 mm PR167 6. Geleider tegen de binnenkant van de kastdeur aan 9. Verwijder de haken en zet met de spijker (K) een de boven- en onderkant houden volgens de teken op 8 mm van de buitenste rand van de deur. tekening en de plaats van de buitenste gaten aangeven.
-
Seite 35: Waarborgvoorwaarden (B)
WAARBORGVOORWAARDEN Onze toestellen worden met de grootst mogelijke zorgvuldigheid geproduceerd. Desondanks kan het voorkomen dat er een defect optreedt. Onze klantendienst zal dit op verzoek herstellen, zowel binnen als buiten de waarborgtermijn. De levensduur van het toestel wordt daardoor niet negatief be•nvloed. Onderstaande waarborgvoorwaarden zijn gestoeld op de EU Richtlijn 99/44/EG en het Burgerlijk Wetboek. -
Seite 36: Disposal
Instructions for the use of the instructions booklet Notes which are important for your safety or for the proper functioning of the appliance Supplementary information regarding operation and practical applications of the appliance. Tips and notes concerning economical and environmentally sound use of the appliance Safety Instructions This information has been provided in the interests of your safety. -
Seite 37: Use And Control Before Use / Refrigerator Compartment - Starting The Appliance / Temperature Control
Disposal of old appliances The symbol on the product or on its packaging indicates that this product may not be treated as household waste. Instead it shall be handed over to the applicable collection point for the recycling of electrical and electronic equipment. -
Seite 38: Refrigerator Compartment - Internal Parts / Hints
¥ Setting ã6Ò = lowest temperature, coldest Hints setting. ¥ ¥ Setting ã Ò = Off A medium setting is generally the most suitable. Saving Energy ¥ Pay careful attention to where the cabinet is Internal Parts placed. See the section ÒInstallationÓ. When installed correctly the cabinet will consume less Storage shelves energy. -
Seite 39: Freezer Compartment - Temperature Control / Interior Accessories / Hints
Freezer compartment Hints Temperature Control Freezing of fresh food and storage of frozen food ¥ To freeze fresh foods it is not necessary to change ¥ Prepare food in small portions to enable it to be the setting of the thermostat knob. rapidly and completely frozen and to make it ¥... -
Seite 40: Cleaning / Changing The Light Bulb
Freezer compartment Cleaning ¥ Remove the frost with a plastic scraper. Never use metal objects for cleaning your ¥ Whenever the thickness of the frost exceeds 5 mm appliance as it may get damaged. complete defrosting should be carried out. NEVER use detergents, abrasive powders, Prooceed as follows: highly perfumed cleaning products or wax... -
Seite 41: Something Not Working
Something not Working Problems may be due to causes which can easily be solved before calling the Technical Service. Please follow these instructions: SYMPTOM SOLUTION Door does not close Weight surpasses the storage limit of the door shelf so spread weight more evenly or take some products out. -
Seite 42: Door Reversal Inner Door Reversal
Door reversal The applianceÕs door has been locked in position for Warning! transport by means of pins on both sides. According If the ambient temperature is cold (i.e. in to the door opening direction, remove relevant pins Winter), the gasket may not fit perfectly to the at the top and at the bottom. -
Seite 43: Installation Positioning / Electrical Connection
Installation The following table shows which ambient Take utmost care when handling your temperature is correct for each climate classification: appliance so as not to cause any damages to the cooling unit with consequent possible fluid Climate for an ambient temperature of leakages. -
Seite 44: Building-In
Building-in Dimensions of the recess ZBA 3154 ZBA 3224 Height of housing (1) 880 1225 Depth of housing (2) Width of housing (3) D022 1. Fit the appliance in the niche by making sure that it stands against the interior surface of the unit on the side where the door hinges of the appliances are fitted. - Seite 45 PR33 7. Fix cover (Hc) on guide (Ha) until it clips into 4. Snap vent grill (B) and hinge cover (E) into place. position. Apply blanking covers (C-D) as indicated. PR167 PR266 8. Open the appliance door and the furniture door at 5.
- Seite 46 PR168 10. Place the small square on the guide again and fix it with the screws supplied. Should the alignment of the furniture door be necessary, use the clearance of slots. At the end of this procedure, it is necessary to check if the door of the furniture closes properly.
-
Seite 47: Declaration Of Guarantee Terms
DECLARATION OF GUARANTEE TERMS Our appliances are produced with the greatest of care. However, a defect may still occur. Our consumer services department will repair this upon request, either during or after the guarantee period. The service life of the appliance will not, however, be reduced as a result.