CAME TA/600 Montage- Und Betriebsanleitung
Touchscreen-thermostat
Vorschau ausblenden
Andere Handbücher für TA/600:
- Montage- und betriebsanleitung (16 Seiten) ,
- Montage- und betriebsanleitung (64 Seiten)

Verwandte Anleitungen für CAME TA/600


Inhaltszusammenfassung für CAME TA/600
- Seite 1 Termostato touch screen FB01001M04 IT Italiano TA/600 EN English FR Français MANUALE DI INSTALLAZIONE ED USO DE Deutsch...
-
Seite 2: Avvertenze Generali
Avvertenze generali • Leggere attentamente le istruzioni prima di iniziare l’installazione ed eseguire gli interventi come specificato dal costruttore. • L’installazione, la programmazione, la messa in servizio e la manutenzione del prodotto deve essere effettuata soltanto da personale tecnico qualificato ed opportunamente addestrato nel rispetto delle normative vigenti ivi comprese le osservanze sulla prevenzione infortuni e lo smaltimento imballaggi. -
Seite 3: Installazione
Installazione Contenuto della confezione Adattatori copriforo Corpo principale Cover Viti per fissaggio alla scatola da incasso NOTA: Sono disponibili come componenti opzionali, cover e adattatori copriforo grigio antracite e grigio alluminio. Controtelai I controtelai e gli adattatori copriforo opportunamente abbinati, permettono di adattare il dispositivo alle maggior parte delle serie civili in commercio seguendo le indicazioni delle pagine seguenti. - Seite 4 Come abbinare/adattare i controtelai alle serie civili BTICINO - Light, Light Tech, Living International. VIMAR - Plana, Eikon. LEGRAND - Vela Quadra, Vela Tonda, Serie Cross. GEWISS - Playbus, Playbus Young. BTICINO - Matix.
- Seite 5 AVE - Banquise, Sistema 45. VIMAR - Idea, Idea Rondò. ABB - Elos.
- Seite 6 GEWISS - System. BTICINO - Axolute, Luna. BTICINO - Livinglight Quadre. VIMAR - Arché BTICINO - Livinglight Tonde. GEWISS - Chorus.
- Seite 7 AVE - Serie 44. BTICINO - Li- vinglight AIR. VIMAR - Eikon Evo. BTICINO - Axolute Air.
- Seite 8 Sequenza di montaggio Installare il dispositivo in posizione idonea a rile- vare correttamente la temperatura dell’ambiente, possibilmente in una parete interna, evitando l’installazione in nicchie, dietro a porte, a tende o vicino a sorgenti di calore. Qualora fosse necessario separare il controtelaio dal corpo del dispositivo fare leva con un cacciavite nel punto indicato in figura E.
-
Seite 9: Collegamenti Elettrici
Collegamenti elettrici I collegamenti vanno effettuati 230 V~ in funzione del tipo di apparec- 50 Hz chiatura comandata dal crono- termostato. LEGENDA Conduttori di alimentazione VALVOLA da rete CHIUSA N = neutro – L = fase APERTA Contatti del relé NC = contatto normalmente chiuso C = comune... -
Seite 10: Descrizione Dispositivo
Descrizione dispositivo ① ② ③ ④ ⑤ ⑥ ⑦ ⑧ ⑨ ⑩ ⑪ ① ⑦ Blocco schermo abilitato Impianto in modalità antigelo La freccia indica ② ⑧ Programma NOTTE in esecuzione il profilo utente attivo Pulsante per accedere al setup del ③... -
Seite 11: Funzionamento Del Dispositivo
Funzionamento del dispositivo Alla prima accensione A il cronotermostato si trova in modalità riscaldamento ed è attivo il programma Comfort e viene visualizzata la temperatura rilevata. NOTA. il primo tocco sullo schermo serve ad accendere la retro illuminazione e non esegue alcun comando. - Seite 12 Cambiare la modalità di funzionamento dell'impianto Toccare l'area evidenziata nella figura D e mantenere il tocco fino a quando un segnale acustico indica la variazione di modalità tra: Impianto in modalità Riscaldamento Impianto in modalità Raffrescamento Impianto Spento Impianto in modalità Antigelo Quando l'impianto viene spento ( ), per alcuni secondi sullo schermo viene visualizzata l'immagine della figura E ad indicare che l'impianto è...
- Seite 13 pre-programmata H I; successivamente riappare la temperatura rilevata. Esclusione dal controllo termico Per attivare questa modalità premere il pulsante fino alla comparsa dell'icona Se l'impianto è in modalità "Riscaldamento", la funzione antigelo rimane attiva. Per qualche secondo viene mostrata la temperatura impostata per l'antigelo J poi viene visualizzata la temperatura rilevata K.
- Seite 14 Modificare i livelli di temperatura pre- programmati Con un qualunque programma di gestione termica attivo (Eco, Comfort, Notte), premere e mantenere premuta l'area evidenziata in figura A fino alla comparsa della schermata di figura B che mostra il nome del programma da modificare. B per modificare la Premere sulle frecce temperature pre-programmata C per il programma...
- Seite 15 Configurazione dei parametri generali del dispositivo Quando il dispositivo si trova in modalità "Impianto spento" (pagina 12), mantenendo premuto il A è possibile accedere alle schermate di configurazione del dispositivo B. pulsante Nota. Dopo l'accesso alle schermate di configurazione, la pressione del pulsante permette di visua- lizzare in sequenza i parametri da configurare.
- Seite 16 Il primo numero lampeggia E; usare le frecce per inserire la prima cifra del codice, toccare l'area evidenziata E per passare alla cifra successiva; in qualunque momento premendo il pulsante il codice digitato viene considerato valido e si passa al parametro successivo da configurare.
- Seite 17 mente difficili da climatizzare, con varia- zioni estreme della temperatura esterna e Set-point + differenziale comanda l'accensione dell'impianto come Set-point illustrato in figura J. Premere il pulsante per passare al Set-point parametro successivo da configurare. – differenziale Tempo Algoritmo Proporzionale Integrale ( Se alla schermata H, si è...
-
Seite 18: Retroilluminazione Del Display
figura N per poter inserire, Premere il pulsante O, il valore della banda mediante le frecce proporzionale. Premere il pulsante per passare al parametro succes- sivo da configurare. Set-point Tempo Durata ciclo Tempo minimo di Banda Prog. Tipo di impianto (minuti) ON (minuti) Proporzionale... - Seite 19 Regolare la luminosità del display Variare la luminosità dello schermo usando le frecce O= Retro-illuminazione sempre spenta. Premere il pulsante per passare al parametro succes- sivo da configurare. "Bip" pulsanti Scegliere se attivare/disattivare il "bip" pulsanti usando le frecce Premere il pulsante per passare al parametro succes- sivo da configurare.
-
Seite 20: Caratteristiche Tecniche
• Intervallo di rilevamento della temperatura ambiente: 15 secondi. • Isolamento elettrico: Classe II, rinforzato tra parti accessibili e morsetti. • Temperatura massima della testa di comando: T40 CAME S.p.A. Via Martiri Della Libertà, 15 31030 Dosson di Casier - Treviso - Italy... - Seite 21 Touch screen thermostat FB01001-EN TA/600 INSTALLATION AND USE MANUAL EN English...
-
Seite 22: General Precautions
General Precautions • Read the instructions carefully before beginning the installation and carry out the actions as specified by the manufacturer. • The installation, programming, commissioning and maintenance of the product must be carried out only by qualified technical personnel, correctly trained with regard to respecting the regulations in force, including the implementation of accident prevention measures and the disposal of packaging. -
Seite 23: Installation
Installation Package contents Hole cover adapter Main unit Covers Screws for fastening to recessing back-box N.B. Covers and hole cover adapters in anthracite grey and aluminium grey are available as optional components. Subframes The subframes and appropriately paired hole cover adapters allow the device to be adapted to most wiring systems available, following the instructions on the following pages. - Seite 24 How to combine/adapt the supports for domestic installations BTICINO - Light, Light Tech, Living International. VIMAR - Plana, Eikon. LEGRAND - Vela Quadra, Vela Tonda, Serie Cross. GEWISS - Playbus, Playbus Young. BTICINO - Matix.
- Seite 25 AVE - Banquise, Sistema 45. VIMAR - Idea, Idea Rondò. ABB - Elos.
- Seite 26 GEWISS - System. BTICINO - Axolute, Luna. BTICINO - Livinglight Quadre. VIMAR - Arché BTICINO - Livinglight Tonde. GEWISS - Chorus.
- Seite 27 AVE - Serie 44. BTICINO - Li- vinglight AIR. VIMAR - Eikon Evo. BTICINO - Axolute Air.
- Seite 28 Assembly sequence Install the unit in a position which is suitable for cor- rect room temperature measurement, for example on an internal wall. Avoid installation in alcoves, behind doors or curtains, or near heat sources. If the support needs to be separated from the main unit, use a screwdriver for leverage at the point shown in figure E.
-
Seite 29: Electrical Connections
Electrical connections The connections are made ac- 230 V~ cording to the type of equipment 50 Hz controlled by the programmable thermostat. Mains power supply wires VALVE N = neutral – L = live CLOSED Relay contacts OPEN NC = normally closed contact C = common NO = normally open contact Loads... -
Seite 30: Description Of Device
Description of device ① ② ③ ④ ⑤ ⑥ ⑦ ⑧ ⑨ ⑩ ⑪ ① ⑦ Screen lock on System in frost-protection mode ② ⑧ NIGHT program in operation The arrow indicates the active user profile ③ ⑨ ECO program in operation Button to access device set-up ④... -
Seite 31: Setting Date And Time
Operation of device When first turned on A the programmable thermostat is in heating mode and the Comfort program is on; the temperature measured is displayed. NOTE. The first touch on the screen turns on the backlighting and does not carry out any command. Setting date and time Briefly touch the area highlighted in figure A to display the current time;... - Seite 32 Changing the system's operating mode Touch the area shown in figure D and continue touching until a beep indicates the mode is changed between: System in Heating mode System in Cooling mode System off System in Frost-protection mode When the system is off ( ), the image in figure E is displayed on the screen for a few seconds, to indicate that the system is off;...
- Seite 33 Each time it is pressed, it shows the program in activation and the pre-set desired temperature for a few seconds H I; then the temperature detected reappear. Exclusion from thermal control To activate this mode press button until the icon appears. If the system is in "Heating"...
-
Seite 34: Unlocking The Screen
Changing the pre-set temperature levels With any heat management program active (Eco, Com- fort, Night), press and hold down the area highlighted in figure A until the screen in figure B appears showing the name of the program to be changed. arrows B to change the pre-set Press on the temperature C for the program displayed. - Seite 35 Configuration of general parameters of the device button A gives access to When the device is in "System off" mode (page 12), holding down the the device's configuration screens B. Note. After accessing the configuration screen, press button to display in sequence the parameters to be configured.
- Seite 36 The first number flashes E; use the arrows to en- ter the first digit of the code, touch the area highlighted E to move on to the next digit; pressing button any time means the code entered is considered valid and you move on to the next parameter to be configured.
- Seite 37 in external temperature and commands the switching on of the system as shown Set-point + differential in figure J. Set-point Press the button to move on to the next parameter to be configured. Set-point – differential Time Proportional Integral Algorithm ( If, on screen H, the proportional integral algorithm type has been chosen, the screen in figure K is displayed.
- Seite 38 button in figure N to be able to enter Press the the value of the proportional band, using the arrows O. Press the button to move on to the next parameter to be configured. Set-point Time Cycle duration Minimum ON Proportional Prog.
-
Seite 39: Firmware-Version
Adjusting display brightness arrows C. Change the screen brightness using the O= Backlighting always off. Press the button to move on to the next parameter to be configured. Buttons beep Choose whether to activate/deactivate the buttons beep arrows D. using the Press the button to move on to the next parameter to be configured. -
Seite 40: Technical Features
• Room temperature measurement interval: 15 seconds. • Electrical insulation: Class II, reinforced between accessible parts and terminals. • Maximum control unit temperature: T40 CAME S.p.A. Via Martiri Della Libertà, 15 31030 Dosson di Casier - Treviso - Italy tel. (+39) 0422 4940 - fax. (+39) 0422 4941... -
Seite 41: Manuel D'installation Et D'utilisation
Thermostat écran tactile FB01001-FR TA/600 MANUEL D'INSTALLATION ET D'UTILISATION FR Français... -
Seite 42: Instructions Générales
Instructions générales • Lire attentivement les instructions, avant de commencer l'installation et d'effectuer les interventions comme indiqué par le fabricant. • L'installation, la programmation, la mise en service et l'entretien du produit ne doivent être effectués que par un personnel technique qualifié et convenablement formé, conformément aux normes en vigueur, y compris les dispositions concernant la prévention des accidents et l'élimination des emballages. -
Seite 43: Installation
Installation Contenu de l'emballage Adaptateur cache-trou Corps principal Couvercles Vis de fixation au boîtier mural REMARQUE : les cadres et les adaptateurs cache-trou gris anthracite et gris aluminium sont disponibles comme composants en option. Précadres Les précadres et les adaptateurs cache-trou opportunément combinés permettent d'adapter le dispositif à... - Seite 44 Comment combiner/adapter les contre-châssis aux séries civiles BTICINO - Light, Light Tech, Living International. VIMAR - Plana, Eikon. LEGRAND - Vela Quadra, Vela Tonda, Serie Cross. GEWISS - Playbus, Playbus Young. BTICINO - Matix.
- Seite 45 AVE - Banquise, Sistema 45. VIMAR - Idea, Idea Rondò. ABB - Elos.
- Seite 46 GEWISS - System. BTICINO - Axolute, Luna. BTICINO - Livinglight Quadre. VIMAR - Arché BTICINO - Livinglight Tonde. GEWISS - Chorus.
- Seite 47 AVE - Serie 44. BTICINO - Li- vinglight AIR. VIMAR - Eikon Evo. BTICINO - Axolute Air.
-
Seite 48: Séquence De Montage
Séquence de montage Installez le dispositif dans une position en mesure de relever correctement la température ambiante, si possible sur un mur intérieur, en évitant l'installation dans des niches, derrière des portes, des rideaux ou près de sources de chaleur. S'il est nécessaire de séparer le contre-châssis du corps du dispositif, faites levier avec un tournevis au point indiqué... -
Seite 49: Branchements Électriques
Branchements électriques Les branchements doivent être 230 V~ réalisés en fonction du type 50 Hz d'équipement commandé par le chronothermostat. LÉGENDE Conducteurs d'alimentation VANNE sur secteur FERMÉE N = neutre – L = Phase OUVERTE Contacts du relais NF = contact normalement fermé C = commun NO = contact normalement ouvert... - Seite 50 Description dispositif ① ② ③ ④ ⑤ ⑥ ⑦ ⑧ ⑨ ⑩ ⑪ ① ⑦ Blocage écran activé Installation en mode antigel La flèche indique le profil ② ⑧ Programme NUIT en cours d'exécution utilisateur actif Touche pour accéder à la ③...
-
Seite 51: Fonctionnement Du Dispositif
Fonctionnement du dispositif Lors de la première mise en marche A le chronothermostat est en mode chauffage , le programme Confort est activé et la température lue est affichée. REMARQUE : la première pression sur l'écran tactile allume le rétroéclairage et n'exécute aucune commande. - Seite 52 Changement du mode de fonctionnement de l'installation Appuyez sur la zone indiquée dans la figure D jusqu'à ce qu'un bip sonore indique le changement de mode entre : Installation en mode chauffage Installation en mode refroidissement Installation éteinte Installation en mode antigel Lorsque l'installation est éteinte ( ) l'écran affiche pendant quelques secondes l'image de la figure E pour indiquer que l'installation est éteinte ;...
- Seite 53 À chaque nouvelle pression, il est affiché pendant quelques secondes le programme activé et la tempéra- ture souhaitée préprogrammée H I ; la température lue réapparaîtra ensuite. Exclusion par le contrôle thermique Pour activer ce mode, appuyez sur la touche jusqu'à ce que l'icône apparaisse.
- Seite 54 Modifiez les niveaux de température préprogrammés Depuis n'importe quel programme de gestion thermique activé (Éco, Confort, Nuit), maintenez appuyé sur la zone indiquée dans la figure A jusqu'à ce que la page-écran montrée dans la figure E apparaisse. B pour modifier la tem- Appuyez sur les flèches pérature préprogrammée C pour le programme affiché.
- Seite 55 Configuration des paramètres généraux du dispositif Lorsque le dispositif est en mode « Installation éteinte » (page 12), maintenez appuyée la touche pour accéder aux pages-écran de configuration du dispositif B. Remarque. Après avoir accédé aux pages-écrans de configuration, appuyez sur la touche pour visualiser en séquence les paramètres à...
- Seite 56 Le premier numéro E clignote ; utilisez les flèches pour saisir le premier chiffre du code puis touchez la zone indiquée E pour passer au chiffre suivant ; en appuyant à n'importe quel moment sur la touche code saisi est considéré comme validé et l'affichage passe au prochain paramètre à...
- Seite 57 Cette fonction est utile pour les environne- ments particulièrement difficiles à climatiser, Point de consigne + différentiel présentant des variations extrêmes de tem- Point de consigne pérature externe, et commande la mise en marche de l'installation comme cela est indiqué Point de consigne dans la figure J.
- Seite 58 de la figure N pour pouvoir Appuyez sur la touche O, la valeur de la bande saisir, à l'aide des flèches proportionnelle. Appuyez sur la touche pour passer au paramètre suivant à configurer. Point de consigne Temps Durée cycle Temps minimum Bande Prog.
- Seite 59 Réglez la luminosité de l'afficheur Modifiez la luminosité de l'écran en utilisant les flèches O = Rétroéclairage toujours éteint. Appuyez sur la touche pour passer au paramètre suivant à configurer. « Bip » touches Choisissez d'activer/désactiver le « bip » des touches à l'aide des flèches Appuyez sur la touche pour passer au paramètre...
-
Seite 60: Caractéristiques Techniques
• Intervalle de détection de la température ambiante : 15 secondes. • Isolation électrique : Classe II, renforcée entre les parties accessibles et les bornes. • Température maximum de la tête de commande : T40 CAME S.p.A. Via Martiri Della Libertà, 15 31030 Dosson di Casier - Treviso - Italy... - Seite 61 Touchscreen-Thermostat FB01001-DE TA/600 MONTAGE- UND BETRIEBSANLEITUNG DE Deutsch...
-
Seite 62: Allgemeine Hinweise
Allgemeine Hinweise • Lesen Sie aufmerksam die Anweisungen, bevor Sie mit dem Einbau beginnen, und führen Sie die vom Hersteller genannten Arbeiten aus. • Die Installation, Programmierung, Inbetriebnahme und Wartung des Produktes dürfen ausschließlich von qualifiziertem und entsprechend geschultem Fachpersonal unter Einhaltung der geltenden Normen, einschließlich der Unfallverhütungs- und Abfallentsorgungsvorschriften, durchgeführt werden. - Seite 63 Installation Packungsinhalt Abdeckung/Adapter Hauptgehäuse Abdeckungen Schrauben zur Befestigung am Unterputzgehäuse HINWEIS: Optional sind Abdeckungen und Blindtasten in den Farben anthrazit und aluminium erhältlich. Hilfsrahmen Durch die Kombination verschiedener Hilfsrahmen und Abdeckungen kann das Gerät, wie auf den nächsten Seiten beschrieben, in die meisten handelsüblichen Unterputzdosen eingesetzt werden. HINWEIS: Die Marken System, Playbus, Playbus Young, Chorus, sind Eigentum der GEWISS S.p.A.
- Seite 64 Kombinieren und Anpassen von Montagerahmen mit bzw. an handelsübliche Platten BTICINO - Light, Light Tech, Living International. VIMAR - Plana, Eikon. LEGRAND - Vela Quadra, Vela Tonda, Serie Cross. GEWISS - Playbus, Playbus Young. BTICINO - Matix.
- Seite 65 AVE - Banquise, Sistema 45. VIMAR - Idea, Idea Rondò. ABB - Elos.
- Seite 66 GEWISS - System. BTICINO - Axolute, Luna. BTICINO - Livinglight Quadre. VIMAR - Arché BTICINO - Livinglight Tonde. GEWISS - Chorus.
- Seite 67 AVE - Serie 44. BTICINO - Li- vinglight AIR. VIMAR - Eikon Evo. BTICINO - Axolute Air.
-
Seite 68: Vorgehensweise Zur Montage
Vorgehensweise zur Montage Installieren Sie das Gerät an einer geeigneten Stelle für das Messen der Raumtemperatur, möglichst an einer Innenwand und nicht in Nischen, hinter Türen oder Gardinen oder in der Nähe von Wärmequellen. Sollte es erforderlich sein, den Montagerahmen vom Gerätegehäuse zu trennen, hebeln Sie diesen mithilfe eines Schraubenziehers, den Sie an der in Abbildung E gezeigten Stelle ansetzen, auf. -
Seite 69: Elektrische Anschlüsse
Elektrische Anschlüsse Die Anschlüsse müssen, in Ab- 230 V~ hängigkeit des Typs des Gerätes 50 Hz das durch das Thermostat ge- steuert werden soll, vorgenom- men werden; LEGENDE VENTIL Leiter der Stromversorgung GESCHLOSSEN N = Nullleiter – L = Phase GEÖFFNET Relaiskontakte NC = Öffnerkontakt... -
Seite 70: Gerätebeschreibung
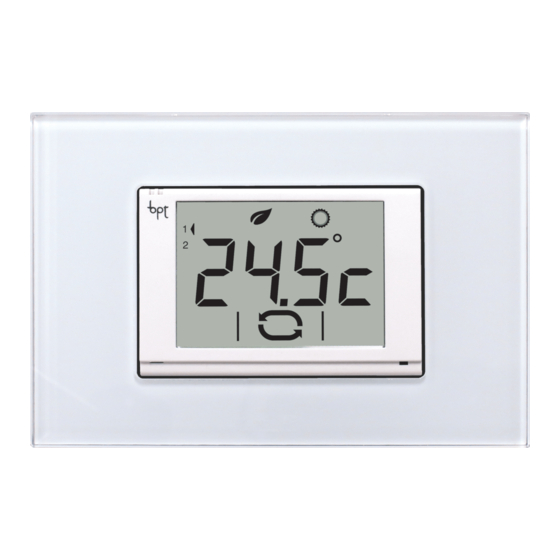
Gerätebeschreibung ① ② ③ ④ ⑤ ⑥ ⑦ ⑧ ⑨ ⑩ ⑪ ① ⑦ Bildschirmsperre aktiv Anlage im Frostschutzmodus Der Pfeil zeigt das aktive ② ⑧ Programm NACHT wird ausgeführt Benutzerprofil an Schaltfläche für den Zugriff auf die ③ ⑨ Programm ECO wird ausgeführt Einrichtung des Gerätes Schaltfläche zum Ändern des Modus... -
Seite 71: Einstellung Von Datum Und Uhrzeit
Gerätebetrieb Beim ersten Einschalten A befindet sich das Thermostat mit Zeitschaltuhr im Heizmodus , es ist das Programm Comfort aktiv und es wird die gemessene Temperatur angezeigt. HINWEIS: Bei der ersten Berührung des Bildschirms schaltet sich die Hintergrundbeleuchtung ein, ohne dass ein Befehl ausgeführt wird. Einstellung von Datum und Uhrzeit Berühren Sie kurz den in Abbildung A hervorgehobenen Bereich, um die aktuelle Uhrzeit anzeigen zu lassen;... - Seite 72 Ändern des Betriebsmodus der Anlage Berühren Sie den Bereich, der in Abbildung D her- vorgehoben ist, solange, bis ein akustisches Signal die Änderung des Betriebsmodus bestätigt. Folgende Modi sind möglich: Anlage im Heizmodus Anlage im Kühlmodus Anlage aus Anlage im Frostschutzmodus Wenn die Anlage ausgeschaltet wird ( ), erscheint auf dem Bildschirm für einige Sekunden der Bildschirm aus Abbildung E, der anzeigt, dass die Anlage aus-...
- Seite 73 Bei jedem Antippen erscheinen für einige Sekunden das aktive Programm und die gewünschte vorprogrammierte Temperatur H I; anschließend wird wieder die gemessene Temperatur angezeigt. Ausschluss von der Temperaturregulierung Zum Aktivieren dieses Modus tippen Sie auf die Schalt- fläche , bis das Symbol erscheint.
-
Seite 74: Aufheben Der Bildschirmsperre
Ändern der vorprogrammierten Temperaturniveaus Tippen Sie bei einem beliebigen aktiven Programm zur thermischen Verwaltung (Eco, Comfort, Nacht) solange auf den in der Abbildung A hervorgehobenen Bereich, bis der Bildschirm aus Abbildung B erscheint, der den Namen des zu ändernden Programms anzeigt. B an, um die vorprogram- Tippen Sie die Pfeile mierte Temperaturen C für das angezeigte Programm... -
Seite 75: Konfiguration Der Allgemeinen Geräteparameter
Konfiguration der allgemeinen Geräteparameter Wenn sich das Gerät im Modus "Anlage aus" (Seite 12) befindet, können durch längeres Berühren der A die Konfigurationsbildschirme des Gerätes B aufgerufen werden. Schaltfläche Hinweis: Nach dem Zugriff auf den Konfigurationsbildschirm können Sie durch Antippen der Schaltfläche nacheinander die konfigurierbaren Parameter anzeigen lassen. -
Seite 76: Einstellen Des Algorithmustyps Für Die Thermische Verwaltung
Die erste Ziffer blinkt E; geben Sie mit den Pfeilen die erste Ziffer des Codes ein und berühren Sie den hervorgehobenen Bereich E, um zur nächsten Ziffer zu wechseln. Durch Antippen der Schaltfläche einem beliebigen Zeitpunkt wird der eingegebene Code bestätigt und die Anzeige wechselt zum nächsten zu konfigurierenden Parameter. - Seite 77 Diese Funktion ist hilfreich für Räume, die aufgrund einer stark variierenden Außentem- Sollwert + Differenzial peratur besonders schwer zu klimatisieren Sollwert sind. Sie steuert das Einschalten der Anlage wie gezeigt in Abbildung J. Drücken Sie Sollwert die Schaltfläche , um zum nächsten zu - Differenzial Zeit konfigurierenden Parameter überzugehen.
-
Seite 78: Einstellen Der Maßeinheit Der Temperatur
in Abbildung N. Tippen Sie auf die Schaltfläche O den Daraufhin können Sie mithilfe der Pfeile Wert des Proportionalbereichs eingeben. Drücken Sie die Schaltfläche , um zum nächsten zu konfigurierenden Parameter überzugehen. Sollwert Zeit Zyklusdauer Minimale ON-Dauer Proportional- Prog. Art der Anlage (Minuten) (Minuten) bereich... -
Seite 79: Einstellen Der Display-Helligkeit
Einstellen der Displayhelligkeit Variieren Sie die Helligkeit des Bildschirms mithilfe der Pfeile O = Hintergrundbeleuchtung immer aus. Drücken Sie die Schaltfläche , um zum nächsten zu konfigurierenden Parameter überzugehen. Piepton Schaltfläche D fest, ob der Piepton Legen Sie mithilfe der Pfeile der Schaltflächen ein- oder ausgeschaltet sein soll. -
Seite 80: Technische Eigenschaften
• Messintervall Raumtemperatur: 15 Sekunden • Elektrische Isolierung: Klasse II, verstärkt zwischen zugänglichen Teilen und Klemmen • Höchsttemperatur des Steuerventils: T40 CAME S.p.A. Via Martiri Della Libertà, 15 31030 Dosson di Casier - Treviso - Italy tel. (+39) 0422 4940 - fax. (+39) 0422 4941...