
Verwandte Anleitungen für Midland BIKE GUARDIAN WI-FI


Inhaltszusammenfassung für Midland BIKE GUARDIAN WI-FI
- Seite 1 BIKE & CAR DASH CAM BIKE GUARDIAN BIKE GUARDIAN WI-FI WI-FI WI-FI ALWAYS VIDEO FULL HD IP 68 WIDE CHARGING PHOTO 12MP RATING ANGLE...
- Seite 2 All trademarks and registered trademarks are the property of their respective owners. Tutti i marchi di fabbrica registrati sono di proprietà dei rispettivi titolari...
-
Seite 3: Principali Funzioni
Informazioni su questa guida Il contenuto del presente documento viene divulgato solo a scopo informativo ed è soggetto a mo- difiche senza preavviso. Abbiamo fatto il possibile per garantire che il presente manuale sia preciso e completo. Tuttavia, non ci assumiamo alcuna responsabilità per eventuali errori e omissioni che potrebbero essere stati commessi e fatti. - Seite 4 Avvertenze Il manuale d’uso contiene dettagli su utilizzo, funzionamento, specifiche tecniche e precauzioni. Si consiglia di leggere attentamente l’intero manuale prima di utilizzare il prodotto e conservare il ma- nuale anche in seguito. Ci auguriamo che i nostri prodotti siano di vostra soddisfazione e possano esservi utili per molto tempo! L’installazione e l’uso in modo scorretto possono causare gravi infortuni all’utilizzatore, al mezzo ed a terzi.
-
Seite 5: Descrizione Dei Comandi
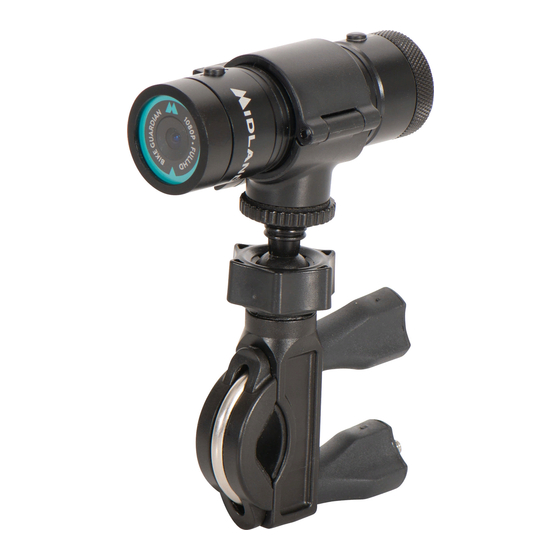
Descrizione dei comandi RESET HDMI RESET RESET WIFI HDMI HDMI WIFI WIFI 1. Lente 7. Microfono 2. LED blu accensione 8. Alloggiamento Micro SD 3. Pulsante ON 9. Connettore ricarica 4. LED rosso registrazione 10. Selettore modalità 5. Pulsante foto/REC 11. -
Seite 6: Contenuto Della Confezione
Contenuto della confezione 1. Cavo USB 2. Cavo USB waterproof con guarnizioni 3. Staffa di aggancio con viti di ricambio 4. Supporto con biadesivo composto da: adattatore GO-PRO, vite, aggancio rapido, supporto base piatta con biadesivo 5. Supporto manubrio 6. Supporto a ventosa 7. -
Seite 7: Ricarica Della Batteria
Ricarica della batteria È possibile ricaricare la videocamera connettendo il cavo USB ad un caricatore o ad un PC (potete utilizzare sia il cavo con coperchio waterproof che il cavo di connessione al PC) Durante la carica il led BLU della ricarica resterà acceso. A carica completa il led si spegnerà. Programmazione data/ora Collegare la videocamera al WiFi del telefono e lanciare l’app: in automatico BIKE GUARDIAN WIFI aggiornerà... -
Seite 8: Fissaggio Della Videocamera
Fissaggio della videocamera 1. Fissare BIKE GUARDIAN WiFi al supporto avvitando le due viti a brugola. 2. Fissare il supporto da manubrio 3. Avvitare BIKE GUARDIAN WiFi sul supporto. 4. Avvitare il cavo waterproof (n.2 contenuto della confezione) a BIKE GUARDIAN WiFi e colle- garlo ad una fonte di alimentazione. - Seite 9 5. Il connettore USB posto all’altra estremità deve essere posizionato in modo tale da essere pro- tetto dall’acqua. Nota: quando si usa il cavo waterproof ricordarsi sempre di applicare la guarnizione in dotazione mentre se si usa il tappo senza cavo la guarnizione va rimossa Fissaggio adesivo Fissare il supporto adesivo, avendo cura di pulire e sgrassare la superficie prima dell’applicazione dell’adesivo.
- Seite 10 Modalità Foto Accendere la videocamera e premere il tasto rosso per scattare foto. Nella tabella sotto sono riportate le durate indicative delle memorie in funzione della risoluzione sele- zionata e della capacità della memoria. Consigliamo di formattare la micro SD card ogni 2 settimane di utilizzo Modalità...
- Seite 11 App “VISIONBANK” L’Applicazione VISIONBANK permette di controllare la videocamera a distanza utilizzando uno smartphone o un tablet. Le caratteristiche permettono di vedere in tempo reale, riprodurre e condividere le foto/filmati selezionati. Scaricate la App “VISIONBANK” sul vostro smartphone o tablet presso lo store Apple App o Google Play.
-
Seite 12: Specifiche Tecniche
Specifiche tecniche Risoluzione FullHD 1080p / HD 720p/WVGA/VGA Frame rate 1080p@ 30fps / 720p@30fps Angolo visuale 170° Formato video Waterproof IP68 Alimentazione USB 5V DC MicroSD Da8 a 128GB (4GB o inferiori non supportate) Batteria 1000 mAh (fino a 120min) Per scaricare eventuali aggiornamenti firmware e per informazioni sulla garanzia visitate il sito www.midlandeurope.com... -
Seite 13: Main Features
About this Guide The content of this document is for information purpose and is subject to change without prior notice. We made every effort to ensure that this User Guide is accurate and complete. However, no liability is assumed for any errors and omissions that may have occurred. The manufacturer reserves the right to change the technical specifications without prior notice. - Seite 14 Warnings This manual includes details on how to use the device, its working, technical specifications and pre- cautions. We recommend to carefully read it before using the camera and keep it for the future. We trust that this DVR will meet your needs for a long time! An improper installation and an incorrect use of the camera could cause personal injuries to the user and damages to the vehicle.
-
Seite 15: Controls Description
Controls description RESET HDMI RESET RESET WIFI HDMI HDMI WIFI WIFI 1. Lens 7. Microphone 2. Blue LED power on 8. Micro SD slot 3. ON button 9. Recharge connector 4. Red LED recording 10. Mode selector 5. Photo/REC control 11. -
Seite 16: What's In The Box
What’s in the box 1. USB cable 2. Waterproof USB cable with rubber gaskets 3. Lock mount with spare screws 4. Bi-adhesive mount composed of: GO-PRO adaptor, screw, quick release mount, flat mount with bi-adhesive 5. Handlebar mount 6. Suction cup mount 7. -
Seite 17: Battery Recharge
Battery recharge BIKE GUARDIAN WI-FI can be recharged by connecting the USB cable to a proper charger or to a PC (you can use both cables supplied in the package: the waterproof cable or the one suitable for the PC connection). - Seite 18 Fixing the camera Fix the camera to the support by screwing the two Allen screws supplied in the package. 1. Install the handlebar mount 2. Screw the camera to the support Screw the waterproof cable to the camera and connect it to a power source. Attention: the waterproof condition is guaranteed only with the connector to fix to the camera.
- Seite 19 Adhesive support Before attaching the adhesive support, carefully clean the surface where it will be applied. Fix the camera to the adhesive support. Suction cup mount Before fixing the suction cup mount, clean the surface where it will be applied. Push the fixing lever towards the windshield.
- Seite 20 Video mode The camera automatically starts recording when it’s powered and stops recording when the power is switched off. When the microSD card is full, BIKE GUARDIAN WIFI continues recording by deleting the older files. If the camera is not powered, just turn it on with the ON/Off button and then press the red control to start/stop recording.
- Seite 21 “VISIONBANK” App The VISIONBANK APP allows to control the camera remotely using a smartphone or tablet. Features include live preview, playback and video/photo sharing. 1. Download the “VISIONBANK” APP on your smartphone or tablet from Apple Store or Google Play. 2.
-
Seite 22: Technical Specifications
Technical specifications Resolution FullHD 1080p / HD 720p/WVGA/VGA Frame rate 1080p@30fps / 720p@30fps Wide angle 170° Video format Waterproof IP68 Power supply USB 5V DC MicroSD From 8 up to 128GB (4GB or lower are not supported) Battery 1000 mAh (up to 120min) To download further firmware updatings and for information about the warranty please go to www.midlandeurope.com... -
Seite 23: Haupteigenschaften
BIKE GUARDIAN Einleitung Der Inhalt dieses Dokuments dient zu Informationszwecken und kann ohne vorherige Ankündigung geändert werden. Wir haben uns bemüht sicherzustellen, dass dieses Benutzerhandbuch genau und vollständig ist. Es wird jedoch keine Haftung für eventuelle Fehler und Auslassungen übernommen. Der Hersteller behält sich das Recht vor, die technischen Spezifikationen ohne vorherige Ankünd- igung zu ändern. - Seite 24 Warnung Dieses Handbuch enthält Details zur Verwendung des Geräts, über seine Funktionsweise sowie technische Daten und Vorsichtsmaßnahmen. Wir empfehlen, dieses Handbuch vor Gebrauch der Kamera sorgfältig zu lesen und für die Zukunft aufzubewahren. Wir vertrauen darauf, dass diese Kamera Ihre Anforderungen lange erfüllt! Eine unsachgemäße Installation und ein falscher Gebrauch der Kamera können zu Verletzungen des Benutzers und zu Schäden am Motorrad/Fahrzeug führen.
-
Seite 25: Tasten Und Funktionen
Tasten und Funktionen RESET HDMI RESET RESET WIFI HDMI HDMI WIFI WIFI 1. Linse 7. Mikrofon 2. Blaue LED: eingeschaltet 8. Micro SD Buchse 3. Ein/Ausschalter 9. Ladebuchse 4. Rote LED: Aufnahme 10. Modus Auswahl 5. Foto/Video Aufnahme 11. Reset 6. - Seite 26 Lieferumfang USB Kabel Wasserdichtes USB Kabel mit Deckel Universale Befestigung mit Ersatzschrauben Klebehalterung (flach) mit Go-Pro Adapter Lenkerhaltung Saugnapfhalterung Schraubschlüssel...
-
Seite 27: Einstellung Datum Und Uhrzeit
Aufladen Die BIKE GUARDIAN Kamera kann mit beiden Kabeln im Lieferumfang (wasserdichtes Kabel und Datenkabel) an einer geeigneten Stromversorgung oder am PC aufgeladen werden. Während des Ladevorgangs leuchtet die Ladeanzeige blau und erlischt, sobald die Kamera vollständig aufgeladen ist. Einstellung Datum und Uhrzeit Verbinden Sie die Kamera per WLAN mit Ihrem Telefon und starten Sie die App: die Zeit und Datum werden automatisch von Ihrem Smartphone aktualisiert. -
Seite 28: Befestigung Der Kamera Am Lenker
Befestigung der Kamera am Lenker Befestigen Sie die Kamera in der universalen Halterung mit den beiliegenden Schrauben. 1. Montieren Sie die Halterung danach auf einem Stativgewinde 2. Ziehen Sie die Schraube des Stativgewindes fest an Befestigen Sie den Deckel des wasserdichten Kabels an der Rückseite der Kamera. Achtung: das Kabel ist nur an dem Ende, das an der Kamera installiert wird, wasserdicht! Der USB An- schluss an der anderen Seite muss so positioniert werden, dass er vor Regenwasser geschützt ist. -
Seite 29: Saugnapfhalterung
Klebehalterung Bitte reinigen Sie zuerst die Oberfläche sorgfältig, auf der Sie die Klebehalterung anbringen möchten. Bringen Sie danach die Klebehalterung auf der Oberfläche an. Saugnapfhalterung Bitte reinigen Sie zuerst die Oberfläche sorgfältig, auf der Sie die Saugnapfhalterung anbringen möchten. Drücken Sie die Saugnapfhalterung an eine Scheibe und fixieren Sie die Halterung, in dem Sie den Hebel runterdrücken. - Seite 30 Video Modus Sobald die Kamera eingeschaltet wird, startet sie automatisch die Aufnahme und beendet die Auf- nahme auch wieder, wenn die Kamera ausgeschaltet wird. Wenn die Micro SD Speicherkarte voll ist, werden die ältesten Dateien zuerst überspielt. Die Tabelle zeigt die Aufnahmedauer je nach Speicherkarte und gewählter Auflösung. Speicherkarte 1080p Auflösung 720p Auflösung...
- Seite 31 “VISIONBANK” App Mit der VISIONBANK APP können Sie die Kamera ganz einfach per Smartphone oder Tablet be- dienen. Sie können eine Live-Vorschau starten, Videos wiedergeben und online teilen. 1. Laden Sie die “VISIONBANK” APP aus dem Apple Store oder von Google Play herunter. 2.
-
Seite 32: Technische Spezifikationen
Technische Spezifikationen Auflösung FullHD 1080p / HD 720p / WVGA / VGA Bildrate 1080p@30fps / 720p@30fps Aufnahmewinkel 170° Video Format Wasserdichtigkeit IP68 Stromversorgung USB 5V DC MicroSD Von 8 GB bis zu 128 GB (4 GB oder weniger werden nicht unterstützt) Batterie 1000 mAh (bis zu 120min) -
Seite 33: Características Principales
Acerca de esta guía El contenido de este documento tiene fines informativos y está sujeto a cambios sin previo aviso. Hicimos todos los esfuerzos posibles para garantizar que esta Guía del usuario sea precisa y completa. Sin embargo, no se asume ninguna responsabilidad por cualquier error u omisión que pueda haber ocurrido. - Seite 34 Advertencias Este manual incluye detalles sobre cómo usar el dispositivo, su funcionamiento, especificaciones téc- nicas y precauciones. Recomendamos leerlo detenidamente antes de usar la cámara y guardarlo para el futuro. ¡Confiamos en que este DVR satisfaga sus necesidades durante mucho tiempo! Una instalación incorrecta y un mal uso de la cámara podrían causar lesiones personales al usuario y daños al vehículo.
-
Seite 35: Descripción De Los Controles
Descripción de los controles RESET HDMI RESET RESET WIFI HDMI HDMI WIFI WIFI 1. Lente 7. Micrófono 2. LED azul de encendido 8. Ranura Micro SD 3. Botón de encendido 9. Conector de carga 4. LED rojo de grabación 10. Selector de modo 5. -
Seite 36: Qué Hay En La Caja
Qué hay en la caja 1. Cable USB 2. Cable USB Waterproof con juntas de goma 3. Montaje de bloqueo con tornillos de repuesto 4. Soporte biadhesivo compuesto de: adaptador GO-PRO, tornillo, soporte de liberación rápida, base plana con biadhesivo 5. -
Seite 37: Carga De La Batería
Carga de la batería BIKE GUARDIAN WIFI puede cargarse conectando el cable USB a un cargador adecuado o al ordenador (puede usar los dos cables suministrados: el cable waterproof o el cable para ordenador). Durante la carga, el led azul estará encendido y se apagará cuando la carga esté completa. Ajustar la fecha y la hora Conecte la cámara al smartphone vía WIFI y abra la APP: la fecha y la hora se actualizarán automá- ticamente según su smartphone. - Seite 38 Montar la cámara en el manillar Fije la cámara al soporte con los dos tornillos Allen suministrados. 1. Instale el soporte de manillar 2. Enrosque la cámara en el soporte Atornille el cable waterproof a la cámara y conéctelo a una fuente de alimentación. Atención: la condición de impermeabilidad está...
- Seite 39 Soporte adhesivo Antes de colocar el soporte adhesivo, limpie cuidadosamente la superficie donde se aplicará. Fije la cámara al soporte adhesivo. Soporte de ventosa Antes de colocar el soporte de ventosa, limpie cuidadosamente la superficie donde se aplicará. Empuje la palanca de fijación hacia el parabrisas. Para los mejores videos, ajuste las juntas para obte- ner la mejor vista de ángulo.
- Seite 40 Modo Vídeo La cámara comienza a grabar automáticamente cuando está encendida y deja de grabar cuando se apaga. Cuando la tarjeta microSD está llena, BIKE GUARDIAN WIFI continúa grabando sobrescri- biendo los archivos más antiguos. Si la cámara no está alimentada, enciéndala con el botón ON/Off y después pulse el botón rojo para empezar/detener la grabación.
- Seite 41 App “VISIONBANK” La APP VISIONBANK permite controlar la cámara remotamente desde un smartphone o tableta. Las características incluyen vista previa en vivo, reproducción y compartir vídeos / fotos. 1. Descargue la APP “VISIONBANK” en su smartphone o tableta desde Apple Store o Google Play.
-
Seite 42: Especificaciones Técnicas
170° Formato de vídeo Waterproof IP68 Alimentación USB 5V DC MicroSD Desde 8 hasta 128GB (no soporta 4GB o inferior) Batería 1000 mAh (hasta 120min) Para descargar más actualizaciones de firmware y obtener información sobre la garantía, vaya a www.midland.es... - Seite 43 IT / RSM A CTE INTERNATIONAL declara que este aparelho Cte International Srl dichiara che il prodotto è conforme cumpre com o disposto na Directiva 2014/53/UE do ai requisiti essenziali e alle disposizioni della Direttiva Parlamento Europeu. A Declaração de Conformidade 2014/53/UE.
- Seite 44 Käesolevaga kinnitab Cte International Srl selle mudeli С настоящото CTE international Srl декларира, че vastavust direktiivi 2014/53/UE. Vastavusdeklaratsioon продукта е в съответствие с основните изисквания и on kättesaadav veebilehel http://www.midlandeurope. съответните модификации на Директива 2014/53/UE. com/it/pagina/10090-certifications Декларацията за съвместимост е налична на сайта: http://www.midlandeurope.com/it/pagina/10090-cer- CTE International patvirtina, kad šis modelis atitinka visus tifications...
- Seite 45 • INFORMAZIONE AGLI UTENTI: Ai sensi dell’art. 13 del decreto legislativo 25 luglio 2005, n.151 “Attuazione delle Direttive 2002/95/CE, 2002/96/CE e 2003/108/CE, relative alla riduzione dell’uso di sostanze pericolose nelle apparecchiature elettriche ed elettroniche, nonché allo smaltimento dei ri- fiuti”. Il simbolo del cassonetto barrato riportato sull’apparecchiatura indica che il prodotto alla fine della propria vita utile deve essere raccolto separatamente dagli altri rifiuti.
- Seite 46 Vertrieb durch: ALAN ELECTRONICS GmbH Daimlerstraße 1K - D-63303 Dreieich Deutschland. Vor Benutzung Bedienungsanleitung beachten. Importado por: MIDLAND IBERIA, SA C/Cobalt, 48 - 08940 Cornellà de Llobregat, Barcelona - España. Antes de utilizar, lea atentamente el manual de uso. Importé par: ALAN FRANCE S.A.R.L.