Inhaltsverzeichnis
Werbung
Verfügbare Sprachen
Verfügbare Sprachen
Quicklinks
Werbung
Inhaltsverzeichnis

Verwandte Anleitungen für Midland Street Guardian Night


Inhaltszusammenfassung für Midland Street Guardian Night
- Seite 1 VIDEOCAMERA DA AUTO CAR CAMCORDER KFZ-KAMERA CAMÉSCOPE DE VOITURE...
-
Seite 2: Informazioni Su Questa Guida
Vi ringraziamo per aver acquistato STREET GUARDIAN NIGHT, la videocamera Full HD da auto. STREET GUARDIAN NIGHT è robusta e compatta, è dotata di un design accattivante e moderno, ma soprattutto è in grado di registrare ogni singolo istante del percorso, per essere un testimone affidabile in caso d’imprevisti. -
Seite 3: Contenuto Della Confezione
• Per evitare effetti negativi sul video, non utilizzare STREET GUARDIAN NIGHT in presenza di polvere o nebbia eccessive • Alla fine del suo ciclo di vita non smaltire la videocamera in modo casuale e non gettarla nel fuoco: potrebbe esplodere. -
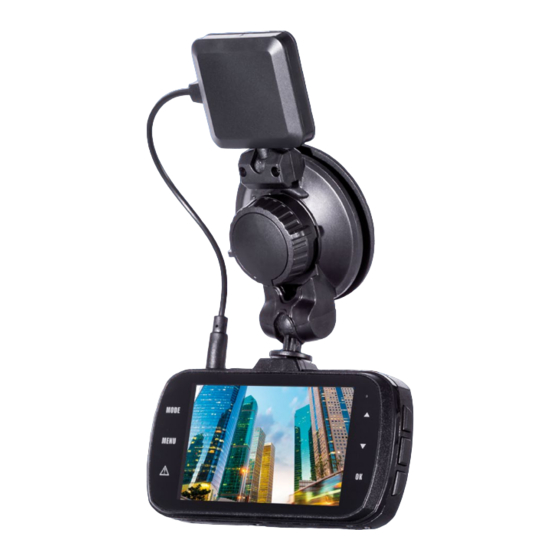
Seite 4: Descrizione Delle Parti
Descrizione delle parti... - Seite 5 Rif. Nome Funzione Istruzioni per l’uso Connettore GPS Connettore GPS Quando è attiva la funzione GPS, sul display compare l’icona relativa; questo GPS mostra il rilevamento di lon- gitudine e latitudine durante la guida, senza funzione di navigazione. Interfaccia Uscita alta Collegare la videocamera al televisore HD con il cavo HDMI definizione...
- Seite 6 Pulsante di Premere per Premere per bloccare il file durante la registrazione. bloccare il file NOTA: premendo il pulsante SOS, la videocamera crea un emergenza SOS nuovo file nella cartella protetta. Dopo 1 minuto la videocamera torna a registrare in una cartella non protetta Display LCD 10.
-
Seite 7: Per Iniziare
Guida al funzionamento Accensione/spegnimento automatici Dopo aver effettuato il collegamento all’alimentazione del veicolo, STREET GUARDIAN NIGHT sarà in grado di registrare automaticamente dei video una volta avviato il mezzo e si spegnerà automatica- mente memorizzando il video quando il veicolo si spegne. - Seite 8 quindi l’accensione e spegnimento automatici non sono possibili. Occorre accendere e spegnere manual- mente la videocamera. Accensione/spegnimento manuali 1. Premere brevemente il pulsante Power: si accenderà la spia rossa. 2. Entrare nella modalità video, premere nuovamente a lungo il pulsante Power: la spia rossa si spe- gnerà.
- Seite 9 Istruzioni sul funzionamento di base di foto/video/playback (Riproduzione) Modalità e registrazione video 1. Premere il pulsante MODE fino a entrare nella modalità video: sull’angolo superiore sinistro dell’L- CD è presente un’icona di registrazione video; 2. premere brevemente il pulsante OK/REC per avviare la registrazione: la spia rossa del video inizierà a lampeggiare, indicando che il DVR è...
- Seite 10 2. premere brevemente il pulsante MENU una volta per passare a impostazione video: nell’angolo su- periore destro dell’LCD apparirà l’icona blu del video. 3. Sul display sono disponibili le seguenti opzioni di impostazione: • Risoluzione video • Qualità dell’immagine • Assistente guida •...
-
Seite 11: Impostazione Del Sistema
viene avvisato 3 secondi prima di un possibile evento pericoloso, in caso di riduzione eccessiva della distanza di sicurezza. Rilevamento di movimento (Motion detection): On/Off. Di default questa funzione è disabilitata. Prima di utilizzare questa funzione è necessario disattivare l’autospegnimento (Spegnimento automa- tico). -
Seite 12: Funzionamento
• Impostazione limite di velocità • Informazioni sulla versione. Funzionamento: 1. Premere brevemente il pulsante Up/Down per scorrere le opzioni di impostazione 2. Premere brevemente il tasto OK per entrare nell’impostazione, premere brevemente il pulsante Up/ Down per modificare l’impostazione 3. - Seite 13 Impostazione foto Dopo l’accensione premere brevemente il pulsante MODE, per passare alla modalità foto: sull’angolo superiore sinistro dell’LCD apparirà l’icona foto; premere il pulsante MENU per entrare nell’imposta- zione. Sono disponibili 2 opzioni di impostazione: Risoluzione foto, Qualità dell’immagine. 1. Premere brevemente UP/DOWN per scorrere le opzioni di impostazione; 2.
- Seite 14 Installazione e uso del software Midland Player Se è necessario verificare le informazioni sul GPS, installare innanzitutto il software Midland Player. Il software è contenuto nella memoria interna dell’unità. 1. Connettere l’unità al PC attraverso il cavo dati USB 2. Aprire la directory PLAYER nella memoria interna dell’unità...
-
Seite 15: Requisiti Minimi Del Sistema
In condizioni operative normali, per risolvere eventuali problemi con il dispositivo fare riferimento ai seguenti suggerimenti. Non è possibile scattare foto e registrare Verificare se vi sia spazio sufficiente a tale scopo nella scheda SD. Arresto automatico durante la registrazione Considerata l’enorme quantità... -
Seite 16: Specifiche Del Prodotto
Specifiche del prodotto Caratteristiche del prodotto Videocamera HD, Registrazione HD Sensore G integrato (per salvare il file bloccato in caso di collisione) Dimensioni LCD 3.0 LTPS 16:9 Lente Angolo 150°A+ HD UltraWide Pixel foto 13MP Pixel video Apertura lente F=2.0 Lingua Inglese Olandese Polacco Francese Spagnolo Italiano Tedesco Portoghese... - Seite 17 ATTENZIONE: L’adattatore di alimentazione è il dispositivo di disconnessione dell’apparato; la base di carica della corrente deve restare vicino all’apparato e facilmente accessibile. Per scaricare eventuali aggiornamenti firmware e per informazioni sulla garanzia visitate il sito www.mia - dlandeurope.com...
-
Seite 18: About This Guide
Thank you for purchasing STREET GUARDIAN NIGHT, the FULL HD car DVR. STREET GUARDIAN NIGHT is a robust and compact car camcorder, with a stylish and modern desi- gn, that is able to record whatever happens while you are driving. A reliable witness in case of accidents or unforeseen events. -
Seite 19: What's In The Box
• Due to local laws and vehicles safety considerations, do not manually operate the device while dri- ving What’s in the box • Street Guardian Night car camcorder • Suction cup with GPS • 12V charger with cigarette lighter plug •... -
Seite 20: Description Of The Controls
Description of the controls... - Seite 21 Ref. Name Function Description GPS connector GPS connector When the GPS function is activated, the relative icon appears on the display. This GPS shows tracking of the longitude and latitude while driving, without navigation function. HDMI interface High definition To view videos and photos connect the camera to HD output television by HDMI cable GPS support...
- Seite 22 Press to lock the SOS Emergency Press to lock the file while recording. NOTE: when you press the SOS button, the camera creates Button file a new file in locked folder. After 1 minute the camera will return to record in unlocked folder LCD DISPLAY 10.
-
Seite 23: Getting Started
Then the led will turn off. Auto power on/off After STREET GUARDIAN NIGHT has been connected to vehicle’s power, it will automatically start recording at the turning on of the vehicle and will automatically stop recording when the vehicle is turned off. - Seite 24 2. Enter the video mode, press long the Power button again: the red led will turn off. Attention: in case of very low battery, the camera will emit an acoustic sound and then switch off. Recharge To recharge the car camcorder connect it to the PC by means of the USB cable. The camera however, must be always powered while in use : in standby conditions the battery life is about 10 minutes;...
-
Seite 25: Menu Settings
Basic operation instructions about photo/video/playback Video mode and recording • Press the MODE button until enter to video mode: , there is a video recording icon shown on the top left corner of the LCD; • Short press the OK/REC button to start recording, the red video indication light starts flashing, indicating that the DVR is recording. - Seite 26 corner of the LCD; 2. press shortly the MENU button once to switch to the video setting: the video blue icon will appear on the top right corner of the LCD. 3. The following setting options are available on the display: •...
-
Seite 27: System Settings
When the vehicle vibrates owing to a collision the camera will automatically turn on and starts recording. STREET GUARDIAN NIGHT will be recording for 1 minute and the file will be locked and protected from being overwritten by cycle recording. -
Seite 28: Operation
Operation: 1. Press shortly the Up/Down button to browse the setting options 2. Press OK to enter the setting and select the desired option with Up/Down 3. Confirm your selection with OK; if you don’t want to save the modification, exit the setting by pushing MENU. -
Seite 29: Photo Setting
Photo setting 1. After power on, press the MODE button to switch to photo mode: the photo icon will appear on the top left corner of the LCD; push MENU to enter the setting. 2. Two setting options are available: Photo resolution, Image quality. 3. - Seite 30 Midland Player software: installation and use If need check the GPS information , the Midland Player must be installed firstly. Player software is stored in the internal memory of the unit. 1. Connect the unit to the PC via USB data cable 2.
-
Seite 31: Minimum System Requirements
FAQ (Frequently Asked Questions) Under normal operating conditions, if you experience problems with the device, please refer to the following methods to solve. Cannot take pictures and record Please check whether there is enough space in the SD card. Automatic stop while recording Due to the huge amount of HD video data, please use high-speed 10 Class SD card, SDHC compati- ble. -
Seite 32: Product Specifications
Product specifications Product Feature HD Camera, HD Recording G-sensor Built-in (to save locked file when collision happens) LCD Size 3.0 LTPS 16:9 Lens 150 Degree A+ HD ultra wide angle Photo Pixel 13MP Video Pixel Lens Aperture F=2.0 Language English Dutch Polski Francais Español Italiano Deutsch Portuguese Video Format 1920*1080 60P 1920*1080 30P HDR 1920*1080... - Seite 33 WARNING: Direct plug-in ac/dc power supplì must be used for disconnecting the device from the mains; the deskotp charger must be positone closet o the unit and easily accessibly. To download further updatings and for information about the warranty please visit www.midlandeurope.
-
Seite 34: Über Diese Anleitung
Sie beim Steuern des Wagens und in Ihrer Sicht nicht beeinträchtigt werden. Im Vergleich zu anderen Dashcams zeichnet sich die STREET GUARDIAN NIGHT durch ihr exklusives Design und ihre elegante Optik aus – sie passt perfekt in Ihren Wagen. -
Seite 35: Hinweise Zur Montage
Tuch verwenden. • Um die Qualität der Videos nicht zu beeinträchtigen, die STREET GUARDIAN NIGHT nicht bei starkem Staub oder Nebel verwenden. • Am Ende der Nutzungsdauer die Dashcam nicht mit dem Hausmüll entsorgen. Die Kamera nicht ins Feuer werden, da sie explodieren könnte. -
Seite 36: Beschreibung Der Bedienelemente
Beschreibung der Bedienelemente... - Seite 37 Nr. Nr. Bezeichnung Funktion Beschreibung GPS-Anschluss GPS-Anschluss Wenn die GPS-Funktion aktiviert ist, wird das ent- sprechende Symbol auf dem Display angezeigt. Die GPS-Funktion verfolgt die Breiten- und Längenkoordin- aten während der Fahrt, keine Navigationsfunktion. HDMI-Anschluss Hochauflösende Für die Anzeige von Videos und Fotos die Kamera mit Ausgabe einem HDMI-Kabel an einen HD-Fernseher anschließen.
- Seite 38 Menü Foto/Aufnahme/ Im Videomodus: einmal kurz drücken, um zu den Videoe- Wiedergabe, instellungen zu wechseln Funktionseinstel- Im Fotomodus: einmal kurz drücken, um zu den Fotoe- lungen instellungen zu wechseln Im Video-/Fotowiedergabemodus: einmal kurz drücken, um zu den Wiedergabeeinstellungen zu wechseln SOS-Notfalltaste Drücken, um die Drücken, um die Datei während der Aufnahme zu sperren Datei zu sperren...
-
Seite 39: Erste Schritte
120 Minuten). Danach erlischt die LED. Automatisches Ein-/Ausschalten Wenn die STREET GUARDIAN NIGHT an die Stromversorgung des Fahrzeugs angeschlossen ist, beginnt sie automatisch mit der Aufnahme, wenn das Fahrzeug angelassen wird, und beendet die Aufnahme automatisch, wenn der Motor abgestellt wird. -
Seite 40: Grundlegende Bedienungsanleitung Zur Foto-/Video-/Wiedergabefunktion
Achtung: Wenn der Akku sehr schwach ist, gibt die Kamera einen Ton aus und schaltet sich ab. Aufladen Um die Dashcam aufzuladen, schließen Sie sie mit dem USB-Kabel an einen PC an. Die Kamera muss jedoch während des Betriebs ständig mit Strom versorgt werden: Im Standby- Betrieb beträgt die Akkulaufzeit etwa 10 Minuten;... -
Seite 41: Menüeinstellungen
Loop video time Dauer der Videoschleife Audio Audio System time/Date/Diver ID Systemzeit/Datum/Fahrer-ID Fotomodus • Drücken Sie kurz die MODE-Taste, um in den Fotomodus zu wechseln: Oben links auf dem Display wird nun das entsprechende Symbol angezeigt. Drücken Sie kurz Ein/Aus oder OK/REC, um Fotos aufzunehmen. Das LCD blinkt einmal. Achtung: Die Kamera kann maximal 50 Fotos aufnehmen. - Seite 42 Video setting Videoeinstellungen Menu options Menüoptionen Videoauflösung: 1920*1080 60p, 1920*1080 30p, HDR 1920*1080 30P HDR (High Dynamic Range) ist ein Verfahren, das einen größeren Helligkeitsbereich reproduzieren kann; es bewirkt, dass Ihre Videos heller und die Farben intensiver werden. HDR verbessert den Kontrast während einer Videoaufnahme und ist bei schlechter Beleuchtung sehr hilfreich, zum Beispiel wenn sich eine Person an einem dunklen Ort befindet oder wenn Sie eine Landschaft aufnehmen.
-
Seite 43: Systemeinstellungen
Wenn das Fahrzeug aufgrund einer Kollision schwingt, schaltet sich die Kamera automatisch ein und startet eine Videoaufnahme. STREET GUARDIAN NIGHT zeichnet 1 Minute lang auf, die Datei wird gesperrt und vor dem Überschreiben während der Schleifenaufnahme geschützt. Schleifenaufnahme: Aus/1 Min./3 Min./5 Min. - Seite 44 System setting Systemeinstellungen Menu options Menüoptionen Sprache: Wählen Sie die gewünschte Sprache. Fahrer-ID: Geben Sie Ihre Kennung ein: Mit den Aufwärts-/Abwärts-Tasten ändern Sie einen Buchstaben, mit OK ändern Sie die Position (9 Positionen); drücken Sie MENU, um die Einstellung zu speichern und den Menüpunkt zu verlassen.
-
Seite 45: Wiedergabeeinstellungen
Foto 1. Drücken Sie nach dem Einschalten die MODE-Taste, um in den Fotomodus zu wechseln: Das Fotosymbol wird oben links auf dem Display angezeigt. Drücken Sie auf MENU, um die Einstellung aufzurufen. 2. Zwei Einstellmöglichkeiten sind verfügbar: „Auflösung“ und „Bildqualität“. 3. - Seite 46 Software Midland Player: Installation und Verwendung Wenn Sie die GPS-Informationen einsehen möchten, müssen Sie zuerst den Midland Player installieren. Die Wiedergabesoftware ist im internen Speicher des Geräts abgelegt. Car DV Player_installer CarDVPlayer_installer Car DV Player Setup Installation von Car DV Player 1.
-
Seite 47: Häufig Gestellte Fragen
Häufig gestellte Fragen Wenn Sie unter normalen Betriebsbedingungen Probleme mit dem Gerät haben, schauen Sie sich bitte die folgenden Lösungsvorschläge an. Foto- und Videoaufnahme nicht möglich Prüfen Sie, ob genug freier Speicher auf der SD-Karte vorhanden ist. Automatische Abschaltung während der Aufnahme Aufgrund der hohen Datenmenge bei HD-Videodaten sollten Sie eine SDHC-kompatible Highspeed- Class10-SD-Karte verwenden. -
Seite 48: Technische Daten
Technische Daten Produktmerkmale HD-Kamera, HD-Aufnahme Beschleunigungssensor Integriert (zur Speicherung einer gesperrten Datei bei einer Kollision) Displaygröße 3.0 LTPS, 16:9 Objektiv 150-Grad A+ HD-Ultraweitwinkel Fotoauflösung 13 MP Videoauflösung 2 MP Blende F=2.0 Sprache English Dutch Polski Francais Español Italiano Deutsch Portuguese Videoformat Videoauflösung 1920*1080 bei 60 Hz, 1920*1080 bei 30 Hz, HDR... - Seite 49 Warnung: Eine direkt angesteckte Wechselstrom-/Gleichstromquelle muss dazu verwendet werden, um das Gerät vom Netz zu trennen; das Tisch-Ladegerät muss in der Nähe des Geräts liegen und leicht zugänglich sein. Um Updates und weitere Informationen über die Garantiebedingungen herunterzuladen, gehen Sie bitte auf www.midlandeurope.com.
-
Seite 50: À Propos De Ce Guide
Ne pas utiliser de produits chimiques ou de solvants pour nettoyer votre caméra, un chi on doux et humidifié est su sant. • Pour éviter d’a ecter la qualité de vos vidéos, n’utilisez pas la STREET GUARDIAN NIGHT en présence de poussière ou brouillard excessif . •... -
Seite 51: Contenu De La Boîte
En raison des lois locales et des conditions relatives à la sécurité routière, n’utilisez pas de façon manuelle votre caméra pendant la conduite. Contenu de la boîte • Caméra de véhicule Street Guardian Night • Fixation ventouse avec GPS intégré •... -
Seite 52: Description Des Contrôles
Description des contrôles... - Seite 53 Ref. Nom Fonction Description connecteur Connexion au Quand la fonction GPS est activée, l’icône relative apparaît sur l’écran. Ce GPS montre un suivi de la longitude et de la latitude durant la conduite, sans fonc- -tion de navigation. interface HDMI Sortie haute- Pour visualiser les vidéos et photos, connectez la caméra à...
- Seite 54 Vérouiller le Bouton SOS Appuyez pour vérouillez l’enregistrement en cours. fichier NOTE: Quand vous préssez le bouton SOS, la caméra créée un nouveau chier dans un document vérouillé. Au bout d’une minute, la caméra enregistre à nouveau dans un fichier dévérouillé. ÉCRAN LCD 10.
-
Seite 55: Pour Commencer
Un indicateur lumineux bleu s’allume pendant le chargement de l’appareil (chargement complèt en 120 minutes). Une fois le chargement complèt, l’indicateur lumineux s’éteint. Marche/arrêt automatique Une fois la STREET GUARDIAN NIGHT connectée au véhicule, l’enregistrement vidéo se met en marche automatiquement dès l’allumage du moteur et s’éteint automatiquement une fois celui-ci coupé. - Seite 56 Pour entrer en mode vidéo, appuyez longuement sur le bouton d’alimentation : l’indicateur rouge s’éteint. Attention : en cas de batterie très faible, la caméra émet un son acoustique puis s’éteint. Recharger Pour recharger la caméra, connectez-la à un PC à l’aide du câble USB fournit dans la boîte. Cependant, la caméra doit toujours être alimentée pendant son utilisation.
-
Seite 57: Menu Paramètres
Instructions de base des modes vidéo/photo/lecture Mode vidéo et enregistrement • Appuyez sur MODE jusqu’à entrer en mode vidéo: l’icône propre au mode vidéo apparaît alors dans le coin en haut à gauche de l’écran. • Appuyez sur OK/REC pour commencer l’enregistrement : l’indicateur lumineux (rouge) com- mence à... - Seite 58 à gauche de l’écran; 2. Appuyez une fois sur MENU pour accéder au paramètres vidéo: une icône vidéo bleue apparaît dans le coin supérieur droit de l’écran. 3. Les options de paramètrages suivant apparaîssent sur l’écran: • Résolution vidéo • Qualité de l’image •...
- Seite 59 Pour l’activer, rendez-vous dans les paramètres du menu , option «Parking Mode» et sélectionnez «ON ». Lorsque le véhicule vibre en raison d’une collision, la caméra s’allume et enregistre automatiquement. STREET GUARDIAN NIGHT peut enregistrer pendant 1 minute et mettre le fichier dans un dossier vérouillé et ainsi l’empêcher d’être e acé par l’enregistrement cyclique.
- Seite 60 Fonction : 1. Appuyez sur les commandes UP/DOWN pour parcourir les di érentes options. 2. Appuyez sur OK pour entrer dans le paramètre et sélectionnez l’option désirée. 3. Confirmez votre choix avec OK; Si vous ne voulez pas sauvegarder les modifications, quittez les réglages en appuyant sur MENU.
-
Seite 61: Paramètres Photos
Paramètres Photos 1. Après avoir allumé l’appareil, appuyez sur MODE jusqu’à entrer en mode photo: l’icône correspondante au mode photo apparaît dans le coin supérieur gauche de l’écran ; appuyez sur MENU pour entrer dans les réglages. 2. Deux options de réglage sont disponibles : résolution photo, qualité de l’image. 3. - Seite 62 Logiciel de Lecture Midland: installation et utilisation Si vous avez besoin de vérifier les informations GPS, le logiciel de lecture Midland doit être installé. Le logiciel est stocké dans la mémoire interne de l’appareil. 1. Connectez l’appareil à un PC via le câble USB.
-
Seite 63: Configuration Minimale Requise
FAQ (Questions Fréquentes) Si vous rencontrez des problèmes avec l’appareil, dans des conditions normales d’utilisation, reportez-vous aux solutions suivantes. Impossibilité d’enregistrer et de prendre des photos Vérifiez qu’il y ait encore de l’espace disponible dans la carte SD. Arrêt automatique pendant l’enregistrement Utilisez une carte SD de classe 10 à... -
Seite 64: Caractéristiques Techniques
Caractéristiques Techniques Caractéristiques principales Caméra HD, Enregistrement HD G-sensor Intégré Taille de l’écran 3.0 LTPS 16:9 Lentille 150° A+ HD très grand angle Photo Pixel 13MP Video Pixel Ouverture F=2.0 Language English Dutch Polski Francais Español Italiano Deutsch Portuguese Format vidéo 1920*1080 60P 1920*1080 30P HDR 1920*1080 Résolution vidéo Video Codec. - Seite 65 ATTENTION: il est nécessaire d’utiliser une alimentation ac/dc pour débrancher l’appareil du secteur ; Le chargeur doit se situer proche de son unité et être facilement accessible.
- Seite 66 2014/53/UE, del Parlamento Europe. La Declaración de и съответните модификации на Директива Conformidad está disponible en http://www.midland- 2014/53/UE. Декларацията за съвместимост е europe.com/it/pagina/10090-certifications налична на сайта: http://www.midlandeurope.com/it/ FR / LU / CH pagina/10090-certifications Par la présente Cte International Srl déclare que le modèle est conforme aux exigences essentielles et autres dispo- CTE INTERNATIONAL Srl erklærer at produktet er i...
- Seite 67 saatavilla http://www.midlandeurope.com/it/pagi- na/10090-certifications –verkkosivuilla. Cte International Srl ovime izjavljuje da je ime ovog mode- INFORMAZIONE AGLI UTENTI: Ai sensi dell’art. 13 la u suglasnosti sa bitnim zahtjevima te ostalim relevantnim del decreto legislativo 25 luglio 2005, n.151 “Attua- odredbama Propisa 2014/53/EU. Ova Izjava o suglasnosti zione delle Direttive 2002/95/CE, 2002/96/CE e je dostupna na web stranici http://www.midlandeurope.
- Seite 68 Importado por: ALAN COMMUNICATIONS, SA C/Cobalt, 48 - 08940 Cornellà de Llobregat (Barcelona - España) Tel: +34 902 384878 Fax: +34 933 779155 www.midland.es Lea atentamente las instrucciones antes de usar el equipo. Vertrieb durch: ALAN ELECTRONICS GmbH Daimlerstraße 1K - D-63303 Dreieich Deutschland www.alan-electronics.de...